
Reasons to Merge Cells in Excel
Merging cells in Excel allows you to combine two or more adjacent cells into a single cell. This can be useful for a variety of reasons, including:
- Improving readability: Merging cells can help to create a more organized and visually appealing spreadsheet by aligning related information into one merged cell. This is particularly helpful when working with large datasets or creating reports.
- Creating headings and titles: Merging cells can be used to create larger cell sizes, which can be ideal for adding headings or titles to different sections of your spreadsheet. With merged cells, you can make your headers stand out and easily distinguish them from the rest of the data.
- Combining multiple columns or rows: Sometimes, you may want to group data from multiple columns or rows into a single cell. Merging cells allows you to achieve this, making it easier to analyze and compare data sets.
- Creating labels and annotations: By merging cells, you can create larger cells where you can add labels or annotations to provide additional information about the data in the spreadsheet. This can be useful for documenting formulas, explaining data sources, or providing general notes.
- Formatting purposes: Merging cells can also be done for formatting purposes, such as creating tables or adjusting the layout of your spreadsheet. By merging cells, you can customize the appearance of your data to meet your specific requirements.
These are just a few of the many reasons why you might want to merge cells in Excel. Whether it’s for readability, organization, or formatting purposes, merging cells can help you create more visually appealing and functional spreadsheets.
How to Merge Cells in Excel
Merging cells in Excel is a simple process that can be done in various ways, depending on your preference and the specific requirements of your spreadsheet. Here are three common methods to merge cells in Excel:
Merging Adjacent Cells:
To merge adjacent cells, follow these steps:
- Select the range of cells you want to merge. For example, if you want to merge cells A1, B1, and C1, simply click and drag over those cells.
- Right-click on the selected cells and choose the “Merge Cells” option from the context menu. Alternatively, you can find the “Merge & Center” button in the Home tab of the Excel ribbon and click on it.
- The selected cells will be merged into a single cell, and the content of the leftmost cell will be retained in the merged cell.
Merging Non-Adjacent Cells:
If you want to merge non-adjacent cells, the steps are slightly different:
- Select the first cell you want to merge.
- Hold down the Ctrl key on your keyboard and select the additional cells you want to merge.
- Right-click on any of the selected cells and choose the “Merge Cells” option from the context menu.
- The selected cells will be merged into a single cell, with the content of the top-left cell retained in the merged cell.
Merging Cells with the Merge & Center Button:
The Merge & Center button in the Excel toolbar provides a quick way to merge and center cells. Here’s how to use it:
- Select the cells you want to merge.
- Click on the “Merge & Center” button in the Home tab of the Excel ribbon.
- The selected cells will be merged into a single cell, and the content will be centered in the merged cell.
These methods make it easy to merge cells in Excel, allowing you to customize the layout and appearance of your spreadsheet to suit your needs. Whether you’re merging adjacent cells, non-adjacent cells, or using the Merge & Center button, merging cells in Excel is a versatile feature that helps you create professional-looking spreadsheets.
Merging Adjacent Cells
Merging adjacent cells in Excel is a common task that allows you to combine multiple cells into a single cell. Follow these steps to merge adjacent cells:
- Select the range of cells you want to merge. For example, if you want to merge cells A1, B1, and C1, simply click and drag over those cells.
- Right-click on the selected cells and choose the “Merge Cells” option from the context menu. Alternatively, you can find the “Merge & Center” button in the Home tab of the Excel ribbon and click on it.
- The selected cells will be merged into a single cell, and the content of the leftmost cell will be retained in the merged cell.
Merging adjacent cells is useful when you want to consolidate information or create headings for your spreadsheet. For example, if you have a table with dates in cells A1, B1, and C1, merging these cells into a single cell can create a heading that says “Dates” for that column. This enhances the readability and organization of your data.
When merging adjacent cells, keep the following considerations in mind:
- If the merged cell contains data, the content from the leftmost cell will be retained, and the content from other cells in the range will be deleted.
- The formatting of the leftmost cell will be applied to the merged cell. If you want to change the formatting of the merged cell, you can do so after merging.
- The merged cell will display the content of the leftmost cell, but the actual data will be stored in the top-left cell of the merged range. So, formulas or references to the merged range will still refer to the top-left cell.
Merging adjacent cells is a handy feature when you want to combine data or create uniform headings in Excel. By merging cells, you can customize the appearance of your spreadsheet and improve its overall presentation.
Merging Non-Adjacent Cells
In Excel, you can also merge non-adjacent cells, which means merging cells that are not contiguous or adjacent to one another. This feature can be useful when you want to combine specific cells from different parts of your spreadsheet. Here’s how you can merge non-adjacent cells:
- Select the first cell you want to merge.
- Hold down the Ctrl key on your keyboard and continue selecting the additional cells you want to merge. Make sure to include all the cells you want to merge in the selection.
- Right-click on the selected cells and choose the “Merge Cells” option from the context menu.
- The selected cells will be merged into a single cell, with the content of the top-left cell retained in the merged cell.
Merging non-adjacent cells can be helpful when you want to combine data from different parts of your spreadsheet into a single cell or create unique labels and annotations. For example, if you have a table with data in cells A1, B3, and C5, you can merge these cells to create a summary or explanation specific to that data range.
It’s important to keep in mind the following considerations when merging non-adjacent cells:
- The content of the top-left cell in the selection will be retained in the merged cell. Other cells in the selected range will be cleared, so make sure you have the desired content in the top-left cell before merging.
- The formatting of the top-left cell will be applied to the merged cell. If you want to modify the formatting, you can do so after merging.
- Similar to merging adjacent cells, the actual data will be stored in the top-left cell of the merged range. Any formulas or references to the merged range will still refer to the top-left cell.
Merging non-adjacent cells gives you more flexibility and control over how you organize and present data in Excel. By merging cells strategically, you can create customized labels, annotations, or summaries that enhance the clarity and visual appeal of your spreadsheet.
Merging Cells with the Merge & Center Button
The Merge & Center button in Excel provides a quick and convenient way to merge cells while also centering the content within the merged cell. Here’s how you can use the Merge & Center button to merge cells:
- Select the cells you want to merge. You can either select adjacent cells or non-adjacent cells, depending on your needs.
- In the Home tab of the Excel ribbon, locate the Merge & Center button.
- Click on the Merge & Center button.
- The selected cells will be merged into a single cell, and the content will be centered within the merged cell.
The Merge & Center button is a convenient option when you want to quickly merge and center cells without the need to access the right-click menu or use keyboard shortcuts. It is particularly useful when working with larger sets of data or when you desire a consistent and professional appearance for your merged cells.
When using the Merge & Center button, keep the following considerations in mind:
- The content of the leftmost cell in the selection is retained in the merged cell, and the content of the other cells is cleared. Ensure that the leftmost cell contains the desired information before using the Merge & Center button.
- The formatting of the merged cell will be based on the formatting of the leftmost cell. If you want to apply different formatting, you can do so after merging the cells.
- As with other merging methods, the actual data remains in the top-left cell of the merged range. Any formulas or references to the merged range will still refer to the top-left cell.
The Merge & Center button streamlines the process of merging cells in Excel while also providing the added benefit of automatically centering the content. By utilizing this feature, you can easily create visually appealing and well-organized spreadsheets.
Merging Cells with the Merge Cells Tool
In addition to the Merge & Center button, Excel also provides the Merge Cells tool, which allows for more customization when merging cells. Here’s how you can use the Merge Cells tool to merge cells:
- Select the cells you want to merge. Similar to other merging methods, you can choose adjacent cells or non-adjacent cells, depending on your requirements.
- In the Home tab of the Excel ribbon, locate the “Merge & Center” dropdown button.
- Click on the dropdown button to display additional merging options.
- Select the “Merge Cells” option from the dropdown menu.
- The selected cells will be merged into a single cell without centering the content. The content will be left-aligned within the merged cell.
The Merge Cells tool offers a level of flexibility by allowing you to merge cells without automatically centering the content. This can be beneficial when you want to maintain the alignment of the content within the merged cell or when you want to apply specific formatting to the merged cells.
When using the Merge Cells tool, consider the following:
- The content of the leftmost cell in the selection is retained in the merged cell, and the content of the other cells is cleared. Ensure that the leftmost cell contains the desired information before using the Merge Cells tool.
- The formatting applied to the merged cell will be based on the formatting of the leftmost cell. If you wish to modify the formatting, you can do so after merging the cells.
- Like with other merging methods, the actual data remains in the top-left cell of the merged range. Any formulas or references to the merged range will still refer to the top-left cell.
The Merge Cells tool provides an additional option for merging cells in Excel, giving you more control over the alignment and formatting of the merged cells. By utilizing this tool, you can create customized merged cells that enhance the visual appearance and structure of your spreadsheet.
Merging Cells with a Shortcut
If you prefer to use keyboard shortcuts in Excel, you can also merge cells using a simple shortcut combination. Here’s how you can merge cells using a shortcut:
- Select the cells you want to merge, whether they are adjacent cells or non-adjacent cells.
- Press and hold the Alt key on your keyboard.
- While holding the Alt key, press the following sequence of keys: H, M, and then C.
- The selected cells will be merged into a single cell, and the content of the leftmost cell will be retained.
Merging cells using a shortcut can be a time-saving method, especially if you frequently perform this action in your Excel worksheets. It allows you to quickly merge cells without needing to navigate through menus or use the mouse.
When merging cells with a keyboard shortcut, keep the following considerations in mind:
- The content of the leftmost cell in the selection is retained in the merged cell, and the content of the other cells is cleared. Ensure that the leftmost cell contains the desired information before using the shortcut.
- The formatting applied to the merged cell will be based on the formatting of the leftmost cell. If you wish to modify the formatting, you can do so after merging the cells.
- Similar to other merging methods, the actual data remains in the top-left cell of the merged range. Formulas or references to the merged range will still refer to the top-left cell.
Using a shortcut to merge cells in Excel offers convenience and efficiency, allowing you to streamline your workflow when working with merged cells. By incorporating this keyboard shortcut into your Excel knowledge, you can merge cells swiftly and effectively.
Things to Consider When Merging Cells
While merging cells in Excel can be a useful feature, it’s important to consider a few aspects before applying this action to your spreadsheet. Here are some things to keep in mind:
- Data loss: When you merge cells, the content of all cells except the leftmost cell is cleared. Make sure you have the necessary data in the leftmost cell before merging to avoid losing important information.
- Formula references: If you have formulas or references that include the cells you plan to merge, keep in mind that they will still refer to the top-left cell of the merged range. Double-check your formulas and update the references if needed to ensure accuracy.
- Alignment: Merging cells may affect the alignment of your data. By default, the content within merged cells is horizontally centered. If you want to align the content differently, you can adjust the alignment settings after merging the cells.
- Data analysis: When merging cells, consider the impact it may have on data analysis. Merged cells can make it challenging to perform functions like sorting, filtering, or applying formulas that need to reference individual cells within the merged range. Assess the implications for data analysis before merging cells.
- Printing: If you plan to print your spreadsheet, keep in mind that merged cells may affect the layout and formatting. Ensure that the merged cells don’t lead to a cluttered or distorted printout, and make any necessary adjustments to maintain readability.
By considering these aspects before merging cells, you can avoid potential issues and ensure the accurate representation of your data. Remember to save a backup copy of your spreadsheet or test the merging process on a sample dataset if you’re unsure of the outcome.
How to Unmerge Cells in Excel
Unmerging cells in Excel allows you to revert merged cells back to their original individual cell format. This can be useful if you need to separate previously merged cells or modify the layout of your spreadsheet. Here are three common methods to unmerge cells in Excel:
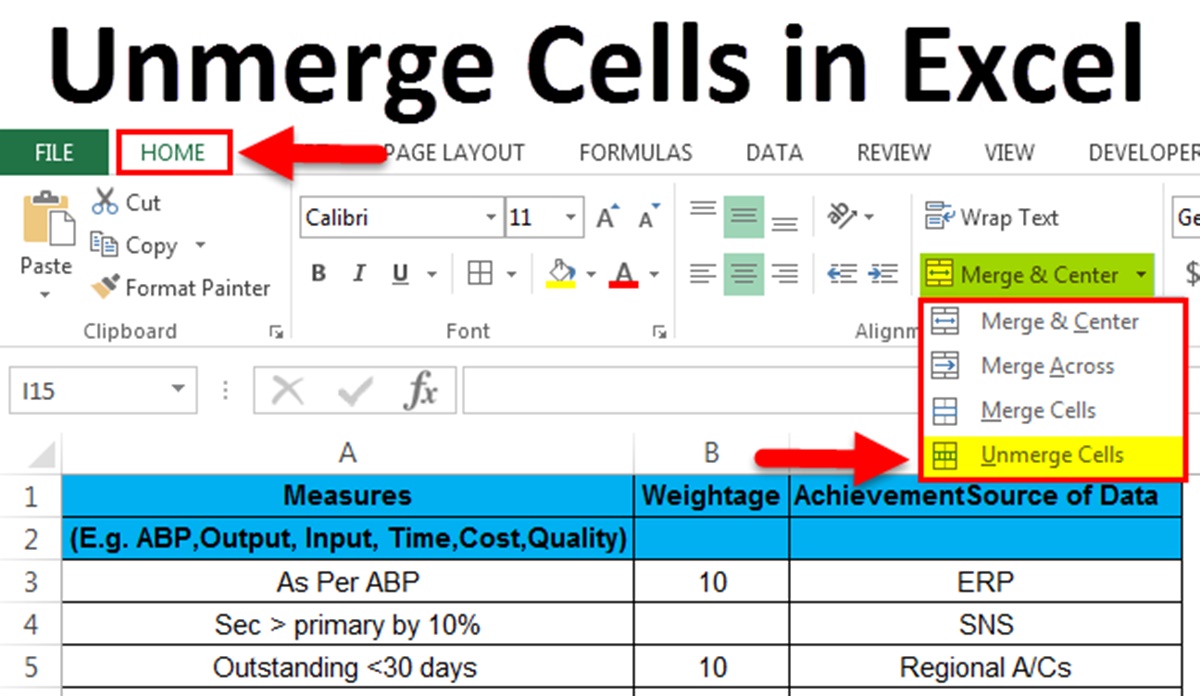
Unmerging Cells with the Unmerge Button:
To unmerge cells using the Unmerge button, follow these steps:
- Select the merged cell or range of cells that you want to unmerge.
- In the Home tab of the Excel ribbon, locate the “Merge & Center” button.
- Click on the “Merge & Center” button to display the dropdown menu.
- Select the “Unmerge Cells” option from the dropdown menu.
- The selected cells will be unmerged, and the content will return to their original individual cells.
Unmerging Cells with a Shortcut:
If you prefer using keyboard shortcuts, you can unmerge cells using the following shortcut:
- Select the merged cell or range of cells that you want to unmerge.
- Press and hold the Alt key on your keyboard.
- While holding the Alt key, press the following sequence of keys: H, E, and then M.
- The selected cells will be unmerged, and the content will return to their original individual cells.
Undoing Merged Cells with the Undo Button:
If you recently merged cells and want to undo the merge, you can use the Undo button to revert the action:
- Click on the Undo button in the Excel toolbar. You can also use the Ctrl + Z keyboard shortcut.
- The most recent action, which includes the merging of cells, will be undone, and the cells will return to their original individual format.
Unmerging cells in Excel provides flexibility and allows you to change the structure and layout of your spreadsheet. Whether you choose to use the Unmerge button, a shortcut, or the Undo button, the unmerging process is straightforward and reversible.
Unmerging Cells with the Unmerge Button
To unmerge cells in Excel, you can use the Unmerge button, which allows you to revert the merged cells back to their original individual cell format. Here’s how to unmerge cells using the Unmerge button:
- Select the merged cell or range of cells that you want to unmerge.
- In the Home tab of the Excel ribbon, locate the “Merge & Center” button.
- Click on the “Merge & Center” button to display the dropdown menu.
- Select the “Unmerge Cells” option from the dropdown menu.
- The selected cells will be unmerged, and the content will return to their original individual cells.
The Unmerge button provides a simple and convenient way to unmerge cells without the need for additional steps. It is particularly useful when you want to quickly undo cell merging and restore the original formatting and structure of your spreadsheet.
Here are a few things to consider when using the Unmerge button:
- Only the selected cells that are currently merged will be unmerged. If you have other merged cells in your spreadsheet, they will remain unaffected.
- The contents of the merged cell will be distributed to the individual cells of the range that was previously merged. If there was conflicting data in the merged cells, it may need to be rearranged or adjusted after unmerging.
- The formatting applied to the merged cell will be retained in the individual cells after unmerging. If you want to modify the formatting of the individual cells, you can do so after unmerging.
Using the Unmerge button is a straightforward way to remove cell merging and restore original cell structure. Whether you need to separate previously merged cells for data analysis or adjust the layout of your spreadsheet, the Unmerge button in Excel provides a simple solution.
Unmerging Cells with a Shortcut
If you prefer using keyboard shortcuts in Excel, you can also unmerge cells using a simple shortcut combination. Here’s how you can unmerge cells using a shortcut:
- Select the merged cell or range of cells that you want to unmerge.
- Press and hold the Alt key on your keyboard.
- While holding the Alt key, press the following sequence of keys: H, E, and then M.
- The selected cells will be unmerged, and the content will return to their original individual cells.
The shortcut for unmerging cells is a fast and efficient method, especially if you frequently perform this action in your Excel worksheets. Using keyboard shortcuts allows you to quickly unmerge cells without the need to navigate through menus or use the mouse.
Here are a few considerations when unmerging cells with a keyboard shortcut:
- Only the selected cells that are currently merged will be unmerged. Other cells in your spreadsheet will remain unaffected.
- The contents of the merged cell will be distributed to individual cells in the previously merged range. Any conflicting data may need to be rearranged or adjusted after unmerging.
- The formatting applied to the merged cell will be retained in the individual cells after unmerging. If you want to modify the formatting of the individual cells, you can do so after unmerging.
Using a shortcut to unmerge cells in Excel offers a convenient and efficient approach, allowing you to streamline your workflow when working with merged cells. By incorporating this keyboard shortcut into your Excel knowledge, you can unmerge cells swiftly and effectively.
Undoing Merged Cells with the Undo Button
If you have recently merged cells in Excel and want to undo the merge, you can utilize the built-in Undo button. The Undo button allows you to reverse the most recent action, including cell merging. Here’s how you can undo merged cells using the Undo button:
- Click on the Undo button in the Excel toolbar. You can also use the Ctrl + Z keyboard shortcut.
- The most recent action, which includes the merging of cells, will be undone, and the cells will return to their original individual format.
The Undo button is a valuable tool in Excel as it provides a straightforward way to reverse actions without the need for specific commands or configurations. With a simple click or keyboard shortcut, you can easily undo the merging of cells and restore them to their previous state.
Here are a few considerations when using the Undo button to undo merged cells:
- The Undo button undoes the most recent action, so if you have performed other actions after merging cells, those actions will also be reverted.
- All formatting changes, content modifications, or other actions that were made after the merge operation will be undone along with the cell merging.
- The Undo button has a limitation in that it can only reverse the most recent action. If you need to undo a merge from multiple steps ago, you may need to use alternative methods like the Unmerge button or keyboard shortcuts.
The Undo button is a quick and convenient way to revert merged cells back to their original state in Excel. It serves as a reliable tool to undo actions, including merging cells, and provides flexibility when working with your spreadsheet.
Tips for Merging and Unmerging Cells in Excel
Merging and unmerging cells in Excel can help you enhance the readability, organization, and formatting of your spreadsheet. To make the most of these features, consider the following tips:
- Plan ahead: Before merging cells, think about the purpose and impact it will have on your data. Consider the layout, readability, and functionality of the merged cells, ensuring that it aligns with your intended goals for the spreadsheet.
- Keep merged ranges consistent: If you plan to merge cells in multiple rows or columns, make sure to keep the merged ranges consistent throughout the spreadsheet. This will help maintain a uniform appearance and make it easier to read and analyze the data.
- Avoid excessive cell merging: While merging cells can be useful, it’s important to use it judiciously. Avoid excessive merging, especially in large datasets, as it can complicate data manipulation, sorting, filtering, and other operations.
- Use merged cells for headings and labels: Merging cells is particularly useful for creating headings, titles, or labels in your spreadsheet. By merging cells for these purposes, you can make them stand out and improve the overall organization of your data.
- Consider unmerging for data manipulation: If you need to perform calculations, sorting, filtering, or other operations that rely on individual cells, consider unmerging the cells before proceeding. Unmerging cells allows for better manipulation and analysis of data.
- Be mindful of merged cell limitations: Remember that merged cells can have limitations, especially when it comes to data analysis and adjusting row heights or column widths. Keep these limitations in mind and ensure that your merged cells do not impede any necessary operations.
- Document any merged cells: If you share your spreadsheet with others or revisit it at a later date, it’s helpful to document any merged cells. You can add comments or notes to explain the purpose and relevance of the merged cells, providing clarity to users who may not be familiar with your spreadsheet.
Following these tips will help you effectively merge and unmerge cells in Excel, enhancing the presentation and usability of your spreadsheets. By considering your specific needs, being mindful of limitations, and maintaining consistency, you can leverage cell merging and unmerging to optimize your Excel workflow.