
Clearing Browsing History
Browsing history refers to the list of websites you have visited on your iPhone. Clearing your browsing history can help protect your privacy and free up storage space. Here’s how you can do it:
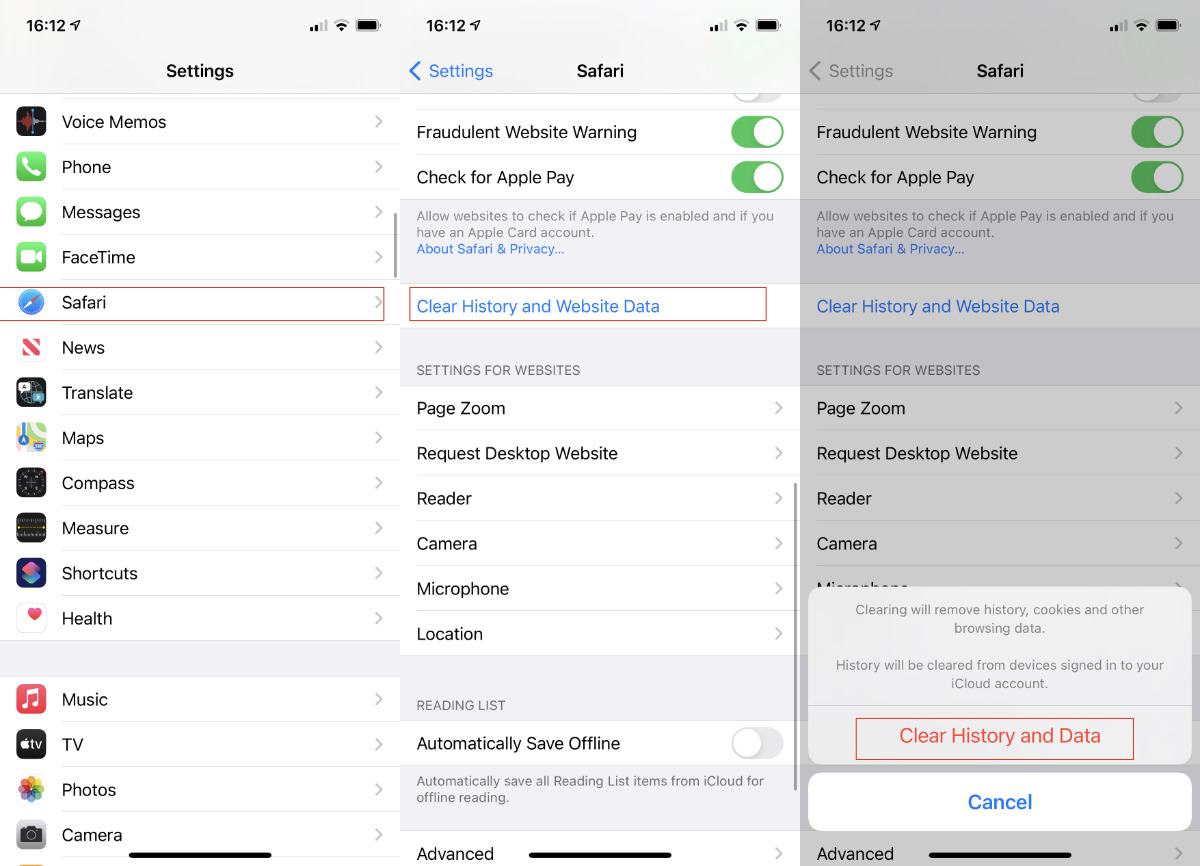
1. Open the “Settings” app on your iPhone.
2. Scroll down and tap on “Safari”.
3. Scroll down again and tap on “Clear History and Website Data”.
4. A confirmation message will appear, asking if you want to clear your browsing history and website data. Tap “Clear History and Data” to proceed.
Once you’ve done this, all the websites you have visited will be removed from your browsing history. It’s worth noting that clearing your browsing history will also log you out of any websites you’re currently logged into.
If you’re using a different browser on your iPhone, such as Chrome or Firefox, the process might be slightly different:
– In Chrome: Open the Chrome app, tap the three dots menu in the bottom-right corner, go to “History”, and tap “Clear Browsing Data”. Select the data you want to clear, like browsing history, cookies, or cache, and tap “Clear Browsing Data” to confirm.
– In Firefox: Open the Firefox app, tap the three lines menu in the bottom-right corner, go to “Settings”, then “Privacy”. Tap on “Clear Private Data” and select the data you want to clear, such as browsing history, cookies, or cache. Finally, tap “Clear Private Data” to complete the process.
By regularly clearing your browsing history, you can keep your iPhone optimized and ensure your online activities remain private.
Clearing Website Data
When you browse the internet on your iPhone, websites often store data on your device to improve your browsing experience. This data, known as website data or cache, can accumulate over time and take up valuable storage space. Clearing website data can help speed up your device and protect your privacy. Here’s how you can do it:
1. Open the “Settings” app on your iPhone.
2. Scroll down and tap on “Safari”.
3. Scroll down again and tap on “Clear History and Website Data”.
4. A confirmation message will appear, asking if you want to clear your browsing history and website data. Tap “Clear History and Data” to proceed.
By following these steps, not only will your browsing history be cleared, but also the website data stored on your iPhone. This includes cached files, cookies, and other temporary data that websites have stored during your browsing sessions.
It’s worth noting that clearing website data may log you out of websites you’re currently logged into and remove any personalized settings you have set. However, this process can help improve the performance of your iPhone and ensure that outdated website data doesn’t interfere with your browsing experience.
If you’re using a different browser like Chrome or Firefox, the steps to clear website data will be slightly different:
– In Chrome: Open the Chrome app, tap the three dots menu in the bottom-right corner, go to “Settings”, then “Privacy”. Tap on “Clear Browsing Data” and select the data you want to clear, such as browsing history, cookies, or cache. Finally, tap “Clear Browsing Data” to confirm.
– In Firefox: Open the Firefox app, tap the three lines menu in the bottom-right corner, go to “Settings”, then “Privacy”. Tap on “Clear Private Data” and select the data you want to clear, such as browsing history, cookies, or cache. Finally, tap “Clear Data” to complete the process.
Regularly clearing website data can help keep your iPhone running smoothly and ensure your browsing sessions remain private.
Clearing Cookies and Data
Cookies are small files that websites store on your device, containing information about your browsing preferences and history. While cookies can enhance your browsing experience, they can also track your online activities. Clearing cookies and data on your iPhone can help protect your privacy and free up storage space. Here’s how you can do it:
1. Open the “Settings” app on your iPhone.
2. Scroll down and tap on “Safari”.
3. Scroll down again and tap on “Clear History and Website Data”.
4. A confirmation message will appear, asking if you want to clear your browsing history and website data. Tap “Clear History and Data” to proceed.
By following these steps, both your browsing history and website data, including cookies, will be cleared from your iPhone. This helps protect your privacy by removing any tracking information that websites may have stored.
If you’re using a different browser like Chrome or Firefox, the process to clear cookies and data will be slightly different:
– In Chrome: Open the Chrome app, tap the three dots menu in the bottom-right corner, go to “Settings”, then “Privacy”. Tap on “Clear Browsing Data” and select the data you want to clear, such as browsing history, cookies, or cache. Finally, tap “Clear Browsing Data” to confirm.
– In Firefox: Open the Firefox app, tap the three lines menu in the bottom-right corner, go to “Settings”, then “Privacy”. Tap on “Clear Private Data” and select the data you want to clear, such as browsing history, cookies, or cache. Finally, tap “Clear Data” to complete the process.
Clearing cookies and data on a regular basis can help protect your privacy and improve the performance of your iPhone. However, keep in mind that clearing cookies may sign you out of websites and remove any personalized settings you have made.
Clearing AutoFill Data
AutoFill data on your iPhone allows you to conveniently fill in forms, passwords, and other information with just a few taps. However, over time, the AutoFill data can accumulate and contain outdated or incorrect information. Clearing AutoFill data can help ensure the accuracy of your autofill suggestions and protect your privacy. Here’s how you can do it:
1. Open the “Settings” app on your iPhone.
2. Scroll down and tap on “Safari”.
3. Scroll down again and tap on “AutoFill”.
4. Tap on “Clear All” under the “Saved Credit Cards” section to remove any stored credit card information.
5. If you want to clear other AutoFill data such as contact information or passwords, tap on the corresponding option and select “Edit” or “Clear All” to delete the relevant data.
By following these steps, you can clear the AutoFill data stored on your iPhone. This ensures that outdated or incorrect information is not suggested when filling out forms or logging into websites.
It’s important to note that clearing AutoFill data will not remove the information stored in your Contacts app or iCloud Keychain. It only removes the information stored specifically for AutoFill purposes on your iPhone.
If you’re using a different browser like Chrome or Firefox, the process to clear AutoFill data will vary:
– In Chrome: Open the Chrome app, tap the three dots menu in the bottom-right corner, go to “Settings”, then “Autofill”. Here, you can clear Autofill data for addresses and passwords by tapping on the respective options and selecting “Clear All”.
– In Firefox: Open the Firefox app, tap the three lines menu in the bottom-right corner, go to “Settings”, then “Privacy”. Under the “Autofill” section, tap on “Clear Private Data” and select the Autofill data you want to clear, such as addresses or credit cards. Finally, tap “Clear Data” to complete the process.
Regularly clearing AutoFill data can help ensure the accuracy and privacy of your autofill suggestions, enhancing your browsing experience on your iPhone.
Clearing Search History in Safari
Safari, the default browser on your iPhone, keeps a record of the searches you perform while using the search bar. Clearing your search history can help maintain your privacy and prevent others from accessing your search queries. Here’s how you can clear your search history in Safari:
1. Open the “Settings” app on your iPhone.
2. Scroll down and tap on “Safari”.
3. Scroll down and tap on “Clear History and Website Data”.
4. A confirmation message will appear, asking if you want to clear your browsing history and website data. Tap “Clear History and Data” to proceed.
By following these steps, not only will your browsing history and website data be cleared, but your search history will also be removed from Safari. This helps protect your privacy by erasing any record of the searches you have performed.
It’s important to note that clearing your search history will also log you out of any websites you’re currently logged into.
If you’re using a different browser like Chrome or Firefox, the process to clear search history may vary:
– In Chrome: Open the Chrome app, tap the three dots menu in the bottom-right corner, go to “History”, and tap “Clear Browsing Data”. Select the data you want to clear, such as browsing history, cookies, or cache, and tap “Clear Browsing Data” to confirm.
– In Firefox: Open the Firefox app, tap the three lines menu in the bottom-right corner, go to “Settings”, then “Privacy”. Tap on “Clear Private Data” and select the data you want to clear, such as browsing history, cookies, or cache. Finally, tap “Clear Data” to complete the process.
Clearing your search history on a regular basis can help maintain your privacy and ensure that your search queries remain confidential.
Clearing Call History
Your iPhone keeps a log of all the calls you have made, received, and missed. Clearing your call history can help protect your privacy and keep your call log organized. Here’s how you can clear your call history on an iPhone:
1. Open the “Phone” app on your iPhone.
2. At the bottom of the screen, tap on the “Recents” tab.
3. On the top-right corner of the screen, tap on “Edit”.
4. A red minus icon will appear next to each call entry. Tap on the minus icon for each entry that you want to delete.
5. Once you have selected the entries you wish to remove, tap on the “Delete” button.
By following these steps, you can clear the call history on your iPhone, removing any record of the calls you have made or received. It’s important to note that clearing your call history cannot be undone, so make sure to double-check before deleting any entries.
If you want to clear your entire call history in one go, you can tap on the “Clear” button at the top-left corner of the “Recents” tab. This will remove all entries in your call history.
Additionally, you can prevent your iPhone from logging your call history by enabling the “Private Browsing” mode in the Safari settings. Keep in mind that enabling private browsing will also disable some browsing features that rely on storing data, such as AutoFill and storing website preferences.
Clearing your call history regularly can help maintain your privacy and keep your call log more manageable.
Clearing Text Message History
Your iPhone stores a record of all the text messages you send and receive. Clearing your text message history can help protect your privacy and free up storage space on your device. Here’s how you can clear your text message history on an iPhone:
1. Open the “Messages” app on your iPhone.
2. Tap on the conversation you want to delete or swipe left on the conversation to reveal the “Delete” button.
3. Tap on the “Delete” button, or tap “Edit” in the top-left corner of the screen and select multiple conversations, then tap the trash bin icon at the bottom-right corner of the screen to delete them.
By following these steps, you can delete individual text message conversations or multiple conversations at once. Deleting a conversation removes all messages and attachments within that conversation.
If you want to clear your entire text message history, you can go to “Settings” on your iPhone:
1. Open the “Settings” app.
2. Scroll down and tap on “Messages”.
3. Scroll down again and tap on “Keep Messages”.
4. Choose the option “30 Days” or “1 Year” to keep your text messages for a specific duration, and older messages will be automatically deleted.
Enabling this feature will automatically delete text message conversations that are older than the specified time interval.
It’s worth noting that deleting text message conversations cannot be undone, so make sure to double-check before deleting any important messages. If you want to keep a record of specific messages, you can take a screenshot or save them as a note on your iPhone.
Regularly clearing your text message history can help protect your privacy, free up storage space, and keep your message inbox organized.
Clearing App Store Purchase History
The App Store on your iPhone keeps a record of all the apps you have downloaded, including both free and paid apps. Clearing your App Store purchase history can help declutter your list of past downloads and remove any unwanted or outdated apps from your history. Here’s how you can clear your App Store purchase history:
1. Open the “App Store” app on your iPhone.
2. Tap on your profile picture or initials in the top-right corner of the screen.
3. Scroll down and tap on “Purchased”.
4. You’ll see a list of all the apps you have downloaded or purchased. Swipe left on an app to reveal the “Hide” button, then tap on “Hide” to remove it from your purchase history. You can do this for multiple apps if desired.
By following these steps, you can remove specific apps from your App Store purchase history. Hidden apps will no longer appear in your purchase history, but they will still be available to download in the “Hidden Purchases” section, should you ever want to reinstall them.
It’s important to note that hiding an app from your purchase history does not provide a refund or permanently delete the app from your device. You will still be able to access the app’s data and use it on your iPhone if it is still installed.
If you want to clear your entire App Store purchase history, Apple does not provide a direct option to do so. However, you can contact Apple Support and request assistance with clearing your purchase history.
Clearing your App Store purchase history can help declutter your list of past downloads and keep it more organized. It provides a way to remove unwanted or outdated apps from your history, giving you a cleaner and more manageable App Store experience.
Clearing Maps History
The Maps app on your iPhone keeps a record of your search history, including the locations you have searched for and the directions you have accessed. Clearing your Maps history can help protect your privacy and free up storage space on your device. Here’s how you can clear your Maps history:
1. Open the “Maps” app on your iPhone.
2. Tap on the search bar at the top of the screen.
3. The search history will appear as a list of recent locations and saved places. Tap on the “X” button next to each entry to delete it.
4. If you want to clear the entire Maps history, tap on the “Clear” button at the bottom of the search history list.
By following these steps, you can remove individual search entries or clear your entire Maps history. This helps protect your privacy by removing any record of the locations you have searched for and the directions you have accessed.
It’s important to note that clearing your Maps history does not affect your saved places, such as home or work addresses, or any custom lists you have created. It only removes the search history and recent locations.
Clearing your Maps history can be useful if you share your iPhone with others or if you want a fresh start with your location searches. It can also free up storage space on your device, as Maps history can take up a significant amount of storage over time.
Additionally, you can prevent Maps from retaining your search history by disabling the “Frequent Locations” feature in your iPhone settings. To do this:
1. Open the “Settings” app on your iPhone.
2. Scroll down and tap on “Privacy”.
3. Tap on “Location Services”.
4. Scroll down and tap on “System Services”.
5. Find and disable the “Frequent Locations” option.
Disabling this feature will prevent Maps from storing your frequent locations, further enhancing your privacy.
Regularly clearing your Maps history can help protect your privacy, free up storage space, and ensure a clean and organized experience with the Maps app on your iPhone.
Clearing Siri and Dictation History
Siri, the intelligent voice assistant on your iPhone, and the Dictation feature both store a history of your voice commands and dictated messages. Clearing this history can help maintain your privacy and ensure that your voice recordings are not stored on your device. Here’s how you can clear your Siri and Dictation history:
1. Open the “Settings” app on your iPhone.
2. Scroll down and tap on “Siri & Search”.
3. Tap on “Siri & Dictation History”.
4. You’ll see an option to “Delete Siri & Dictation History”. Tap on it.
5. A confirmation message will appear, explaining that clearing this history will remove your voice recordings from Apple servers as well as any devices signed in to your iCloud account. Tap on “Clear Siri & Dictation History” to proceed.
By following these steps, you can clear your Siri and Dictation history, ensuring that your voice recordings are deleted from your device and Apple servers. This helps protect your privacy by removing any stored voice commands or dictated messages.
Keep in mind that clearing your Siri and Dictation history will also reset the voice recognition feature. You may need to re-teach Siri your voice activation phrase and preferences if you use those features.
If you want to prevent Siri from storing your voice recordings in the future, you can disable the “Hey Siri” feature and dictation. Here’s how:
1. Open the “Settings” app on your iPhone.
2. Scroll down and tap on “Siri & Search”.
3. Disable the “Listen for “Hey Siri”” option if you don’t want Siri to listen for that activation phrase.
4. Scroll down again and tap on “Keyboard”.
5. Disable the “Enable Dictation” option if you don’t want your voice to be used for dictation.
Disabling these features will prevent Siri and Dictation from storing your voice recordings in the future.
Regularly clearing your Siri and Dictation history can help maintain your privacy and ensure that your voice recordings are not stored on your device or Apple’s servers.
Clearing Location History
Your iPhone keeps a record of your location history, which includes the places you have visited and the routes you have taken. Clearing your location history can help protect your privacy and ensure that your whereabouts are not stored on your device. Here’s how you can clear your location history:
1. Open the “Settings” app on your iPhone.
2. Scroll down and tap on “Privacy”.
3. Tap on “Location Services”.
4. Scroll down and tap on “System Services”.
5. Tap on “Significant Locations” to access your location history.
6. You may need to authenticate with Face ID, Touch ID, or your passcode to proceed.
7. You’ll see a list of significant locations that your iPhone has recorded. Tap on a location to view more details.
8. To clear your location history, scroll down and tap on “Clear History” at the bottom of the screen.
9. A confirmation message will appear. Tap on “Clear History” again to confirm.
By following these steps, you can clear your location history, removing any record of the places you have visited from your iPhone. This helps protect your privacy by ensuring that your location data is not stored on your device.
It’s important to note that clearing your location history does not disable location services on your iPhone. It only deletes the history of specific locations that your device has recorded.
If you want to prevent your iPhone from recording your future location history altogether, you can disable the “Significant Locations” feature. Here’s how:
1. Open the “Settings” app on your iPhone.
2. Scroll down and tap on “Privacy”.
3. Tap on “Location Services”.
4. Scroll down and tap on “System Services”.
5. Disable the “Significant Locations” feature.
Disabling this feature will prevent your iPhone from recording and storing your significant location history. However, keep in mind that it may also affect certain location-based services and features.
Regularly clearing your location history can help protect your privacy and ensure that your past locations are not stored on your device.
Clearing Health App Data
The Health app on your iPhone allows you to track and monitor your health and fitness data. This app collects information from various sources such as your iPhone’s built-in sensors, connected devices, and third-party apps. Clearing Health app data can help declutter and manage your health information. Here’s how you can clear your Health app data:
1. Open the “Health” app on your iPhone.
2. Tap on your profile picture or initials in the top-right corner of the screen.
3. Scroll down and tap on “Privacy”.
4. Under the “Health Data” section, tap on the category of data you want to clear, such as “Activity”, “Heart”, or “Nutrition”.
5. Select the specific data type you want to clear, like “Steps”, “Heart Rate”, or “Calories”.
6. You’ll see a list of sources that contribute to that data type. Tap on a source to view its data.
7. To clear the data associated with a specific source, tap on the source and then tap on “Delete All Data from [Source Name]”.
By following these steps, you can selectively clear data from specific sources within the Health app. This allows you to remove unwanted or outdated health information, while still keeping the data from other sources intact.
It’s important to note that clearing Health app data only removes the data stored within the app. It does not remove any data from third-party apps that have access to Health app data or data that has been backed up to iCloud or other services.
If you want to completely clear all data from the Health app, you can reset it to its initial state. However, keep in mind that resetting the Health app will delete all data, including your profile, settings, and preferences.
To reset the Health app:
1. Open the “Settings” app on your iPhone.
2. Scroll down and tap on “Privacy”.
3. Tap on “Health”.
4. Scroll down and tap on “Reset” at the bottom of the screen.
5. Tap on “Reset again” to confirm.
This will reset the Health app and remove all data and settings associated with it.
Regularly clearing and managing your Health app data can help declutter and organize your health information, ensuring that you have a clean and accurate record of your health and fitness data.
Clearing Safari Reading List
Safari’s Reading List feature allows you to save articles, web pages, and other content to read later. Clearing your Safari Reading List can help declutter your saved items and keep it more organized. Here’s how you can clear your Safari Reading List:
1. Open the Safari app on your iPhone.
2. Tap on the book icon at the bottom of the screen to access your Reading List.
3. Tap on “Show all” to view all the items in your Reading List.
4. Swipe left on an item to reveal the “Delete” button, then tap on it to remove the item from your Reading List.
5. If you want to clear your entire Reading List, tap on “Edit” in the top-right corner of the screen and then tap on “Clear All” at the bottom-left corner.
6. A confirmation message will appear. Tap on “Clear All” again to confirm.
By following these steps, you can remove individual items or clear your entire Reading List in Safari. This helps declutter your saved items and keeps your Reading List more streamlined and focused on the content you want to read.
It’s important to note that clearing your Safari Reading List does not affect your bookmarks or browsing history. It only removes the items you have saved specifically in your Reading List.
If you’re using a different browser like Chrome or Firefox, the process to clear your reading list may vary. Please refer to the respective browser’s settings and options for managing your saved items.
Regularly clearing your Safari Reading List can help keep it organized and ensure that you have a curated list of articles and web pages that you genuinely want to read. It can prevent your Reading List from becoming cluttered with outdated or irrelevant content.
Clearing Recently Deleted Photos
When you delete photos from your iPhone, they are moved to the “Recently Deleted” album. This album acts as a temporary storage for deleted photos, allowing you to recover them if needed. However, these photos still take up storage space on your device. Clearing the Recently Deleted album can help free up storage space by permanently removing the deleted photos. Here’s how you can clear the Recently Deleted photos:
1. Open the “Photos” app on your iPhone.
2. Tap on the “Albums” tab at the bottom of the screen.
3. Scroll down and tap on the “Recently Deleted” album.
4. You’ll see a collection of photos and videos that have been deleted within the past 30 days.
5. Tap on “Select” in the top-right corner of the screen.
6. Choose the photos and videos you want to permanently delete. You can tap on each item or use the “Select All” button.
7. Once you’ve selected the items, tap on the “Delete” option at the bottom-right corner of the screen.
8. A confirmation message will appear, asking if you want to delete the selected items. Tap on “Delete [Number of Items]” to permanently remove them.
By following these steps, you can clear the Recently Deleted album and permanently delete the photos and videos that have been deleted from your iPhone. This helps free up storage space and ensures that the deleted media is fully removed from your device.
It’s important to note that once you clear the Recently Deleted album, you cannot recover the photos or videos. Make sure to double-check your selection before permanently deleting the items.
If you continuously delete photos and want to skip the step of moving them to the Recently Deleted album, you can change your settings to bypass this temporary storage and directly delete photos. Here’s how:
1. Open the “Settings” app on your iPhone.
2. Scroll down and tap on “Photos”.
3. Under the “Recently Deleted” section, tap on the switch next to “Keep Deleted Items”.
Disabling this option will immediately delete photos instead of moving them to the Recently Deleted album. However, exercise caution as you won’t have the opportunity to recover mistakenly deleted photos.
Regularly clearing the Recently Deleted album can help keep your photo library organized and free up valuable storage space on your device.
Clearing Recently Deleted Albums
On your iPhone, when you delete an entire album from your Photos app, it gets moved to the “Recently Deleted” album where it is stored temporarily. This gives you a chance to recover the album if you change your mind. However, the deleted album still takes up storage space on your device. Clearing the Recently Deleted Albums can help free up storage space by permanently removing these deleted albums. Here’s how you can clear the Recently Deleted Albums:
1. Open the “Photos” app on your iPhone.
2. Tap on the “Albums” tab at the bottom of the screen.
3. Scroll down and tap on the “Recently Deleted” album.
4. Inside the “Recently Deleted” album, you’ll see a collection of albums that have been deleted within the past 30 days.
5. Tap on “Select” in the top-right corner of the screen.
6. Choose the albums you want to permanently delete. You can tap on each album or use the “Select All” button.
7. Once you’ve selected the albums, tap on the “Delete” option at the bottom-right corner of the screen.
8. A confirmation message will appear, asking if you want to delete the selected albums. Tap on “Delete [Number of Albums]” to permanently remove them.
By following these steps, you can clear the Recently Deleted Albums and permanently delete the albums that have been deleted from your iPhone. This helps free up storage space and ensures that the deleted albums are completely removed from your device.
It’s important to note that once you clear the Recently Deleted Albums, you cannot recover the deleted albums. Make sure to double-check your selection before permanently deleting them.
It’s worth mentioning that clearing the Recently Deleted Albums only removes the albums and their associated photos/videos from your device’s storage. It does not remove the albums from other devices or cloud services if you have them synced.
Regularly clearing the Recently Deleted Albums helps keep your photo library organized, ensures more storage space is available on your device, and assists in better managing your Albums collection.
Clearing Recently Deleted Videos
When you delete videos from your iPhone, they are moved to the “Recently Deleted” album where they are stored temporarily. The Recently Deleted album gives you a chance to recover deleted videos if you change your mind. However, these deleted videos still take up storage space on your device. Clearing the Recently Deleted Videos can help free up storage space by permanently removing these deleted videos. Here’s how you can clear the Recently Deleted Videos:
1. Open the “Photos” app on your iPhone.
2. Tap on the “Albums” tab at the bottom of the screen.
3. Scroll down and tap on the “Recently Deleted” album.
4. Inside the “Recently Deleted” album, you’ll see a collection of videos that have been deleted within the past 30 days.
5. Tap on “Select” in the top-right corner of the screen.
6. Choose the videos you want to permanently delete. You can tap on each video or use the “Select All” button.
7. Once you’ve selected the videos, tap on the “Delete” option at the bottom-right corner of the screen.
8. A confirmation message will appear, asking if you want to delete the selected videos. Tap on “Delete [Number of Videos]” to permanently remove them.
By following these steps, you can clear the Recently Deleted Videos and permanently delete the videos that have been deleted from your iPhone. This helps free up storage space and ensures that the deleted videos are fully removed from your device.
It’s important to note that once you clear the Recently Deleted Videos, you cannot recover the deleted videos. Make sure to double-check your selection before permanently deleting them.
Additionally, clearing the Recently Deleted Videos only removes the videos from your device’s storage. If you have them synced with other devices or cloud services, you may need to delete the videos from those platforms as well to fully free up storage space.
Regularly clearing the Recently Deleted Videos allows you to manage your videos effectively, ensuring that you have ample storage space to capture new memories and keep your device running smoothly.
Clearing Recently Deleted Notes
The Notes app on your iPhone allows you to create and save important information, personal thoughts, and ideas. When you delete a note, it goes to the “Recently Deleted” folder, which acts as a safety net in case you accidentally delete a note. However, these deleted notes can take up storage space on your device. Clearing the Recently Deleted Notes can help free up storage space by permanently removing these deleted notes. Here’s how you can clear the Recently Deleted Notes:
1. Open the “Notes” app on your iPhone.
2. Tap on the “Back” button in the top-left corner of the screen to return to the main “Folders” view.
3. Scroll down and tap on the “Recently Deleted” folder.
4. You’ll see a list of notes that have been deleted within the past 30 days.
5. Tap on “Edit” in the top-right corner of the screen.
6. Select the notes you want to permanently delete by tapping on them.
7. Once you’ve selected the notes, tap on the “Delete” button at the bottom-right corner of the screen.
8. A confirmation message will appear, asking if you want to delete the selected notes. Tap on “Delete [Number of Notes]” to permanently remove them.
By following these steps, you can clear the Recently Deleted Notes and permanently delete the notes that have been deleted from your iPhone. This helps free up storage space and ensures that the deleted notes are fully removed from your device.
It’s important to note that once you clear the Recently Deleted Notes, you cannot recover the deleted notes. Make sure to double-check your selection before permanently deleting them.
Regularly clearing the Recently Deleted Notes is a good practice to keep your Notes app organized, ensure you have sufficient storage space for new notes, and streamline your digital workspace.
Clearing Recently Deleted Contacts and Calendars
When you delete contacts or events from your iPhone’s Contacts and Calendars apps, they are moved to the “Recently Deleted” folder where they are stored temporarily. This provides a safety net in case you mistakenly delete any important contacts or events. However, these recently deleted items can continue to take up storage space on your device. Clearing the Recently Deleted Contacts and Calendars can help free up storage space by permanently removing these deleted items. Here’s how you can clear the Recently Deleted Contacts and Calendars:
1. Open the “Contacts” or “Calendars” app on your iPhone, depending on which you want to clear.
2. Tap on the “Groups” or “Calendars” option at the top of the screen to access your list of contacts or events.
3. Scroll down and tap on the “Recently Deleted” option, usually located at the bottom of the screen.
4. You’ll see a list of recently deleted contacts or events, depending on the app you’re using.
5. Tap on “Select” in the top-right corner of the screen.
6. Choose the contacts or events you want to permanently delete by tapping on each item.
7. Once you’ve selected the items, tap on the “Delete” option at the bottom of the screen.
8. A confirmation message will appear, asking if you want to delete the selected contacts or events. Tap on “Delete [Number of Items]” to permanently remove them.
By following these steps, you can clear the Recently Deleted Contacts or Calendars and permanently delete the items that have been deleted from your iPhone. This helps free up storage space and ensures that the deleted items are fully removed from your device.
It’s important to note that once you clear the Recently Deleted Contacts or Calendars, you cannot recover the deleted items. Make sure to double-check your selection before permanently deleting them.
Regularly clearing the Recently Deleted Contacts and Calendars is a good practice to keep your Contacts and Calendars apps organized, maintain storage space, and ensure that you have the most up-to-date and relevant information.
Clearing Recently Deleted Files in iCloud Drive
iCloud Drive allows you to store files and access them across your Apple devices. When you delete files from iCloud Drive, they are moved to the “Recently Deleted” folder where they are stored temporarily. This provides a safety net in case you accidentally delete any important files. However, these recently deleted files can continue to take up storage space in your iCloud account. Clearing the Recently Deleted files in iCloud Drive can help free up storage space by permanently removing these deleted files. Here’s how you can clear the Recently Deleted files:
1. Go to the “Files” app on your iPhone.
2. Tap on “Browse” at the bottom-right corner of the screen to access your iCloud Drive.
3. Scroll down and tap on the “Recently Deleted” option.
4. You’ll see a list of recently deleted files in iCloud Drive.
5. Tap on “Select” in the top-right corner of the screen.
6. Choose the files you want to permanently delete by tapping on each item.
7. Once you’ve selected the files, tap on the “Delete” option at the bottom of the screen.
8. A confirmation message will appear, asking if you want to delete the selected files. Tap on “Delete” to permanently remove them.
By following these steps, you can clear the Recently Deleted files in iCloud Drive and permanently delete the files that have been deleted from your account. This helps free up storage space in your iCloud storage and ensures that the deleted files are fully removed from your iCloud Drive.
It’s important to note that once you clear the Recently Deleted files, you cannot recover the deleted files. Make sure to double-check your selection before permanently deleting them.
Regularly clearing the Recently Deleted files in iCloud Drive is a good practice to manage your storage space efficiently and keep your iCloud Drive organized with only the files you need.
Clearing Recently Deleted Voice Memos
The Voice Memos app on your iPhone allows you to record and save audio recordings. When you delete voice memos, they are moved to the “Recently Deleted” folder within the app. This provides a temporary storage for deleted voice memos, giving you a chance to recover them if needed. However, these recently deleted voice memos still take up space on your device. Clearing the Recently Deleted Voice Memos can help free up storage space by permanently removing these deleted recordings. Here’s how you can clear the Recently Deleted Voice Memos:
1. Open the Voice Memos app on your iPhone.
2. Tap on the “Recently Deleted” folder at the bottom right corner of the screen.
3. You’ll see a list of voice memos that have been deleted within the past 30 days.
4. Tap on “Select” in the top-right corner of the screen.
5. Choose the voice memos you want to permanently delete by tapping on each item.
6. Once you’ve selected the voice memos, tap on the “Delete” button at the bottom-left corner of the screen.
7. A confirmation message will appear, asking if you want to delete the selected voice memos. Tap on “Delete All” to permanently remove them.
By following these steps, you can clear the Recently Deleted Voice Memos and permanently delete the recordings that have been deleted from your iPhone. This helps free up storage space and ensures that the deleted voice memos are fully removed from your device.
It’s important to note that once you clear the Recently Deleted Voice Memos, you cannot recover the deleted recordings. Make sure to double-check your selection before permanently deleting them.
Regularly clearing the Recently Deleted Voice Memos helps optimize your device’s storage and ensures that you have enough space to continue capturing new audio recordings as needed.
Clearing Recently Deleted Alarms and Reminders
The Clock app on your iPhone allows you to set alarms and create reminders to help you stay organized and manage your time effectively. When you delete alarms or reminders, they are moved to the “Recently Deleted Alarms” or “Recently Deleted Reminders” folder, depending on the type of item deleted. This provides a temporary storage for deleted alarms and reminders, giving you a chance to recover them if needed. However, these recently deleted items still occupy space on your device. Clearing the Recently Deleted Alarms and Reminders can help free up storage space by permanently removing these deleted items. Here’s how you can clear the Recently Deleted Alarms and Reminders:
1. Open the Clock app on your iPhone for alarms or the Reminders app for reminders.
2. Tap on the “Back” button until you reach the main screen showing the list of alarms or reminders.
3. Look for the “Recently Deleted Alarms” or “Recently Deleted Reminders” label.
4. Tap on it to access the recently deleted alarms or reminders.
5. Tap on “Edit” in the top-right corner of the screen.
6. Choose the specific alarms or reminders you want to permanently delete by tapping on each item.
7. Once you’ve selected the items, tap on the “Delete” button at the bottom of the screen.
8. A confirmation message will appear, asking if you want to delete the selected alarms or reminders. Tap on “Delete” to permanently remove them.
By following these steps, you can clear the Recently Deleted Alarms and Reminders and permanently delete the items that have been deleted from your iPhone. This helps free up storage space and ensures that the deleted alarms or reminders are fully removed from your device.
It’s important to note that once you clear the Recently Deleted Alarms or Reminders, you cannot recover the deleted items. Make sure to double-check your selection before permanently deleting them.
Regularly clearing the Recently Deleted Alarms and Reminders helps keep your Clock or Reminders app organized and ensure that you have ample space for new alarms or reminders you may need in the future.