
Clearing Browsing History
One of the essential tasks for maintaining your privacy while browsing the web is regularly clearing your browsing history. Fortunately, Safari for iPad makes it easy to clear your browsing history and start afresh. Here’s how:
1. Open the Safari app on your iPad and tap on the bookmarks icon, which resembles an open book.
2. At the top of the screen, tap on the “History” option. This will open a list of your recently visited websites.
3. To clear your browsing history, simply tap on the “Clear” button located at the bottom right corner of the screen.
4. A pop-up will appear, giving you the option to clear the browsing history from the last hour, today, today and yesterday, or all time. Select the desired time range.
5. Finally, tap on the “Clear History” button to confirm.
By following these steps, Safari will remove all traces of the websites you’ve visited within the selected time range. This can help safeguard your privacy and prevent others from accessing your browsing history.
While clearing your browsing history is an effective way to maintain privacy, it’s important to note that it won’t delete other data associated with websites, such as stored data or cookies. To remove these, you’ll need to take additional steps, which we’ll cover in the following sections.
It’s recommended to regularly clear your browsing history, especially if you share your iPad with others or want to keep your browsing habits private. By doing so, you can enjoy a fresh start with every browsing session and maintain your online privacy.
Clearing Individual Website Data
In addition to clearing your entire browsing history, Safari for iPad allows you to clear data for individual websites. This can be useful when you want to remove specific website data while keeping the rest intact. Follow these steps to clear individual website data:
1. Launch the Safari app on your iPad and tap on the bookmarks icon at the top of the screen, resembling an open book.
2. Tap on the “History” option and locate the website for which you want to clear data.
3. Swipe left on the website entry to reveal a “Delete” button. Tap on it.
4. A pop-up will appear asking if you want to delete the website data. Tap on “Delete” to confirm.
Once you delete the data for a particular website, Safari will remove all the stored information associated with it, such as cookies, cached files, and login credentials.
Clearing individual website data can be helpful in scenarios where you want to remove specific cookies or login information from a particular website without affecting the data for other sites. This way, you can maintain your privacy while still preserving useful data for other websites.
It’s worth noting that deleting website data may require you to re-enter your login credentials on those websites the next time you visit. Therefore, be sure to have your login information handy before deleting website data.
Regularly clearing individual website data in Safari for iPad can help keep your browsing experience clutter-free and preserve your privacy. By selectively removing data from specific websites, you have granular control over your browsing data and can ensure that only the necessary information is stored on your device.
Clearing Website History from the Safari Menu
Safari for iPad provides a convenient option to clear website history directly from the Safari menu. This method allows you to quickly remove browsing data without going through the bookmarks or history sections. Here’s how to clear website history from the Safari menu:
1. Open the Safari app on your iPad and tap on the address/search bar at the top of the screen.
2. Once the Safari menu appears, swipe down until you see the “Clear” option.
3. Tap on “Clear” to reveal multiple options, including “Clear History and Website Data.” Tap on this option.
4. A pop-up will appear, asking you to confirm the clearing of history and website data. Tap on “Clear History and Data” to proceed.
By following these steps, Safari will instantly remove all your browsing history and other website data, such as cookies and cached files. This method is an efficient way to clear your browsing data with just a few taps, without needing to navigate through different sections of the Safari app.
It’s important to note that clearing website history and data using this method will remove all stored data for websites, including login credentials and preferences. Therefore, make sure you consider this before proceeding with the clearing process.
Regularly clearing website history and data from the Safari menu is an effective way to maintain your privacy and keep your browsing sessions clean. By removing stored data for websites, you can ensure that your browsing activities remain private and reduce the risk of any unwanted data accumulation on your iPad.
Deleting Cookies and Data
When browsing the web, websites often store small pieces of data called cookies on your iPad. While cookies can enhance your browsing experience by saving preferences and login information, they can also track your online activities. Safari for iPad allows you to delete cookies and clear other website data to protect your privacy. Here’s how:
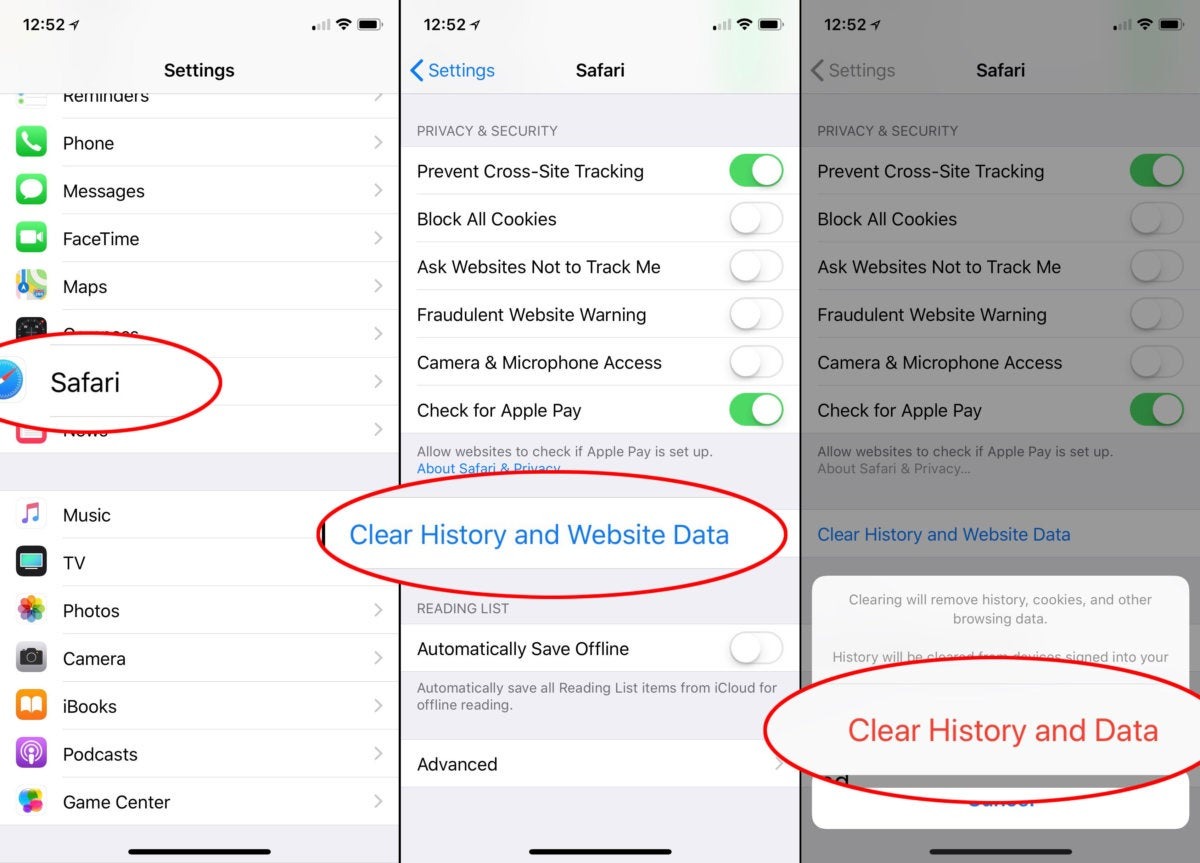
1. Launch the Settings app on your iPad and scroll down until you find “Safari.” Tap on it to access Safari settings.
2. In the Safari settings, scroll down and tap on “Clear History and Website Data.” A pop-up will appear, warning you that clearing history and website data will remove browsing history, cookies, and other stored data. Tap on “Clear History and Data” to confirm.
3. If you want to delete cookies and data for specific websites instead of all websites, scroll down to the “Advanced” section in Safari settings and tap on “Website Data.”
4. On the next screen, you’ll see a list of all websites that have stored data on your iPad. To delete cookies and data for a specific website, swipe left on the website entry and tap on “Delete.”
Deleting cookies and data in Safari for iPad helps protect your privacy by removing information that websites may have stored about your browsing habits. By regularly clearing cookies and data, you can minimize the chance of being tracked by websites and enjoy a more private browsing experience.
It’s important to note that clearing cookies may cause you to lose saved login information or preferences on websites. Therefore, you may need to re-enter your login credentials or reconfigure preferences on certain sites after deleting cookies.
By being mindful of the cookies and website data stored on your iPad and periodically clearing them, you can take control of your online privacy and ensure that your browsing sessions are secure and private.
Adjusting Safari Privacy Settings
Protecting your privacy while browsing the web is a top priority. Safari for iPad offers a range of privacy settings that you can adjust to enhance your browsing experience and safeguard your personal information. Here’s how to adjust Safari privacy settings:
1. Open the Settings app on your iPad and scroll down until you find “Safari.” Tap on it to access Safari settings.
2. In the Safari settings, you’ll find several privacy settings that you can customize according to your preferences.
3. One important privacy setting is “Prevent Cross-Site Tracking.” Enabling this option allows Safari to block websites from tracking your online activities across multiple sites. Enable the toggle switch next to this option to activate it.
4. Another useful privacy feature is “Ask Websites not to Track Me.” Enabling this option sends a request to websites, asking them not to track your browsing activities. Enable the toggle switch next to this option to activate it.
5. Additionally, you can customize other settings like “Block All Cookies” or choose to “Block Third-Party Cookies” to limit the data that websites can store on your iPad.
By adjusting these privacy settings in Safari, you gain more control over the information that websites can collect about you. Blocking cross-site tracking and requesting not to be tracked provide additional layers of privacy protection as you browse the web.
Keep in mind that while blocking cookies or enabling certain privacy settings can enhance your online privacy, it may also affect the functionality of certain websites, especially those that rely on cookies to remember your preferences or maintain login sessions. In such cases, you may need to adjust the settings accordingly to allow specific websites to function properly.
By customizing the privacy settings in Safari for iPad, you can strike a balance between protecting your privacy and enjoying a seamless browsing experience. Take advantage of these settings to safeguard your personal information and browse the web with peace of mind.
Using Private Browsing Mode
Safari for iPad offers a built-in feature called Private Browsing mode, which allows you to browse the web without leaving any trace of your online activities. When enabled, Private Browsing mode prevents Safari from storing your browsing history, cookies, and other website data. Here’s how to use Private Browsing mode:
1. Open the Safari app on your iPad.
2. Tap on the tabs icon located at the bottom right corner of the screen. It resembles two overlapping squares.
3. In the tabs view, you’ll see a button labeled “Private” at the bottom left corner of the screen. Tap on it to enable Private Browsing mode.
4. A new private browsing window will open, indicated by a dark theme and a grey address/search bar at the top of the screen.
5. You can now browse the web in Private Browsing mode, knowing that your browsing history and website data will not be stored on your iPad.
6. To exit Private Browsing mode, tap on the tabs button again, and then tap on “Private” to toggle it off.
Using Private Browsing mode is beneficial when you want to browse the web without leaving behind any traces on your device. It’s particularly useful if you’re using a shared iPad or if you wish to keep your browsing activities private from others who may use your device.
Although Private Browsing mode prevents Safari from storing your browsing history and website data, it’s important to note that it does not provide complete anonymity. ISPs, network administrators, and the websites themselves may still track your online activities, but your iPad will not retain any data.
Additionally, Private Browsing mode does not prevent websites from collecting information or tracking you while you’re actively visiting them. It only ensures that this information is not stored on your iPad. For increased privacy, consider using a virtual private network (VPN) or specialized browser extensions.
By utilizing Private Browsing mode in Safari for iPad, you can enjoy a browsing session that leaves no trace on your device, providing you with a sense of privacy and control over your online activities.
Turning off AutoFill
AutoFill is a convenient feature in Safari for iPad that automatically fills in forms with saved information, such as your name, address, and passwords. While this feature can save you time, it may also pose a privacy risk, especially if you’re using a shared device or are concerned about your personal information being stored. Here’s how to turn off AutoFill in Safari:
1. Open the Settings app on your iPad and scroll down until you find “Safari.” Tap on it to access Safari settings.
2. In the Safari settings, scroll down and tap on “AutoFill.”
3. In the AutoFill settings, you’ll find options to disable various AutoFill features, such as “Use Contact Info” and “Names and Passwords”.
4. To turn off AutoFill completely, disable the toggle switches next to all available options (e.g., names, addresses, passwords).
By disabling AutoFill, Safari will no longer automatically fill in forms for you. This means that you’ll need to enter your information manually each time you encounter a form on a website.
While disabling AutoFill can help protect your privacy, it’s important to remember that it also removes the convenience of having forms automatically populated. If you decide to disable AutoFill, make sure to have your essential information readily available to enter manually when needed.
Furthermore, consider exercising caution when saving sensitive information such as passwords and credit card details in Safari’s AutoFill. If you prefer a more secure method, consider using a dedicated password manager app or software instead.
By making the conscious choice to turn off AutoFill in Safari for iPad, you can have greater control over your personal information and minimize the risk of inadvertently sharing sensitive details when using a shared device or when you have privacy concerns.
Blocking Pop-ups
Pop-up windows can be a nuisance while browsing the web, often interrupting your browsing experience with unwanted advertisements or malicious content. To enhance your browsing experience and protect your device from potential threats, Safari for iPad allows you to block pop-ups. Here’s how to block pop-ups:
1. Open the Settings app on your iPad and scroll down until you find “Safari.” Tap on it to access Safari settings.
2. In the Safari settings, scroll down and locate the “Block Pop-ups” option. Enable the toggle switch next to it to block pop-ups.
3. Once enabled, Safari will automatically block pop-ups from appearing while you’re browsing the web.
By blocking pop-ups, you can enjoy a smoother and uninterrupted browsing experience. However, it’s important to note that some legitimate websites may use pop-ups for important content or functionality. If you encounter any issues while browsing a trusted website, you can always disable the pop-up blocker temporarily.
If you come across a website where pop-ups are still appearing despite having the pop-up blocker enabled, it could be an indication that the website is utilizing aggressive or deceptive tactics. In such cases, it is recommended to exercise caution and consider leaving the website to avoid potential scams or security threats.
Keep in mind that blocking pop-ups does not guarantee protection against all types of unwanted content or malicious threats. It is still essential to exercise caution while browsing the web, refrain from clicking on suspicious links, and ensure that your device has up-to-date security measures, such as antivirus software and regular software updates.
By enabling the pop-up blocker in Safari for iPad, you can enjoy a more streamlined browsing experience by reducing interruptions and protecting yourself from potentially harmful or unwanted pop-up content.
Enabling Do Not Track feature
Privacy-conscious individuals can take advantage of Safari’s Do Not Track feature to express their preference for online privacy. Enabling this feature communicates to websites that you do not wish to be tracked for targeted advertising or data collection purposes. Here’s how to enable the Do Not Track feature in Safari for iPad:
1. Open the Settings app on your iPad and scroll down until you find “Safari.” Tap on it to access Safari settings.
2. In the Safari settings, scroll down and locate “Privacy & Security.”
3. Tap on “Do Not Track” to enable this feature.
Once you enable the Do Not Track feature, Safari will add a Do Not Track HTTP header to all your outgoing web requests. It serves as a request to websites, indicating your preference for not being tracked.
It’s important to note that while enabling the Do Not Track feature signals your preference for online privacy, its effectiveness depends on whether websites choose to respect this preference. Not all websites may comply with the Do Not Track request. Additionally, advertisers and third-party services may still collect data based on your browsing habits, even if they choose not to use targeted advertising.
Enabling the Do Not Track feature is a simple step you can take to express your privacy preferences. However, it’s also essential to be cautious while browsing, not click on suspicious links or download unknown files, and regularly review and adjust your privacy settings to protect your personal information.
While the effectiveness of Do Not Track is limited, it still serves as a signal to websites and advertisers that you prefer not to be tracked. By enabling this feature in Safari for iPad, you can make a statement about your privacy preferences and encourage more responsible data collection and targeted advertising practices.
Resetting Safari
If you encounter persistent issues with Safari on your iPad, such as slow performance, frequent crashes, or unusual behavior, you may consider resetting Safari to its default settings. Resetting Safari can help resolve these problems by clearing caches, removing browsing history, and disabling extensions. Here’s how to reset Safari on your iPad:
1. Open the Settings app on your iPad and scroll down until you find “Safari.” Tap on it to access Safari settings.
2. In the Safari settings, scroll down and tap on “Clear History and Website Data.” A pop-up will appear, warning you that clearing history and website data will remove browsing history, cookies, and other stored data. Tap on “Clear History and Data” to confirm.
3. Next, scroll down to find the “Advanced” section in Safari settings and tap on it.
4. In the Advanced settings, you’ll find the option to “Website Data.” Tap on it, and a new screen will appear, showing a list of websites that have stored data on your iPad.
5. To remove all stored website data and reset Safari, tap on “Remove All Website Data.” Confirm your action when prompted.
By following these steps, Safari will be reset to its default settings, clearing all browsing data, cookies, and stored website data. It’s important to note that resetting Safari will also disable any installed extensions or plugins and restore Safari’s default preferences.
Please note that resetting Safari should be done with caution, as it will remove all your browsing history, saved logins, and website data. Therefore, be sure to back up any important information or export bookmarks, if needed, before proceeding with the reset.
Resetting Safari can be a helpful troubleshooting step to resolve issues with the browser and restore its performance. However, if the problems persist, it may be worth considering other troubleshooting options or seeking assistance from Apple Support.
By resetting Safari on your iPad, you can start fresh with a clean browser slate, and hopefully enjoy a smoother and more reliable browsing experience.