
Choosing the Right Song
When it comes to making a song your ringtone on your Android phone, the first step is to choose the perfect song that reflects your personality and style. Here are some tips to help you make the right choice:
- Consider your favorite genre: Think about the type of music you enjoy listening to the most. Whether you’re a fan of pop, rock, hip-hop, or country, selecting a song from your favorite genre will make your ringtone more enjoyable.
- Pick a song that represents you: Select a song that resonates with your personality or showcases your interests. It could be a song that reminds you of specific memories or simply one that makes you feel good.
- Keep it catchy: Opt for a song with a catchy chorus or a memorable melody. This will ensure that your ringtone grabs attention when your phone rings.
- Avoid long intros or outros: While you might love a song’s intro or outro, it can be frustrating to listen to them every time your phone rings. Choose a song that has a shorter and more impactful intro to keep your ringtone concise.
- Consider the lyrics: Pay attention to the lyrics of the song. Avoid using a ringtone with explicit or controversial content, especially in professional or formal settings.
Remember, the goal is to select a song that you’ll enjoy hearing every time your phone rings. Take some time to curate a list of potential songs and choose the one that best reflects your personality and preferences.
Editing the Song Length
Once you’ve chosen the perfect song to set as your ringtone, you may need to edit its length to ensure that it fits within the time constraints for a ringtone. Follow these steps to edit the song length:
- Trim the song: Use a reliable audio editing software or mobile app to trim the song to the desired length. Look for options like “cut” or “trim” to remove unnecessary portions from the beginning or end of the song.
- Focus on the chorus: If you want to highlight the most catchy or memorable part of the song, consider shortening the ringtone to include only the chorus. This will make your ringtones more attention-grabbing.
- Avoid abrupt endings: When editing the song length, make sure to fade out the ending instead of stopping it abruptly. This will ensure a smoother transition when the ringtone ends.
- Save the edited file: Once you’ve made the necessary edits, remember to save the newly trimmed version of the song as a separate audio file. This will prevent any changes from affecting the original file.
When editing the song length, it’s important to exercise caution to preserve the integrity of the music. Be mindful of any copyright restrictions and ensure that you have the necessary rights to modify the song.
By trimming the song to the desired length, you can create a customized ringtone that perfectly suits your preferences and fits within the allowable time limits.
Converting the Song to a Ringtone Format
Once you have edited the song to the desired length, the next step is to convert it into a ringtone format that is compatible with your Android phone. Follow these steps to convert the song:
- Choose a file conversion method: There are several ways to convert the song to a ringtone format. You can use specialized software, online converters, or mobile apps specifically designed for this purpose. Select the method that works best for you.
- Convert the file: Follow the instructions provided by the chosen file conversion method. Usually, you will need to upload or select the edited song file and choose the desired ringtone format, such as MP3 or WAV.
- Adjust the ringtone settings: Some file conversion methods allow you to adjust additional settings for your ringtone, such as volume level or fade-in/fade-out effects. Customize these settings as desired to enhance the ringtone’s sound quality and appeal.
- Download or save the converted file: After converting the song successfully, download or save the newly converted ringtone file to your computer or mobile device. Make a note of the file’s location for easy access during the transfer process.
It’s important to ensure that the converted ringtone file meets the required specifications for Android phones. Generally, ringtone files should be in MP3 format and have a maximum file size of a few megabytes to ensure compatibility and optimal performance.
By converting the edited song into a ringtone format, you can create a file that is specifically designed to be used as a ringtone on your Android phone.
Transferring the Ringtone to Your Android Phone
Now that you have successfully converted the song into a ringtone format, it’s time to transfer it to your Android phone. Follow these steps to transfer the ringtone:
- Connect your Android phone to your computer: Use a USB cable to connect your Android phone to your computer. Ensure that your phone is unlocked and set to file transfer mode.
- Locate the ringtone file on your computer: Open the folder where you saved the converted ringtone file on your computer. Make sure you remember the file’s location as you will need to access it in the next step.
- Copy the ringtone file to your Android phone: Drag and drop the ringtone file from your computer to a designated folder on your Android phone. You can choose the “Ringtones” or “Notifications” folder for easy access.
- Disconnect your Android phone from your computer: Once the file transfer is complete, safely disconnect your Android phone from your computer by clicking on the disconnect icon on your computer’s screen or using the “Eject” option.
After transferring the ringtone to your Android phone, it will be available in your device’s ringtone settings. You can now proceed to set it as your default ringtone or assign it to specific contacts.
If you prefer to transfer the ringtone wirelessly, you can also use cloud storage services or email the ringtone file to yourself and download it directly onto your Android phone.
By following these steps, you can easily transfer the converted ringtone from your computer to your Android phone and start personalizing your device’s sound settings.
Setting the Song as Your Default Ringtone
Now that you have successfully transferred the ringtone to your Android phone, you can proceed to set it as your default ringtone. Follow these steps to make the song your default ringtone:
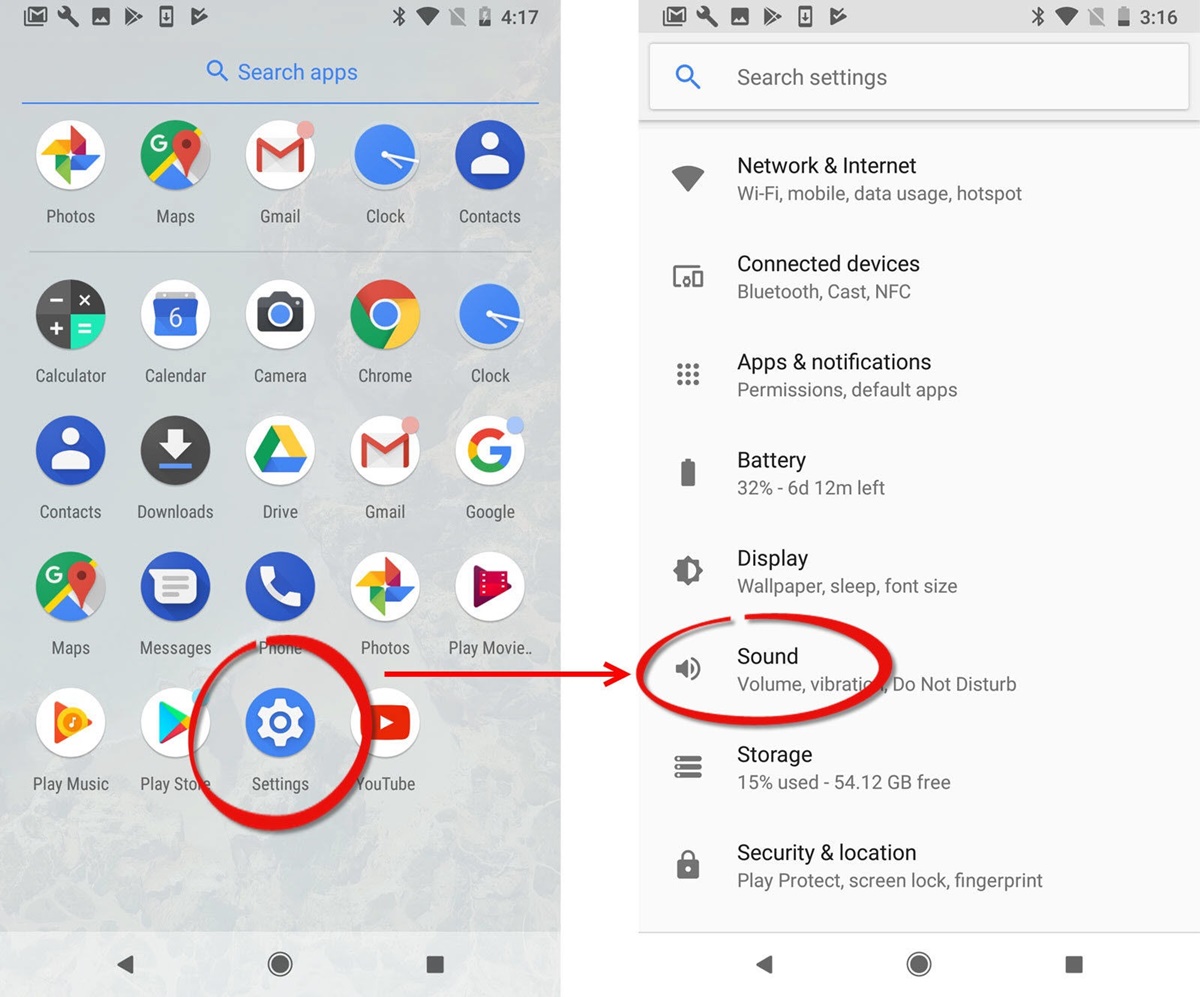
- Open the Settings app: On your Android phone, navigate to the Settings app. It is usually represented by a gear icon and can be found in your app drawer or on your home screen.
- Find the Sound or Sound & Vibration settings: In the Settings app, locate the Sound or Sound & Vibration settings option. The name may vary depending on your Android phone’s manufacturer or Android version.
- Select the Phone Ringtone or Default Ringtone option: Within the Sound or Sound & Vibration settings, look for the Phone Ringtone or Default Ringtone option. Tap on it to access the list of available ringtones.
- Browse and select your ringtone: Scroll through the list of available ringtones and locate the file you transferred earlier. Tap on it to preview the ringtone.
- Set the ringtone as default: Once you have selected the desired ringtone, tap on the “Set as Default” or similar option to designate it as your default ringtone. Your Android phone should now play the selected song whenever you receive a call.
It’s worth noting that the exact steps and options may vary slightly depending on your Android phone model and the version of Android you are using. However, the general process should be similar across different devices.
By setting the song as your default ringtone, you can personalize your Android phone and enjoy hearing your favorite song every time someone calls you.
Setting the Song as a Contact’s Ringtone
If you want to go the extra mile in personalizing your Android phone, you can set the song as a specific contact’s ringtone. Follow these steps to assign the song as a contact’s ringtone:
- Open the Contacts app: Locate and open the Contacts app on your Android phone. It is usually represented by an icon with a person or a silhouette and is found in your app drawer or on your home screen.
- Select the desired contact: Scroll through your contacts list or use the search function to find and select the contact you want to assign the ringtone to.
- Edit the contact’s details: Once you have selected the contact, look for the option to edit their contact details. This is usually represented by an icon or a menu button with pencil or edit icon.
- Assign the custom ringtone: Within the contact’s edit screen, look for the Ringtone or Set Ringtone option. Tap on it to access the list of available ringtones.
- Select your custom ringtone: Scroll through the list of ringtones and locate the song you want to assign to the contact. Tap on it to select it as the contact’s ringtone.
- Save the changes: Once you have set the custom ringtone, make sure to save the changes to the contact’s details. This may involve tapping on a save icon or selecting a save option from the menu.
Now, whenever that contact calls you, your Android phone will play the designated song, making it easier to identify who is calling without even looking at your phone.
It’s important to note that not all Android phones or contact apps offer the option to assign custom ringtones to individual contacts. In such cases, you may need to explore third-party contact apps that provide this functionality.
By setting the song as a contact’s ringtone, you can add a personal touch to your phone and have a customized ringtone for specific people in your contacts list.
Troubleshooting Common Issues
While setting a song as your ringtone on your Android phone is generally straightforward, you may encounter some common issues along the way. Here are some troubleshooting tips to help you overcome these challenges:
- Incompatible file format: Ensure that the converted ringtone file is in a compatible format, such as MP3. If you’re experiencing issues, try converting the file again using a different method or file format.
- File size limitations: Some Android phones have restrictions on the maximum file size for ringtones. If your ringtone file is too large, use an audio editing tool to compress the file or trim it further.
- Wrong file location: Double-check that you have transferred the ringtone file to the correct folder on your Android phone. If the file is not in the designated folder (e.g., Ringtones or Notifications), your phone may not recognize it as a ringtone.
- Volume level: Check the volume settings on your Android phone to ensure that the ringtone volume is not set too low or muted. Adjust the volume level as needed to ensure that you can hear the ringtone when receiving calls.
- Permission issues: In some cases, your Android phone may not have the necessary permissions to access or use the ringtone file. Grant the required permissions through the app settings or file manager to resolve this issue.
If you continue to experience difficulties, try restarting your Android phone or consulting the user manual or support documentation provided by the phone’s manufacturer. Additionally, online forums and communities dedicated to Android troubleshooting may offer valuable insights and solutions.
Remember, not all Android phone models or software versions have the same features or settings. Therefore, it’s essential to consult the specific instructions and guidelines provided by your phone’s manufacturer.
By troubleshooting common issues, you can overcome any obstacles and successfully set your desired song as your ringtone on your Android phone.