
Required Materials
Before embarking on your journey to create a night vision potion in Minecraft, you will need to gather a few essential materials. These items are necessary for brewing the potion and are relatively easy to find within the Minecraft game world. Here is a list of the required materials:
- Glass Bottles: You will need at least one glass bottle to contain the night vision potion. Glass bottles can be crafted using three pieces of glass in the crafting table.
- Nether Wart: Nether Wart is a necessary ingredient for brewing potions. It can be found in Nether Fortresses or grown in your own Nether Wart Farm. Harvest the Nether Wart by breaking it with any tool.
- Golden Carrots: This item serves as the main ingredient for the night vision potion. Golden carrots can be crafted using carrots and golden nuggets in the crafting table. Each night vision potion requires one golden carrot.
- A Fermented Spider Eye: This ingredient is essential for transforming the base potion into a night vision potion. Fermented spider eyes can be crafted using a spider eye and sugar in the crafting table.
- Glowstone Dust: Glowstone dust is needed to enhance the potency of the night vision potion. It can be obtained by mining Glowstone Blocks found in the Nether dimension. Each night vision potion requires one glowstone dust.
Now that you have gathered all the required materials, you are ready to begin the process of crafting your very own night vision potion in Minecraft. Follow the step-by-step guide below to create the potion and see in the dark like never before!
Step 1: Find a Brewing Stand
The first step in creating a night vision potion in Minecraft is to find a brewing stand. A brewing stand is a special block that is used to brew various types of potions in the game. Here’s how you can find a brewing stand:
- Locate a village: Villages are common structures in the Minecraft world, and they often have a brewing stand inside one of the houses. Look for a village by exploring your Minecraft world.
- Navigate to a stronghold: Strongholds are underground structures that contain various rooms, including libraries. Libraries in strongholds can sometimes have brewing stands. You can find strongholds by throwing Eye of Enders and following their direction.
- Craft a brewing stand: If you can’t find a village or stronghold, you can always craft a brewing stand yourself. To craft a brewing stand, you will need one blaze rod and three cobblestones. Arrange the materials in a crafting table as shown below to create a brewing stand:

Once you have a brewing stand, place it in your desired location. This is where you will be brewing the night vision potion.

Now that you have found or crafted a brewing stand, you are ready to move on to the next step – gathering the ingredients needed for the night vision potion.
Step 2: Gather the Ingredients
Now that you have a brewing stand, it’s time to collect the ingredients needed to brew the night vision potion in Minecraft. These ingredients are crucial for the potion’s success, so be sure to gather them before proceeding to the next steps. Here’s what you will need:
- Nether Wart: Nether Wart is a key ingredient for brewing potions. You can find Nether Wart in Nether Fortresses or grow it in your own Nether Wart Farm. Use any tool to break the Nether Wart and collect it.
- Golden Carrot: The main ingredient for the night vision potion is the Golden Carrot. To craft a Golden Carrot, you will need one Carrot and one Gold Nugget. Place the Carrot in the center slot and the Gold Nugget in the top-left and top-right slots of the crafting table to create the Golden Carrot.
- Fermented Spider Eye: The Fermented Spider Eye is used to transform the base potion into a night vision potion. Craft this ingredient by combining one Spider Eye and one Sugar in the crafting table.
- Glowstone Dust: Glowstone Dust is needed to increase the potency of the night vision potion. You can obtain Glowstone Dust by mining Glowstone Blocks found in the Nether dimension. Each night vision potion requires one Glowstone Dust.
Once you have gathered all these ingredients, you are ready to move on to the next step – crafting the night vision potion. Make sure to have all the ingredients in your inventory before proceeding.
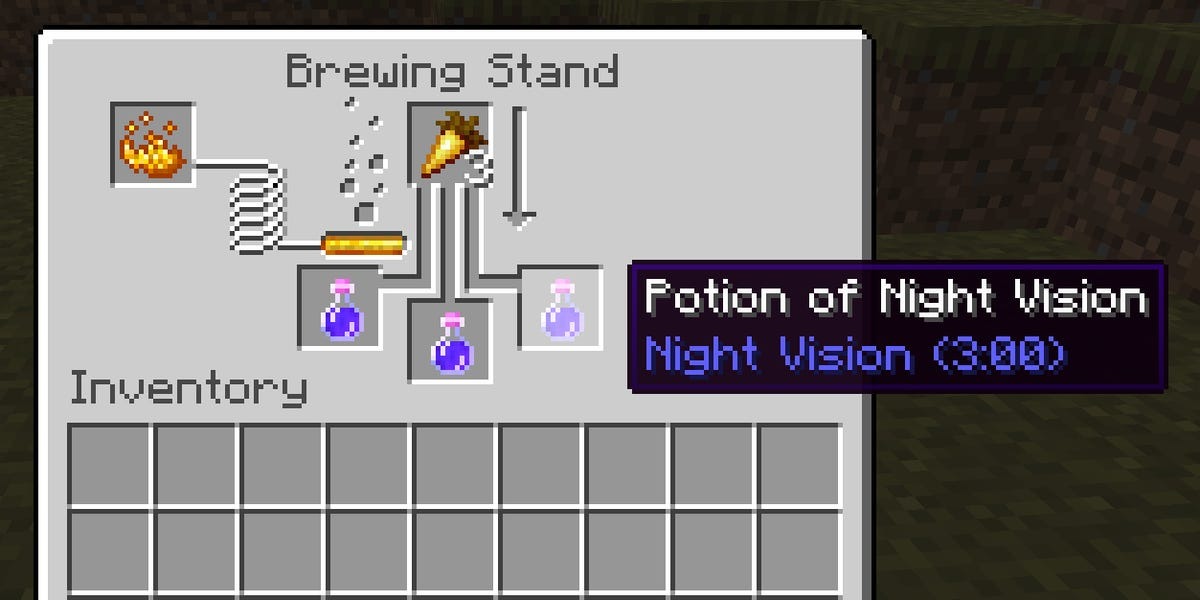
Step 3: Craft the Night Vision Potion
With all the necessary ingredients collected, it’s time to craft the night vision potion in Minecraft. Follow the steps below to create your own night vision potion:
- Open the Brewing Stand: Right-click on the brewing stand to open its interface. This will allow you to start the brewing process.
- Add Blaze Powder: Place Blaze Powder into the top slot of the brewing stand. You will need this as a fuel to activate the brewing process.
- Add Water Bottles: Place three Glass Bottles filled with water into the bottom three slots of the brewing stand. These will be the base for your night vision potion.
- Add Nether Wart: In the top slot of the brewing stand, add one piece of Nether Wart. This will start the brewing process and create an Awkward Potion as the first step.
- Add Golden Carrot: After the Nether Wart has brewed for a while, add one Golden Carrot to the top slot of the brewing stand. This will transform the Awkward Potion into a Night Vision Potion.
The brewing progress bar will fill up as each step is completed. Once the brewing process is finished, you will see three Night Vision Potions in the bottom slots of the brewing stand interface.
Congratulations! You have successfully crafted the night vision potion. However, the process is not complete yet. In the next step, you will need to add Blaze Powder to activate the night vision potion and make it ready for use.
Step 4: Add Blaze Powder
Now that you have crafted the night vision potion, it’s time to activate it by adding Blaze Powder. Follow these steps to complete this step:
- Open the brewing stand interface by right-clicking on it.
- Ensure that there is at least one empty Glass Bottle in the bottom slot of the brewing stand.
- Place one Blaze Powder into the top slot of the brewing stand. This will act as a catalyst to activate the night vision potion.
- Wait for the brewing process to complete. You will see the progress bar filling up as the Blaze Powder interacts with the night vision potion.
- Once the brewing process is finished, you will have activated night vision potions in the bottom slots of the brewing stand.
It’s important to note that each Blaze Powder can activate multiple night vision potions, so you can add more Blaze Powder to the brewing stand to activate additional potions if needed. However, using one Blaze Powder per night vision potion is sufficient.
Now that you have activated the night vision potions, you can proceed to the next step to collect them and use them in the game.
Step 5: It’s Brewing Time
Now that you have activated the night vision potions, it’s time to let them brew and reach their full potential. Here’s what you need to do:
- Make sure there is at least one empty glass bottle in the bottom slot of the brewing stand.
- Leave the brewing stand interface open and let the night vision potions brew. It will take some time for the brewing process to complete.
- During this time, you can continue exploring or working on other activities in the game.
- Keep an eye on the brewing progress bar, which will fill up as the night vision potions brew.
- Once the brewing process is complete, you will see the activated night vision potions in the bottom slots of the brewing stand.
Your patience will be rewarded as the night vision potions reach their optimal strength. Remember to keep the brewing stand powered by adding Blaze Powder when necessary, ensuring a steady supply of activated night vision potions.
Now that the brewing process is complete, you are ready to collect the night vision potions and use them to your advantage in the game. Don’t forget to grab some empty glass bottles as well for future brewing endeavors.
Step 6: Collect the Potion
After patiently waiting for the brewing process to complete, it’s time to collect the freshly brewed night vision potions. Follow these steps to retrieve your potions:
- Open the brewing stand interface.
- Ensure there is at least one empty slot in your inventory or a chest nearby to store the night vision potions.
- Click and drag the night vision potions from the bottom slots of the brewing stand into your inventory or the nearby chest.
- Repeat this process until you have collected all the night vision potions you brewed.
- Check your inventory or the chest to make sure you have successfully collected the potions.
Now that you have the night vision potions in your possession, you can use them whenever darkness hinders your vision in Minecraft. Place the night vision potions in your hotbar for easy access during your gameplay.
Remember, the night vision potions have a limited duration, so be strategic about when you choose to consume them. Save them for situations where increased visibility is crucial, such as exploring dark caves, fighting mobs at night, or navigating undersea depths.
With your newly collected night vision potions, you’re ready to conquer the Minecraft world with enhanced vision and confidence.
Step 7: Drink and Enjoy
Congratulations on successfully crafting and collecting your night vision potions! Now it’s time to drink your potion and enjoy the benefits of enhanced vision in Minecraft. Follow these final steps:
- Select the night vision potion from your inventory or hotbar.
- Right-click or use the designated button to consume the potion.
- Once consumed, you will notice a subtle visual effect indicating that the night vision potion is active.
- Now, you will be able to see clearly in dark environments, eliminating the need for torches or other light sources.
- Enjoy exploring caves, mining deep underground, navigating through the night, or undertaking any task that previously required additional light.
As you explore the Minecraft world with your night vision potion, keep in mind that the effect has a limited duration. Typically, a night vision potion lasts for 3 minutes, but it can be extended by brewing it with Redstone Dust in a subsequent crafting process.
Make the most of your night vision potion while it lasts, and plan accordingly to ensure you have enough potions for your adventures. Consider brewing more night vision potions in the future to replenish your supply.
With your newfound ability to see in the dark, you have a significant advantage in your Minecraft journey. The night vision potion opens up new possibilities and makes your gameplay experience more convenient and enjoyable.
Drink up, embrace the enhanced vision, and continue your adventure in the vast world of Minecraft!