
Finding the Right Location
Finding the Right Location
When it comes to creating a map in Minecraft, finding the perfect location is the first step. Whether you’re looking to create a map for navigation purposes or to display your world’s landmarks, choosing the right spot is crucial. Here are some tips to help you find the ideal location for your map:
- Scenic Landscapes: Look for areas with stunning landscapes that will make your map visually appealing. Whether it’s a majestic mountain range, a serene lake, or a beautiful forest, finding a location with natural beauty will enhance the overall look of your map.
- Landmarks and Points of Interest: Consider locations that have unique landmarks or points of interest. This could be a grand castle, a massive waterfall, or even a hidden treasure. These landmarks can serve as important reference points on your map.
- Accessibility: Think about how accessible your chosen location is. If you want your map to be useful for navigation, it’s important to select a spot that is easy to reach and central to other important areas in your world.
- Resources: Take into account the availability of resources in the area. If you plan on using your map for survival purposes, choosing a location with ample resources such as wood, ores, and food sources can be advantageous.
- Symmetry and Balance: Consider the symmetry and balance of the location. Having a balanced landscape can help create a visually appealing and organized map. Look for areas with evenly distributed elements, such as mountains on both sides of a river.
By keeping these factors in mind, you’ll be on your way to finding the perfect location for your Minecraft map. Remember, it’s all about creating a map that is aesthetically pleasing, functional, and suits your specific needs. Happy exploring!
Gathering Materials
Gathering Materials
Once you have found the right location for your Minecraft map, the next step is to gather the necessary materials. These materials will be used to craft the map and any additional items you may want to include. Here’s what you’ll need:
- Paper: Paper is the main ingredient for crafting a map. It can be crafted by combining sugar cane, which is commonly found near water sources, into paper. Make sure to gather enough sugar cane to create an ample supply of paper for your mapping needs.
- Compass: A compass is essential for creating a map that shows your location accurately. It can be crafted using four iron ingots and a piece of redstone. Iron can be obtained by mining iron ore, which is commonly found underground. Redstone can be found in caves or by mining redstone ore.
- Dyes: Dyes are optional but can add a touch of customization to your map. Different colored dyes can be obtained from various sources, such as flowers, cacti, or even squids. Experiment with different dyes to add a personal touch to your map.
- Leather: Leather is used to create a map’s frame, allowing it to be displayed on an item frame or in an item frame. Leather can be obtained by slaughtering cows or horses found in the game. Make sure to gather enough leather to create multiple maps if desired.
- Additional Items: Depending on your creativity and the purpose of your map, you may want to gather additional materials. These could include items like signs, banners, or even different types of blocks for building structures. Be sure to gather these materials based on your specific map design.
By collecting these materials, you’ll have everything you need to craft a map that accurately represents your chosen location in Minecraft. Remember to gather enough resources to create multiple maps or experiment with various designs. Happy collecting!
Crafting a Map
Crafting a Map
Now that you have gathered all the necessary materials, it’s time to craft your map in Minecraft. Follow these steps to create a functional and detailed map:
- Create Paper: Start by crafting paper using the sugar cane you have collected. Open your crafting table and place three sugar cane in a horizontal row in any of the three rows.
- Craft a Compass: Next, craft a compass using the iron ingots and redstone. Place four iron ingots in a square shape in the middle row of the crafting table, with the redstone in the center.
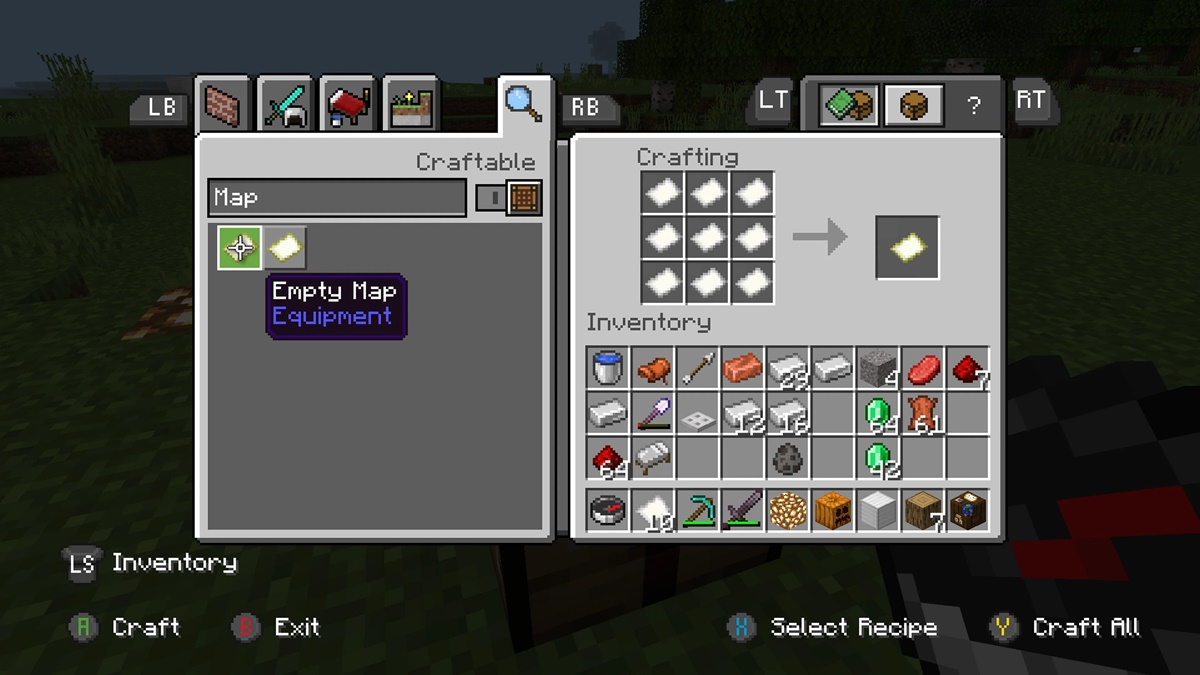
- Craft the Map: To craft the map, place the compass in the center square of the crafting table and surround it with eight pieces of paper. This will create an empty map.
- Expand the Map: If you want to create a larger map that shows more of your surroundings, you can expand it. To do this, combine your existing map with more paper in a crafting table. Each time you do this, the map will increase in size and reveal more of your explored area.
- Label Your Map: After crafting the map, you can label it to make it easier to identify later. To do this, simply use an anvil and name the map whatever you like. This is especially useful when creating multiple maps for different areas or purposes.
Once you have crafted your map, it’s time to put it to use. Hold the map in your hand and right-click to open it. You will be able to see a representation of your surroundings and any explored areas.
Remember that the map will only update and display new areas if you explore them while holding the map. Keep this in mind as you venture forth and continue to create and expand your Minecraft map.
Expanding the Map
Expanding the Map
Creating a map in Minecraft is not limited to a small area. You have the ability to expand the map and reveal more of your surroundings. This is especially useful when you want to create a detailed and comprehensive map of your entire world. Here’s how you can expand your map:
- Craft Multiple Maps: Start by crafting multiple maps using the compass and paper, as mentioned earlier. Having multiple maps allows you to explore different areas and create detailed maps for each region.
- Explore New Areas: Once you have multiple maps, you can begin exploring new areas of your world. As you venture into unexplored territory, make sure to hold one of the blank maps in your hand. This will ensure that the map updates and reveals the newly explored area.
- Combine Maps: When you want to expand your map, return to your base or a specific location and combine the existing map with additional paper. Place the map and the paper in the crafting table, with the map in the center square and the paper surrounding it. This will create an enlarged version of the map, showing more of the world.
- Repeat the Process: If you still want to expand the map further, you can continue combining the enlarged map with additional paper. Each time you do this, the map will increase in size and uncover more of your explored areas.
- Label the Expanded Map: Once you have expanded your map, it’s important to label it to differentiate it from the previous versions. Use an anvil to rename the map and indicate the specific area or region it represents.
Remember that as you expand your map, you’ll need to keep exploring new areas while holding the map in order for it to update and reveal more of the world. This allows you to create a comprehensive and detailed map that showcases the entirety of your Minecraft world.
By expanding your map, you not only gain a better understanding of your surroundings but also create a valuable tool for navigation and planning. Enjoy the adventure of exploring and expanding your Minecraft map!
Using Markers and Icons
Using Markers and Icons
In addition to creating a map that accurately displays your surroundings, you can further enhance its functionality by adding markers and icons. These visual indicators can help you identify important locations, landmarks, or points of interest on your Minecraft map. Here’s how to use markers and icons effectively:
- Choose the Right Icon: Start by deciding on the icons or symbols you want to use on your map. Consider the purpose of your map and the specific locations you want to mark. For example, you might use a sword icon to mark a battle arena or a tree icon to indicate a forest.
- Label the Icons: Once you have selected the icons, you can label them for clarity. This is especially helpful when you have multiple markers of the same type. Use an anvil to rename the icons, specifying the name or description of the location it represents.
- Place the Icons: With your labeled icons ready, it’s time to place them on your map. Hold the map and right-click on the desired location to place an icon. This will mark the spot and display the icon on your map.
- Organize and Color Code: To keep your map organized, you can color-code the icons based on categories or themes. This will make it easier to identify specific locations at a glance. For example, you can assign a specific color for landmarks, another for villages, and so on.
- Update and Remove Icons: As your world evolves and changes, you may need to update or remove icons from your map. Simply revisit the marked locations and either replace or remove the icons as needed. This ensures that your map remains up-to-date.
Using markers and icons on your Minecraft map adds a layer of visual representation, making it easier to navigate and identify important locations. Whether you’re marking areas of interest, your base, or specific resource locations, these icons can be invaluable tools in your adventures.
Experiment with different icons, labeling techniques, and colors to customize your map and make it uniquely yours. With a well-marked and organized map, you’ll have a better grasp of your world and its various features.
Sharing and Transporting Maps
Sharing and Transporting Maps
Once you have crafted and customized your Minecraft map, you may want to share it with others or transport it to different locations within the game. Fortunately, there are several ways to do this effectively. Here are some methods for sharing and transporting your maps:
- Copy the Map: To share a map with another player, make a copy of the map you want to share. Simply craft a duplicate map using the same materials, or if you already have an empty map, place it in a cartography table with a piece of paper to create a duplicate.
- Trade with Other Players: If you’re playing in multiplayer mode, you can trade maps with other players. This can be done by dropping the map on the ground and having the other player pick it up, or using the trading interface if available.
- Store Maps in Item Frames or Chests: If you want to display your maps or store them for safekeeping, you can place them in item frames or chests. This allows you to showcase your maps as decorative pieces or store them in a secure location.
- Use Ender Chests: Ender chests provide a convenient way to transport your maps to different locations. Simply place the map in an ender chest and access it at any other ender chest in the game. This is especially useful for exploring different parts of your world without the need to carry multiple maps.
- Upload Maps to Online Platforms: If you want to share your Minecraft map with a wider audience, you can upload it to online platforms such as Minecraft forums or community websites. This allows other players to download and explore your creation, even if they’re not playing on the same server or in the same multiplayer world.
By utilizing these methods, you can easily share and transport your Minecraft maps. Whether you’re collaborating with other players, showcasing your creations, or simply wanting to preserve your maps for future adventures, these techniques offer convenience and accessibility.
Remember to respect the terms of use and guidelines when sharing your maps online. Also, make sure to keep backups of your maps in case they get lost or damaged during the sharing or transportation process.
Enjoy the process of sharing and transporting your maps, and see how your creations inspire and captivate other players in the Minecraft community!
Creating Custom Maps
Creating Custom Maps
If you’re looking to take your Minecraft map creation to the next level, you can delve into the realm of custom maps. Custom maps allow you to design and build unique environments, challenges, and adventures for yourself and others to enjoy. Here are some steps to get started on creating your own custom maps:
- Plan Your Concept: Start by brainstorming and planning the concept for your custom map. Consider the theme, setting, storyline, and gameplay mechanics you want to incorporate. This will serve as the foundation for the entire map creation process.
- Use World Editing Tools: Custom map creation often involves using world editing tools such as MCEdit or WorldEdit. These tools allow you to modify and shape your Minecraft world with precision, making it easier to create unique landscapes, structures, and obstacles.
- Add Custom Structures: Experiment with adding custom structures and buildings to your map. This can include anything from elaborate dungeons and hidden treasure rooms to sprawling cities and intricate mazes. Consider using structure generation tools or building by hand to bring your ideas to life.
- Create Custom Gameplay Elements: Custom maps often include unique gameplay elements and mechanics. This can involve creating custom mobs, implementing puzzle-solving mechanics, or crafting complex redstone contraptions. Be creative and think outside the box to provide engaging and challenging gameplay experiences.
- Add Custom Textures and Sounds: Enhance the atmosphere of your custom map by incorporating custom textures and sounds. This can involve creating your own texture packs or using existing ones to give your map a distinct visual style. Similarly, adding custom sounds and music can further immerse players in your creation.
- Test and Refine: Once you have built your custom map, thoroughly test it to ensure a smooth and enjoyable experience for players. Pay attention to the difficulty level, pacing, and any potential bugs or issues that may arise. Gather feedback from playtesters and make necessary adjustments to improve the overall quality of your map.
Creating custom maps in Minecraft provides an opportunity to unleash your imagination and showcase your creativity. Whether you’re designing an adventure map, a parkour challenge, or a unique survival experience, custom maps offer endless possibilities for both creators and players.
Remember to share your custom map with the Minecraft community, allowing others to experience and appreciate your hard work. Additionally, don’t hesitate to explore and play the custom maps created by other talented individuals – you may find inspiration and new ideas for your future creations.
Embrace the world of custom maps and let your creativity soar in the vast world of Minecraft!
Using Texture Packs with Maps
Using Texture Packs with Maps
Texture packs, also known as resource packs, can greatly enhance the visual experience of your Minecraft maps. By changing the textures and visuals of blocks, items, and entities within the game, texture packs can provide a whole new look and feel to your custom maps. Here’s how you can use texture packs effectively with your maps:
- Choose a Compatible Texture Pack: Start by selecting a texture pack that is compatible with the version of Minecraft you are playing. There are a vast number of texture packs available, each offering a unique style and design. Look for packs that align with the theme and aesthetic of your map.
- Download and Install the Texture Pack: Once you have chosen a texture pack, download it from a trusted source. Texture packs typically come in .zip or .rar format. To install the texture pack, open Minecraft and go to the Options menu. From there, navigate to the Resource Packs section and click on “Open Resource Packs folder”. Place the downloaded texture pack file into the folder and select it in the Resource Packs menu within the game.
- Customize the Look of Blocks and Items: Texture packs allow you to change the appearance of blocks, items, and other in-game elements. Experiment with different textures to give your map a unique and immersive atmosphere. For example, you can use a medieval-themed texture pack for a fantasy map or a futuristic texture pack for a sci-fi adventure.
- Enhance the Map’s Ambiance: Texture packs can also include custom sounds and music, which can enhance the ambiance of your map. Consider using texture packs that offer custom atmospheric sounds, such as chirping birds, flowing water, or eerie cave echoes. These additions can immerse players further into your map’s environment.
- Ensure Compatibility and Consistency: When using texture packs with maps, it’s important to ensure compatibility and consistency. Make sure that the chosen texture pack doesn’t alter essential gameplay mechanics or visually confuse players. Additionally, be mindful that the textures are consistent throughout your map for a cohesive experience.
- Inform Players About Texture Pack Requirements: If you have designed your custom map with a specific texture pack in mind, it’s essential to inform players about the necessary texture pack requirements. Provide clear instructions or include the texture pack file along with your map download to ensure players have the intended visual experience.
By utilizing texture packs effectively, you can transform the visual aesthetics of your Minecraft maps, enhancing the immersion and overall experience for players. Whether you want to create a whimsical and colorful world or a gritty and realistic environment, texture packs offer endless possibilities for customization.
Remember to credit the creators of the texture packs you use in your maps, respecting their work and adhering to any licensing requirements they may have. Additionally, encourage players to explore different texture packs and discover their own preferred visual experience within Minecraft.
Embrace the creative potential of texture packs and witness how they can elevate your maps to new levels of visual splendor!
Tips and Tricks
Tips and Tricks
Creating maps in Minecraft can be a rewarding and enjoyable experience. To help you make the most out of your map-making journey, here are some useful tips and tricks to consider:
- Plan Ahead: Before diving into map creation, take some time to brainstorm and plan your map’s concept, layout, and objectives. This will provide clarity and direction throughout the process.
- Experiment with Redstone: Redstone is a versatile and powerful tool for adding interactive elements to your map. Learn the basics of redstone circuits and mechanisms to create puzzles, traps, or even automated systems.
- Seek Inspiration: Don’t hesitate to seek inspiration from other map creators and the Minecraft community. Explore popular custom maps, watch YouTube tutorials, and join forums to gain fresh ideas and insights.
- Playtest Regularly: Constant playtesting is crucial to ensure your map’s quality. Involve friends, fellow players, or even create a dedicated team of playtesters who can provide feedback and help you identify any issues or areas for improvement.
- Take Advantage of Command Blocks: Command blocks can add a whole new level of complexity and customization to your maps. Explore different command block features like teleportation, custom mobs, or triggering special events.
- Optimize Performance: Pay attention to map performance to ensure a smooth gameplay experience. Utilize tools like Optifine or tweak the game settings to improve FPS and reduce lag, especially if your map contains complex redstone contraptions or large structures.
- Create Engaging Storylines: Engage players by incorporating captivating storylines and compelling narratives into your maps. Think about character development, plot twists, and meaningful choices to make your map memorable.
- Use Map Making Software: Consider using specialized map-making software like WorldPainter or MCEdit to speed up certain map-building tasks or to create custom terrains and landscapes with more precision and ease.
- Document Your Map: Provide clear instructions or signs within your map to guide players and ensure they understand the objectives or gameplay mechanics. Additionally, keep a record of your map-making process to document and share your creative journey.
Remember, practice makes perfect when it comes to map creation. Don’t be discouraged by any setbacks or challenges you may encounter along the way. With persistence and a willingness to learn and improve, you can create incredible and immersive maps that will captivate players in the Minecraft community.
So roll up your sleeves, let your imagination run wild, and have fun crafting your own unique and memorable Minecraft maps!