
Materials Needed
Before you can create a furnace in Minecraft, you’ll need to gather a few essential materials. Here’s a list of what you’ll need:
- 8 Cobblestones: Cobblestones are one of the most common materials in Minecraft. You can easily find them by mining stone blocks with a pickaxe. Make sure you have at least 8 cobblestones in your inventory.
- 1 Crafting Table: To craft a furnace, you’ll need a crafting table. If you haven’t crafted one yet, you’ll need 4 wooden planks. Place them in a 2×2 grid in the crafting table to create the crafting table.
- 1 Wooden Pickaxe (optional): While not necessary, having a wooden pickaxe can be useful for mining the cobblestones faster. To craft one, use 3 wooden planks and 2 sticks in the crafting table. If you don’t have a wooden pickaxe, you can still break stone blocks with your bare hands, but it will take longer.
Once you have gathered these materials, you’re ready to start crafting your furnace!
Step 1: Gathering Resources
Before you can create a furnace, you’ll need to gather a few essential resources. Here’s how you can do it:
- Find a Mountain or Cave: Look for a mountain or cave in your Minecraft world. These areas often have abundant stone blocks, which you’ll need to collect.
- Mine Stone Blocks: Once you’ve located a suitable area, use your wooden pickaxe or bare hands to mine stone blocks. Each stone block will drop cobblestones when broken.
- Collect Cobblestones: As you mine the stone blocks, collect the cobblestones that drop. You’ll need at least 8 cobblestones to create a furnace.
Remember, if you don’t have a wooden pickaxe, you can still break stone blocks with your bare hands, but it will be a slower process.
Once you have gathered the necessary cobblestones, you can move on to the next step of crafting your furnace.
Step 2: Crafting the Furnace
Now that you have collected the required cobblestones, it’s time to craft your furnace. Follow these steps to create your furnace:
- Open the Crafting Table: Right-click on your crafting table to open it.
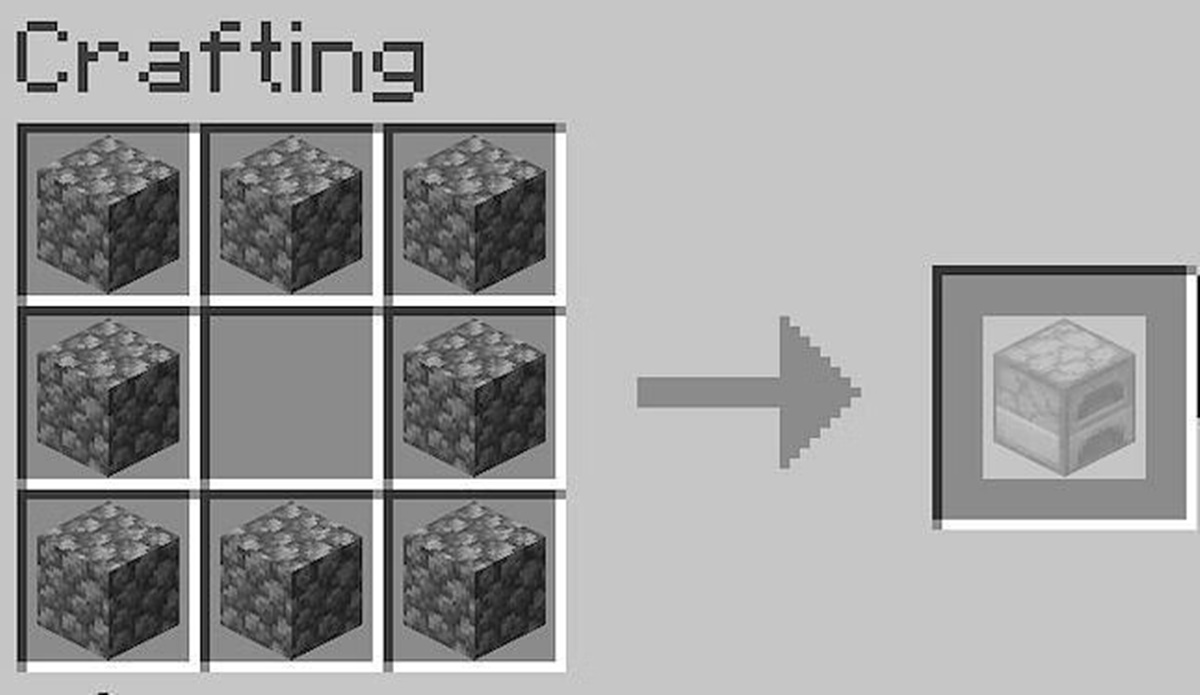
- Arrange the Cobblestones: In the crafting table grid, place the 8 cobblestones in a square shape, filling all the slots except the center.
- Retrieve the Furnace: Once you have placed the cobblestones correctly, a furnace will appear in the result box of the crafting table.
- Collect the Furnace: Click on the furnace in the result box to move it to your inventory.
Great job! You have successfully crafted a furnace. Now, it’s time to place it in your Minecraft world so you can put it to use.
Step 3: Placing the Furnace
With your newly crafted furnace in hand, it’s time to find the perfect spot to place it. Follow these steps to properly place your furnace:
- Select a Suitable Location: Look for a flat surface where you want to place the furnace. It can be indoors or outdoors, as long as there’s enough space.
- Equip Your Furnace: Make sure the furnace is selected in your hotbar so that it’s ready to be placed.
- Position the Furnace: Stand in front of the chosen location, facing the direction you want the front of the furnace to be. The front is the side with the flames.
- Place the Furnace: Right-click or press the assigned button to place the furnace in the selected location. The furnace will now appear, ready to be used.
It’s important to note that you can break and pick up the furnace by using the appropriate tool, such as a pickaxe. However, doing so will cause the furnace to drop as an item, and any items currently inside the furnace will be lost. Be cautious when breaking and repositioning the furnace.
Now that you have placed the furnace, it’s time to learn how to fuel it so you can start using it to smelt various materials in Minecraft.
Step 4: Fueling the Furnace
To make the furnace functional, you need to provide it with a fuel source. Follow these steps to fuel your furnace:
- Access the Furnace: Right-click on the placed furnace to open the furnace interface.
- Place Fuel in the Bottom Slot: In the bottom slot of the furnace interface, place the fuel of your choice. Some common fuel sources include coal, charcoal, wooden items, lava buckets, and even dried kelp. Each fuel has its own burning time, which determines how long it will power the furnace.
- Add the Material to be Smelted: In the top slot of the furnace interface, place the material you want to smelt. This can include ores, such as iron or gold, or even food items, such as raw meat.
Once you have placed the fuel and the material to be smelted, the furnace will start processing. You will see flames and smoke particles, indicating that the smelting process is underway.
It’s important to note that the fuel will be consumed over time as it powers the furnace. Keep an eye on the fuel level and make sure to add more fuel when necessary to keep the furnace running.
Now that you know how to fuel the furnace, it’s time to learn how to use it to smelt various ores and food items.
Step 5: Using the Furnace
Now that your furnace is fueled and ready to go, it’s time to learn how to use it to smelt different materials. Follow these steps to use the furnace:
- Access the Furnace: Right-click on the placed furnace to open the furnace interface.
- Monitor the Progress: In the furnace interface, you will see two slots. The top slot is for the material you want to smelt, and the bottom slot is for the fuel. As the furnace processes, the progress bar in the middle will fill up, indicating the remaining time for completion.
- Retrieve the Smelted Item: Once the progress bar is completely filled, the smelting process is complete. The material you placed in the top slot will transform into a new item. You can now click and drag that item to your inventory.
The type of item you obtain from smelting depends on the material you used. For example, smelting iron ore will result in iron ingots, while smelting raw meat will cook it, turning it into cooked meat that provides more hunger points when consumed.
Remember to keep an eye on the fuel level in the furnace and add more fuel as needed to continue the smelting process.
The furnace not only allows you to smelt ores and cook food items but can also be used for various other tasks, such as dyeing items and crafting specific blocks. Let’s explore some of these possibilities in the next steps.
Step 6: Smelting Ores
The furnace is an essential tool for smelting ores in Minecraft. Follow these steps to smelt ores using the furnace:
- Access the Furnace: Right-click on the furnace to open the furnace interface.
- Place Ores in the Top Slot: In the top slot of the furnace interface, place the ores you want to smelt. Some common ores include iron ore, gold ore, and diamond ore.
- Add Fuel in the Bottom Slot: In the bottom slot of the furnace interface, place the appropriate fuel source to power the smelting process. Common fuels include coal and charcoal.
- Monitor the Progress: As the furnace processes, the progress bar will fill up, indicating the remaining time for the smelting process.
- Retrieve the Smelted Ingots: Once the progress bar is completely filled, the smelting process is complete. The ores will transform into smelted ingots. Click and drag the ingots to your inventory.
Smelting ores in the furnace is a crucial step in obtaining valuable materials for crafting armor, tools, and other useful items. It allows you to convert raw ores into usable ingots, which can be used in various recipes.
Keep in mind that different ores have different smelting times and yield different amounts of ingots. For instance, smelting iron ore will produce iron ingots, while smelting gold ore will yield gold ingots. It’s a rewarding process that enhances your mining endeavors.
Now that you know how to smelt ores efficiently, let’s discover how the furnace can be used to smelt food items.
Step 7: Smelting Food
In addition to smelting ores, the furnace can also be used to cook and smelt various food items. Follow these steps to smelt food using the furnace:
- Access the Furnace: Right-click on the furnace to open the furnace interface.
- Place Raw Food Items in the Top Slot: In the top slot of the furnace interface, place the raw food items you want to cook. This can include raw meat, raw fish, potatoes, or even kelp.
- Add Fuel in the Bottom Slot: In the bottom slot of the furnace interface, place the fuel source of your choice, such as coal or charcoal.
- Monitor the Progress: As the furnace processes, you will see the progress bar filling up, indicating the cooking process’s remaining time.
- Retrieve the Cooked Food Items: Once the progress bar is completely filled, the cooking process is complete. The raw food items will transform into cooked food items. Simply click and drag the cooked food items to your inventory.
Smelting food items in the furnace is a great way to increase the hunger points they provide when consumed. Cooked food items generally offer more hunger points than their raw counterparts, making them more beneficial for replenishing health and maintaining hunger saturation levels.
It’s worth noting that certain food items, such as meat, need to be cooked before consuming them. Consuming raw food items may result in negative status effects, like food poisoning.
Now that you know how to use the furnace to smelt food items, let’s explore how it can be used for dyeing items and crafting unique blocks.
Step 8: Dyeing Items
The furnace can also be utilized for dyeing items in Minecraft. Follow these steps to dye items using the furnace:
- Access the Furnace: Right-click on the furnace to open the furnace interface.
- Place the Item to be Dyed in the Top Slot: In the top slot of the furnace interface, place the item you want to dye. This can include leather armor, wool, or even glass panes.
- Add the Dye in the Bottom Slot: In the bottom slot of the furnace interface, place the dye of your choice. There are various dyes available in Minecraft, such as rose red, cactus green, and lapis lazuli.
- Monitor the Progress: As the furnace processes, the progress bar will fill up, indicating the remaining time for the dyeing process.
- Retrieve the Dyed Item: Once the progress bar is completely filled, the dyeing process is complete. The item you placed in the top slot will transform into the dyed version. Simply click and drag the dyed item to your inventory.
Dyeing items in Minecraft allows you to personalize and customize your armor, wool, and other decorative items. Different dyes create various colors, providing a vibrant and visually appealing aspect to your creations.
Experiment with different dyes to create stunning color combinations and express your creativity. Dyeing items adds a touch of personalization and style to your gameplay.
Now that you know how to use the furnace for dyeing items, let’s move on to learning how it can be used for crafting unique blocks.
Step 9: Making Minecraft Blocks
One of the lesser-known uses of the furnace is its ability to craft unique blocks in Minecraft. Follow these steps to make blocks using the furnace:
- Access the Furnace: Right-click on the furnace to open the furnace interface.
- Place the Crafting Material in the Top Slot: In the top slot of the furnace interface, place the crafting material needed to create the specific block. This can include sand for glass, clay for bricks, or smooth stone for stone bricks.
- Add the Fuel in the Bottom Slot: In the bottom slot of the furnace interface, place the fuel source, such as coal or charcoal, to power the crafting process.
- Monitor the Progress: As the furnace processes, the progress bar will fill up, indicating the remaining time for the crafting process.
- Retrieve the Crafted Block: Once the progress bar is completely filled, the crafting process is complete. The crafting material will transform into the desired block. Simply click and drag the crafted block to your inventory.
The furnace provides a convenient method for crafting certain blocks in Minecraft, allowing you to create unique structures and designs. Whether it’s turning sand into glass for windows, clay into bricks for building, or smooth stone into stone bricks for decorative purposes, the furnace opens up a world of possibilities.
Experiment with different materials and explore the various block crafting recipes to enhance your Minecraft world with custom blocks that suit your creative vision.
Now that you know how to use the furnace for crafting blocks, let’s move on to the final step, which involves upgrading the furnace to improve its functionality.
Step 10: Upgrading the Furnace
The furnace in its basic form is a valuable tool, but it can be upgraded to further improve its functionality. Follow these steps to upgrade your furnace:
- Craft a Better Furnace: To upgrade your furnace, you’ll need to craft a better version. There are two options available:
- Blast Furnace: The blast furnace is an upgraded furnace that allows for faster smelting times. To craft a blast furnace, you’ll need 3 smooth stone, 5 iron ingots, and 1 furnace. Arrange these materials in the crafting table to create a blast furnace.
- Smoker: The smoker is another upgraded furnace that specializes in cooking food items. To craft a smoker, you’ll need 4 logs and 1 furnace. Arrange these materials in the crafting table to create a smoker.
- Place the Upgraded Furnace: Once you have crafted the desired furnace upgrade, choose a suitable location and place it by right-clicking.
- Utilize the Enhanced Features: The upgraded furnace will offer specific benefits depending on the type. The blast furnace will provide faster smelting times for ores and smeltable items, while the smoker will offer faster cooking times for food items.
- Upgrade Further: If you wish to take your furnace upgrades to the next level, you can create an even more advanced version called the “Minecraft Forge.” This extensively upgraded furnace is made using 5 iron ingots, 6 stones, and 1 furnace. Once crafted, place it in a suitable location and benefit from its increased smelting speed and higher fuel efficiency.
By upgrading your furnace, you can significantly improve your crafting efficiency and save time while smelting ores or cooking food items. Consider the specific benefits of each upgraded furnace type and choose the one that best suits your needs.
Now that you have learned how to upgrade your furnace, you are equipped to maximize its potential and enhance your Minecraft gameplay experience.