
Materials Needed
Before you embark on your DIY smartphone projector project, gather the following materials:
- A shoebox – Choose a shoebox that is sturdy and large enough to accommodate your smartphone.
- A magnifying glass – Look for a magnifying glass with a large lens for optimal projection.
- Scissors – You’ll need a pair of scissors to cut through the cardboard.
- Black tape – Use black tape to secure various parts of the projector.
- A ruler – A ruler will come in handy for measuring and cutting precise lines.
- A marker – Use a marker to trace out cutting lines on the shoebox.
- A craft knife – A craft knife can be useful for making detailed cuts.
- A smartphone holder – Choose a smartphone holder that is compatible with your smartphone for stability.
- A glue gun – A glue gun will help you secure the magnifying glass and smartphone holder in place.
- A white sheet or screen – You’ll need a white surface to project the image onto.
These materials should be readily available at your local craft store or online. Once you have gathered all the necessary items, you are ready to move on to the next step and start building your own DIY smartphone projector.
Step 1: Preparing the Shoebox
The first step in building your DIY smartphone projector is to prepare the shoebox. Follow these instructions:
- Start by removing the lid from the shoebox, as you won’t be needing it for this project.
- Next, take the shoebox and cover any logos or designs on the outside with black tape to create a uniform surface.
- Using a ruler and a marker, measure and draw a rectangle on one of the shorter sides of the shoebox. This will serve as the projection window.
- Using a pair of scissors or a craft knife, carefully cut along the marked lines to create the projection window.
- Once the window is cut out, use black tape to cover any rough edges or exposed cardboard to give it a clean finish.
This step is crucial as it provides the foundation for your homemade projector. Ensure that the projection window is positioned correctly and that it is large enough to accommodate the size of your smartphone screen.
By following these instructions, you have successfully prepared the shoebox for the next steps in building your DIY smartphone projector.
Step 2: Cutting the Frame
After preparing the shoebox, the next step is to cut the frame that will hold the magnifying glass and smartphone holder. Follow these instructions:
- Measure and mark the dimensions of the magnifying glass on the longer side of the shoebox. Leave enough space around the magnifying glass for stability.
- Using a ruler and a marker, trace the outline of the magnifying glass onto the shoebox.
- Carefully cut along the marked lines to create a rectangular hole big enough to fit the magnifying glass.
- Now, measure and mark the dimensions of the smartphone holder below the magnifying glass frame.
- Using a ruler and a marker, trace the outline of the smartphone holder onto the shoebox.
- Carefully cut along the marked lines to create a slot for the smartphone holder to fit securely.
Ensure that the cuts are precise and clean to provide stability and support for the magnifying glass and smartphone. It is important to make the holes snug, so they hold the components firmly in place.
Once you have finished cutting the frame, you are now ready to move on to the next step: attaching the magnifying glass.
Step 3: Attaching the Magnifying Glass
Now that you have cut the frame for the magnifying glass, it’s time to attach it to the shoebox. Follow these instructions:
- Apply a small amount of hot glue or adhesive to the back of the magnifying glass.
- Carefully place the magnifying glass over the cutout frame and press it firmly against the shoebox.
- Hold it in place for a few seconds to allow the glue to set and secure the magnifying glass.
Ensure that the magnifying glass is aligned properly with the cutout frame and positioned at the correct distance from the projection window. This will ensure that the projected image is clear and focused.
Attaching the magnifying glass is a critical step in the construction of your DIY smartphone projector. Take your time and be gentle to avoid damaging the components.
With the magnifying glass securely attached, you are now ready to move on to the next step: securing the smartphone holder.
Step 4: Securing the Smartphone Holder
With the magnifying glass in place, the next step is to secure the smartphone holder. Follow these instructions:
- Slide your smartphone holder into the slot you created in the shoebox.
- Ensure that the holder is snug and fits securely in the slot.
- If necessary, use hot glue or adhesive to secure the edges of the smartphone holder to the shoebox for added stability.
It’s important to position the smartphone holder in a way that allows the phone’s screen to align with the projection window and the magnifying glass. This will ensure that the image is properly projected and focused.
Make sure the smartphone holder is stable enough to hold your phone securely without any risk of it slipping or falling during use.
By following these instructions, you have successfully secured the smartphone holder in your DIY smartphone projector.
Now that the smartphone holder is in place, you are ready to move on to the next step: assembling the projector.
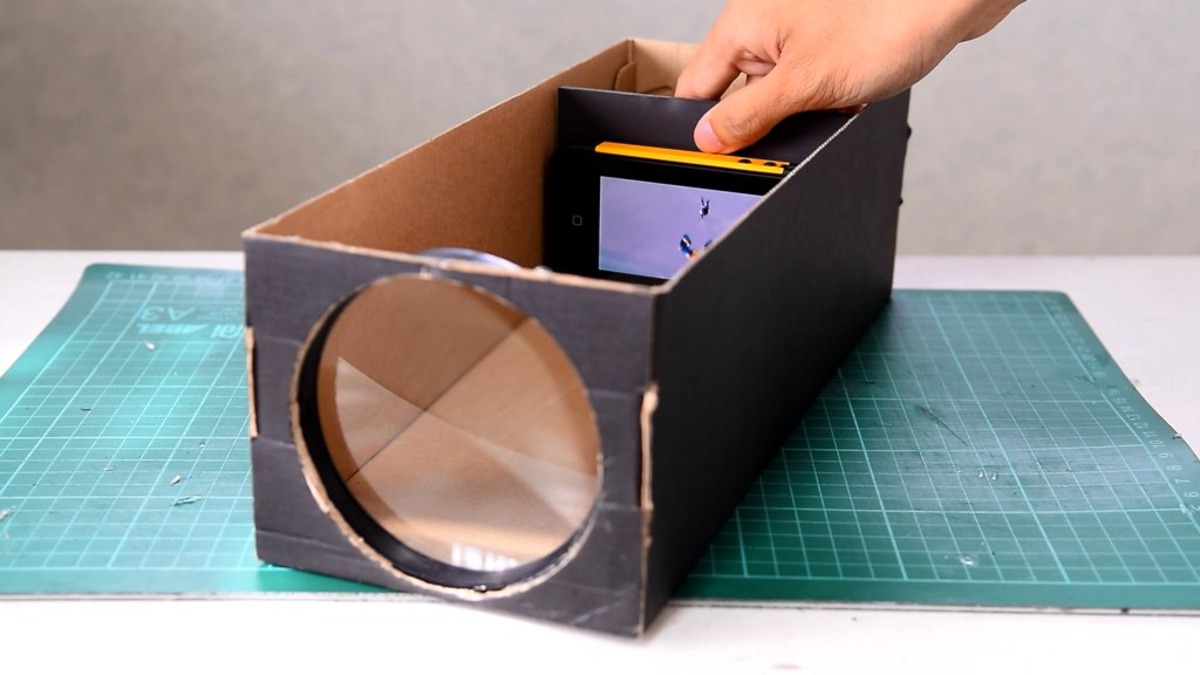
Step 5: Assembling the Projector
Now that you have attached the magnifying glass and secured the smartphone holder, it’s time to assemble the projector. Follow these instructions:
- Position the shoebox with the projection window facing forward.
- Place your smartphone inside the holder, ensuring that the screen is facing towards the magnifying glass.
- Adjust the position of the smartphone, if needed, to ensure that the entire screen is visible through the projection window.
- If your smartphone has a flashlight feature, turn it on and position the flashlight towards the back of the phone, facing the projection window. This will provide additional brightness for a clearer projection.
- If desired, you can use black tape or adhesive to secure the smartphone in place to prevent any movement or slipping during use.
Once you have followed these steps, your DIY smartphone projector is fully assembled and ready to be used. Make sure all the components are securely in place before moving on to the next step.
Now that the projector is assembled, let’s move on to the next step: adjusting the focus.
Step 6: Adjusting the Focus
Adjusting the focus of your DIY smartphone projector is crucial to ensure a clear and sharp projection. Follow these instructions:
- Start by turning off the lights in the room or moving to a dimly lit area. This will enhance the visibility of the projection.
- Position the projector at an appropriate distance from the projection surface, such as a white sheet or a blank wall.
- To adjust the focus, move the smartphone holder closer or farther from the projection window while keeping the image centered and in focus.
- Experiment with different distances and angles until you achieve a clear and well-defined projection. Take your time during this process to ensure the best possible result.
- Once you are satisfied with the focus, you can fine-tune the image quality by adjusting the brightness and contrast settings on your smartphone.
Remember to take into consideration any environmental factors like ambient lighting and the position of the projector, as they can affect the quality of the projection.
By following these instructions and making necessary adjustments, you can achieve an optimal projection with clear focus and image quality.
Now that you have adjusted the focus, it’s time to move on to the next step: testing the projector.
Step 7: Testing the Projector
Now that your DIY smartphone projector is assembled and the focus is adjusted, it’s time to test it out and see how well it works. Follow these instructions:
- Ensure that the projector is set up in a dark or dimly lit room to optimize the visibility of the projection.
- Turn on your smartphone and open any media or content that you would like to project.
- Position the smartphone in the holder, aligning it with the projection window and the magnifying glass.
- Turn on the flashlight feature on your smartphone, if available, to enhance the brightness of the projection.
- With the lights off, align the projector with the projection surface and adjust the distance and angle until you achieve a clear and well-focused image.
- Play your desired media or content on your smartphone and observe the projected image on the surface. Make any necessary adjustments to improve the quality and visibility of the projection.
During the testing phase, you may want to experiment with different media, angles, and distances to find the best configuration for optimal projection quality.
Remember to consider the surrounding environment and adjust the settings on your smartphone, such as brightness and volume, for the best viewing experience.
By following these instructions and testing the projector, you can ensure that your DIY smartphone projector is functioning properly and delivering the desired projection results.
Now that you have tested the projector, let’s move on to the next step: enhancing the sound.
Step 8: Enhancing the Sound
While your DIY smartphone projector focuses on delivering a visual experience, you can complement it by enhancing the audio quality. Follow these instructions to enhance the sound:
- If your smartphone has front-facing speakers, position the projector in a way that directs the sound towards the audience.
- Consider connecting external speakers or a Bluetooth audio device to your smartphone for a more immersive sound experience.
- Adjust the volume settings on your smartphone to ensure a balanced and clear sound projection.
- If needed, use audio cables or adapters to connect your smartphone to a larger sound system for a more powerful audio output.
- Experiment with different audio settings on your smartphone or any connected audio devices to find the best sound quality for your projected media.
By enhancing the sound of your DIY smartphone projector, you can create a more immersive and enjoyable viewing experience.
Keep in mind that the sound quality of your projection will depend on the capabilities of your smartphone and the external audio devices you choose to incorporate.
Now that you have enhanced the sound, let’s move on to the next step: tips for better projection.
Step 9: Tips for Better Projection
To optimize the projection quality of your DIY smartphone projector, consider the following tips:
- Use a white or light-colored surface as your projection screen. This will provide a clearer and brighter image compared to using a colored or textured surface.
- Ensure that the projection surface is clean and free from any dust or smudges that could affect the image quality.
- Minimize ambient light in the room to prevent any interference with the projected image. Drawing curtains or blinds can help darken the room and enhance the visibility of the projection.
- Adjust the brightness and contrast settings on your smartphone to enhance the clarity and vibrancy of the projected content.
- Consider using a tripod or a stable surface to mount your DIY smartphone projector. This will ensure a steady projection and minimize any shaking or movement that could distort the image.
- Regularly clean the lens of the magnifying glass to remove any smudges or fingerprints that could affect the clarity of the projection.
- Experiment with different media formats and content types to explore the full potential of your DIY smartphone projector.
- Keep your smartphone fully charged or connected to a power source during projection to avoid any interruptions due to battery drain.
- Consider using a wireless screen mirroring feature or a streaming device to project media from your smartphone to your DIY projector wirelessly.
By following these tips, you can enhance the overall projection quality and ensure a more enjoyable viewing experience with your DIY smartphone projector.
Now that you have learned these tips, let’s move on to the final step: enjoying your DIY smartphone projector to the fullest!
Step 10: Enjoying Your DIY Smartphone Projector
Congratulations on successfully building your own DIY smartphone projector! Now it’s time to sit back, relax, and enjoy the fruits of your labor. Here are some ways to make the most out of your DIY creation:
- Host a movie night with friends or family and project your favorite films or TV shows on a larger screen. Create a cozy atmosphere with blankets, pillows, and snacks for a true cinematic experience.
- Use your DIY projector for presentations or slideshows during business meetings or educational purposes. It can add a professional touch and make your content more engaging.
- Take your DIY projector outdoors for a movie night under the stars. Set up a white sheet or portable screen, invite friends over, and enjoy movies, documentaries, or even live sports events in an open-air setting.
- Explore creative avenues by projecting artwork, photography, or digital designs onto a larger surface. This can be an interactive way to showcase your work or inspire your artistic endeavors.
- Create a mini home theater setup in your bedroom or living room using your DIY projector. Add comfortable seating, surround sound speakers, and adjustable lighting to create an immersive entertainment space.
- Experiment with different apps and games on your smartphone to play on the larger projected screen. From interactive games to virtual reality experiences, the possibilities are endless.
Remember to regularly maintain and clean your DIY projector to ensure optimal performance and longevity. Safely store it in a dry and dust-free area when not in use.
By enjoying and exploring the possibilities with your DIY smartphone projector, you can make the most out of your creation and have endless hours of entertainment and creativity ahead.
Now, go ahead and share the excitement with others as you embark on your DIY projector adventures!