
Setting up a Discord bot account
If you’re looking to create a Discord bot, the first step is setting up a Discord bot account. Follow these simple steps to get started:
- Go to the Discord Developer Portal (https://discord.com/developers) and login with your Discord account.
- Create a new application by clicking on the “New Application” button. Give your application a name and click “Create”.
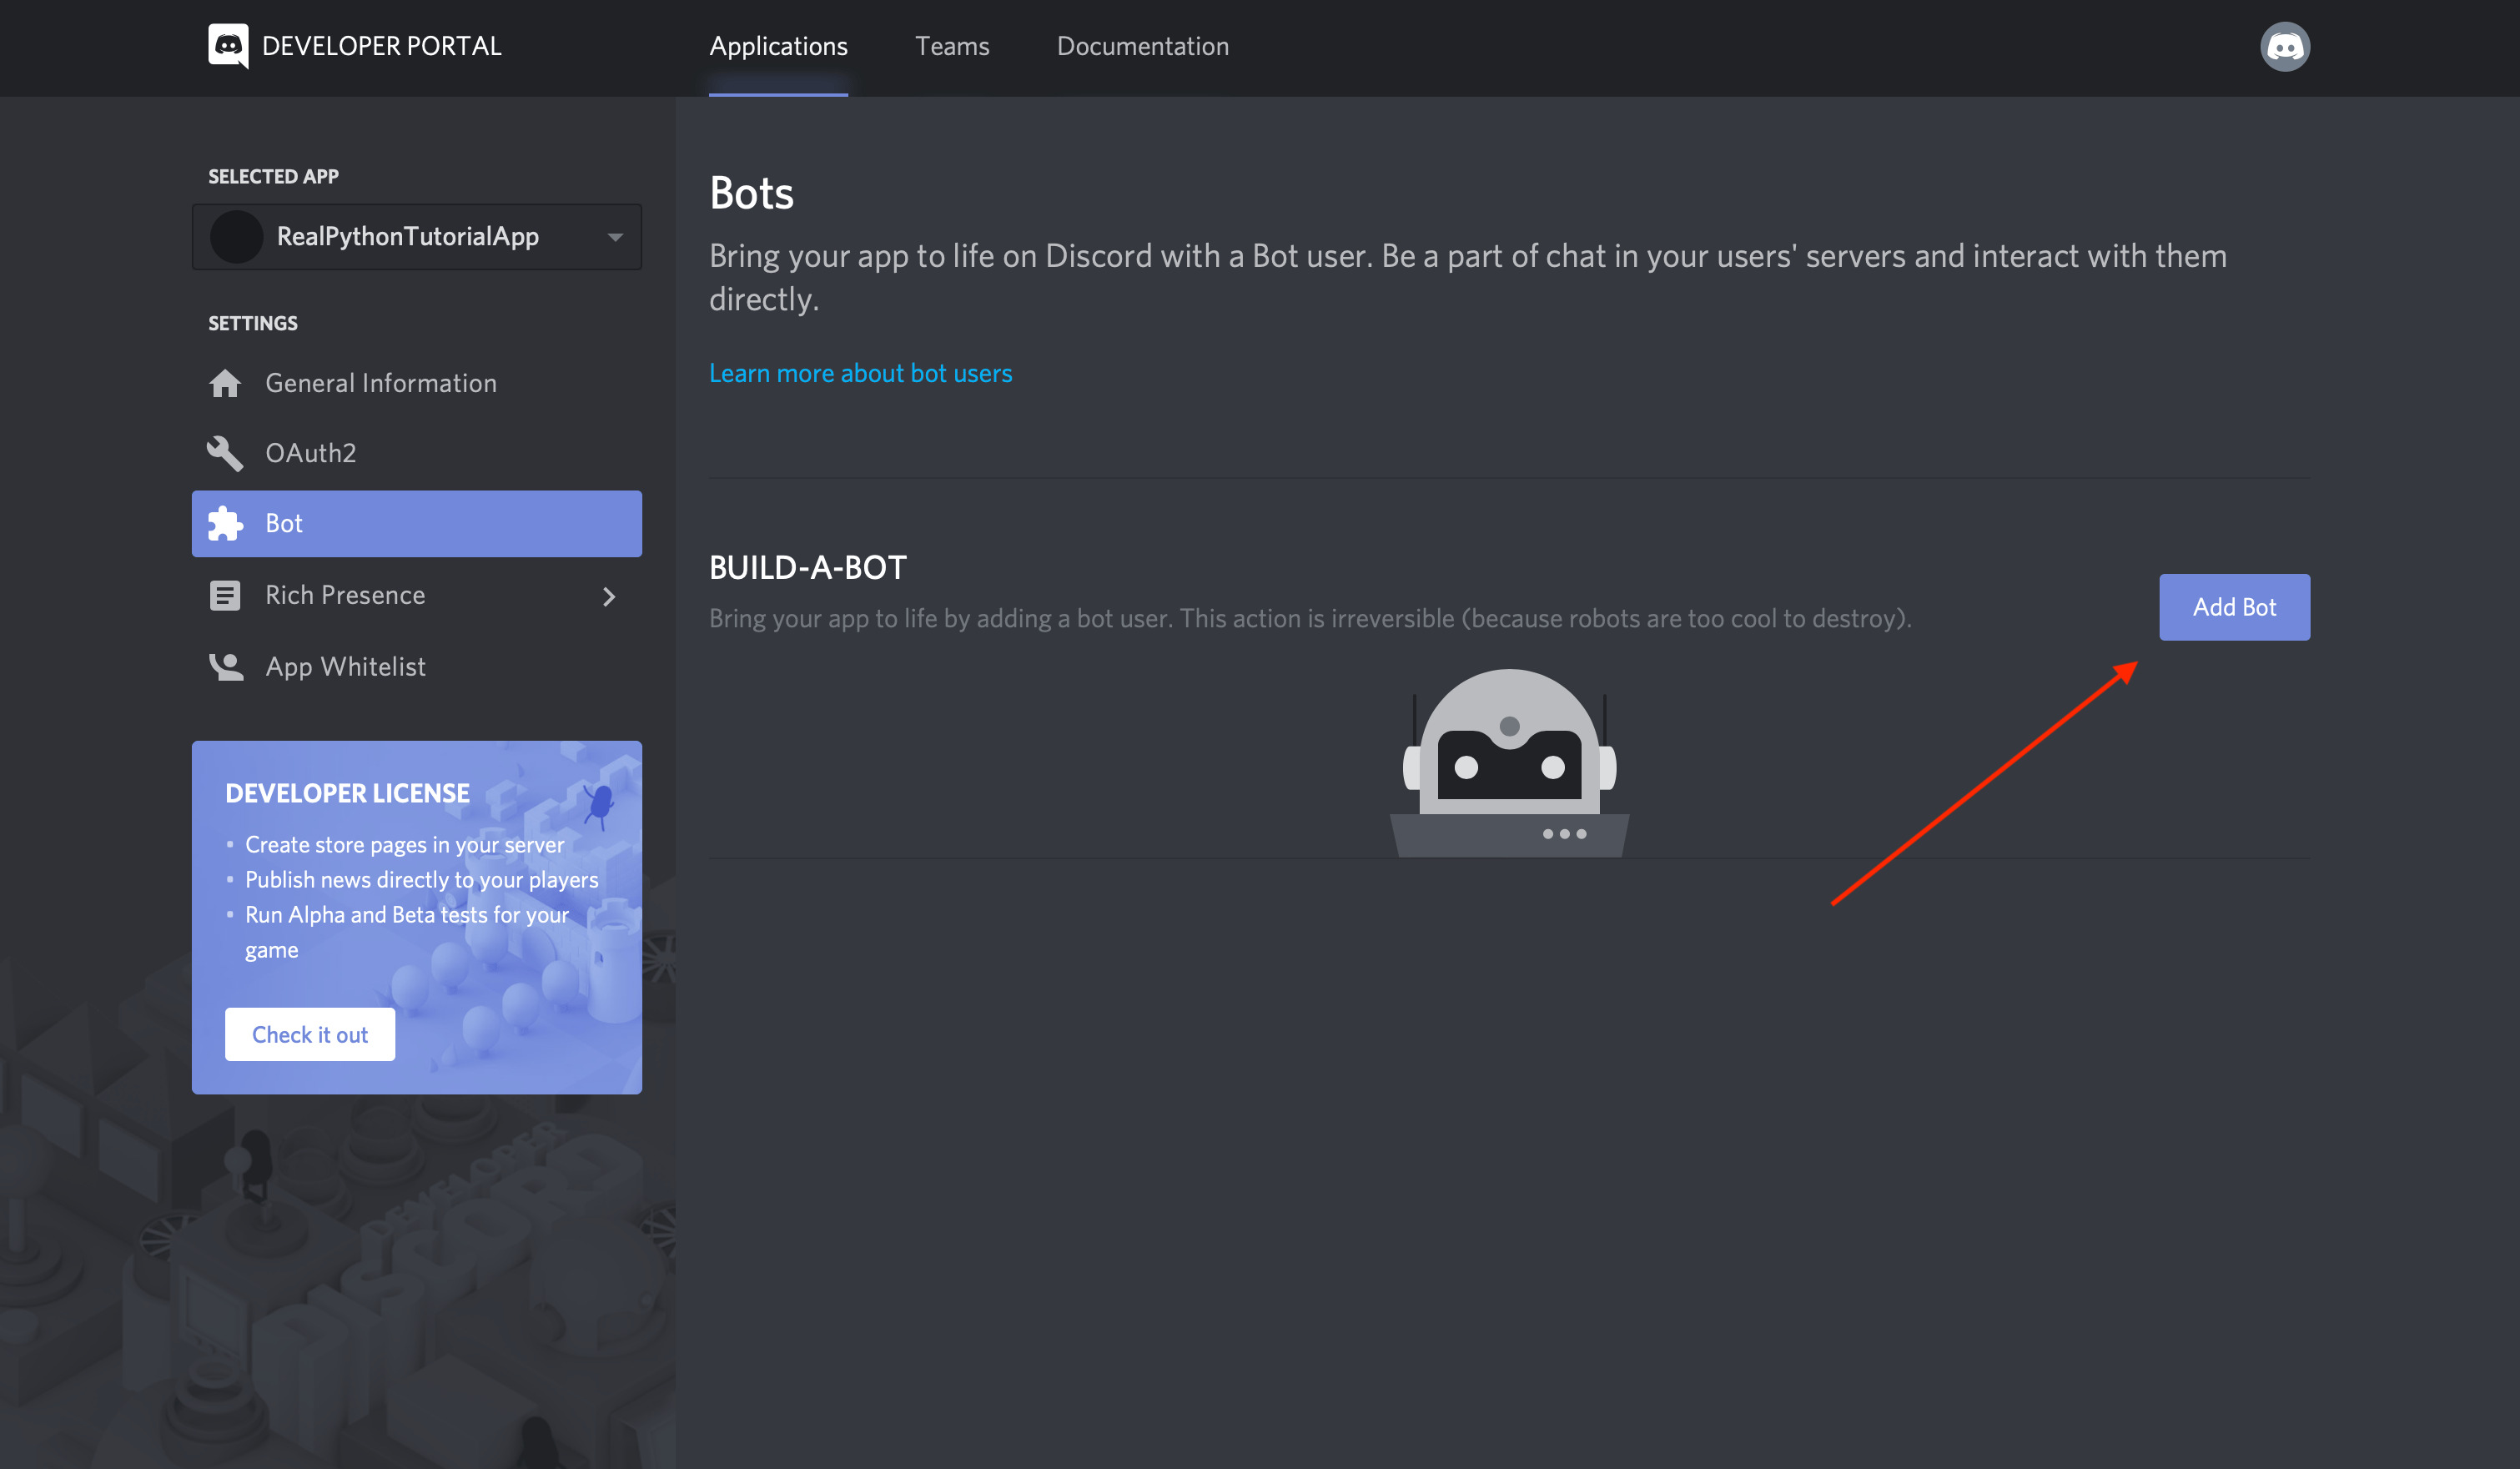
- After creating the application, navigate to the “Bot” tab on the left-hand side and click “Add Bot”. Confirm the action by clicking “Yes, do it!”
- Here, you can customize your bot’s username and avatar. You can also toggle options like “Public Bot” or “Require OAuth2 Code Grant”.
- Under the “Token” section, you’ll find your bot’s unique token. This token is crucial for authentication, so make sure to keep it safe and never share it with anyone.
- You can now invite your bot to your Discord server by generating an invite link. Scroll up to the “OAuth2” tab, select the required scopes and permissions for your bot, and copy the generated invite link.
- Paste the invite link into your web browser and select the server where you want to add your bot. Follow the prompts to complete the installation process.
Setting up a Discord bot account is the first step towards creating a functional and interactive bot. Make sure to keep your bot token secure and follow the Discord guidelines to ensure a smooth experience for yourself and your users.
Installing Node.js and Discord.js
Before you can start building your Discord bot, you need to have Node.js and the Discord.js library installed on your computer. Here’s how you can do it:
- First, download and install Node.js from the official website (https://nodejs.org/). Choose the appropriate version for your operating system and follow the installation instructions.
- Once Node.js is installed, open your terminal or command prompt and run the command
node -vto verify that Node.js is installed correctly. You should see the version number displayed. - To install Discord.js, you need to navigate to your project directory in the terminal or command prompt. Use the
cdcommand to change directories. - Once you’re in the correct directory, run the command
npm install discord.js. This will download the Discord.js library and all its dependencies. - After the installation is complete, you can verify that Discord.js is installed correctly by running the command
node -e "console.log(require('discord.js'))". If you don’t see any errors, then Discord.js is ready to be used in your project.
Installing Node.js and Discord.js is an important step in the process of building your Discord bot. Node.js provides the runtime environment, while Discord.js is the library that allows you to interact with the Discord API. Take the time to ensure that both are installed correctly before moving on to the next steps.
Creating a new Discord bot project
Now that you have your Discord bot account set up and Node.js installed, it’s time to create a new Discord bot project. Follow these steps to get started:
- Open your preferred code editor and create a new folder for your bot project. Give it a descriptive name that reflects the purpose of the bot.
- In the project folder, create a new JavaScript file. You can name it
index.jsor any other name you prefer. - Open the
index.jsfile in your code editor and begin by requiring the Discord.js library at the top of the file:const Discord = require('discord.js'); - Create a new instance of the Discord.Client class:
const client = new Discord.Client(); - Next, add an event listener to handle the bot’s readiness:
- Now, use the bot token obtained from the Discord Developer Portal to log in to the bot account:
- Save the
index.jsfile and return to your terminal or command prompt. Navigate to your project directory and run the commandnode index.jsto start your bot.
client.on('ready', () => {
    console.log('Bot is ready!');
});const token = 'YOUR_BOT_TOKEN';
client.login(token);By creating a new Discord bot project, you are laying the foundation for the bot’s functionality. Remember to replace 'YOUR_BOT_TOKEN' with the actual token you obtained earlier. At this point, your bot should be logged in and ready to respond to events and commands.
Adding your bot to a server
Once you have your Discord bot created and the code set up, the next step is to add your bot to a server. Follow these steps to invite your bot to a server:
- Make sure you are logged in to the Discord website and that you have the necessary permissions to add bots to servers.
- Go to the Discord Developer Portal (https://discord.com/developers) and select your bot application.
- In the left-hand navigation panel, click on “OAuth2”.
- Under the “Scopes” section, select “bot” to indicate that you want to add a bot to a server.
- Scroll down and select the necessary permissions your bot will require. Keep in mind that different permissions allow your bot to perform different actions within the server.
- Once you have selected the desired permissions, the “Scopes” section will generate an invite link for your bot.
- Click on the generated invite link and select the server where you want to add your bot. Make sure you have the necessary permissions in that server to add bots.
- Follow the prompts to complete the bot invitation process.
After successfully adding your bot to a server, it will appear in the member list. Make sure that your bot has the necessary permissions to perform its intended functions within that server. You can always modify the permissions or remove the bot from the server if needed. Now, your bot is ready to start interacting with users and responding to commands in the server where it has been added.
Setting up bot command prefixes
When building a Discord bot, it’s important to set up command prefixes to distinguish bot commands from regular chat messages. Here’s how you can set up bot command prefixes:
- In your Discord bot project, create a new variable to store your desired command prefix. For example, you can use
const prefix = '!';to set the prefix as an exclamation mark (!). - Next, add an event listener to listen for the ‘message’ event. This event is triggered whenever a message is sent in a server where your bot is present.
- In the callback function of the ‘message’ event, check if the message content starts with your bot command prefix:
- You can then use conditional statements or a switch case to handle different commands based on the extracted command string. For example:
- Inside each command block, you can include the necessary logic to perform the desired action, such as sending a message, fetching data, or executing a specific function.
client.on('message', (message) => {
  // Your code here
});if (message.content.startsWith(prefix)) {
// Extract the command from the message content
const command = message.content.slice(prefix.length).trim();
// Your code here
}if (command === 'ping') {
// Handle the 'ping' command
} else if (command === 'help') {
// Handle the 'help' command
} else {
// Handle unknown commands
}Setting up bot command prefixes is essential to ensure that your bot recognizes and responds to specific commands. Customize the command prefix according to your preference while making sure it doesn’t conflict with other bot or server prefixes. With the command prefix in place, your bot will be ready to receive and handle commands from users within the Discord server.
Creating basic bot commands
One of the fundamental aspects of building a Discord bot is creating basic commands that the bot can recognize and respond to. Let’s dive into how you can create these commands:
- Inside the callback function of the ‘message’ event listener in your bot project, you can add conditional statements or switch cases to check for specific commands.
- To create a basic command, you can use an if statement that checks if the command string matches a specific keyword. For example:
- In the above example, when a user sends a message starting with the command prefix followed by “ping”, the bot will send a reply of “Pong!” to the channel where the command was invoked.
- You can create as many basic commands as you like, each with its own unique keyword and corresponding action. For example:
- Remember to consider the permissions and context of the message when designing your bot commands. For example, you may want to restrict certain commands to certain users or roles.
- Test your bot commands in a Discord server where your bot is added to ensure they are functioning as intended.
if (command === 'ping') {
    message.channel.send('Pong!');
}if (command === 'hello') {
message.channel.send('Hello, there!');
} else if (command === 'help') {
message.channel.send('Here are the available commands: ...');
} else {
message.channel.send('Unknown command. Type "!help" for a list of commands.');
}By creating basic bot commands, you can start making your bot interactive and responsive to user actions. Feel free to add more commands and customize the actions according to your specific requirements. Keep in mind that error handling and user input validation are important aspects to consider for a smoother user experience with bot commands.
Adding functionality with event listeners
Event listeners are crucial for adding functionality to your Discord bot beyond simple command responses. They allow your bot to react to various events that occur within the Discord server. Here’s how you can use event listeners to enhance your bot’s capabilities:
- Start by identifying the events you want your bot to listen and respond to. Examples of common events include ‘message’, ‘guildMemberAdd’, ‘guildMemberRemove’, and ‘channelCreate’.
- In your Discord bot project, add event listeners using the ‘on’ method provided by the Discord.Client class. Here’s an example:
- In the callback function of the event listener, you can add logic and actions based on the event. For instance, when a new message is received, you can check if it contains certain keywords and respond accordingly.
- Here’s an example of an event listener that responds to a user joining the server:
- In this case, when a new member joins the server, the bot will find the ‘welcome’ channel and send a welcoming message mentioning the new member.
- Consider using event listeners to handle other events such as presence updates, message edits, user banning, etc. This allows you to create dynamic and interactive behaviors for your bot.
- Remember to test your event listeners in different scenarios to ensure they function as intended.
client.on('message', (message) => {
  // Your code here
});client.on('guildMemberAdd', (member) => {
const welcomeChannel = member.guild.channels.cache.find(channel => channel.name === 'welcome');
welcomeChannel.send(`Welcome to the server, ${member}!`);
});By adding functionality with event listeners, you can create dynamic and interactive experiences with your Discord bot. Experiment with different events and explore the various properties and methods available in the Discord.js library to extend your bot’s capabilities and provide a more engaging experience for users within the server.
Handling user interactions with arguments
As your Discord bot becomes more complex, you may encounter scenarios where users need to provide arguments along with their commands. Handling user interactions with arguments allows your bot to process and utilize the provided information effectively. Here’s how you can handle user interactions with arguments:
- In your bot project, when processing a command, check if there are any arguments included in the user’s message. Arguments are typically additional pieces of information provided by the user after the command keyword.
- To extract the arguments from the user’s message, you can use string manipulation methods or regular expressions. For example, you can split the message content using spaces to separate the command and its arguments:
- In the above example, the
argsarray will contain all the arguments provided by the user, while thecommandvariable will store the actual command keyword. - Once you have the arguments, you can process them accordingly. This might involve validating the arguments, converting them to the appropriate data types, or using conditional statements to handle different argument combinations.
- Here’s an example of a command that takes in a single argument:
- In this case, if a user sends
!say Hello, world!, the bot will extract the argumentHello, world!and send it back to the channel. - Consider handling different argument scenarios, such as optional arguments, multiple arguments, or arguments with specific formats. Regular expressions can be helpful for validating and extracting complex argument patterns.
- Ensure that your bot handles invalid or missing arguments gracefully by providing appropriate error messages or instructions to the user.
const args = message.content.slice(prefix.length).trim().split(' ');
const command = args.shift().toLowerCase();if (command === 'say') {
const messageToSay = args.join(' ');
message.channel.send(messageToSay);
}By effectively handling user interactions with arguments, your Discord bot can process and utilize the provided information to deliver tailored responses or perform specific actions. Experiment with different argument patterns and scenarios to enhance the functionality and versatility of your bot.
Advanced bot command features
Building upon the basic command structure, you can incorporate advanced features into your Discord bot commands to create a more dynamic and interactive experience for users. Here are some advanced bot command features you can implement:
- Command Permissions: Assign different permission levels to your bot commands to control who can use them. You can restrict certain commands to server administrators or specific roles.
- Cooldowns: Implement cooldowns on commands to prevent abuse or spam. This ensures that users can only use a command after a certain amount of time has passed since their last usage.
- Embeds: Use Discord.js’s rich embed feature to display information in a visually appealing and structured manner. Embeds allow you to include images, buttons, and styled text in your bot’s responses.
- Argument Validation: Validate user-provided arguments to ensure they meet specific criteria, such as numeric values, specific formats, or length constraints. Proper validation helps prevent errors and ensures accurate command execution.
- Database Integration: Integrate a database system, such as MongoDB or SQLite, to store and retrieve data relevant to your bot. This can include saved preferences, user profiles, or server-specific settings.
- Error Handling: Implement robust error handling to catch and handle exceptions in your code. Display meaningful error messages to users to assist them in troubleshooting issues.
- Interactive Prompts: Create commands that engage users in a conversation-like interaction. For example, you can ask users for input or confirmation before executing a specific action.
- Command Help: Design a command to display helpful information about your bot’s commands. This can include a list of available commands, their functionality, and usage instructions.
- Command Aliases: Allow users to invoke commands using different aliases or shortcuts. This provides flexibility and makes it easier for users to interact with your bot based on their preferences.
- External APIs: Integrate external APIs to fetch and display live data in response to certain commands. This can include weather information, stock prices, or game statistics.
Implementing these advanced features can significantly enhance the functionality and user experience of your Discord bot. However, remember to strike a balance and ensure that the added complexity does not compromise the bot’s performance or usability. Regular testing and gathering user feedback can help you refine and improve your bot’s advanced command features.
Hosting your Discord bot
Once you have developed your Discord bot, you will need to host it in order to keep it running and accessible to users. Here are some hosting options to consider:
- Self-Hosting: You can host your Discord bot on your own server or computer. You need to ensure that your machine is always connected to the internet and running the bot script. Keep in mind that self-hosting requires technical knowledge, server management skills, and may be limited by your network infrastructure.
- Cloud Hosting: Cloud platforms such as Amazon Web Services (AWS), Google Cloud Platform (GCP), or Microsoft Azure provide reliable and scalable hosting solutions. You can deploy your bot script on a virtual machine or container in the cloud to ensure high availability and performance. Cloud hosting offers flexibility, automatic scaling, and convenient management options.
- Dedicated Hosting: Dedicated hosting providers offer specialized servers designed for hosting applications. With dedicated hosting, you have full control over the server resources and can optimize the environment specifically for your bot.
- PaaS (Platform as a Service): PaaS providers, such as Heroku or Glitch, offer managed hosting platforms specifically designed for deploying and running applications, including Discord bots. These platforms often provide easy deployment, automatic scaling, and simplified management.
When choosing a hosting option, consider factors such as scalability, reliability, security, server management capabilities, and cost. Ensure that the hosting environment meets the requirements of your bot, including the necessary libraries, dependencies, and runtime environment.
Once your bot is hosted, make sure to keep it up to date with the latest security patches, library updates, and feature enhancements. Regularly monitor the bot’s performance, logs, and user feedback to identify and fix any issues that may arise.
Remember to follow Discord’s bot development guidelines and adhere to their terms of service when hosting your bot. Additionally, be responsive to user inquiries, feedback, and bug reports to maintain a positive user experience and continuously improve your bot.
Additional resources and tips
Building and maintaining a Discord bot can be a rewarding experience. Here are some additional resources and tips to help you along the way:
- Discord.js Documentation: Consult the official Discord.js documentation (https://discord.js.org/) for detailed guides, examples, and API references. It provides valuable information on working with the Discord API and utilizing the features of the library.
- Community Support: Join online communities, such as Discord developer forums, subreddits, and Discord servers dedicated to bot development. Engaging with the community can provide you with valuable insights, troubleshooting help, and opportunities to collaborate with other bot developers.
- Version Control: Utilize version control systems like Git to track and manage changes to your bot’s codebase. This helps you maintain a history of modifications, collaborate with others, and easily revert changes if needed.
- Error Logging and Monitoring: Implement error logging and monitoring mechanisms to capture and track any errors that occur within your bot. Tools like Sentry or Rollbar can help you identify and fix issues quickly.
- Testing: Regularly test your bot commands and features in different server environments to ensure they function as expected. Create test cases and simulate user interactions to cover various scenarios.
- Optimization: Optimize your bot’s code to ensure it performs efficiently. Use best practices, such as reducing unnecessary API calls, handling bulk operations, and implementing caching mechanisms when appropriate.
- User Experience: Ensure that your bot provides clear and helpful responses to user interactions. Craft error messages, usage instructions, and help prompts to guide users and enhance their experience.
- Keep Learning: Stay updated with the latest Discord platform updates, library releases, and bot development trends. Continuously seek opportunities to expand your knowledge and improve your coding skills.
Remember, building a successful Discord bot takes time, practice, and continuous improvement. Be creative, explore different features, and don’t be afraid to experiment. With dedication and persistence, your Discord bot can become a valuable addition to any Discord community.