
Why Lock Notes on iPhone?
Keeping personal and sensitive information secure is crucial in today’s digital age. Apple understands the importance of privacy and has provided users with a built-in feature to lock their notes on iPhone. But why should you use this feature? Let’s explore the reasons below.
1. Protecting sensitive information: Your iPhone can contain a plethora of personal and confidential details, such as passwords, financial information, social security numbers, or ideas for your next big project. Locking your notes ensures that this information remains hidden from prying eyes, even if your device falls into the wrong hands.
2. Adding an extra layer of security: While your iPhone may already require a passcode or biometric authentication to unlock, enabling the Notes lock feature offers an additional line of defense specifically for your notes. This protects your confidential information from unauthorized access, even if someone gains access to your unlocked phone.
3. Peace of mind: By enabling the Notes lock feature, you can have peace of mind knowing that your private thoughts, ideas, and sensitive information are safe. This allows you to use the Notes app to its full potential without worrying about the security of your data.
4. Preventing accidental disclosure: We all have moments of forgetfulness or may accidentally leave our devices unattended. By locking your notes, you minimize the risk of accidentally sharing or exposing sensitive information when someone else accesses your device.
5. Enhanced confidentiality: Whether you are a student, professional, or entrepreneur, the ability to lock notes adds an extra layer of confidentiality to your work. You can keep your business plans, meeting notes, or research securely within your iPhone, ensuring that only authorized individuals can access them.
Securing your notes on iPhone is essential for maintaining your privacy and protecting sensitive information. By utilizing the built-in lock feature, you can have peace of mind knowing that your personal thoughts and confidential data are safe from prying eyes.
How to Enable Notes Lock Feature?
If you want to protect your notes on iPhone, one of the most important steps is enabling the Notes lock feature. This ensures that your confidential information remains secure. Here’s how you can enable it:
1. Open the Settings app: Tap on the Settings app icon on your iPhone’s home screen to open it.
2. Scroll down and tap on “Notes”: In the Settings menu, scroll down until you locate the “Notes” option. Tap on it to access the Notes settings.
3. Tap on “Password” or “Face ID & Passcode”: Depending on your iPhone model and iOS version, you might see either “Password” or “Face ID & Passcode” under the Notes settings. Tap on the appropriate option.
4. Set a password: If you tapped on “Password,” you will be prompted to set a password for your notes. Enter a secure and memorable password that you will easily remember. You can also toggle on the option to use the password with Touch ID or Face ID for added convenience.
5. Enable “Use Password” or “Use Face ID/Touch ID”: If you chose “Face ID & Passcode,” you will need to enable the “Use Face ID” or “Use Touch ID” toggle switch. This allows you to unlock your locked notes using your face or fingerprint.
6. Verify your password or biometrics: Once you’ve set a password or enabled Face ID/Touch ID, the system will ask you to verify it to ensure accuracy. Follow the on-screen instructions to complete the verification process.
7. Lock individual notes: After setting up the Notes lock feature, you can now lock specific notes by opening the Notes app, selecting the note you wish to lock, tapping on the share icon, and selecting “Lock Note” from the options. You will be required to enter your password or authenticate using biometrics to lock the note.
By following these simple steps, you can enable the Notes lock feature on your iPhone and start safeguarding your sensitive information and personal thoughts with ease.
Setting a Password for Notes
If you want to secure your notes on iPhone, setting a password is a crucial step in safeguarding your sensitive information. The Notes app offers a password feature that allows you to lock your notes with a unique password. Here’s how you can set a password for your notes:
1. Open the Notes app: Locate and tap on the Notes app icon on your iPhone’s home screen to launch it.
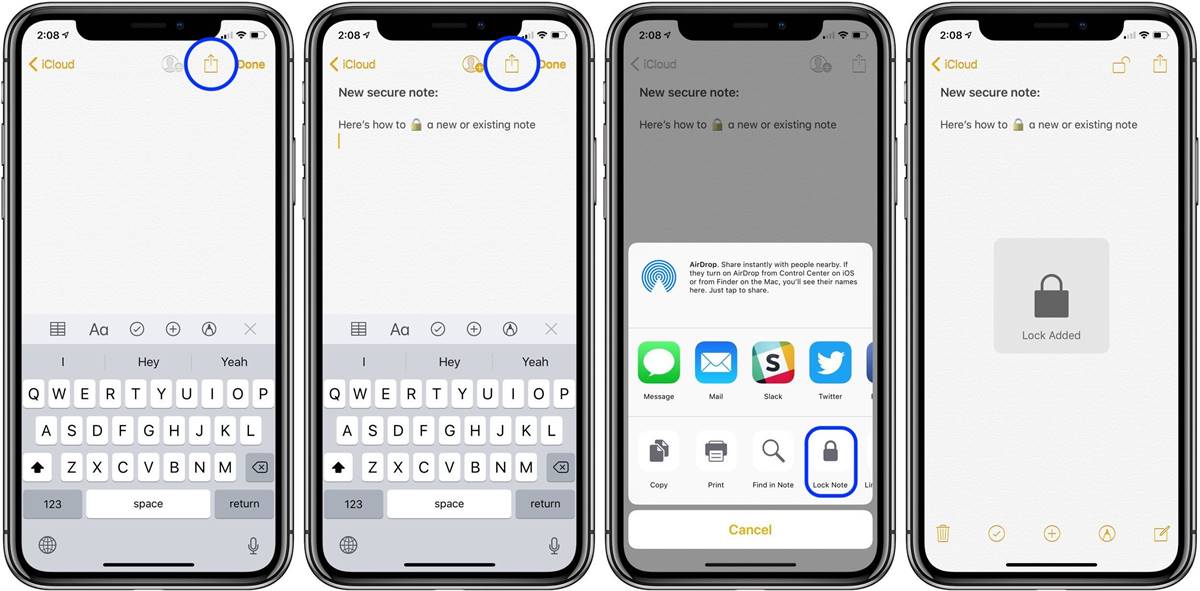
2. Create a new note or select an existing one: You can either create a new note by tapping the “+” symbol or select an existing note that you want to lock with a password.
3. Tap on the share icon: At the top-right corner of the note, you will see a share icon. Tap on this icon to open the sharing options.
4. Select “Lock Note”: From the sharing options, scroll down and tap on “Lock Note.” This will immediately prompt you to set a password for the note.
5. Enter a password: Enter a strong, unique password that you will remember. It is recommended to use a combination of letters, numbers, and special characters to enhance the security of your password.
6. Verify your password: The system will ask you to re-enter the password to ensure accuracy. Carefully enter the same password again to verify it.
7. Add a password hint (optional): You have the option to add a password hint that can help jog your memory if you forget your password. However, make sure the hint is not too obvious or easily guessable.
8. Confirm the password: Once you’ve entered the password and added a hint (if desired), tap on “Done” to confirm and set the password for the note. From now on, the note will be locked, and you will need to enter the password to access its contents.
Setting a password for your notes adds an extra layer of security, ensuring that only authorized individuals can view the locked content. Remember to choose a strong password and avoid sharing it with others to maintain the confidentiality of your notes.
Using Touch ID/Face ID to Lock Notes
If your iPhone is equipped with Touch ID or Face ID technology, you can take advantage of these convenient and secure authentication methods to lock your notes. With Touch ID/Face ID, you can quickly and easily access your locked notes using your fingerprint or facial recognition. Here’s how you can use Touch ID/Face ID to lock notes on your iPhone:
1. Ensure Touch ID/Face ID is set up: Before you can use Touch ID or Face ID to lock your notes, make sure you have set up these features on your iPhone. You can do this by going to the “Settings” app, selecting “Touch ID & Passcode” or “Face ID & Passcode,” and following the prompts to enroll your fingerprint or set up facial recognition.
2. Open the Notes app: Locate the Notes app on your iPhone’s home screen and tap on it to open the app.
3. Create a new note or select an existing one: You have the option to create a new note by tapping the “+” symbol or select an existing note that you want to lock with Touch ID/Face ID.
4. Tap on the share icon: At the top-right corner of the note, tap on the share icon to access the sharing options.
5. Select “Lock Note”: From the sharing options, scroll down and tap on “Lock Note.” If Touch ID/Face ID is available and set up on your device, you will see the option to use Touch ID or Face ID to unlock the note.
6. Authenticate with Touch ID or Face ID: When prompted, place your finger on the Touch ID sensor or let your device scan your face for Face ID. This will verify your identity and unlock the note, allowing you to view and edit its contents.
7. Repeat the process for other notes: If you want to lock additional notes using Touch ID/Face ID, simply repeat the steps above for each note you want to secure.
Using Touch ID/Face ID to lock notes offers a convenient and secure way to protect your sensitive information. It eliminates the need to remember and enter a password manually, making it easy to access your locked notes while ensuring privacy and security.
Locking Individual Notes
The Notes app on your iPhone allows you to lock individual notes for an added layer of privacy and security. This feature allows you to selectively protect specific notes that contain sensitive information. Here’s how you can lock individual notes:
1. Open the Notes app: Locate and tap on the Notes app icon on your iPhone’s home screen to open it.
2. Create a new note or select an existing one: You can either create a new note by tapping the “+” symbol or select an existing note that you want to lock.
3. Tap on the share icon: At the top-right corner of the note, you will see a share icon. Tap on this icon to open the sharing options.
4. Select “Lock Note”: From the sharing options, scroll down and tap on “Lock Note.” If you have already set up a password or enabled Touch ID/Face ID for Notes, it will prompt you to authenticate yourself.
5. Enter your password or authenticate: If you have set a password for Notes, enter the password when prompted. If you have enabled Touch ID/Face ID, use your fingerprint or facial recognition to authenticate.
6. Confirm the lock: Once you have entered your password or authenticated with Touch ID/Face ID, the note will be locked, and a lock icon will appear next to its title. From now on, you will need to enter your password or use Touch ID/Face ID to access the locked note.
Note: It’s essential to remember your password or ensure that your Touch ID/Face ID is properly set up. If you forget your password or experience issues with Touch ID/Face ID, it may be challenging to regain access to your locked notes.
You can repeat the above steps for any other notes you want to lock. It’s worth mentioning that individual notes are locked independently, meaning you can have a combination of locked and unlocked notes within your Notes app.
Locking individual notes allows you to have greater control over the security and privacy of your sensitive information, ensuring that only you can access and view its contents.
Unlocking Locked Notes
If you have locked a note on your iPhone using the Notes app, you may need to unlock it to access its contents. Unlocking a locked note is a straightforward process, and there are a few different methods depending on the security method you have chosen. Here’s how you can unlock locked notes:
1. Open the Notes app: Locate and tap on the Notes app icon on your iPhone’s home screen to open it.
2. Find the locked note: Scroll through your list of notes or use the search bar to locate the specific locked note you want to unlock.
3. Tap on the locked note: Tap on the locked note to open it. You will see a locked padlock icon next to its title or at the top-right corner of the note.
4. Authenticate yourself: Depending on the security method you have set up, you will need to authenticate yourself to unlock the note. If you have set a password, you will be prompted to enter it. If you have enabled Touch ID or Face ID, you will need to use your fingerprint or facial recognition to unlock the note.
5. Access the unlocked note: Once you have successfully authenticated, the note will be unlocked, and you can now freely view and edit its contents.
Note: If you forget your password or experience issues with Touch ID/Face ID, unlocking your locked notes may become challenging. It’s important to ensure that you have a reliable method of remembering or recovering your password and that your Touch ID/Face ID is properly set up.
Remember, once unlocked, the note will remain unlocked until you manually lock it again. It’s important to be conscious of this and lock the note when you no longer need immediate access to its contents, especially if you have sensitive information stored within.
By following these steps, you can easily unlock your locked notes and regain access to their contents, allowing you to view and edit them as needed.
Disabling Lock Feature for Notes
If you no longer need to lock your notes on iPhone or want to remove the added layer of security, you have the option to disable the lock feature for Notes. Disabling the lock feature allows you to access all your notes without needing to authenticate every time. Here’s how you can disable the lock feature:
1. Open the Settings app: Locate and tap on the Settings app icon on your iPhone’s home screen to open it.
2. Scroll down and tap on “Notes”: In the Settings menu, keep scrolling until you find the “Notes” option. Tap on it to access the Notes settings.
3. Tap on “Password” or “Face ID & Passcode”: Depending on your iPhone model and iOS version, you might see either “Password” or “Face ID & Passcode” under the Notes settings. Tap on the appropriate option.
4. Enter your password or authenticate: If prompted, enter your password or use Touch ID/Face ID to authenticate yourself.
5. Disable the lock feature: In the Notes settings, you will find a toggle switch labeled “Allow Notes to be Locked.” Toggle this switch off to disable the lock feature for all your notes.
Note: Disabling the lock feature does not unlock currently locked notes. It only prevents the lock feature from being applied to new notes or enabling the lock on existing unlocked notes. To unlock previously locked notes, you need to follow the unlocking process outlined earlier.
By disabling the lock feature for your notes, you can quickly access all your notes without needing to authenticate each time. However, it’s important to consider the sensitivity of the information stored in your notes and make an informed decision about the level of security you require.
If you decide to re-enable the lock feature in the future, you can follow the steps mentioned earlier to set up a password or enable Touch ID/Face ID for Notes.
Troubleshooting: Issues with Notes Lock Feature
While the Notes lock feature provides an added level of security for your sensitive information, you may occasionally encounter issues or face challenges when using this feature on your iPhone. Let’s discuss some common troubleshooting steps for issues with the Notes lock feature:
1. Forgot your password: If you have enabled a password for your locked notes and have forgotten it, there is no way to recover it directly. However, you can reset the password by going to the Notes settings in the iPhone Settings app and choosing “Reset Password.” Keep in mind that this will remove the lock from all your locked notes, and you will need to set a new password.
2. Issues with Touch ID/Face ID: If you are experiencing difficulties with Touch ID or Face ID not recognizing your fingerprint or face accurately, ensure that your iPhone’s sensor or camera is clean and free from any dirt or obstruction. You can also try re-registering your fingerprint or face in the Touch ID/Face ID settings. If the problem persists, restart your iPhone or consider contacting Apple Support for further assistance.
3. Unable to lock specific notes: If you are unable to lock or unlock specific notes, ensure that you have the latest version of iOS installed on your device. Sometimes, updating to the latest version of iOS can resolve issues with the Notes app. If the problem continues, try closing the Notes app completely and reopening it. If the issue persists, consider restarting your iPhone.
4. Syncing issues: If you have multiple iOS devices and are using iCloud to sync your notes across devices, make sure that Notes syncing is enabled in the iCloud settings. If you are experiencing syncing issues, sign out of iCloud on your device, then sign back in. This can often resolve any syncing problems related to the Notes app.
5. Unable to view locked notes: If you encounter difficulties viewing locked notes even after successfully entering the password or authenticating with Touch ID/Face ID, try force-closing the Notes app and reopening it. If the problem persists, restart your iPhone to refresh the system and resolve any temporary software issues.
If the troubleshooting steps mentioned above do not resolve the issues with the Notes lock feature on your iPhone, it may be necessary to contact Apple Support for further assistance. They can provide additional guidance and help resolve any technical issues specific to your device.
Remember, it is essential to keep your iPhone updated with the latest software version and regularly back up your device to ensure the security and integrity of your notes and other data.
Tips to Keep Your Locked Notes Secure
While locking your notes on iPhone provides an extra layer of security, it’s important to ensure that you take additional measures to keep your locked notes secure. Here are some tips to help you maintain the confidentiality and integrity of your locked notes:
1. Use a strong and unique password: If you choose to lock your notes with a password, make sure to use a strong and unique password. Avoid using easily guessable combinations like birthdays or common words. Instead, opt for a mix of uppercase and lowercase letters, numbers, and special characters.
2. Enable Touch ID/Face ID: Utilizing Touch ID or Face ID as an authentication method for unlocking notes adds an extra layer of security. It ensures that only you can access your locked notes using your fingerprint or facial recognition, making it more difficult for unauthorized individuals to gain access.
3. Regularly update your iPhone: Keeping your iPhone’s software up to date is crucial for security. Software updates often include bug fixes and security enhancements that can help protect your device and the information stored within it, including locked notes.
4. Avoid sharing passwords or authentication credentials: It is essential to keep your password or fingerprint/Face ID authentication credentials confidential. Do not share this information with others unless necessary. By doing so, you maintain exclusive access to your locked notes.
5. Be cautious when using public Wi-Fi: Public Wi-Fi networks may pose security risks. Avoid accessing or unlocking your locked notes while connected to unsecured or unfamiliar Wi-Fi networks. Consider using a virtual private network (VPN) for added security when accessing your sensitive information on public networks.
6. Keep backups of your data: Regularly back up your iPhone to ensure that your data, including locked notes, is protected in case of device loss, damage, or other unforeseen circumstances. Regular backups ensure that even if a device is compromised, your information remains secure and accessible from a backup source.
7. Be mindful of who has physical access to your device: Even with a locked note, someone with physical access to your unlocked iPhone may still be able to view its contents. Be cautious about lending your device to others and make it a habit to lock your iPhone whenever it is not in use.
By following these tips, you can enhance the security and privacy of your locked notes on your iPhone. These measures help safeguard your personal and sensitive information, providing you with peace of mind knowing that your locked notes are protected.