
Option 1: Use Restrictions Feature
If you want to lock certain apps on your iPhone and prevent unauthorized access, a built-in feature called Restrictions can come to your rescue. By enabling restrictions, you can control what apps are allowed to be accessed and restrict certain activities on your device. Here’s how to use this feature to lock apps:
- Open the “Settings” app on your iPhone.
- Scroll down and tap on “Screen Time.”
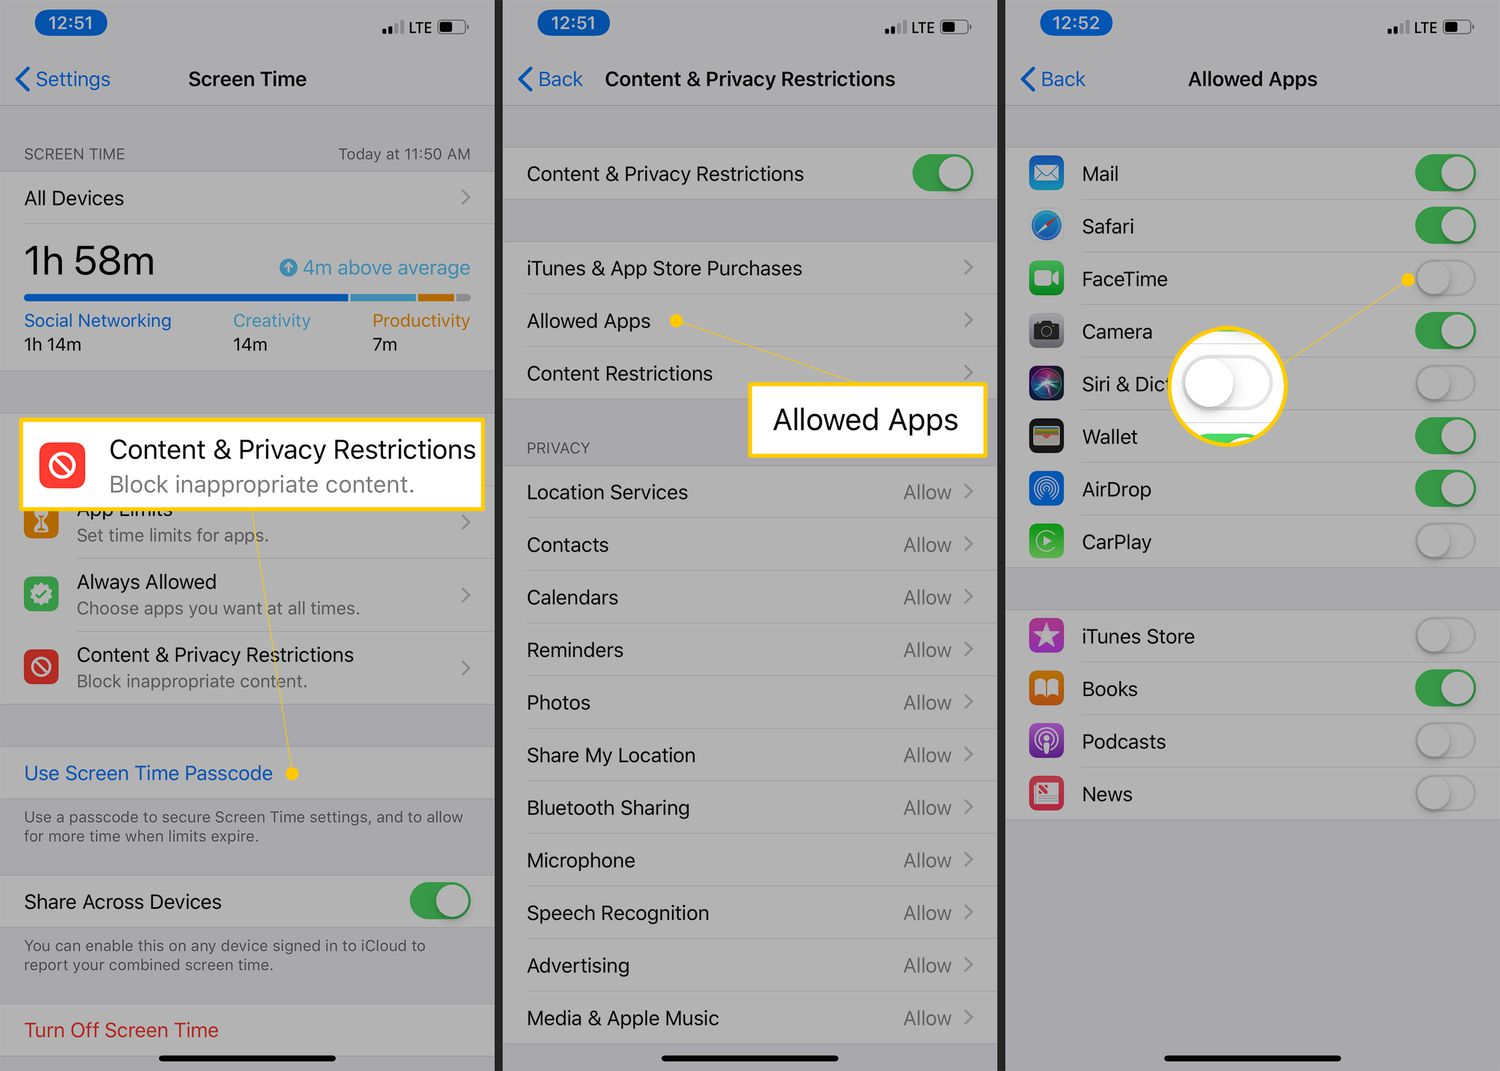
- Tap on “Content & Privacy Restrictions.”
- Select “iTunes & App Store Purchases” to restrict app installations and app deletions.
- Toggle on “Require Password.” You can choose to enter your Apple ID password or set a custom passcode.
- Go back to “Content & Privacy Restrictions.”
- Tap on “Allowed Apps.”
- Toggle off any apps that you want to lock.
- If you want to lock specific features within certain apps, you can scroll down and tap on individual apps to customize their access.
Once you have locked the apps using the Restrictions feature, the apps will be hidden from your home screen, and a “Content & Privacy Restrictions” passcode will be required to access them.
It’s important to note that the Restrictions feature also provides additional options for limiting web content, restricting explicit content, and managing purchases. You can explore these settings further based on your specific needs.
Using the Restrictions feature is a great way to restrict access to certain apps on your iPhone, especially when it comes to preventing unauthorized usage by children or others who may have access to your device. However, it’s worth mentioning that this feature does not provide advanced app locking functionalities like individual password protection or app-specific locks.
If you require more robust app locking capabilities, you may want to consider alternative methods like using third-party app lockers or enabling Touch ID/Face ID authentication for specific apps.
Option 2: Use Screen Time Feature
The Screen Time feature, introduced in iOS 12, offers a comprehensive set of tools to manage and control the usage of your iPhone, including the ability to lock specific apps. Here’s how you can use the Screen Time feature to lock apps on your iPhone:
- Open the “Settings” app on your iPhone.
- Tap on “Screen Time.”
- Tap on “App Limits.”
- Tap on “Add Limit.”
- Choose the app or category of apps that you want to lock.
- Set a time limit for the app(s) you selected, preferably setting a very low limit like one minute.
- Tap on “Add” to save the limit.
- Toggle on “Block at End of Limit.”
By following these steps, you can effectively lock the chosen app(s) on your iPhone. Once the time limit is reached, the app(s) will be locked and cannot be accessed until the next day.
It’s important to note that the Screen Time feature not only allows you to lock apps but also provides valuable insights into your usage patterns, including app usage statistics, notifications management, and device downtime. This feature can help you establish healthy device usage habits and reduce the temptation to constantly check your apps.
With the Screen Time feature, you gain a greater level of control over the usage of your iPhone, ensuring that certain apps are not overused or accessed during specific time periods. However, keep in mind that this method may not provide the same level of security as more advanced app locking solutions.
If you require enhanced app locking capabilities, such as individual passcodes for specific apps or the ability to hide apps completely from your home screen, you may want to explore other options like third-party app lockers or enabling device authentication methods like Touch ID or Face ID for individual apps.
Option 3: Use App Lockers from the App Store
If you’re looking for more advanced app locking features and additional customization options, you can turn to third-party app lockers available on the App Store. These apps provide a dedicated solution for locking individual apps with passcodes, fingerprints, or Face ID. Here’s how you can use app lockers to lock apps on your iPhone:
- Open the App Store on your iPhone.
- Search for “app lockers” or “app lock” in the search bar.
- Explore the available app locker options and read user reviews and ratings to find a reliable and highly rated app locker.
- Download and install the app locker of your choice.
- Launch the app locker and follow the on-screen instructions to set up a passcode or enable fingerprint/Face ID authentication.
- Grant necessary permissions to the app locker when prompted.
- Once set up, open the app locker and select the apps that you want to lock.
- Customize the locking methods and additional features according to your preferences.
- Exit the app locker, and the locked apps will now require the selected authentication method to be accessed.
App lockers from the App Store offer a wide range of additional features, such as decoy modes, break-in alerts, and app usage tracking. Some app lockers even provide the option to hide locked apps completely from the home screen, adding an extra layer of security.
While using third-party app lockers provides advanced app locking capabilities, it’s important to note that these apps may require additional permissions and access to your device data. It’s essential to carefully review the app’s privacy policy and ensure that you’re comfortable with the permissions they require before installing and using them.
Overall, using app lockers from the App Store can be an effective way to lock your desired apps and add an extra level of security to your iPhone. Just make sure to choose a reputable app locker that meets your needs and maintains your privacy.
Option 4: Enable Guided Access
If you want to temporarily restrict access to specific apps on your iPhone, you can utilize the Guided Access feature. This feature allows you to lock your device in a single app and control which features are available. Here’s how you can use Guided Access to lock apps:
- Go to the “Settings” app on your iPhone.
- Tap on “Accessibility.”
- Scroll down and select “Guided Access.”
- Toggle on “Guided Access” to enable the feature.
- Open the app you want to lock.
- Triple-click the side or home button, depending on your iPhone model.
- In the Guided Access screen that appears, you can customize the options such as disabling certain areas of the screen or specific app functionalities.
- Set a passcode for Guided Access, if desired.
- Tap on “Start” to begin Guided Access mode.
With Guided Access enabled, the selected app will remain locked, and only the features and areas of the screen that you’ve allowed will be accessible. If anyone tries to leave the app or access restricted features, they will be prompted to enter the passcode you set for Guided Access.
Guided Access is particularly useful if you want to temporarily limit access to certain apps, such as when you lend your iPhone to someone or want to limit distractions during focused work or study sessions.
Keep in mind that Guided Access is only a temporary locking solution, and it requires you to manually enable and disable it each time. Once you exit Guided Access mode, your iPhone will return to normal operation.
Using Guided Access provides a convenient and customizable way to lock specific apps on your iPhone for temporary periods, ensuring that only the allowed features are accessible. However, if you’re looking for a more permanent locking solution or want to have finer control over app access, you may want to explore other options like app lockers or the built-in Restrictions feature.
Option 5: Hide Apps from the Home Screen
If you prefer not to use third-party apps or additional features, you can simply hide the apps you want to lock from the home screen. This method doesn’t provide direct app locking functionality but can make the apps less visible and accessible. Here’s how you can hide apps on your iPhone:
- Locate the app you want to hide on your home screen.
- Long-press on the app icon until the apps start jiggling.
- Tap on the “X” that appears on the corner of the app icon to delete it. This doesn’t delete the app; it only removes it from the home screen.
- Press the home button or swipe up to exit the jiggle mode.
- Open the App Store on your iPhone.
- Tap on your profile picture or initial at the top right corner.
- Scroll down and tap on “Purchased.”
- Find the app you want to lock and tap on the cloud/download icon next to it to re-download the app. This restores the app on your device.
- The re-downloaded app will appear in the App Library or in the “Recently Added” section instead of the home screen.
By hiding the apps from the home screen, they become less visible and accessible to others who may use your iPhone. However, please note that this method doesn’t provide an additional layer of security or authentication to access the hidden apps.
It’s important to remember that this method only hides the apps from the home screen, and the apps can still be accessed from the App Library or through search. If you want to completely restrict access to the apps, you may want to consider using app lockers or other app locking methods mentioned earlier.
Hiding apps from the home screen is a simple and straightforward way to minimize the visibility and accessibility of certain apps on your iPhone. It can be particularly useful if you want to keep certain apps more private or limit their usage by others without installing additional apps or enabling complex features.
Option 6: Use Touch ID or Face ID for App Authentication
If your iPhone is equipped with Touch ID or Face ID, you can take advantage of these biometric authentication methods to lock and secure specific apps on your device. By enabling Touch ID or Face ID for app authentication, you can ensure that only authorized individuals can access the locked apps. Here’s how to set it up:
- Open the “Settings” app on your iPhone.
- Scroll down and tap on “Touch ID & Passcode” or “Face ID & Passcode.”
- Enter your passcode to proceed.
- Under the “Use Touch ID for” (or “Use Face ID for”) section, toggle on the switch next to the apps you want to lock with biometric authentication.
Once you’ve enabled Touch ID or Face ID authentication for specific apps, you can simply use your fingerprint or face to unlock and access them. This adds an extra layer of security and convenience to protect your sensitive information and restrict unauthorized access to your apps.
If you want to disable Touch ID or Face ID for app authentication, you can follow the same steps and toggle off the switch next to the apps you no longer want to lock with biometric authentication.
It’s important to note that not all apps support Touch ID or Face ID authentication for app locking. Only apps that have integrated the necessary APIs can utilize these biometric authentication methods. However, many popular apps, such as banking apps and password managers, are compatible with Touch ID or Face ID and provide an added level of security.
By leveraging the power of Touch ID or Face ID for app authentication, you can conveniently lock and secure specific apps on your iPhone. This ensures that only you or authorized users can access the locked apps, providing an effective means of protecting your personal information and maintaining privacy.