
Why would you want to lock a mouse to one monitor?
When using multiple monitors, it can sometimes be frustrating when your mouse cursor moves uncontrollably from one screen to another. This can especially be a problem when you’re working on a task that requires precision or when you’re using applications or programs exclusively on one monitor. To avoid this annoyance and maintain a seamless workflow, you may want to consider locking your mouse to one monitor.
Locking your mouse to one monitor ensures that you have full control over your cursor’s movements within the boundaries of that particular screen, preventing accidental cursor travel to adjacent displays. This can increase your productivity and make multitasking more efficient, allowing you to focus on the task at hand without the distraction of an errant cursor.
There are various scenarios where you may find it beneficial to lock your mouse to one monitor. For example, if you’re a designer or video editor working on graphic-intensive projects across multiple screens, having precise control over your mouse movements within a specific monitor can help you maintain accuracy. Additionally, gamers who play across multiple displays may want to lock their mouse to prevent unintended cursor movement that could disrupt gameplay or impact performance.
Locking your mouse to one monitor can also be useful for professionals who utilize several applications simultaneously, such as developers, stock traders, or data analysts. By confining your mouse to one screen, you can focus on specific tasks or applications without the hassle of unnecessary cursor movement.
Ultimately, the decision to lock your mouse to one monitor depends on your personal preferences and work style. If you frequently encounter issues with cursor movement across multiple screens or prefer a more streamlined experience, mastering the art of mouse locking may significantly enhance your productivity and overall user experience.
Method 1: Using display settings
One of the most straightforward ways to lock your mouse to one monitor is by using the display settings on your computer. This method typically works on both Windows and Mac operating systems, and here’s how you can do it:
- On Windows:
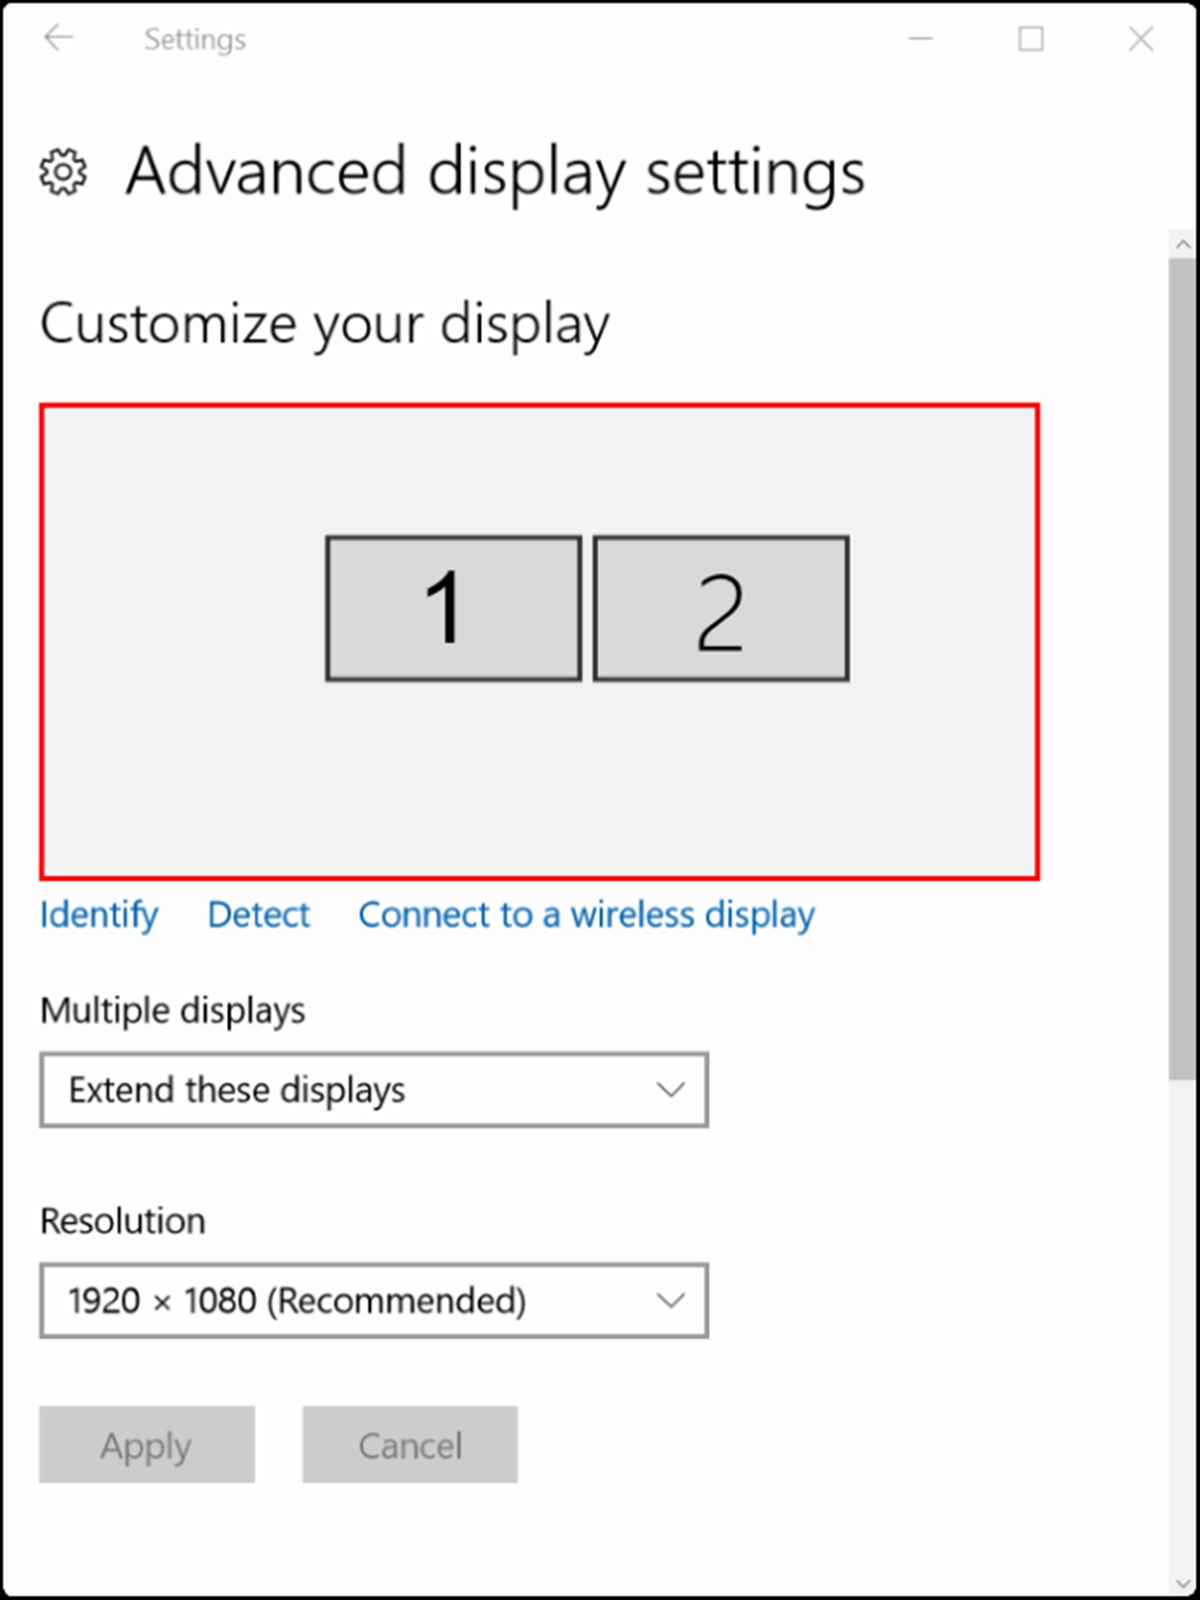
- Right-click on an empty area of your desktop and select “Display settings” from the context menu.
- In the display settings, you’ll see a diagram representing your connected monitors. Identify the monitor to which you want to lock your mouse.
- Click on the monitor and scroll down to the “Multiple displays” section.
- Select “Show only on this display” or “Only use this display,” depending on your Windows version.
- Click on the “Apply” button to save the settings.
- On Mac:
- Click on the Apple menu in the top left corner of your screen and select “System Preferences.”
- In the System Preferences window, click on “Displays.”
- In the arrangement tab, you’ll see a diagram displaying your monitors. Drag and arrange the monitors as desired.
- Ensure that the menu bar is positioned on the monitor where you want to lock your mouse.
- Close the System Preferences window to save the settings.
By configuring your display settings to show only the desired monitor, you effectively lock your mouse within its boundaries. It’s important to note that this method may vary slightly depending on your specific operating system version, so be sure to refer to the appropriate settings options on your computer.
Using the display settings method offers a simple and native way to ensure your mouse stays confined to a single monitor. It doesn’t require any third-party software installation, making it a convenient option for those who prefer built-in solutions.
Once you’ve successfully locked your mouse to a specific monitor using the display settings method, you can enjoy the benefits of a focused workspace without the distraction of cursor travel between multiple screens.
Method 2: Using third-party software
If the native display settings on your computer don’t offer the option to lock your mouse to one monitor, or if you’re looking for more advanced features and customization options, you can turn to third-party software solutions. There are several applications available that allow you to control your mouse movement and lock it to a specific screen. Here are a few popular choices:
- MouseJail: MouseJail is a lightweight and user-friendly tool that enables you to lock your mouse to a single monitor. It offers customizable options, such as defining hotkeys to toggle the lock and adjust sensitivity settings.
- Dual Monitor Tools: Dual Monitor Tools is a comprehensive software suite that includes various utilities for managing multiple monitors. One of its features is “Lock Cursor,” which allows you to restrict the mouse cursor to a specific display.
- Actual Multiple Monitors: Actual Multiple Monitors is a powerful software package that offers a wide range of features to enhance multi-monitor setups. Along with its extensive customization options, it includes a “Lock Mouse” feature that keeps the cursor within the confines of a chosen monitor.
When using third-party software, it’s important to choose a reputable and trusted solution that is compatible with your operating system. Look for software that offers regular updates, good user reviews, and a user-friendly interface.
After installing and configuring the chosen software, you’ll typically have access to various settings that allow you to lock your mouse to one monitor. These settings might include options like hotkeys, screen-edge resistance, or virtual boundaries. Experiment with the available options to find the settings that work best for your needs.
Using third-party software can provide you with more control and flexibility when it comes to locking your mouse to a specific monitor. These applications often offer additional features and customization options that go beyond the capabilities of native display settings.
Remember to consider your specific requirements before selecting and installing any third-party software. Ensure that the software is compatible with your operating system and that it meets your desired functionality and security standards.
Method 3: Using keyboard shortcuts
Another way to lock your mouse to one monitor is by utilizing keyboard shortcuts. While this method may not provide the same level of granular control as the previous methods, it can be a quick and convenient solution, especially if you need to temporarily lock your mouse to a specific screen. Here’s how you can do it:
- Windows:
- Press the Windows key and the P key simultaneously.
- A projection menu will appear on the right side of the screen.
- Choose the “PC screen only” or “Second screen only” option, depending on your Windows version.
- Mac:
- Press the Command key and the F1 key concurrently.
- This will activate the “Mirror Displays” feature, which duplicates the content to all connected displays.
By using these keyboard shortcuts, you effectively lock your mouse to the selected monitor, preventing it from freely moving to other screens. However, it’s important to note that this method may not offer the same level of customization and fine-tuned control as other solutions.
Additionally, it’s worth mentioning that keyboard shortcuts may vary depending on your specific operating system version. Be sure to refer to the appropriate shortcuts for your system.
Using keyboard shortcuts to lock your mouse to one monitor can be an efficient solution when you need to quickly limit cursor movement. It’s a handy trick to have in your repertoire, especially for temporary situations or when the native display settings or third-party software options are not readily accessible.
Experiment with these keyboard shortcuts and find the method that works best for you. Incorporating keyboard shortcuts into your workflow can help you streamline your multitasking and maintain better control over your mouse movements.
Method 4: Using the monitor’s settings
In addition to the software and system settings, some monitors come equipped with built-in features that allow you to lock your mouse to one specific screen. This method can be particularly useful if you prefer to control cursor confinement directly from the monitor itself. Here’s how you can utilize your monitor’s settings:
- Locate the control buttons or menu on your monitor. These buttons are typically located along the bottom or side of the screen.
- Press the appropriate button to access the monitor’s settings menu.
- Navigate through the settings menu using the arrow or navigation buttons until you find the option related to mouse locking or cursor control.
- Once you find the mouse locking option, select it and enable the lock feature. The specific steps and wording might vary depending on the monitor model and brand.
- Save the settings and exit the menu.
By using the monitor’s built-in settings, you can directly control the behavior of your cursor and restrict it to your desired screen.
It is important to note that not all monitors offer this feature, and the availability of specific settings may vary depending on the manufacturer. Consult your monitor’s user manual or visit the manufacturer’s website for detailed instructions and information about the built-in features.
This method provides a hardware-based solution and may offer a more seamless and integrated experience for locking your mouse to a specific monitor. However, it is dependent on the capabilities of your monitor, so not all users may have access to this option.
If your monitor does not have this feature, you can explore the other methods mentioned in this article to achieve mouse locking across your displays.
Overall, using the monitor’s settings to lock your mouse to one screen can be a practical solution, especially for those who prefer a more direct and monitor-centric approach to cursor control.
How to disable mouse lock on one monitor
If you no longer want to keep your mouse locked to a specific monitor and wish to regain the ability to freely move it across multiple screens, you can easily disable the mouse lock. The process may vary depending on the method you used to lock your mouse initially. Here are a few common methods and how to disable the mouse lock for each:
- Using display settings:
- Open the display settings on your computer.
- Locate the option that allowed you to lock your mouse to one monitor.
- Select the option to extend your display or enable the use of all connected monitors.
- Apply the settings to save the changes.
- Using third-party software:
- Open the third-party software that you used to lock your mouse.
- Navigate to the settings or options menu within the software.
- Look for a toggle or checkbox that allows you to disable the mouse lock feature.
- Disable the feature and save the changes.
- Using keyboard shortcuts:
- Press the appropriate keyboard shortcut to unlock your mouse.
- For Windows, press the Windows key and the P key simultaneously and choose the desired option from the projection menu.
- For Mac, press the Command key and the F1 key together to deactivate the “Mirror Displays” feature.
- Using the monitor’s settings:
- Access your monitor’s settings menu using the control buttons.
- Navigate to the option that controls mouse locking or cursor confinement.
- Disable the lock feature and save the changes.
By following these steps, you can easily disable the mouse lock and restore the freedom of movement across multiple monitors. Remember to apply the changes or save the settings to ensure they take effect.
If you encounter any difficulties or if the mouse lock persists even after attempting these methods, consult the user manual of your computer, monitor, or third-party software for further guidance specific to your setup.
Having the ability to disable mouse lock whenever needed allows you to adapt to different tasks and work environments, providing greater flexibility and convenience in your multi-monitor setup.