
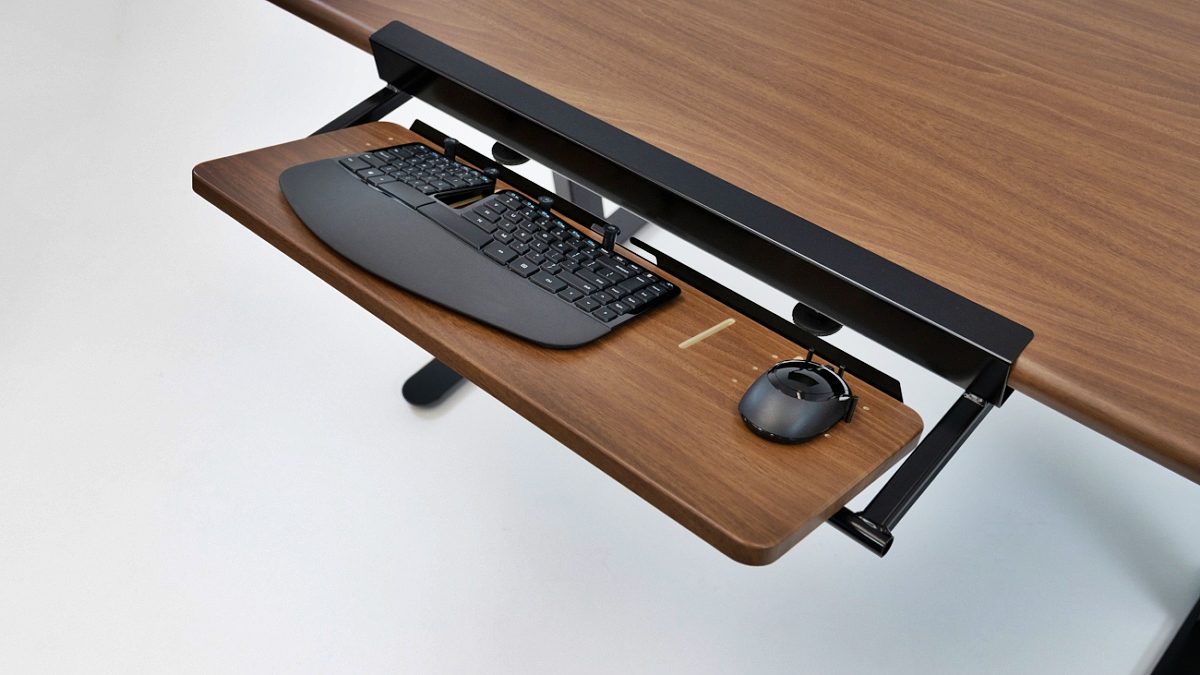
Choosing the Right Keyboard Tray
When it comes to setting up a comfortable and ergonomically-friendly workspace, choosing the right keyboard tray is crucial. A keyboard tray not only helps in minimizing strain and fatigue on your wrists and arms but also promotes proper posture and reduces the risk of developing musculoskeletal disorders. Here are some important factors to consider when selecting a keyboard tray:
1. Size and Compatibility: Ensure that the keyboard tray you choose is suitable for the size of your keyboard and mouse. It should have enough space to comfortably accommodate your hands and allow for smooth movement.
2. Adjustable Features: Look for a keyboard tray that offers adjustable height and tilt options. This allows you to customize the tray’s position to match your individual needs and preferences.
3. Mounting Options: Determine the most suitable mounting option for your workstation. Keyboard trays can be mounted under the desk, on the desk surface, or on a keyboard arm that attaches to the edge of the desk. Consider the space available and the design of your desk when making this decision.
4. Sturdiness and Durability: Opt for a keyboard tray that is made from high-quality materials and has a sturdy construction. You want a tray that can support the weight of your keyboard and mouse without wobbling or becoming unstable.
5. Ergonomic Design: Look for additional features that enhance ergonomics, such as a wrist rest or a palm support. These features can help reduce strain on your wrists and promote a more comfortable typing experience.
6. Ease of Installation: Consider the installation process and ensure that it is within your capabilities. Some keyboard trays require drilling, while others come with a clamp-on design. Choose one that suits your skills and preferences.
7. Budget: Set a budget for your keyboard tray purchase. There are options available in various price ranges, so determine how much you are willing to invest in a quality keyboard tray.
By carefully considering these factors, you can select a keyboard tray that provides the optimal ergonomic support and comfort for your daily work routine. Remember that the right keyboard tray can make a significant difference in your productivity and overall well-being in the long run.
Gathering the Necessary Tools and Materials
Before you begin the installation process, it’s important to gather all the necessary tools and materials. By having everything on hand, you can ensure a smooth and efficient installation. Here are the tools and materials you’ll need:
1. Screwdriver: Depending on the type of keyboard tray you are installing, you may need a Phillips or flat-head screwdriver. Check the instructions provided with your keyboard tray to determine the correct type.
2. Screws and Bolts: Most keyboard trays come with the necessary screws and bolts for installation. However, it’s always a good idea to have a variety of sizes and lengths of screws and bolts on hand, just in case.
3. Drill and Drill Bits: If your keyboard tray requires drilling holes in the desk or any other surface, you’ll need a drill that is compatible with the size of the screws or bolts. Make sure to have the appropriate drill bits as well.
4. Measuring Tape: A measuring tape will help ensure accurate placement and alignment of the keyboard tray rails and other components. It’s important to measure carefully to prevent any installation errors.
5. Pencil or Marker: Use a pencil or marker to mark the positions where the keyboard tray rails, sliding mechanism, and other components will be installed. This will serve as a guide during the installation process.
6. Level: To ensure proper alignment and a straight installation, a level will come in handy. This will help prevent any uneven or crooked installation of the keyboard tray.
7. Allen Wrench: Some keyboard trays may require the use of an Allen wrench for specific adjustments or hardware tightening. Check the instructions to see if an Allen wrench is needed and ensure you have the correct size.
8. Safety Equipment: Depending on the nature of the installation, you may need safety equipment such as gloves or safety glasses. Always prioritize your safety during any installation process.
By gathering all these tools and materials ahead of time, you’ll have everything you need to successfully install your keyboard tray. This will help you complete the installation efficiently and ensure that you have a comfortable and ergonomic workspace.
Clearing the Desk Space
Prior to installing a keyboard tray, it’s essential to clear the desk space to provide a clean and organized area for the installation. Clearing the desk space not only ensures a smooth installation process but also allows for better ergonomics and functionality. Here are the steps to clear your desk space:
1. Remove Clutter: Remove any unnecessary items from your desk, such as paperwork, folders, and office supplies. Clearing clutter will help create a clean and spacious workspace for the keyboard tray installation.
2. Rearrange Electronics: If you have any electronic devices, such as a monitor or speakers, consider adjusting their positions on the desk to accommodate the keyboard tray. Ensure that there is enough space for the tray to be mounted and that it does not interfere with other devices.
3. Secure Loose Cables: Organize and secure loose cables and wires by using cable management solutions such as cable clips, ties, or a cable management tray. This will prevent cables from getting tangled and potentially interfering with the keyboard tray installation.
4. Move Objects Off the Desk: If there are any decorative objects, office supplies, or personal items on your desk, temporarily relocate them to a different area. This will allow for a clear workspace and make the installation process easier.
5. Clean the Surface: Wipe down the desk surface to remove any dust, dirt, or debris. A clean surface will ensure better adherence of adhesive mounting components or provide a smooth area for drilling holes, if required.
6. Assess Desk Stability: Before installing the keyboard tray, check the stability of your desk. If the desk is wobbly or unstable, consider reinforcing or adjusting it to provide a sturdy base for the keyboard tray installation.
7. Check Desk Height: Take a moment to evaluate the height of your desk. Ensure that it is at an appropriate level based on your sitting or standing posture. Adjust the desk height if necessary to maintain proper ergonomics when using the keyboard tray.
By following these steps to clear your desk space, you’ll create an ideal environment for installing the keyboard tray. This will ensure a seamless installation process and provide you with a clutter-free and ergonomic workspace to enhance your productivity and comfort.
Attaching the Keyboard Tray Rails to the Desk
Once you have cleared the desk space, it’s time to attach the keyboard tray rails to the desk. The rails serve as the foundation for the keyboard tray, providing stability and allowing for smooth sliding motions. Follow these steps to attach the keyboard tray rails:
1. Refer to the Manufacturer’s Instructions: Read the manufacturer’s instructions carefully to understand the specific requirements and steps for attaching the keyboard tray rails. Each brand and model may have slightly different installation procedures.
2. Position the Rails: Place the keyboard tray rails in the desired location on the desk surface. Ensure they are aligned symmetrically and at the appropriate distance apart, depending on the size of your keyboard tray.
3. Mark the Mounting Holes: Use a pencil or marker to mark the position of the mounting holes on the desk. This is where you will attach the rails using screws or bolts later in the installation process. Ensure the marks are accurate and clearly visible.
4. Pre-drill Holes (If Required): If the manufacturer’s instructions specify pre-drilling holes for the mounting screws or bolts, use the appropriate drill bit size to create the holes in the marked locations. Take care to drill straight and at the correct depth.
5. Attach the Rails: Place the keyboard tray rails back onto the marks you made and use screws or bolts to securely fasten them to the desk. Tighten them properly, but be careful not to over-tighten, which can damage the rails or desk surface.
6. Verify Stability: Once the rails are attached, gently test their stability by applying light pressure. Ensure there is no wobbling or movement. If there is any instability, double-check the attachment points and adjust as necessary.
7. Follow Additional Instructions: Some keyboard tray models may have additional steps or mechanisms for attaching the rails. Follow the manufacturer’s instructions for any specific adjustments or configurations required for your particular keyboard tray.
By properly attaching the keyboard tray rails to the desk, you lay the foundation for a stable and functional workspace. This step is crucial to ensure the smooth sliding and proper functioning of the keyboard tray, allowing for comfortable and ergonomic use throughout your workday.
Installing the Sliding Mechanism
After attaching the keyboard tray rails, the next step in installing a keyboard tray is to install the sliding mechanism. The sliding mechanism allows the keyboard tray to glide smoothly along the rails, enabling easy access to your keyboard and mouse. Here’s how to install the sliding mechanism:
1. Check the Manufacturer’s Instructions: Review the manufacturer’s instructions to understand the specific requirements and steps for installing the sliding mechanism. Different keyboard tray models may have varying mechanisms, so it’s important to follow the provided guidelines.
2. Align the Sliding Mechanism: Place the sliding mechanism onto the keyboard tray rails, aligning it with the pre-drilled holes or mounting slots. Make sure it is positioned evenly and centered on the rails.
3. Secure the Sliding Mechanism: Using the screws or bolts provided, fasten the sliding mechanism to the keyboard tray rails. Ensure that the screws or bolts are tightened securely, but avoid overtightening, as it may affect the smooth sliding motion.
4. Test the Sliding Mechanism: Slide the keyboard tray back and forth along the rails to ensure that the sliding mechanism functions properly. It should glide smoothly and without any resistance. If there are any issues, check for any obstructions or misalignment and make the necessary adjustments.
5. Verify Locking Mechanism (if applicable): Some sliding mechanisms have a locking mechanism that allows you to lock the keyboard tray in place. If your keyboard tray has this feature, test and verify that the locking mechanism functions correctly.
6. Follow Additional Instructions: Depending on the specific model of the keyboard tray, there may be additional steps or adjustments required for the sliding mechanism. Refer to the manufacturer’s instructions for any additional guidance.
Installing the sliding mechanism is a crucial step in ensuring the functionality of your keyboard tray. It allows for smooth and effortless movement, allowing you to position the tray at the desired height and angle, promoting ergonomic workspace setup and comfort during extended computer use.
Mounting the Keyboard Tray Platform
The next step in installing a keyboard tray is to mount the keyboard tray platform onto the sliding mechanism. The platform is where you will place your keyboard and mouse, providing a stable and ergonomic surface for typing and navigating. Here’s how to mount the keyboard tray platform:
1. Consult the Manufacturer’s Instructions: Review the manufacturer’s instructions for specific guidance on mounting the keyboard tray platform. Each keyboard tray model may have different mechanisms or mounting methods, so it’s important to follow the provided instructions.
2. Position the Keyboard Tray Platform: Place the keyboard tray platform onto the sliding mechanism, aligning the pre-drilled holes or mounting slots. Ensure that the platform is centered and evenly positioned on the sliding mechanism.
3. Secure the Keyboard Tray Platform: Use the screws or bolts provided to fasten the keyboard tray platform to the sliding mechanism. Make sure to tighten the screws or bolts securely, but avoid overtightening, as it may affect the functionality of the sliding mechanism.
4. Test the Stability: Apply gentle pressure to the keyboard tray platform to ensure that it is securely attached and stable. Confirm that there is no wobbling or movement once it’s installed. If there are any stability issues, double-check the attachment points and make any necessary adjustments.
5. Check Height and Angle Adjustments: If your keyboard tray platform offers height and angle adjustments, test these settings to find the most comfortable position for your typing posture. Adjust the platform to the desired height and angle, ensuring that it promotes a neutral wrist position and reduces strain.
6. Follow Any Additional Instructions: Some keyboard tray models may have additional features or adjustments for the platform mounting process. Consult the manufacturer’s instructions for any specific guidelines or recommendations.
Mounting the keyboard tray platform is a crucial step in creating an ergonomic and functional workspace. It provides a stable and adjustable surface for your keyboard and mouse, allowing for comfortable and efficient typing and navigation during your workday.
Adjusting the Keyboard Tray Height and Angle
Adjusting the height and angle of your keyboard tray is essential to maintain proper ergonomics and ensure a comfortable typing position. The correct positioning can help reduce strain on your wrists, arms, and shoulders. Follow these steps to adjust the height and angle of your keyboard tray:
1. Evaluate your Sitting Position: Sit in your preferred working position at your desk. Ensure that your feet are flat on the floor, your back is supported, and your thighs are parallel to the floor. This will serve as a foundation for adjusting your keyboard tray.
2. Locate the Height Adjustment Mechanism: Identify the height adjustment mechanism on your keyboard tray. This can vary depending on the model, but it is commonly located underneath the tray or on the sliding mechanism.
3. Release the Height Lock: If your keyboard tray has a height lock, release it to allow for adjustments. This may involve flipping a lever, pressing a button, or loosening a knob.
4. Adjust the Height: Gradually raise or lower the keyboard tray to a height that allows your elbows to be at a 90-degree angle and your wrists to be in a neutral position. This position should promote a straight, relaxed posture while typing. Experiment with different heights until you find the most comfortable position.
5. Lock the Height Adjustment: Once you’ve found the desired height, secure the height adjustment mechanism to lock the keyboard tray in place. Follow the manufacturer’s instructions on how to properly lock the adjustment mechanism to ensure stability.
6. Find the Angle Adjustment Mechanism: Locate the angle adjustment mechanism on your keyboard tray. It is typically found on the keyboard tray platform and may involve a lever, knob, or other mechanisms.
7. Release the Angle Lock: If your keyboard tray has an angle lock, release it to allow for adjustments. This will allow you to tilt the tray to a more comfortable typing angle.
8. Adjust the Angle: Tilt the keyboard tray platform to a slight negative or neutral angle, keeping your wrists in a straight, natural position. Avoid tilting your wrists upward, as this can strain the tendons and muscles. Find the angle that feels comfortable for your wrists and promotes a natural typing posture.
9. Lock the Angle Adjustment: Once you’ve found the optimal angle, lock the angle adjustment mechanism to secure the keyboard tray platform in place. This ensures stability and prevents the tray from inadvertently tilting.
By adjusting the height and angle of your keyboard tray, you can create a more ergonomic and comfortable working environment. Regularly reassess and fine-tune these settings to meet your changing needs and maintain a healthy posture during prolonged computer use.
Securing the Keyboard Tray in Place
After adjusting the height and angle of your keyboard tray to achieve optimal ergonomics, the next step is to secure it in place. Properly securing the keyboard tray ensures stability and prevents any unwanted movements during use. Follow these steps to secure your keyboard tray:
1. Evaluate the Securing Mechanism: Different keyboard tray models may have various securing mechanisms. Identify the specific mechanism on your keyboard tray, such as a latch, locking lever, or twist lock.
2. Engage the Securing Mechanism: Activate the securing mechanism by following the manufacturer’s instructions. This may involve engaging a latch, sliding a locking lever into place, or tightening a twist lock.
3. Confirm the Tray Stability: Test the stability of the keyboard tray by applying gentle pressure. Ensure that it remains securely in place and does not wobble or move excessively. If there is any looseness or instability, double-check the securing mechanism and make any necessary adjustments.
4. Verify Sliding Motion: Slide the keyboard tray back and forth along the rails to ensure that the securing mechanism does not impede its movement. The tray should glide smoothly and effortlessly without any restrictions.
5. Check for Any Additional Locks or Adjustments: Some keyboard tray models may have additional locks or adjustments to further secure the tray. Refer to the manufacturer’s instructions for any specific recommendations or optional features to enhance stability.
6. Monitor for Any Changes: Regularly check the keyboard tray’s stability over time. Over prolonged use, the securing mechanism or other components may loosen or require readjustment. Make any necessary modifications to maintain the stability and functionality of the keyboard tray.
Securing your keyboard tray ensures that it remains in the desired position, allowing for comfortable and efficient keyboard and mouse usage. By following these steps and ensuring proper stability, you can create a workspace that promotes productivity and supports your ergonomic needs.
Testing and Adjusting the Keyboard Tray
Once you have secured your keyboard tray in place, it’s essential to test and make any necessary adjustments to ensure optimal comfort and functionality. Testing and adjusting the keyboard tray will help fine-tune its position, height, and angle according to your specific needs. Follow these steps to test and adjust your keyboard tray:
1. Sit in your Working Position: Sit in your usual working position at your desk, ensuring that your feet are flat on the floor, back is supported, and arms are relaxed at your sides. This baseline position will help you assess the comfort and functionality of the keyboard tray.
2. Type and Navigate: Begin typing and using your mouse on the keyboard tray platform. Pay attention to your hand, wrist, and arm positions. Assess whether your wrists are in a neutral position or if there is any strain or discomfort. Similarly, check if the mouse is within easy reach and at a comfortable height.
3. Evaluate Arm and Shoulder Position: Observe the position of your arms and shoulders while using the keyboard tray. Ensure that your arms are relaxed and your shoulders are not elevated or hunched. Adjust the height and angle of the tray if needed to achieve a more comfortable and relaxed position.
4. Assess Wrist Support: Consider the level of wrist support provided by the keyboard tray. If necessary, use a wrist rest or adjust the tray’s tilt to properly support your wrists. Ensure that your wrists are neutral and not strained or excessively flexed.
5. Make Necessary Adjustments: Based on your observations and comfort level, make any adjustments to the height and angle of the keyboard tray. Experiment with different positions until you find the configuration that allows for the most comfortable and efficient typing and mouse usage.
6. Test for Ease of Use: Continuously test the keyboard tray for ease of use and accessibility. Ensure that it allows for smooth and natural movements while typing, navigating, and reaching for other items on your desk. Make adjustments as needed to enhance functionality and productivity.
7. Seek Input from Others: If possible, seek feedback from colleagues or ergonomic professionals to further evaluate your keyboard tray setup. They may provide insights and suggestions to improve your ergonomic positioning and enhance your overall comfort while using the tray.
Regularly testing and adjusting your keyboard tray will help maintain a comfortable and ergonomic workspace. Everyone’s needs and preferences may vary, so it’s important to find a configuration that works best for you. By fine-tuning your keyboard tray, you can optimize your typing experience and reduce the risk of discomfort or strain during long hours of computer use.
Organizing Cables and Wires
Keeping cables and wires neat and organized is an important aspect of maintaining a clean and efficient workspace. Untidy cables can not only look unsightly but also pose a safety hazard and make it difficult to access and manage your keyboard tray. Here are some tips for organizing cables and wires:
1. Use Cable Management Solutions: Invest in cable management solutions such as cable clips, cable sleeves, or cable ties. These tools help keep cables bundled together and prevent them from tangling or getting in the way of your keyboard tray.
2. Route Cables Behind the Desk: Route cables and wires behind your desk to minimize visual clutter and keep them out of the way. Use adhesive cable clips or cable management channels to secure the cables to the back of the desk and prevent them from hanging down.
3. Label Cables: Labeling cables can save you time and frustration when troubleshooting or reconfiguring your workspace. Use cable labels or color-coded tags to identify each cable’s purpose, making it easier to locate and manage specific connections.
4. Utilize Cable Sleeves: Cable sleeves are fabric or plastic tubes that gather multiple cables into a single bundle. They not only reduce cable clutter but also provide a clean and organized appearance. Thread your cables through the sleeve to keep them tidy and prevent tangling.
5. Use Cable Management Clips: Cable management clips attach to the edge of your desk or keyboard tray and hold cables in place. They keep cables raised and prevent them from sliding off the desk or becoming entangled with other objects.
6. Consider Wireless Solutions: Whenever possible, opt for wireless devices to reduce the number of cables required. Wireless keyboards and mice eliminate the need for cable management and provide greater flexibility in positioning your keyboard tray.
7. Arrange Power Cables: Pay attention to power cables and surge protectors. Use cable ties or Velcro wraps to bundle and manage power cords. Keep power strips or surge protectors hidden from view but easily accessible, ensuring they remain safely away from water or heat sources.
8. Regular Cable Maintenance: Periodically check and adjust your cable organization to avoid cables becoming tangled or dislodged. Take a few minutes to tidy up cables and ensure they are securely fastened using your chosen cable management solutions.
By implementing effective cable management practices, you can create a more organized and visually pleasing workspace. A clutter-free environment promotes better focus and productivity while reducing the risk of accidents or damage to your keyboard tray and other equipment.
Maintaining and Cleaning the Keyboard Tray
Maintaining and cleaning your keyboard tray is vital to ensure its longevity, functionality, and hygiene. Regular maintenance will help keep your workspace looking neat and organized while optimizing your typing experience. Here are some tips for maintaining and cleaning your keyboard tray:
1. Regular Dusting: Dust the surface of your keyboard tray regularly using a soft cloth or microfiber duster. This will prevent the build-up of dust and debris, which can affect the smooth movement of your keyboard and mouse.
2. Wipe Down with a Mild Cleaner: Periodically wipe down your keyboard tray using a mild, non-abrasive cleaner. Dampen a cloth or sponge with the cleaner and gently wipe the tray to remove any stains or spills. Avoid using harsh chemicals or abrasive cleaners that may damage the surface.
3. Clean Keyboard Tray Tracks: Pay attention to the tracks or rails of your keyboard tray, as dirt and debris can accumulate in these areas. Use a small brush or a cotton swab dampened with a mild cleaner to clean the tracks, ensuring smooth sliding motion.
4. Check for Loose Screws or Bolts: Regularly inspect the screws or bolts that hold your keyboard tray in place. If you notice any loosening, use a screwdriver or appropriate tool to tighten them. Keeping the tray securely fastened will prevent wobbling or instability.
5. Avoid Excessive Weight: Be mindful of the weight you place on your keyboard tray. Avoid placing heavy objects or excessive pressure that could potentially damage the tray or its mounting mechanism. Check the weight limit specified by the manufacturer and adhere to it.
6. Address Stuck Keys: If keys on your keyboard become stuck or unresponsive, remove the keyboard from the tray and clean it separately according to the manufacturer’s instructions. This will help maintain proper keyboard functionality and prevent damage to the tray.
7. Organize Cable Management: Periodically review and organize the cable management around your keyboard tray to prevent tangled or messy cables. Re-position, secure, or use cable management solutions to keep cables neatly arranged and free from interference.
8. Follow Manufacturer’s Guidelines: Always refer to the manufacturer’s guidelines and instructions for specific cleaning and maintenance recommendations for your keyboard tray. Different materials and designs may require specialized care.
By following these maintenance and cleaning tips, you can prolong the lifespan of your keyboard tray and ensure optimal performance. A well-maintained keyboard tray not only enhances your typing experience but also contributes to the overall cleanliness and professionalism of your workspace.