
Preparing for Installation
Before you begin installing RAM on your computer, it’s important to prepare yourself and your workspace. This will ensure a smooth and successful installation process. Here are a few steps to follow:
- Turn off your computer: Before handling any internal components of your computer, it’s crucial to shut it down properly. Save any open files and close all applications before proceeding.
- Disconnect the power: Once your computer is turned off, unplug the power cord from the electrical outlet. This will prevent any electrical shocks while working inside the computer.
- Find a suitable workspace: Choose a clean and well-lit area to work on your computer. Make sure you have enough space to comfortably maneuver and access the computer’s internal components.
- Use an anti-static mat or wrist strap: Static electricity can damage sensitive computer parts. To prevent this, use an anti-static mat on your work surface, or wear an anti-static wrist strap. This will help discharge any static electricity you may have built up.
- Gather the necessary tools: You will need a small Phillips screwdriver to remove the computer’s cover and possibly other tools depending on your computer’s model. Check the manufacturer’s instructions or online resources to determine if you need any specific tools.
By following these steps and preparing yourself and your workspace adequately, you will ensure a safe and efficient RAM installation process. Remember to take your time and be careful when handling delicate computer components.
Gathering the Necessary Tools
Before you begin installing RAM on your computer, it’s important to gather all the necessary tools. Having the right tools at hand will make the process smoother and more efficient. Here are the essential tools you will need:
- Small Phillips screwdriver: A small Phillips screwdriver is required to remove the screws that secure the computer’s cover. Make sure the screwdriver fits the screws properly to avoid damaging them.
- Pry tool (optional): In some cases, you may need a pry tool to help remove the computer’s cover. This can be handy if the cover is tightly secured or if there are clips holding it in place. However, be cautious when using a pry tool to avoid damaging any components.
- Manufacturer’s instructions: It’s always a good idea to have the manufacturer’s instructions or documentation for your computer model. This will provide valuable guidance specific to your system and make the installation process easier.
- Anti-static mat or wrist strap (optional): While not essential, using an anti-static mat or wrist strap can help prevent static electricity from damaging your computer’s components. If you have one available, it’s recommended to use it during the installation.
- Containers or trays: It’s useful to have small containers or trays to keep track of the screws and other small parts you remove from your computer. This will help prevent them from getting lost or mixed up.
Make sure you have all these tools ready and easily accessible before you start the RAM installation process. This will save you time and ensure that you can complete the installation smoothly.
Finding the RAM Slots on Your Motherboard
Before you can install RAM on your computer, you need to locate the RAM slots on your motherboard. The RAM slots are where the memory modules will be inserted. Follow these steps to find the RAM slots:
- Refer to the motherboard manual: The easiest way to find the RAM slots is by referring to the motherboard manual. It provides detailed information and diagrams that show the exact location of the RAM slots.
- Online resources: If you don’t have the motherboard manual or can’t find it, you can search for your motherboard model online. Many manufacturers provide downloadable manuals or documentation on their websites that can help you locate the RAM slots.
- Open the computer’s cover: Use a small Phillips screwdriver to remove the screws securing the computer’s cover. Set the screws aside in a safe place. Gently remove the cover to expose the internal components of the computer.
- Inspect the motherboard: Once the cover is removed, look for a large circuit board inside the computer. This is the motherboard. On the motherboard, you will find several slots and connectors for various components, including the RAM slots.
- Look for rectangular slots: The RAM slots are usually long, rectangular slots located near the processor. They may be color-coded or labeled to indicate the proper installation sequence or memory channel configuration.
- Count the number of RAM slots: Take note of the number of RAM slots on your motherboard. This will determine the maximum amount of RAM you can install on your computer.
Once you have located the RAM slots on your motherboard, you are ready to move on to the next step of the RAM installation process. Remember to handle the components with care and grounding yourself properly to avoid static electricity damage.
Removing the Computer’s Cover
Before you can install RAM on your computer, you need to remove the computer’s cover to access the internal components. Follow these steps to safely remove the cover:
- Power down your computer: Ensure that your computer is turned off properly. Save any open files and close all applications before proceeding.
- Disconnect the power: Unplug the power cord from the electrical outlet to safely disconnect the computer from the power source.
- Ground yourself: Grounding yourself is crucial to prevent static electricity from damaging sensitive components. Touch a metal surface or wear an anti-static wrist strap to discharge any static electricity you may have built up.
- Locate the screws: Examine the back of your computer case to find the screws that secure the cover. There are typically two or more screws that need to be removed.
- Use a screwdriver: Use a small Phillips screwdriver to remove the screws. Place the screws in a safe container or tray to prevent them from getting lost.
- Slide or lift the cover: Gently slide or lift the computer’s cover away from the rest of the case. Take note of any clips or mechanisms that may be holding the cover in place and release them if necessary.
With the computer’s cover removed, you now have access to the internal components, including the RAM slots. Take this opportunity to familiarize yourself with the layout of the motherboard and the location of the RAM slots. Handling the computer with care and caution will ensure a smooth RAM installation process.
Identifying the RAM Slots
After removing the computer’s cover, the next step in installing RAM is identifying the RAM slots on your motherboard. RAM slots are the specific locations where you will insert the RAM modules. To identify the RAM slots, follow these steps:
- Observe the motherboard: Take a close look at the motherboard, the large circuit board inside your computer. The RAM slots are typically located near the processor, but their exact positioning can vary depending on the motherboard model.
- Look for long, rectangular slots: RAM slots are usually long and rectangular in shape. They are designed to accommodate the RAM modules, which have a similar form factor. The slots may be color-coded or labeled to indicate the correct installation sequence or memory channel configuration.
- Check the motherboard manual or specifications: If you have the motherboard manual or access to the motherboard’s specifications online, refer to it for detailed information. The manual or specifications will provide illustrations or diagrams that clearly identify the RAM slots.
- Count the number of slots: Take note of the number of RAM slots on your motherboard. The number of slots will determine the maximum amount of RAM that can be installed on your computer. Typical motherboards have two to four RAM slots, but higher-end models may have more.
- Pay attention to slot markings: Some motherboards may have markings or labels near the RAM slots to indicate the supported memory configurations, such as dual-channel or quad-channel memory. Refer to these markings to ensure the proper installation of the RAM modules.
By identifying the RAM slots on your motherboard, you can proceed with confidence to the next step of the RAM installation process. Remember to handle the RAM modules with care and align them correctly with the slots for a successful installation.
Checking the Current RAM
Prior to installing new RAM modules, it’s important to check the current RAM in your computer. This will help you determine the type, capacity, and configuration of the existing RAM, allowing you to make informed decisions when upgrading. Follow these steps to check the current RAM:
- Access the System Information: On Windows, click the “Start” button, type “System Information” in the search bar, and select the corresponding application. On Mac, click the Apple menu, go to “About This Mac,” and click the “System Report” button.
- View the RAM information: In the System Information or System Report window, navigate to the “Memory” or “Memory Overview” section. Here, you will find details about the currently installed RAM, such as the type, capacity, speed, and the number of occupied slots.
- Note the type of RAM: The System Information will specify the type of RAM installed in your computer, such as DDR3, DDR4, or DDR5. This information is crucial when purchasing compatible RAM modules.
- Check the capacity: Take note of the capacity of the current RAM modules. This will help you determine if you need to add more RAM or replace the existing modules with higher-capacity ones.
- Review the speed: The System Information will display the speed of the current RAM modules, measured in megahertz (MHz). If you plan to add or replace RAM, ensure that the new modules match or exceed the speed of the existing ones for optimal performance.
- Consider the configuration: If the current RAM is installed in a specific configuration, such as dual-channel or quad-channel, note how the memory slots are populated. This will be helpful when installing new RAM modules to maintain optimal channel configuration.
By checking the current RAM in your computer, you can effectively plan your RAM upgrade. Whether you decide to add more RAM or replace existing modules, knowing the type, capacity, and configuration of the current RAM will guide your purchasing decisions and ensure compatibility with your system.
Purchasing the Correct RAM
When it comes to upgrading your computer’s RAM, it is crucial to purchase the correct RAM modules that are compatible with your system. Here are the steps to ensure you purchase the right RAM:
- Identify the type of RAM: Check your computer’s documentation or the System Information to determine the type of RAM your system supports, such as DDR3, DDR4, or DDR5. Make sure to purchase RAM modules that match this specification.
- Consider the capacity: Determine how much RAM you want to add or replace. Take note of the current capacity and assess if you need additional memory to meet your system requirements. Choose a capacity that suits your needs and budget, such as 4GB, 8GB, or 16GB modules.
- Check speed and timings: Consider the speed of the RAM modules you are purchasing. Ideally, the new RAM modules should have the same or higher speed than the existing ones for optimal performance. Additionally, you may want to check the timings (CAS latency) if you require precise memory performance.
- Verify compatibility: Ensure the new RAM modules are compatible with your motherboard’s specifications. Check the motherboard manual or visit the manufacturer’s website to confirm the supported RAM configurations, frequency, and capacity limitations.
- Choose reputable brands: Opt for reputable and trusted brands when purchasing RAM. They tend to offer better quality and compatibility assurance. Additionally, reputable brands often provide warranties, which can be important for peace of mind.
- Consider your budget: Determine your budget for RAM upgrades. Compare prices from various retailers to find the best deal without sacrificing quality. Keep in mind that higher-capacity or faster RAM modules may come at a higher cost.
- Read user reviews: Before making a final decision, read user reviews and ratings for the RAM modules you are interested in. This can provide valuable insights into the reliability, performance, and compatibility of the product.
- Purchase from a reliable source: Finally, purchase the RAM modules from a reputable and reliable source to ensure authenticity and avoid counterfeit products. Choose authorized retailers or trusted online platforms.
By following these steps, you can confidently purchase the correct RAM modules that meet your system’s requirements and enhance its overall performance. Take the time to research and choose the right RAM for a smooth and successful upgrade.
Grounding Yourself
Grounding yourself is an essential step before handling any computer components, including RAM modules. This precaution helps to prevent the buildup and discharge of static electricity, which can damage sensitive electronic parts. Follow these steps to effectively ground yourself:
- Turn off your computer: Shut down your computer and unplug the power cord from the electrical outlet. This eliminates any potential electrical hazards while you work.
- Choose a suitable workspace: Select a clean and dry area to work on your computer. Avoid working on carpeted surfaces as they tend to generate more static electricity. A Hardwood or tile floor is preferable.
- Remove any unnecessary clothing or accessories: Take off any clothing or accessories that may generate static electricity, such as wool sweaters or synthetic materials. This helps minimize the risk of static electricity discharge.
- Use an anti-static wrist strap or mat: Consider using an anti-static wrist strap or an anti-static mat. The wrist strap connects you to a grounded source, while the mat provides a static-free work surface. These accessories help to dissipate any static electricity from your body.
- Touch a grounded metal object: If you don’t have an anti-static wrist strap or mat, touch a grounded metal object, such as a metal table or the unpainted part of your computer case. This helps discharge any static electricity you may have accumulated.
- Avoid excessive movements: While working on your computer, try to minimize excessive movements, as it can create static electricity. Move slowly and deliberately, avoiding any rapid or unnecessary motions.
- Handle RAM modules by the edges: When handling RAM modules, always hold them by the edges. Avoid touching the gold pins or any other components on the module’s surface. This reduces the risk of transferring static electricity to the module.
- Avoid surfaces prone to static buildup: Be mindful of surfaces that are more likely to generate static electricity, such as plastic or synthetic materials. Try to avoid placing RAM modules or other components on these surfaces.
By following these grounding steps, you can significantly reduce the risk of static electricity damage to your computer components. Taking the necessary precautions demonstrates your commitment to maintaining the integrity of your RAM and the overall performance of your computer.
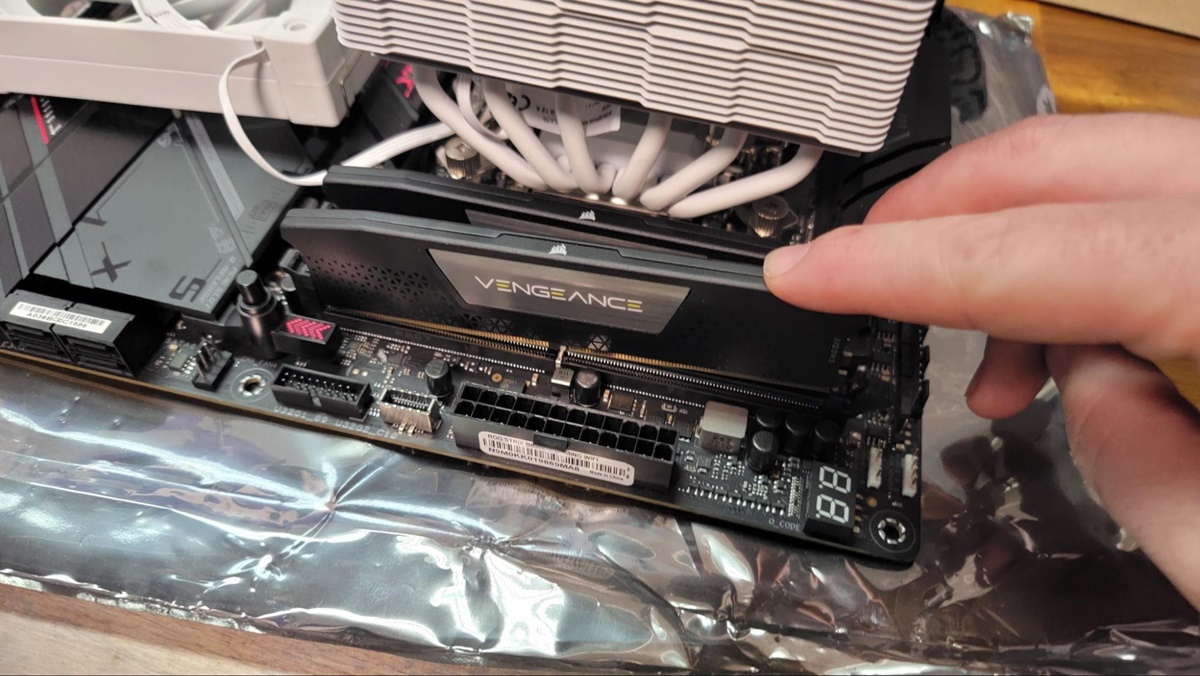
Inserting the RAM Module
Inserting the RAM module into the appropriate slot on your motherboard is a critical step in the RAM installation process. Follow these steps to ensure a successful insertion:
- Locate the RAM slots: Refer to the previous steps to identify the RAM slots on your motherboard. These slots are usually long and rectangular in shape.
- Handle the RAM module with care: Hold the RAM module by the edges, avoiding contact with the gold pins or any other components on the module’s surface. This minimizes the risk of static electricity damage.
- Align the notch: Examine the RAM module and the RAM slot to find the alignment notch. The module has a small notch on the bottom edge, and the RAM slot has a corresponding notch that matches the module’s alignment.
- Insert the RAM module at a 45-degree angle: Position the RAM module at a slight angle, aligning the notch on the module with the matching notch on the RAM slot. Insert the module into the slot at approximately a 45-degree angle.
- Press down evenly and firmly: Once the RAM module is positioned correctly in the slot, apply equal pressure to both ends of the module. Push down firmly until the module is fully seated in the slot and the clips on either side of the slot snap into place.
- Confirm proper installation: Gently wiggle the RAM module back and forth to ensure it is securely inserted. The module should be stable, without any visible gaps between the module and the slot.
It is essential to install the RAM module correctly to ensure proper functioning and compatibility. If you encounter resistance or the module doesn’t fit properly, double-check the alignment and reseat it if necessary. Avoid using excessive force, as it can damage the module or the motherboard.
Repeat these steps if you are installing multiple RAM modules. Remember to follow any specific instructions from your motherboard’s manual or manufacturer regarding the order of installation for multiple modules.
Closing the Computer’s Cover
Once you have finished installing the RAM modules, it’s time to close the computer’s cover. Properly securing the cover ensures the protection and stability of the internal components. Follow these steps to close the computer’s cover:
- Check for any loose cables: Before closing the computer’s cover, inspect the inside of the computer for any loose cables or connectors. Make sure all cables are properly connected and organized to avoid any interference or accidental disconnection.
- Align the cover: Gently position the computer’s cover back into place, aligning it with the screw holes on the case. Make sure the edges of the cover are properly aligned with the edges of the case to ensure a snug fit.
- Secure the cover with screws: Using the small Phillips screwdriver, tighten the screws that secure the cover. Start with one screw and gradually tighten each one in a diagonal pattern until all screws are securely fastened. Be careful not to overtighten to avoid damaging the screws or the case.
- Ensure proper closure: After tightening the screws, ensure that the computer’s cover is firmly closed and there are no gaps or areas where the cover is loose. A properly closed cover helps to maintain a dust-free and secure environment for your computer’s internal components.
Once you have closed the computer’s cover and ensured a secure fit, double-check that all components and cables are in place. Take a moment to admire your work and appreciate the proper installation and organization of your computer’s RAM modules.
With the computer’s cover securely closed, you are now ready to power on your computer and enjoy the improved performance and efficiency that the new RAM modules provide.
Powering on Your Computer
After successfully installing the RAM modules and closing the computer’s cover, it is time to power on your computer. Properly powering on your computer ensures that the new RAM is recognized and utilized by the system. Follow these steps to power on your computer:
- Connect the power cord: Plug the power cord back into the electrical outlet or power strip. Ensure that the cord is securely connected.
- Inspect the connections: Before turning on your computer, double-check that all necessary cables, such as the display cable, keyboard, mouse, and any other peripherals, are properly connected.
- Press the power button: Locate the power button on your computer’s case or front panel. Press the power button to turn on your computer.
- Observe startup process: As your computer powers on, pay attention to the startup process. You may see the manufacturer’s logo or a series of text-based messages that indicate the hardware is being detected.
- Check system information: Once your computer has fully powered on, go to the system information or BIOS setup utility to verify that the installed RAM is being properly recognized. Confirm that the capacity and specifications of the installed RAM match your expectations.
- Run a memory test: To ensure that the new RAM modules are functioning correctly, consider running a memory test utility. Many operating systems have built-in memory diagnostic tools, or you can use third-party software. Running a memory test can identify any potential errors or issues with the new RAM.
- Monitor system performance: After performing the necessary tests, monitor your computer’s performance. You should notice improved multitasking capabilities, faster program loading times, and smoother overall operation with the added RAM.
If you encounter any issues, such as the computer not powering on or the RAM not being recognized properly, refer to the manufacturer’s documentation or seek technical assistance. Generally, performing the RAM installation correctly and powering on your computer should result in a seamless transition to enhanced system performance.
Congratulations! Your computer is now powered on with the newly installed RAM modules. Enjoy the improved speed and responsiveness of your system as you maximize your computer’s potential.
Verifying the Installed RAM
After you’ve powered on your computer, it’s important to verify that the newly installed RAM has been recognized and is functioning properly. This verification process ensures that your system is utilizing the new RAM to its full potential. Follow these steps to verify the installed RAM:
- Access the system information: On Windows, go to the “Start” menu, search for “System Information,” and open the corresponding application. On Mac, click the Apple menu, go to “About This Mac,” and click the “System Report” button.
- Locate the RAM information: In the System Information or System Report window, navigate to the “Memory” or “Memory Overview” section. Here, you will find detailed information about the installed RAM in your computer.
- Confirm the capacity: Check the capacity of the installed RAM modules to ensure that it matches your expectations. The total capacity should reflect the combined values of all the RAM modules you installed.
- Verify the type and speed: Verify that the type and speed of the installed RAM match the specifications of the RAM modules you purchased and installed. Ensure that the new RAM is running at the desired speed.
- Check the number of slots occupied: Confirm that the correct number of RAM slots are occupied. If you installed multiple RAM modules, ensure that each module is recognized and accounted for.
- Review any additional details: Take note of any additional details provided in the system information, such as the manufacturer and part number of the RAM modules. These details can be useful for future reference or troubleshooting purposes.
- Run benchmark tests (optional): If desired, you can run benchmark tests or performance monitoring software to assess the impact of the new RAM on your system’s performance. These tests can provide valuable insights into the efficiency and responsiveness of your computer.
- Monitor system stability: Over a period of usage, observe the stability of your system. Check for any unexpected crashes, errors, or performance issues that could indicate a problem with the newly installed RAM. If you encounter any issues, it may be necessary to troubleshoot further.
If you encounter any discrepancies or issues with the recognized RAM, double-check that the RAM modules are properly seated in the slots. Also, ensure that the modules are compatible with your motherboard and that the BIOS is up to date. If the issues persist, consult the manufacturer’s documentation or seek technical assistance to resolve any potential conflicts.
Verifying the installed RAM ensures that your computer is performing optimally with the new memory upgrade. Take the time to confirm the accuracy of the recognized RAM to ensure that your system is taking full advantage of the added capacity and improved performance.