
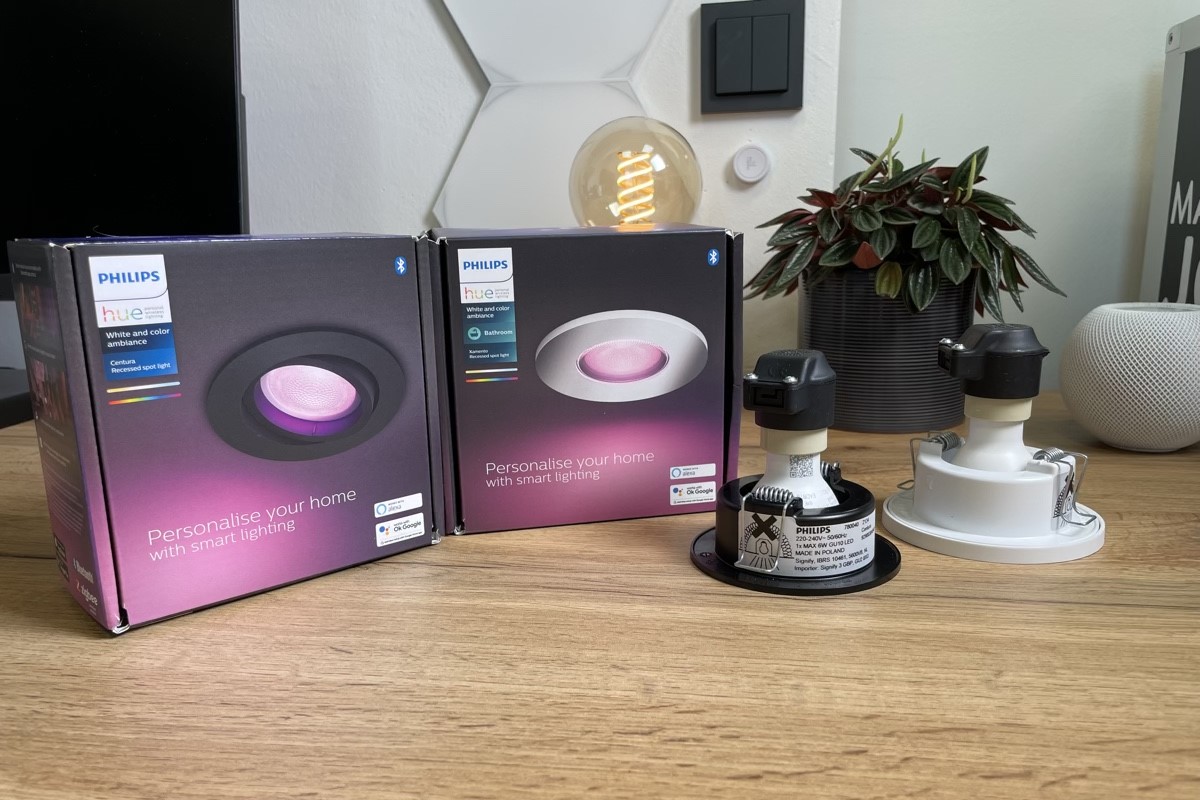
Choosing the Right Philips Hue Recessed Lighting
When it comes to installing Philips Hue recessed lighting, selecting the right type and model is essential to achieve the desired style and functionality. With a wide variety of options available, it’s important to consider factors such as brightness, color temperature, and compatibility with the Philips Hue ecosystem.
First and foremost, consider the brightness level you require for the space. Philips Hue recessed lights come in different lumen outputs, ranging from dim ambiance to bright task lighting. Assess the specific needs of the room and determine whether you want a cozy and relaxed atmosphere or a well-lit area for tasks and activities.
Next, think about the color temperature of the lighting. Philips Hue offers a range of color temperatures, from warm white to cool white, allowing you to customize the ambiance to your preference. Warmer lights create a cozy and inviting atmosphere, while cooler lights provide a more energizing and focused environment.
Compatibility with the Philips Hue ecosystem is another crucial aspect to consider. Ensure that the recessed lighting you choose is compatible with the Philips Hue Bridge, the central hub that connects and controls all your Hue lights. This will allow you to take advantage of features like remote control, scheduling, and integration with voice assistants.
Additionally, consider the type of installation you require. Philips Hue offers both retrofit and new construction versions of their recessed lights. Retrofit versions can be easily installed into existing ceiling openings, making them ideal for retrofits or upgrades. New construction versions, on the other hand, are designed for installation in new buildings or spaces without existing recessed lighting.
Finally, take into account any additional features or options that may enhance your lighting experience. Some Philips Hue recessed lights offer features like tunable white, allowing you to adjust the color temperature throughout the day to mimic natural sunlight. Others even offer color-changing capabilities, enabling you to create vibrant and dynamic lighting scenes.
By considering factors such as brightness, color temperature, compatibility, installation type, and additional features, you can ensure that you choose the right Philips Hue recessed lighting to meet your specific needs and preferences. The selection process is crucial in achieving the desired lighting effect and creating a comfortable and personalized atmosphere in your space.
Gathering the Necessary Tools and Materials
Before you start the installation process for your Philips Hue recessed lighting, it’s important to gather all the necessary tools and materials. Having everything prepared ahead of time will make the installation process smoother and more efficient.
Here are the essential tools and materials you will need:
- Philips Hue recessed lighting kit(s)
- Philips Hue Bridge (if not already installed)
- Screwdriver
- Wire strippers
- Electrician’s tape
- Wire connectors
- Wire nuts
- Electrical tester
- Ladder or step stool
- Pencil or marker
- Measuring tape
- Safety glasses
- Protective gloves
Make sure to have the desired number of Philips Hue recessed lighting kits for your project. Each kit usually includes the necessary components such as the light fixture, trim, and mounting hardware. Additionally, ensure that you have the appropriate number of wire connectors and wire nuts for the wiring process.
Having a screwdriver, wire strippers, and electrical tape on hand is crucial for removing the existing lighting and making electrical connections. The wire strippers will help you strip off the insulation from the wires, while the screwdriver will be necessary for removing screws and securing the new fixtures.
To ensure safety during the installation process, it’s important to have safety glasses and protective gloves. These will protect your eyes and hands from any potential hazards while handling the lighting fixtures and working with electrical connections.
Using a ladder or step stool will provide you with the necessary height to access the ceiling and install the recessed lighting. Additionally, having a pencil or marker and a measuring tape will help with marking the placement of the lights and ensuring they are evenly spaced and aligned.
Lastly, having an electrical tester is essential for ensuring that the power is properly turned off before starting any electrical work. This will help prevent the risk of electric shock or damage to the lighting fixtures.
By gathering all the necessary tools and materials before you begin the installation process, you can ensure a smooth and efficient process, minimizing any potential delays or interruptions. Having everything in place will help you complete the installation in a timely and organized manner, bringing your Philips Hue recessed lighting to life.
Preparing the Installation Area
Before you start installing your Philips Hue recessed lighting, it’s important to properly prepare the installation area. This will help ensure a smooth and successful installation process, as well as optimize the overall lighting performance and aesthetics of the space.
Here are the steps to prepare the installation area:
- Turn off the power: Before starting any electrical work, locate the circuit breaker for the lighting fixture and switch off the power to the area. This will help prevent any accidents or electrical shocks during the installation process. Use an electrical tester to verify that the power is indeed turned off.
- Clean the area: Clear away any dust, debris, or obstacles from the installation area. This will ensure that the lights fit properly and provide a clean and polished look once installed. Use a broom, vacuum cleaner, or duster to remove any dirt or debris from the ceiling and surrounding area.
- Measure and mark: Use a measuring tape and a pencil or marker to measure and mark the placement of the recessed lights. Consider factors such as the layout of the room, the desired lighting distribution, and any existing furniture or fixtures in the area. Make sure the lights are evenly spaced and aligned for a visually pleasing result.
- Cut the openings: Once the placement is marked, use a drywall saw or a hole saw to cut the openings for the recessed lights. Follow the markings and carefully cut along the lines. Take precautionary measures to protect yourself and the surrounding surfaces, and wear safety glasses for added protection.
- Remove any existing lighting: If there are existing lighting fixtures in the installation area, remove them carefully. Disconnect the wires and remove any mounting brackets or hardware. Clean the area and patch any holes or damage in the ceiling if necessary.
By properly preparing the installation area, you can ensure a smooth and efficient process when installing your Philips Hue recessed lighting. Turning off the power, cleaning the area, measuring and marking the placement, cutting the openings, and removing any existing lighting will set the stage for a successful installation. Taking the time to prepare will result in a professional-looking outcome and a well-illuminated space that enhances the ambiance and functionality of your room.
Turning Off the Power and Removing the Existing Lighting
Before you begin installing your Philips Hue recessed lighting, it is crucial to turn off the power to the area and remove any existing lighting fixtures. This step ensures your safety and allows for a smooth and hassle-free installation process.
Here is a step-by-step guide to turning off the power and removing the existing lighting:
- Locate the circuit breaker: Identify the circuit breaker that controls the power supply to the lighting fixture you are replacing. Usually, the circuit breakers are located in the electrical panel of your home. Refer to the circuit breaker directory if available, or test each breaker until you find the correct one.
- Switch off the power: Once you have located the correct circuit breaker, switch it to the “off” position. This will cut off the electricity supply to the lighting fixture, ensuring your safety during the removal process. Use an electrical tester to verify that the power is indeed turned off.
- Remove the light bulb(s): If there are light bulbs in the existing fixture, gently unscrew them and set them aside for future use or disposal. Be cautious not to break the bulbs or cut yourself on any broken glass.
- Remove the fixture cover or trim: Depending on the type of existing lighting fixture, you may need to remove a cover or trim piece. Look for screws, clips, or other fasteners that secure the cover in place, and carefully remove them. Set the cover or trim aside for later.
- Disconnect the wiring: After removing the cover or trim, you will see the wiring connections. Use a screwdriver or pliers to disconnect the wires from the existing fixture. Take note of the wire colors and connections, as you will need this information when wiring the Philips Hue recessed lights.
- Remove the mounting bracket or base: Once the wiring is disconnected, remove any mounting brackets or bases that secure the existing fixture to the ceiling. Loosen any screws or fasteners and carefully detach the fixture. If needed, use a ladder or step stool to reach the fixture safely.
By turning off the power and properly removing the existing lighting fixtures, you create a safe environment to install your Philips Hue recessed lights. Take your time during this process to ensure that all electrical connections are disconnected correctly and that the existing fixtures are removed without any damage or accidents. With the existing lighting removed, you are now ready to proceed with the next steps of the installation process.
Wiring the Philips Hue Recessed Lights
Wiring the Philips Hue recessed lights is a vital step of the installation process, as it allows the lights to receive power and function properly. It’s important to follow the specific wiring instructions provided by Philips Hue to ensure a correct and safe installation. Here’s a general guide for wiring the lights:
- Prepare the wires: Start by preparing the wires that will connect the Philips Hue recessed lights. Depending on your specific installation, you may need to remove the insulation from the ends of the wires using wire strippers.
- Connect the wires: Match the colored wires of the Philips Hue recessed light with the corresponding wires in your electrical box. Typically, black wires are hot/line wires, white wires are neutral wires, and green or bare copper wires are ground wires. Use wire connectors to securely join the wires together. Make sure to follow the specific wiring instructions provided by Philips Hue and ensure that all connections are tight and secure.
- Secure the wires: Once the wires are connected, neatly tuck them into the electrical box and secure them in place using wire nuts or clips. This will help prevent any accidental pulling or loosening of the connections during the installation process.
- Insulate the connections: Use electrical tape to insulate and cover the wire connections. This adds an extra layer of protection and helps ensure that there are no exposed wires, reducing the risk of electrical hazards.
- Double-check the connections: Before proceeding further, double-check all the wiring connections to ensure they are correctly matched and securely fastened. Verify that the hot/line wires are connected to the corresponding hot/line wires and the neutral and ground wires are connected properly.
It’s crucial to follow the specific instructions provided by Philips Hue for your particular model and version of recessed light. The wiring process may vary depending on the specific requirements and design of the lights. If you’re uncertain or uncomfortable with wiring, it’s recommended to consult a professional electrician for assistance.
Remember to always practice caution when working with electrical connections. Ensure the power to the area is turned off before starting any wiring work and use an electrical tester to verify that there is no electricity running through the wires. Take your time and be thorough with the wiring process to ensure a safe and successful installation of your Philips Hue recessed lights.
Connecting the Philips Hue Bridge and Configuring the Lights
After wiring the Philips Hue recessed lights, the next step is to connect them to the Philips Hue Bridge and configure the lights using the Philips Hue app. This allows you to have full control over your lighting system and customize it to your liking. Here’s a step-by-step guide:
- Set up the Philips Hue Bridge: Start by connecting the Philips Hue Bridge to your home’s Wi-Fi router using the provided Ethernet cable. Plug the bridge into an electrical outlet to power it on. Follow the on-screen instructions in the Philips Hue app to complete the setup process.
- Open the Philips Hue app: Launch the Philips Hue app on your smartphone or tablet. If you haven’t installed the app already, it can be downloaded from the App Store or Google Play Store.
- Add the lights: In the Philips Hue app, navigate to the “Settings” or “Configuration” section and select “Add Device” or a similar option. Follow the instructions to search and connect to the Philips Hue recessed lights. This may involve pressing a button on the Hue Bridge and/or following on-screen prompts to identify and pair the lights.
- Configure the lights: Once the lights are successfully connected, you can personalize their settings in the Philips Hue app. Adjust the brightness level, select color temperatures, and even set up lighting scenes or schedules. The app provides a user-friendly interface for customizing your lighting experience.
- Test the lights: To ensure that the lights are properly configured, perform a test by turning them on and off, adjusting the brightness, and changing colors or color temperatures. Verify that the lights respond correctly and that the desired settings are applied.
- Explore additional features: The Philips Hue app offers a wide range of additional features to enhance your lighting experience, such as syncing your lights with music or movies, setting up geofencing for automatic lighting control, or integrating with voice assistants like Amazon Alexa or Google Assistant. Take some time to explore these features and customize your lighting system further.
It’s worth noting that the specific steps and options may vary depending on the version of the Philips Hue app and the capabilities of your Philips Hue Bridge and lights. Refer to the user manual or online resources provided by Philips Hue for detailed instructions tailored to your specific setup.
By connecting the Philips Hue Bridge and configuring the lights using the Philips Hue app, you gain full control over your lighting system and can enjoy the versatility and convenience that the Philips Hue ecosystem offers. Explore the various settings and features to create the perfect lighting ambiance for any occasion.
Installing the Philips Hue Recessed Lights
With the wiring and configuration complete, it’s time to install the Philips Hue recessed lights in your desired location. Proper installation ensures that the lights are securely mounted and positioned for optimal lighting performance. Follow these steps to install the lights:
- Prepare the light fixtures: Before installing the Philips Hue recessed lights, remove any protective covering or packaging material from the fixtures. Ensure that all components, such as the trim and mounting hardware, are intact and ready for installation.
- Align the lights: If you marked the placement of the lights during the preparation phase, use those markings to align the lights accordingly. Pay attention to the spacing and alignment of the fixtures to ensure a visually balanced and appealing result. Use a pencil or marker, if needed, to make slight adjustments to the markings.
- Mount the lights: Depending on the specific design of your Philips Hue recessed lights, follow the manufacturer’s instructions to mount the fixtures in the designated openings. This may involve securing the trim piece, attaching brackets, or using clips or screws to hold the lights in place. Ensure that the lights are securely fastened to the ceiling or mounting surface.
- Connect any additional components: If your Philips Hue recessed lights come with any additional components, such as extension cables or adapters, follow the provided instructions to connect them as needed. These components allow for customization and flexibility in the installation, especially for larger or uniquely shaped spaces.
- Test the lights: After the lights are installed, restore power to the area by turning the circuit breaker back on. Use the Philips Hue app or any available manual controls to test the lights and verify that they are functioning as expected. Check for any flickering, dimming, or connectivity issues, and make any necessary adjustments or troubleshooting.
- Make final adjustments: Once the lights are tested and confirmed to be in working order, make any final adjustments to the positioning and alignment if needed. Fine-tune the angle and direction of the lights to achieve the desired lighting effect in the room. Take a moment to appreciate the transformation and the ambiance created by your newly installed Philips Hue recessed lights.
Remember to always exercise caution and adhere to safety guidelines when installing electrical fixtures. If you’re unsure about any aspect of the installation process or encounter any difficulties, consult the user manual or seek assistance from a qualified electrician.
By following these steps, you can successfully install the Philips Hue recessed lights and enjoy their benefits for years to come. The properly installed lights will enhance the aesthetics and functionality of your space, allowing you to create the perfect lighting atmosphere to suit your needs and preferences.
Testing and Adjusting the Lighting
Once the Philips Hue recessed lights are installed, it’s important to test and adjust the lighting to ensure optimal performance and create the desired ambiance in your space. Testing and making necessary adjustments will help fine-tune the lighting to meet your specific preferences. Here’s what you should do:
- Turn on the lights: Use the Philips Hue app, manual controls, or any designated switches to turn on the lights. Verify that all the installed lights illuminate properly.
- Check for uniformity: Observe the lighting in the room and assess if there are any inconsistencies or variations in brightness or color temperature. Make note of any areas that may require adjustments.
- Adjust brightness: If you find that the lights are too bright or too dim, use the controls in the Philips Hue app to adjust the brightness level of individual lights or groups of lights. Find the right balance that suits your specific needs and preferences.
- Customize color temperature: If your Philips Hue recessed lights feature adjustable color temperature, experiment with different settings to achieve the desired atmosphere. Warmer color temperatures create a cozy and relaxing ambiance, while cooler color temperatures provide a more energizing and focused environment.
- Create lighting scenes: Take advantage of the Philips Hue app to create customized lighting scenes to match different moods or activities. Experiment with different combinations of brightness and color to create unique lighting presets for various situations.
- Consider dimming options: If desired, explore options for dimming the lights to further enhance the ambiance. Depending on your specific Philips Hue recessed lights, you may have the ability to dim the lights using controls in the app, wireless dimmer switches, or compatible voice assistants.
- Test remote control functionality: If you have configured remote control options with the Philips Hue app or compatible accessories, test the remote control functionality to ensure that the lights respond as expected. This will allow you to conveniently control the lighting from different locations within your space.
Throughout the testing and adjustment process, be mindful of the specific capabilities and features of your Philips Hue recessed lights. Refer to the user manual or online resources provided by Philips for guidance on optimizing the lighting settings and taking full advantage of the features available to you.
By testing and adjusting the lighting, you can achieve the perfect lighting atmosphere in your space, whether it’s for relaxation, productivity, or entertainment. Experiment with different combinations, trust your personal preferences, and don’t hesitate to make further adjustments if needed to create the ultimate lighting experience.
Troubleshooting Common Installation Issues
While installing Philips Hue recessed lights, you may encounter certain issues or complications. Troubleshooting these common installation problems will help you address any issues and ensure a smooth and successful installation. Here are some common installation issues and their possible solutions:
- Lights not turning on: If the lights do not turn on after installation, first check the power supply. Make sure the circuit breaker is turned on and that the power is properly connected to the lights. If the power is fine, try resetting the lights by turning them off, waiting for a few seconds, and then turning them back on. If the issue persists, contact Philips Hue support for further assistance.
- Inconsistent brightness or color: If you notice that the brightness or color of the lights is inconsistent across the room, check for any loose connections in the wiring. Ensure that all wires are securely connected and that the connections are properly insulated. If the issue persists, consider resetting the lights and adjusting the settings in the Philips Hue app to ensure uniformity.
- Dimming or flickering lights: Dimming or flickering lights can be caused by various factors, such as incompatible dimmer switches or voltage fluctuations. If you have installed the lights on a dimmer switch, make sure it is compatible with Philips Hue lights or consider replacing it with a compatible dimmer switch. Additionally, check for any loose connections in the wiring or power supply that may be causing the issue.
- Lights not connecting to the Philips Hue Bridge: If the lights are not connecting to the Philips Hue Bridge during the setup process, ensure that the lights are within range of the bridge and that they are properly powered. Check that the bridge is connected to the Wi-Fi network and that you have followed the correct pairing instructions for your specific lights. If the issue persists, refer to the troubleshooting section in the Philips Hue app or contact Philips Hue support for assistance.
- Uneven or misaligned installation: If you notice that the lights are unevenly aligned or misaligned after installation, double-check the measurements and markings made during the preparation phase. Make any necessary adjustments to ensure even spacing and alignment. If the lights cannot be adjusted, remove them carefully, correct the installation area, and reinstall them securely.
If you encounter an issue that is not listed here or if the suggested solutions do not resolve the problem, it’s recommended to consult the user manual or contact Philips Hue support for further assistance. They will be able to provide specific troubleshooting guidance based on your particular installation and setup.
Remember, patience and thoroughness are key during the troubleshooting process. Take the time to carefully analyze the issue, check all connections, and follow the recommended steps to resolve the problem. With proper troubleshooting, you can overcome common installation issues and enjoy the full benefits of your Philips Hue recessed lights.
Tips and Recommendations for Maximizing the Philips Hue System
To get the most out of your Philips Hue recessed lighting and create an immersive lighting experience, consider implementing these tips and recommendations:
- Experiment with lighting scenes: Take advantage of the lighting scene features in the Philips Hue app to set up presets for different activities or moods. Create scenes for movie nights, reading, relaxation, or entertaining guests. This allows you to quickly and easily switch between lighting setups without manually adjusting each light.
- Utilize timers and schedules: Use the scheduling feature in the Philips Hue app to automate your lighting. Set timers to have your lights turn on and off at specific times, providing convenience and energy savings. Schedule your lights to gradually dim in the evening to promote a relaxing atmosphere before bedtime.
- Explore third-party integrations: Philips Hue works with various smart home platforms and devices, allowing for seamless integration and expanded functionality. Connect your Philips Hue lights with voice assistants, such as Amazon Alexa or Google Assistant, to control them with voice commands. Explore other integrations, such as motion sensors or smart home hubs, to enhance your lighting experience.
- Create dynamic lighting: Make use of the Philips Hue app’s dynamic lighting capabilities to sync your lights with music, movies, or games. Experience an immersive lighting experience that amplifies your entertainment and brings a new level of excitement to your space. Various third-party apps and platforms offer additional dynamic lighting options as well.
- Extend your system: Expand your lighting system by adding additional Philips Hue lights or accessories. Consider incorporating Philips Hue Lightstrips or spotlights to accentuate specific areas or features of your space. With a larger system, you can create more dynamic and versatile lighting setups throughout your home.
- Consider smart switches and controls: If you prefer physical controls over app-based controls, consider adding Philips Hue wireless dimmer switches or other compatible smart switches to your setup. These switches allow you to toggle your lights on/off, adjust brightness, and even control preset scenes without relying solely on the app.
- Keep software and firmware up to date: Regularly update the firmware of your Philips Hue Bridge and lights to benefit from performance enhancements, bug fixes, and new features. Check for updates in the Philips Hue app or enable automatic updates to ensure your system is running smoothly.
- Personalize your white ambiance: If you have Philips Hue white ambiance lights, take advantage of the ability to adjust the color temperature throughout the day. Mimic natural sunlight by gradually increasing the color temperature in the morning and decreasing it in the evening. This can help regulate your body’s natural circadian rhythm and provide a more soothing lighting experience.
By implementing these tips and recommendations, you can maximize the potential of your Philips Hue recessed lighting system. Enjoy the convenience, customization, and ambiance that the Philips Hue ecosystem offers, transforming your space into a truly personalized and immersive lighting environment.