
Gather the necessary materials and tools
Before you can install the Philips Hue Lightstrip behind your TV, you will need to gather a few essential materials and tools. Having everything prepared in advance will make the installation process smoother and more efficient. Here’s what you’ll need:
- Philips Hue Lightstrip: Choose the appropriate length of lightstrip that matches the dimensions of your TV. You can find lightstrips available in various lengths to accommodate different TV sizes.
- Clean cloth (microfiber recommended): You’ll need this to clean the back surface of your TV. It’s important to remove any dust, dirt, or grease for proper adhesion of the lightstrip.
- Adhesive tape or mounting clips: Depending on the type of lightstrip you have, you may need adhesive tape or mounting clips to securely attach the lightstrip to the back of your TV.
- Power adapter: The lightstrip requires a power source to work. Ensure you have the compatible power adapter provided by Philips Hue.
- Smart device (smartphone or tablet): You’ll need a smartphone or tablet with the Philips Hue app installed. This will allow you to control and customize the lighting settings.
- Philips Hue Bridge: The Hue Bridge acts as the central hub to connect all your Philips Hue devices. If you already have a Hue Bridge set up in your home, you can skip this step.
- Wi-Fi network: Make sure you have a stable Wi-Fi network connection for the Hue Bridge to connect to and control the lightstrip.
Gathering these materials and tools beforehand will ensure a smooth installation process. It’s always best to be prepared so you can enjoy the vibrant lighting effects of the Philips Hue Lightstrip behind your TV without any hassle.
Measure the dimensions of your TV and determine the length of the lightstrip required
Before installing the Philips Hue Lightstrip behind your TV, it’s important to measure the dimensions of your TV and determine the appropriate length of the lightstrip. This will ensure that the lightstrip spans the entire width of your TV and creates a visually balanced lighting effect. Here’s how you can do it:
- Get a measuring tape and measure the width of your TV. Start from one side of the TV and measure all the way to the other side. Note down the measurement in inches or centimeters.
- Next, consider the placement of the lightstrip. Decide whether you want the lightstrip to cover the top, sides, or bottom of your TV. This will help determine the length of the lightstrip required.
- Based on your preferences, calculate the length of the lightstrip needed. If you want the lightstrip to cover only one side, measure the length of that side. If you want it to cover the top and sides, add the width measurement to both sides. For all-around coverage, add the width measurement to all four sides.
- Keep in mind that the Philips Hue Lightstrip comes in various lengths, typically ranging from 40 inches to 80 inches. Choose the closest length that matches your calculated measurement.
By taking accurate measurements and determining the appropriate length of the lightstrip, you can ensure a seamless installation and achieve the desired lighting effect on your TV. Remember to double-check your measurements before purchasing the lightstrip to avoid any size discrepancies.
Clean the back surface of your TV to ensure proper adhesion of the lightstrip
Before attaching the Philips Hue Lightstrip to the back of your TV, it’s crucial to clean the surface to ensure optimal adhesion. A clean surface will help the lightstrip securely stick to the TV and prevent any peeling or detachment. Here’s how you can do it:
- Turn off your TV and unplug it from the power source. This will prevent any electrical interference or accidental damage during the cleaning process.
- Get a clean cloth, preferably a microfiber cloth, and dampen it slightly with water or a mild cleaning solution. Avoid using harsh chemicals or abrasive materials as they may damage the TV’s surface.
- Gently wipe the back surface of the TV, removing any dust, dirt, fingerprints, or greasy residues. Pay attention to the edges and corners, as these areas are prone to accumulation of dirt.
- For stubborn stains or sticky residues, you can use a small amount of screen cleaning solution specifically designed for TV screens. Apply the solution to the cloth, not directly on the TV, and gently wipe the affected areas.
- Allow the back surface of the TV to dry completely before proceeding with the lightstrip installation. This will ensure that the adhesive backing of the lightstrip adheres properly and securely to the TV.
By cleaning the back surface of your TV before attaching the lightstrip, you’ll create an optimal environment for the lightstrip to adhere to. This will help prevent any issues with peeling or detachment and ensure a long-lasting and visually appealing lighting effect behind your TV.
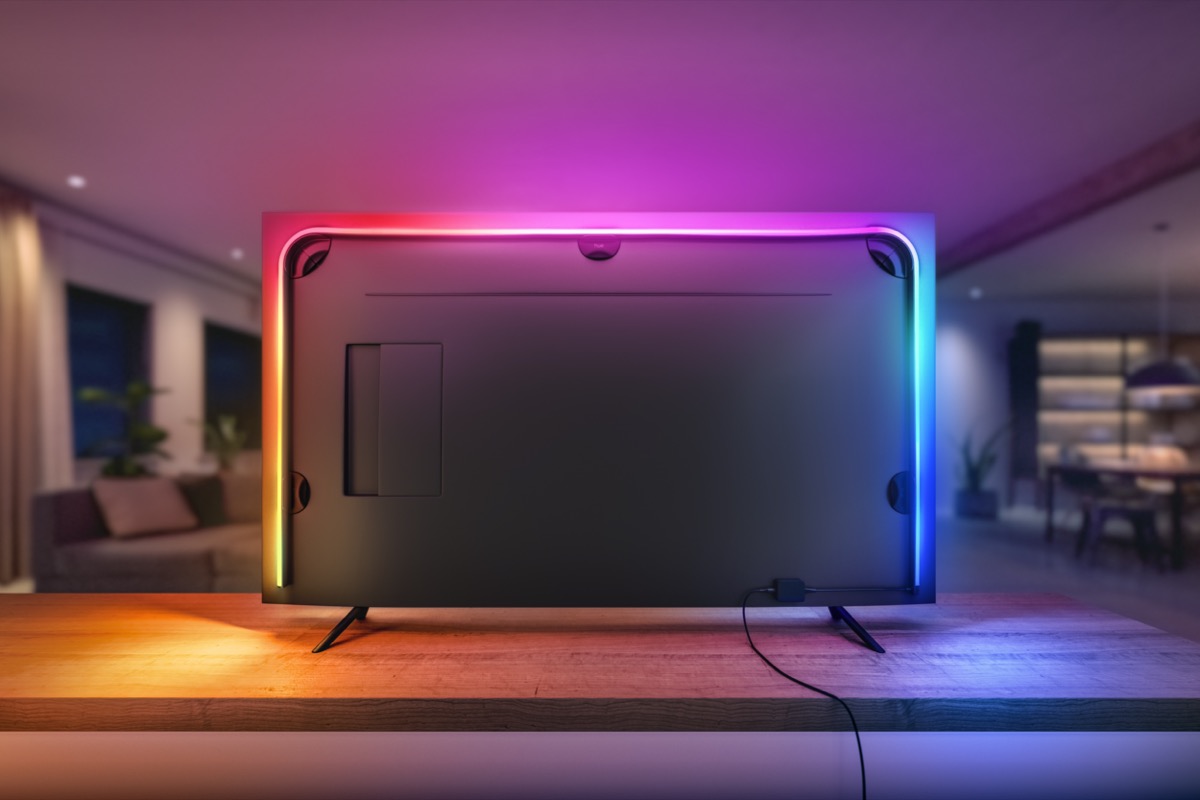
Attach the lightstrip to the TV using the adhesive backing
Once you have prepared the back surface of your TV, it’s time to attach the Philips Hue Lightstrip using the adhesive backing. The adhesive ensures a secure and stable installation, allowing the lightstrip to stay in place while emitting vibrant lighting effects. Here’s how you can do it:
- Take the lightstrip and carefully remove the protective film from the adhesive backing. Make sure to peel it off slowly, avoiding any sudden jerks or movements that might cause damage to the strip.
- Align the lightstrip along the edge or desired placement on the back of your TV. Start from one end and gently press it onto the TV surface, smoothing it out as you go along.
- Apply even pressure along the entire length of the lightstrip to ensure proper adhesion. Take your time and make sure it is securely attached to the TV, without any wrinkles or bubbles.
- If the lightstrip includes any connectors or extension cables, make sure to connect them at this stage. Follow the manufacturer’s instructions for a secure and proper connection.
- For additional stability and support, you can use adhesive tape or mounting clips to secure the lightstrip to the TV. This is especially useful if your TV has an uneven or curved surface.
It’s important to remember that once the lightstrip is attached, it may be challenging to reposition it without causing damage. Ensure that you have aligned it correctly and are satisfied with the placement before firmly pressing it onto the TV’s surface.
By following these steps and securely attaching the lightstrip to the back of your TV, you’ll be ready to move on to the next stage of the installation process and bring vibrant lighting effects to your TV viewing experience.
Connect the lightstrip to the power adapter and plug it into an outlet
After successfully attaching the Philips Hue Lightstrip to the back of your TV, the next step is to connect it to the power adapter and plug it into an electrical outlet. This will provide the necessary power for the lightstrip to function and emit its vibrant lighting effects. Follow these instructions to complete the connection:
- Locate the power adapter that comes with the Philips Hue Lightstrip. It is specifically designed to provide the appropriate power supply for the lightstrip.
- Connect one end of the power adapter to the designated port on the lightstrip. Ensure that the connection is secure and properly aligned.
- Plug the other end of the power adapter into a nearby electrical outlet. Make sure the outlet is easily accessible and can provide uninterrupted power to the lightstrip.
- Switch on the power outlet and check if the lightstrip illuminates. It should light up and display its default color or effect, indicating that it is receiving power.
- If the lightstrip does not light up, double-check the connections and ensure that the power adapter is properly inserted. If the issue persists, refer to the instruction manual or contact Philips Hue support for further assistance.
By connecting the lightstrip to the power adapter and plugging it into an outlet, you are providing the necessary power source for the lightstrip to operate. This step is crucial in order to enjoy the full range of lighting effects and customization options offered by the Philips Hue system.
Download and install the Philips Hue app on your smartphone or tablet
In order to control and customize the lighting effects of the Philips Hue Lightstrip behind your TV, you will need to download and install the Philips Hue app on your smartphone or tablet. This app provides an intuitive interface through which you can adjust the color, brightness, and other settings of your lightstrip. Follow these steps to get started:
- Open the app store on your device (such as the Apple App Store or Google Play Store).
- Search for the “Philips Hue” app and locate the official app developed by Signify Netherlands B.V.
- Tap the “Install” or “Get” button to begin downloading and installing the app on your device. Make sure you have a stable internet connection for a smooth installation process.
- Once the app is installed, locate the app icon on your device’s home screen and tap on it to launch the Philips Hue app.
- Follow the on-screen prompts to grant any necessary permissions and set up an account within the app. This will enable you to connect and control your Philips Hue devices, including the lightstrip.
With the Philips Hue app installed on your smartphone or tablet, you’ll gain access to a wide range of features and settings. You can easily change the color of your lightstrip, adjust the brightness, create different lighting scenes, set timers and schedules, and even sync the lighting effects with music or movies.
Downloading and installing the Philips Hue app is a crucial step in fully utilizing the functionality of your lightstrip and creating a personalized lighting experience behind your TV.
Set up the Hue Bridge and connect it to your home Wi-Fi network
In order to control your Philips Hue Lightstrip and other Philips Hue devices, you’ll need to set up the Hue Bridge and connect it to your home Wi-Fi network. The Hue Bridge acts as the central hub that allows you to control and manage your Philips Hue lighting system. Follow these steps to get started:
- Locate the Hue Bridge in your Philips Hue starter kit. It is a small square-shaped device with an Ethernet port and a power adapter.
- Connect one end of the Ethernet cable to the Ethernet port on the Hue Bridge and the other end to an available Ethernet port on your home router or modem.
- Plug the power adapter into an electrical outlet and connect the other end to the power port on the Hue Bridge. Make sure the Bridge is powered on.
- Wait for a few moments to allow the Hue Bridge to initialize. The power light on the Bridge will indicate when it is ready for setup.
- On your smartphone or tablet, open the Philips Hue app that you previously installed.
- Follow the on-screen instructions provided by the app to complete the setup process. This usually involves creating a Hue account, discovering the Hue Bridge, and connecting it to your home Wi-Fi network. Make sure you have the Wi-Fi network name (SSID) and password handy.
- Once the setup is complete, the app will automatically detect the connected Hue Bridge and you’ll be able to control your lightstrip and other Philips Hue devices through the app.
Setting up the Hue Bridge and connecting it to your home Wi-Fi network allows for seamless communication between your Philips Hue devices and the app. It enables you to control and customize your lightstrip’s settings, create lighting scenes, and integrate it with other smart home devices or virtual assistants.
By following these steps, you’ll have your Hue Bridge up and running, ready to enhance your lighting experience with the Philips Hue Lightstrip.
Add the lightstrip to your Hue Bridge using the app
Once you have successfully set up your Hue Bridge and connected it to your home Wi-Fi network, the next step is to add the Philips Hue Lightstrip to your Bridge using the Philips Hue app. Adding the lightstrip to your Hue Bridge allows for seamless integration and control of the device within your Philips Hue ecosystem. Follow these steps to add the lightstrip:
- Launch the Philips Hue app on your smartphone or tablet.
- Ensure that your device is connected to the same Wi-Fi network as the Hue Bridge.
- In the app, go to the “Settings” or “Add Device” section, typically represented by a gear or plus symbol.
- Select “Add Light”, “Add Device”, or a similar option to begin the process of adding your lightstrip.
- The app will prompt you to press the button on the Hue Bridge to initiate the pairing process. Locate the button on the Bridge and press it as instructed.
- Once the Bridge and app establish a connection, the app will search for and discover the lightstrip. This may take a few moments.
- Once the lightstrip is found, it will appear in the app, and you’ll be prompted to assign it a name or room designation for easy identification.
- Follow the on-screen instructions to complete the setup process. This may include configuring any additional settings or preferences for the lightstrip.
By adding the lightstrip to your Hue Bridge using the app, you’ll be able to conveniently control and manage the lightstrip’s settings, including color, brightness, and scheduling, all from the app’s interface.
Once the pairing process is complete, you’ll have full control over your Philips Hue Lightstrip through the Philips Hue app, allowing you to create dynamic lighting experiences and enhance your TV viewing atmosphere.
Configure the lightstrip settings and adjust the color and brightness
Now that you have successfully added the Philips Hue Lightstrip to your Hue Bridge, it’s time to configure its settings and customize the color and brightness to suit your preferences. The Philips Hue app provides a user-friendly interface that allows you to easily adjust these settings and create the desired ambiance. Follow these steps to configure the lightstrip settings:
- Open the Philips Hue app on your smartphone or tablet.
- Ensure that you are connected to the same Wi-Fi network as your Hue Bridge and that the app is synced with your Bridge.
- Navigate to the “Lights” or “Devices” section in the app, where you will find your added lightstrip listed.
- Select the lightstrip to access its settings and controls.
- Through the app, you can now adjust the color, brightness, and other options for the lightstrip.
- To change the color, you can select from a wide range of predefined colors or create a custom color by adjusting the RGB sliders.
- For brightness control, you can slide the brightness bar to increase or decrease the intensity of the light emitted by the lightstrip.
- Explore other settings in the app, such as dynamic lighting effects, schedules, and scenes, to further customize your lightstrip’s behavior.
- Experiment with different color combinations, brightness levels, and effects to create the perfect atmospheric lighting for your TV viewing experience.
The Philips Hue app offers a multitude of options to fine-tune your lightstrip’s settings, allowing you to create the desired mood and ambiance for any occasion. Whether you prefer vibrant and dynamic colors or soft and relaxing hues, you can easily adjust the settings to cater to your specific preferences.
Take the time to explore the various options and find the perfect combination that enhances your TV viewing experience in a way that complements your personal style.
Mount the Hue Bridge near your TV for easy access
When setting up your Philips Hue Lightstrip behind your TV, it’s important to consider the placement of the Hue Bridge for easy access and optimal functionality. The Hue Bridge serves as the central hub for controlling your Philips Hue devices, including the lightstrip. By mounting the Bridge near your TV, you’ll have convenient access to manage and customize your lighting experience. Follow these steps to mount the Hue Bridge:
- Choose a suitable location near your TV where the Hue Bridge can be easily accessed and connected to your home Wi-Fi network.
- Ensure that the chosen location has a stable power source nearby for plugging in the Bridge.
- Take the mounting bracket or adhesive strip that came with your Hue Bridge and attach it to the back of the Bridge.
- If using a mounting bracket, secure it to the wall or a flat surface near your TV using screws or other appropriate fasteners.
- If using an adhesive strip, carefully remove the backing and affix it to the desired location. Press firmly to ensure proper adhesion.
- Place the Hue Bridge onto the mounting bracket or the adhesive strip, ensuring that it is securely attached.
- Make sure the Bridge is positioned in a way that allows for easy access to the Ethernet and power ports.
- Ensure that the location of the Bridge allows for a good Wi-Fi signal connection.
By mounting the Hue Bridge near your TV, you’ll have convenient access to control and manage your Philips Hue Lightstrip and other Hue devices. This ensures that you can easily adjust the lighting effects, create custom scenes, and enjoy a fully personalized lighting experience while watching your favorite shows or movies.
Take the time to select an ideal location for mounting the Hue Bridge, considering factors such as accessibility and Wi-Fi signal strength. This will ensure that you can effortlessly manage your lighting system and enjoy the full benefits of your Philips Hue Lightstrip.
Enjoy the vibrant lighting effects of your Philips Hue Lightstrip behind your TV
With your Philips Hue Lightstrip installed and fully configured, it’s time to sit back, relax, and enjoy the captivating and vibrant lighting effects it brings to your TV viewing experience. The dynamic lighting capabilities of the lightstrip will add a new dimension to your favorite shows, movies, and games. Here’s how you can immerse yourself in the mesmerizing lighting effects:
- Experiment with different colors and brightness levels to match the mood and ambiance of what you’re watching. Transform your living room into a cinema-like atmosphere with deep blues or fiery reds, or create a soothing environment with soft warm tones.
- Utilize the app’s pre-set scenes or create your own to enhance specific genres or moments. Whether it’s a relaxing movie night or an intense gaming session, the ability to customize the lighting effects allows for a truly immersive experience.
- Sync the lightstrip with your favorite movies or music using third-party apps or entertainment systems. Let the colors and brightness of the lightstrip react and change dynamically to the on-screen action or the beats of your favorite songs.
- Take advantage of timers and schedules to automate the lighting effects. Set the lightstrip to gradually dim or brighten during specific movie scenes or automatically turn on or off at certain times, providing a seamless and effortless lighting experience.
- Explore additional features and integrations offered by the Philips Hue ecosystem. Connect your lightstrip to voice assistants, gaming consoles, or other smart home devices to unlock new possibilities and create a truly interconnected experience.
By enjoying the vibrant lighting effects of your Philips Hue Lightstrip behind your TV, you can elevate your entertainment space and create a personalized and captivating visual experience that enhances your overall enjoyment.
Let your creativity and imagination guide you as you discover the endless possibilities of lighting customization with your Philips Hue Lightstrip. Sit back, relax, and immerse yourself in a whole new level of TV viewing with breathtaking lighting effects.