
Benefits of Installing New Keyboards on Your iPhone
Did you know that you can enhance your iPhone typing experience by installing new keyboards? Your iPhone comes with a default keyboard, but there are numerous third-party keyboards available in the App Store that offer unique features and customization options. Here are some of the benefits of installing new keyboards on your iPhone:
1. Increased Typing Speed and Efficiency: Third-party keyboards often come with advanced predictive text algorithms and gesture typing capabilities, allowing you to type more accurately and quickly. These keyboards learn from your typing patterns and suggest words or phrases as you type, making your texting or emailing experience smoother and faster.
2. Personalization Options: The default iPhone keyboard may not always reflect your personal style or preferences. Installing a new keyboard allows you to choose from a wide range of themes, colors, and designs that match your taste. You can even customize the layout of the keyboard, including the placement of keys and the size of buttons, to make typing more comfortable for you.
3. Increased Language Support: Depending on your language requirements, you may find that the default keyboard on your iPhone does not fully support the languages you need. By installing a new keyboard, you can access a wider range of language options, including languages with different character sets or input methods, making it easier to communicate with others in your preferred language.
4. Specialty Keyboards for Specific Purposes: If you have specific needs or interests, such as programming, emoji, or even GIFs, you can find specialized keyboards tailored to those purposes. These keyboards come with dedicated keys, shortcuts, or integration with third-party apps, allowing you to express yourself or perform tasks more efficiently and effortlessly.
5. Enhanced Privacy and Security: Some third-party keyboards offer end-to-end encryption for your typing, ensuring that your sensitive information remains secure and protected. This additional layer of security can give you peace of mind, especially if you frequently handle sensitive data or engage in confidential conversations.
6. Multi-language Support: If you frequently switch between different languages while typing, installing a new keyboard allows you to have multiple languages enabled at the same time. This eliminates the need to manually switch keyboards whenever you want to type in a different language, making the typing experience more seamless and efficient.
7. Access to Additional Features: Third-party keyboards often come with additional features, such as built-in dictionaries, emojis, GIFs, or even quick access to various apps or services. These extra functionalities can enhance your communication and productivity, providing you with a more diverse and enjoyable typing experience.
Step 1: Open the App Store
The first step to installing a new keyboard on your iPhone is to open the App Store. The App Store is the central hub for downloading and managing all your applications, including keyboards.
Here’s how you can quickly access the App Store on your iPhone:
- Locate the App Store icon on your home screen. It’s represented by a blue icon with a white letter “A” on it.
- Tap on the App Store icon to open it. The App Store will launch, and you’ll be greeted with the Today tab, which showcases featured apps and games.
- On the bottom menu, you’ll find different tabs, including Today, Games, Apps, and Updates. Tap on the Apps tab to browse various categories of applications available for download.
- If you already have a specific keyboard in mind, you can use the Search bar at the top of the screen to directly search for it. Alternatively, you can explore the various categories and recommendations on the App Store to discover new and popular keyboards.
- Once you’ve found a keyboard that interests you, tap on its icon to open its dedicated page. Here, you can find more information about the keyboard, such as its features, user reviews, and screenshots.
The App Store provides a convenient and user-friendly interface for discovering and installing new keyboards on your iPhone. With a vast selection of keyboards available, you’re sure to find one that suits your preferences and enhances your typing experience. So go ahead and open the App Store to start exploring the exciting world of keyboards!
Step 2: Search for Keyboards
After opening the App Store, the next step in installing a new keyboard on your iPhone is to search for the specific keyboard you want to install. The App Store provides a search feature that allows you to quickly find the keyboards that meet your preferences.
Here’s how you can search for keyboards in the App Store:
- Tap on the Search tab at the bottom right corner of the App Store. The search bar will appear at the top of the screen, ready for you to enter your query.
- Type in relevant keywords related to the specific keyboard you want to install. For example, if you’re looking for a keyboard that offers themes and emojis, you might enter “emoji keyboard” or “customizable keyboard” in the search bar.
- As you start typing, the App Store will provide auto-suggestions based on popular searches and the apps available on the store. If you see a suggestion that matches what you’re looking for, tap on it to explore the related keyboards.
- If you have a specific keyboard in mind and know its name, you can type it directly into the search bar to find it quickly.
- Once you’ve entered your search query, tap on the Search button on the keyboard or the magnifying glass icon to initiate the search. The App Store will display a list of relevant keyboards based on your search terms.
- Browse through the search results to find the keyboard you want to install. You can view the app’s name, icon, developer name, rating, and other relevant information to help you make an informed decision.
Searching for keyboards in the App Store allows you to narrow down your options and find the perfect keyboard for your needs. Make sure to explore different search queries and read user reviews to understand the features and functionality of each keyboard before making your selection.
Step 3: Choose a Keyboard to Install
Once you have searched for keyboards in the App Store, it’s time to choose the one that best suits your needs and preferences. The App Store provides a variety of options, so take some time to explore the features and user reviews to make an informed decision.
Here’s how you can choose a keyboard to install on your iPhone:
- Review the search results and tap on the keyboard app that interests you. This will open the app’s dedicated page, where you can find more information about the keyboard.
- On the app’s page, you’ll see a summary of the keyboard’s features, screenshots, ratings, and reviews from other users. Take the time to read through this information to get a sense of how the keyboard functions and whether it aligns with your needs.
- Scroll down to read user reviews and ratings. Pay attention to both positive and negative reviews to get a balanced perspective on the keyboard’s performance and user satisfaction.
- Consider the specific features the keyboard offers. Some keyboards may focus on predictive text, while others may prioritize customization or specialty functionality. Think about the features that are most important to you and whether the keyboard meets those requirements.
- If the keyboard has a free trial or a lite version, take advantage of it to test its functionality and see if you enjoy using it. This will give you a hands-on experience before committing to the full version.
- Once you have evaluated the options and made your decision, tap on the “Install” button or the price button if the keyboard is not free. You may need to enter your Apple ID password or use Touch ID/Face ID to initiate the installation process.
Choosing a keyboard to install on your iPhone is an important step, as it determines the typing experience you’ll have going forward. Be thorough in your research and select a keyboard that offers the features and functionality you desire, based on the information provided on the app’s page and the feedback from other users.
Step 4: Enable the Keyboard in Settings
After you have chosen and installed a new keyboard on your iPhone, the next step is to enable it in the settings. Enabling the keyboard allows you to access and use it across different apps on your device.
To enable the keyboard in the settings, follow these steps:
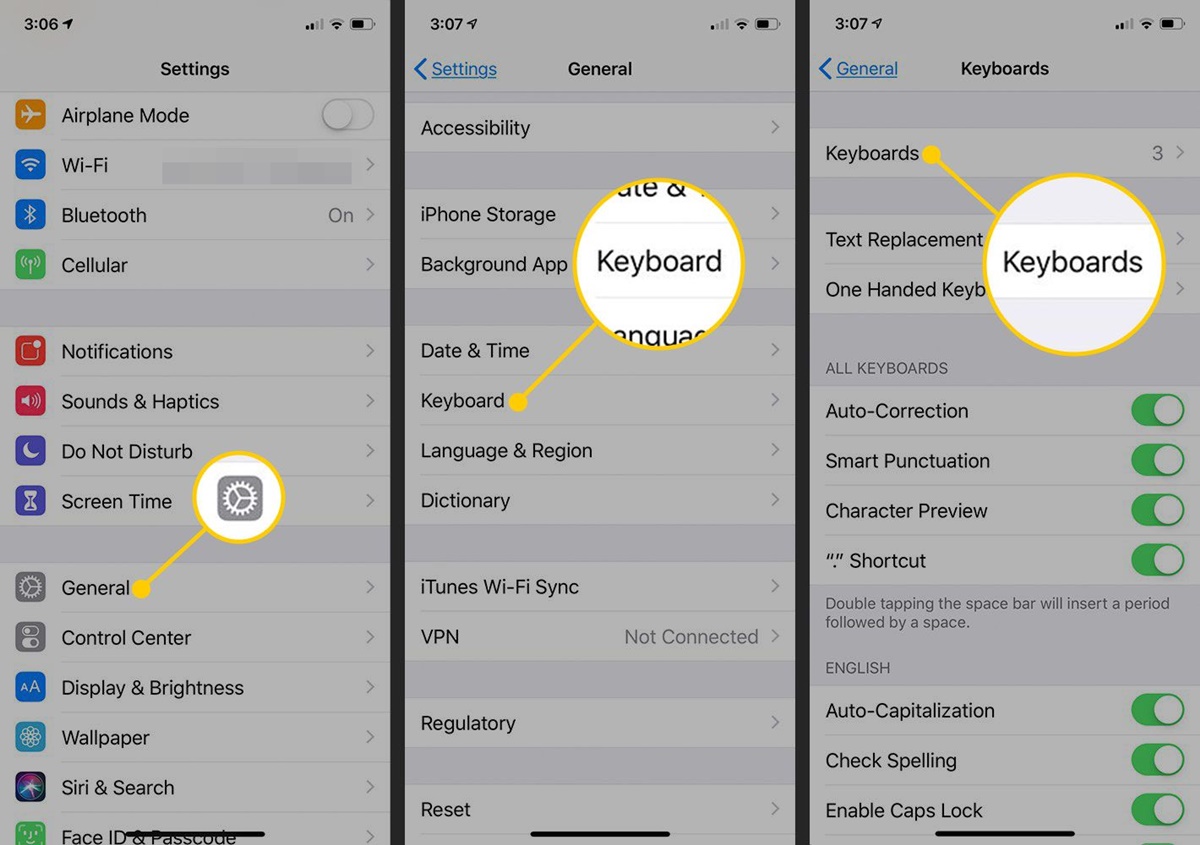
- Go to the Home screen and open the Settings app. The Settings app is represented by a silver-gray gear icon.
- Scroll down and tap on the “General” option.
- In the General menu, look for and tap on “Keyboard.”
- Next, tap on “Keyboards.” You will see a list of all the keyboards currently installed on your iPhone.
- Tap on “Add New Keyboard…” to view a list of available keyboards.
- Locate the keyboard you installed earlier from the list and tap on it to enable it.
- After enabling the new keyboard, it will appear on the list of active keyboards. You can also change the order of the keyboards by tapping on the “Edit” button located at the top right corner of the screen.
- If you want to remove a keyboard, swipe left on the keyboard name and tap on the “Delete” button.
Enabling a new keyboard in the settings gives you the ability to use it across various apps on your iPhone. You can easily switch between different keyboards while typing by tapping on the Globe icon on the keyboard. This allows you to access the specific features and functionality of the installed keyboards based on your preference.
Now that you have enabled the keyboard in the settings, you are one step closer to enhancing your typing experience on your iPhone.
Step 5: Set the Keyboard as Default
Setting the new keyboard as the default option on your iPhone ensures that it automatically appears whenever you need to input text. This eliminates the need to manually switch to the new keyboard each time you want to type using it. Fortunately, iOS allows you to easily set your preferred keyboard as the default option.
Follow these steps to set the keyboard as the default on your iPhone:
- Open the Settings app on your iPhone.
- Scroll down and tap on “General.”
- In the General menu, locate and tap on “Keyboard.”
- Tap on “Keyboards” to view the list of active keyboards.
- Within the Keyboards menu, find the keyboard you want to set as the default and tap on it.
- Toggle the switch next to “Allow Full Access.”
- If prompted, confirm your selection.
By allowing full access, your new keyboard can access information like your typing patterns and preferences. This enables it to provide more accurate predictions, autocorrections, and other advanced features.
After setting the keyboard as the default, it will appear as the first option whenever you need to input text. If you have multiple keyboards enabled, you can easily switch between them by tapping on the Globe icon on the keyboard.
Setting the new keyboard as the default option on your iPhone streamlines your typing experience and ensures that you have quick access to the keyboard you prefer. Enjoy the convenience and customization that your new default keyboard brings!
Step 6: Customize the Keyboard Settings
One of the advantages of installing a new keyboard on your iPhone is the ability to customize its settings according to your preferences. This allows you to personalize the keyboard and tailor it to suit your specific typing style and needs. Here are the steps to customize the keyboard settings:
- Open the Settings app on your iPhone.
- Scroll down and tap on “General.”
- In the General menu, locate and tap on “Keyboard.”
- Under the Keyboard settings, you will find various customization options.
- Auto-Correction: Toggle the switch to enable or disable auto-correction. This feature automatically corrects spelling errors as you type.
- Check Spelling: Enable or disable spell-checking to have words underlined if they are misspelled.
- Predictive: Toggle the switch to enable or disable predictive text, which suggests words or phrases as you type.
- Caps Lock: Toggle the switch to enable or disable the Caps Lock feature, allowing you to type in all capital letters.
- Keyboards: Tap on “Keyboards” to manage the order of your keyboards and add or remove keyboards.
- Add New Keyboard: Tap on this option to explore additional keyboards available in the App Store and install them on your iPhone.
- Other settings may vary depending on the specific keyboard you have installed. Some keyboards offer additional customization options such as themes, color schemes, or keyboard layouts. Explore the settings menu of your chosen keyboard to access these customization options.
Customizing the keyboard settings allows you to fine-tune your typing experience and tailor it to your liking. Whether it’s adjusting autocorrection, enabling predictive text, or adding new keyboards, take the time to explore the various options and make adjustments that enhance your efficiency and comfort while typing.
Step 7: Use the New Keyboard on Your iPhone
Now that you have installed and customized your new keyboard on your iPhone, it’s time to put it to use and start enjoying a refreshed typing experience. Here’s how you can use the new keyboard across different apps on your device:
- Launch any app on your iPhone that requires text input, such as Messages, Notes, or Safari.
- Tap on a text field to bring up the keyboard. If the default keyboard appears, tap on the Globe icon located at the bottom of the keyboard to switch to your preferred keyboard.
- Start typing using the new keyboard. Depending on the features and capabilities of the keyboard, you may experience improvements in typing speed, accuracy, and convenience.
- Take advantage of the unique features of the new keyboard. These could include predictive text suggestions, customized themes, emojis, GIFs, or other specialized functionalities.
- If you need to switch back to the default keyboard or any other enabled keyboards, simply tap on the Globe icon on the keyboard to cycle through the available options.
- Continue using the new keyboard across various apps and enjoy the enhanced typing experience it provides.
Using the new keyboard on your iPhone is simple and intuitive. The keyboard will seamlessly integrate with your device’s operating system and appear whenever you need to input text. Whether it’s composing text messages, drafting emails, or writing notes, you can now enjoy a more personalized and efficient typing experience.
Remember to explore the specific features of the new keyboard and make the most of its capabilities. Get comfortable with the layout and take advantage of any customization options available to truly make the keyboard your own.
Now, go ahead and explore the various apps on your iPhone and enjoy the enhanced typing experience that your new keyboard provides!
Tips for Choosing the Right Keyboard
When it comes to choosing the right keyboard for your iPhone, there are several factors to consider. With a wide range of options available in the App Store, it’s essential to select a keyboard that aligns with your preferences and enhances your typing experience. Here are some tips to help you make an informed decision:
- Consider Your Needs: Think about your specific requirements. Do you need a keyboard with advanced predictive text capabilities, customizable themes, or support for multiple languages? Identifying your needs will help narrow down the options.
- Read User Reviews: Pay attention to user reviews and ratings for the keyboards you are interested in. This will give you insights into the performance, reliability, and user satisfaction of the keyboards.
- Explore Features: Take a closer look at the features each keyboard offers. Some keyboards may specialize in emoji, GIFs, or specific layouts. Ensure that the features align with your usage habits and preferences.
- Consider Privacy and Security: If privacy and security are important to you, look for keyboards that offer end-to-end encryption or clearly state their data usage policies. This will help protect your personal information while typing.
- Try Free Versions: If a keyboard offers a free trial or lite version, take advantage of it to test the keyboard’s functionality and see if it suits your needs. This hands-on experience will help you make a more informed decision.
- Check Compatibility: Ensure that the keyboard you choose is compatible with your iPhone model and iOS version. Read the app details to verify compatibility before installation.
- Consider Customization: If customization options are important to you, look for keyboards that allow you to personalize themes, layouts, or keyboard sizes. This will enable you to create a typing experience that is comfortable and tailored to your liking.
- Research Developer Reputation: Consider the reputation of the keyboard’s developer. Established and trustworthy developers are more likely to provide regular updates and maintain optimal performance.
By considering these tips, you can make an informed decision and choose the right keyboard that suits your needs. Remember, installing a keyboard is a personal choice, so take your time to explore the options, read reviews, and try out different keyboards until you find the one that enhances your typing experience and aligns with your preferences.