
Requirements
Before you can install the Litecoin Wallet to your Ledger Nano S, there are a few requirements you need to meet:
1. A Ledger Nano S device: The Litecoin Wallet can only be installed on the Ledger Nano S hardware wallet. Make sure you have a Ledger Nano S device ready.
2. A computer or laptop: You will need a computer or laptop with an internet connection to download and install the necessary software.
3. Ledger Live app: Download and install the Ledger Live app on your computer. This app is the hub for managing your Ledger Nano S and installing cryptocurrency wallets.
4. USB cable: You will need a USB cable to connect your Ledger Nano S device to your computer or laptop.
5. Updated firmware: Ensure that the firmware on your Ledger Nano S device is up to date. This is important for compatibility and security reasons.
6. Litecoin app: The Litecoin Wallet requires the Litecoin app to be installed on your Ledger Nano S. Make sure you have the Litecoin app ready to install.
By meeting these requirements, you will be ready to proceed with the installation of the Litecoin Wallet to your Ledger Nano S. The next steps will guide you through the process, ensuring that you can securely store and manage your Litecoin funds.
Step 1: Download the Ledger Live App
To begin the process of installing the Litecoin Wallet to your Ledger Nano S, you need to download and install the Ledger Live app. The Ledger Live app is the official software provided by Ledger, the manufacturer of the Ledger Nano S device. It acts as the interface between your computer and your Ledger Nano S, allowing you to manage your cryptocurrencies and install different wallets.
Follow these steps to download and install the Ledger Live app:
1. Open your preferred web browser and go to the official Ledger website.
2. Navigate to the “Downloads” section of the website.
3. Look for the appropriate version of the Ledger Live app for your operating system (Windows, macOS, or Linux) and click on the download link.
4. Once the download is complete, locate the installation file and double-click on it to start the installation process.
5. Follow the on-screen instructions to complete the installation of the Ledger Live app.
After the installation is complete, you will have the Ledger Live app ready to use on your computer. The next step is to connect your Ledger Nano S device to your computer and proceed with the installation of the Litecoin app.
Remember to always download software from trusted sources to ensure the security of your funds. Ledger’s official website is the most reliable place to obtain the Ledger Live app.
With the Ledger Live app installed, you are now one step closer to setting up your Litecoin Wallet on your Ledger Nano S. The next section will guide you through the process of connecting your Ledger Nano S device to your computer.
Step 2: Connect Your Ledger Nano S
Before you can install the Litecoin app on your Ledger Nano S, you need to connect your device to your computer or laptop. Follow these simple steps to establish the connection:
1. Take your Ledger Nano S and locate the USB cable that came with it. Plug one end of the USB cable into the device and the other end into an available USB port on your computer.
2. After connecting the USB cable, your Ledger Nano S device will display the message “Use wallet to view accounts.” Press both buttons on the device simultaneously to access the main menu.
3. Use the left or right button on the device to navigate through the menu until you find the “Settings” option. Press both buttons to enter the settings.
4. Inside the settings menu, navigate to the “Device” section and select “Keyguard” to turn off the feature. This will allow the Ledger Live app to communicate with your device.
5. Once you have turned off the keyguard, navigate back to the main menu and select the “Quit” option to exit the device settings.
6. Your Ledger Nano S is now connected to your computer or laptop. The device will display a message that says “Your device is ready” and show a computer icon indicating the connection.
With the Ledger Nano S successfully connected to your computer, you are now ready to proceed with the installation of the Litecoin app. The next step will guide you through the process of installing the Litecoin app on your Ledger Nano S.
Step 3: Install the Litecoin App on Your Ledger Nano S
Now that your Ledger Nano S is connected to your computer, it’s time to install the Litecoin app on your device. By installing the Litecoin app, you will be able to securely store, send, and receive Litecoin on your Ledger Nano S.
Follow these steps to install the Litecoin app on your Ledger Nano S:
- Open the Ledger Live app on your computer. If you haven’t already done so, enter your Ledger Live account credentials to log in.
- In the Ledger Live app, click on the “Manager” tab located on the left sidebar.
- Connect your Ledger Nano S to your computer if you haven’t done so already.
- The Ledger Live app will automatically detect your connected device. Once detected, click on the “Connect and unlock your device” button.
- On your Ledger Nano S device, navigate to the “Manager” section by using the device’s buttons and confirm your choice by pressing both buttons simultaneously.
- In the Ledger Live app, you will see a list of available apps. Locate the Litecoin app and click on the “Install” button next to it.
- A confirmation message will appear on your Ledger Nano S device. Verify that the app name displayed on your device is “Litecoin” and confirm the installation by pressing both buttons.
- The Litecoin app will start installing on your Ledger Nano S. Wait for the installation to complete.
- Once the installation is successful, the Ledger Live app will display “App installed” for the Litecoin app.
Congratulations! You have successfully installed the Litecoin app on your Ledger Nano S. You are now ready to configure the Litecoin app and start managing your Litecoin funds securely.
Step 4: Open the Litecoin App on Your Ledger Nano S
Now that you have installed the Litecoin app on your Ledger Nano S, it’s time to open the app and get it ready for use.
Follow these steps to open the Litecoin app on your Ledger Nano S:
- Make sure your Ledger Nano S is connected to your computer or laptop.
- If your device is not already on the main menu, press both buttons simultaneously to navigate to the main menu.
- Use the device’s buttons to scroll through the apps until you find the Litecoin app.
- Once you have located the Litecoin app, press both buttons simultaneously to open it.
- Your Ledger Nano S will display a “Please unlock Ledger Wallet” message. Enter your PIN code on the device by using the buttons to navigate and confirm.
- After entering your PIN code, the Litecoin app will open on your Ledger Nano S. The device will display the Litecoin logo, indicating that the app is successfully launched.
With the Litecoin app opened on your Ledger Nano S, you can now access your Litecoin account and perform various transactions securely. In the next step, you will learn how to configure the Litecoin app on your Ledger Nano S to ensure optimal security and usability.
Step 5: Configure the Litecoin App on Your Ledger Nano S
After opening the Litecoin app on your Ledger Nano S, it’s essential to configure it to ensure optimal security and usability. Follow these steps to configure the Litecoin app:
- On your Ledger Nano S, navigate to the Litecoin app’s main menu using the device’s buttons.
- Once you are on the Litecoin app’s main menu, press both buttons simultaneously to enter the app’s settings.
- Inside the settings menu, you will find various options to customize the app’s behavior. You can configure options such as “Display address confirmation” and “Coin support.” Use the buttons on your Ledger Nano S to navigate through the settings and select your preferences.
- For enhanced security, it is recommended to enable the “Display address confirmation” option. This option ensures that the address displayed on your Ledger Nano S matches the address shown on the computer screen before confirming a transaction.
- After configuring the desired settings, navigate back to the main menu of the Litecoin app by pressing the buttons on your Ledger Nano S.
By configuring the Litecoin app on your Ledger Nano S, you can customize its functionality based on your preferences and security requirements. It is essential to review the available options and select the settings that align with your needs.
With the Litecoin app now properly configured, you are ready to proceed with adding your Litecoin account to the Ledger Live app on your computer. This will enable you to manage your Litecoin funds using the user-friendly interface provided by Ledger Live. The next step will guide you through the process.
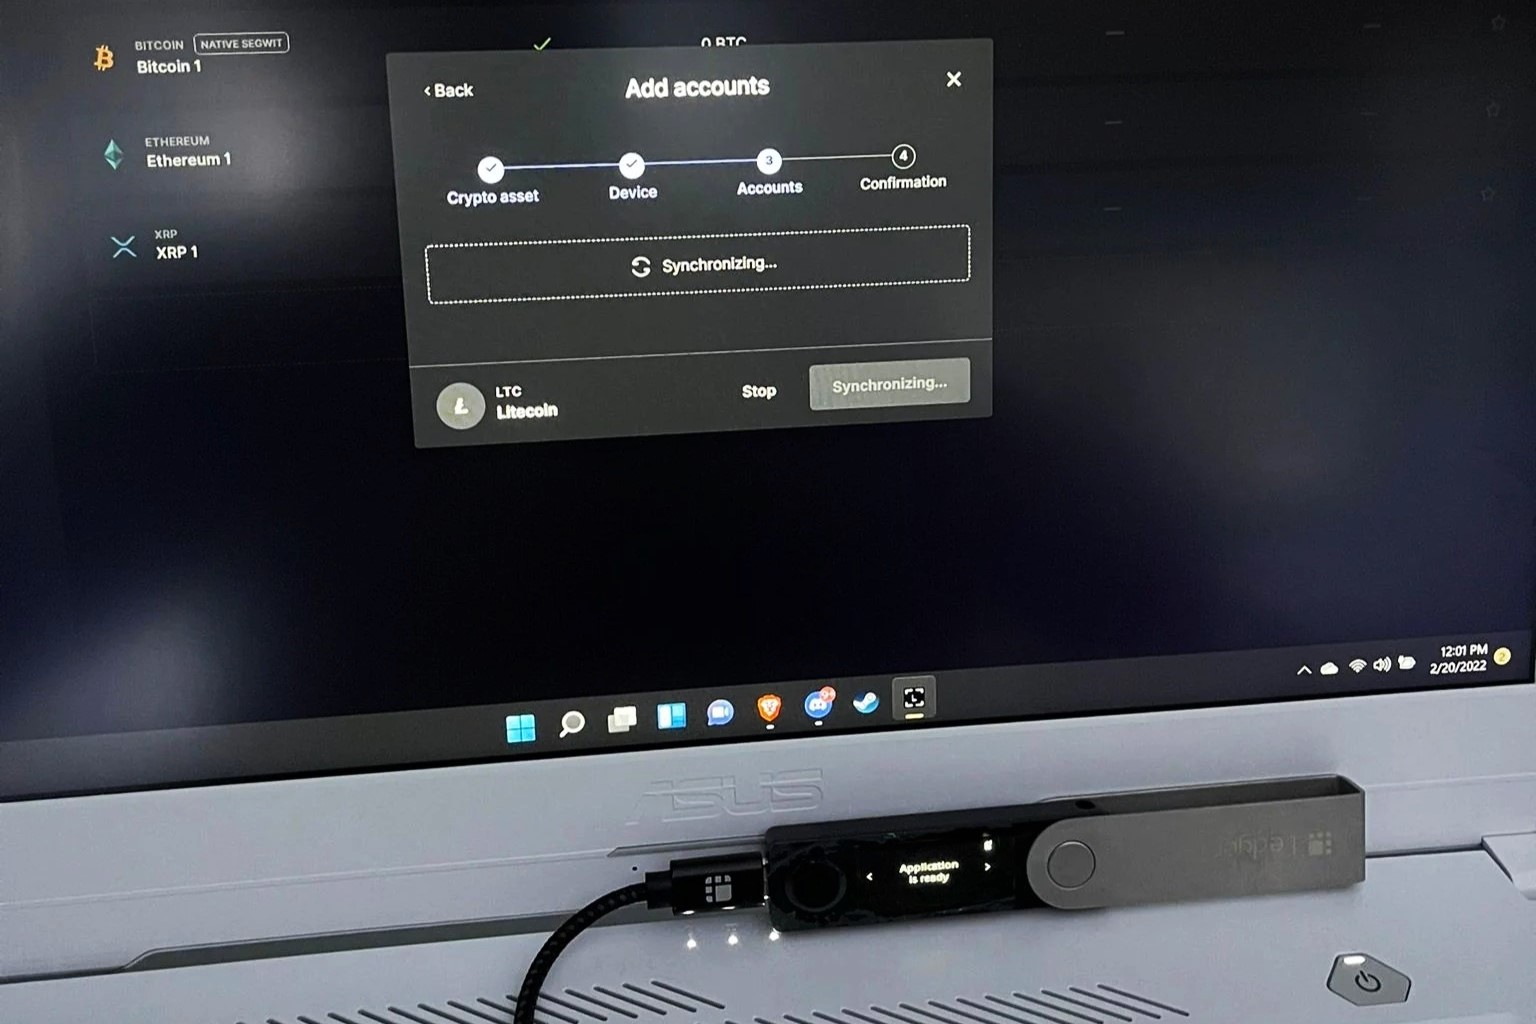
Step 6: Add Litecoin Account on Ledger Live
To manage your Litecoin funds and perform transactions, you need to add your Litecoin account to the Ledger Live app on your computer. By adding the account, you can conveniently view your Litecoin balances, receive funds, and send transactions using the intuitive interface provided by Ledger Live.
Follow these steps to add your Litecoin account on Ledger Live:
- Open the Ledger Live app on your computer.
- In the Ledger Live app, click on the “Accounts” tab located on the left sidebar.
- Click on the “+” button to add a new account.
- From the list of cryptocurrencies, select “Litecoin.”
- Connect your Ledger Nano S to your computer if it’s not already connected.
- Follow the on-screen prompts to select the account derivation path for Litecoin. It is recommended to choose the default path.
- When prompted, unlock your Ledger Nano S by entering your PIN code on the device.
- Once your account is successfully added, you will be able to see your Litecoin balance and transaction history within the Ledger Live app.
Adding your Litecoin account to Ledger Live allows you to conveniently manage your Litecoin holdings and perform transactions while keeping your funds secure on your Ledger Nano S. You can add multiple accounts if needed and switch between them within the Ledger Live app.
Now that you have added your Litecoin account, you can receive Litecoin on your Ledger Nano S. The next step will guide you through the process of receiving Litecoin funds to your Ledger Nano S wallet.
Step 7: Receive Litecoin on Your Ledger Nano S
To receive Litecoin funds on your Ledger Nano S, you need to generate a receiving address and share it with the sender. The funds will then be securely transferred to your Ledger Nano S wallet.
Follow these steps to receive Litecoin on your Ledger Nano S:
- Make sure your Ledger Nano S is connected to your computer.
- Open the Ledger Live app on your computer.
- In the Ledger Live app, navigate to the Litecoin account you want to receive funds into.
- Click on the “Receive” button, usually represented by an arrow pointing upwards.
- A receiving address will be displayed on the screen. Verify that the address shown on your computer matches the address displayed on your Ledger Nano S device.
- To copy the receiving address, click on the “Copy” button or manually note down the address.
- Share the receiving address with the sender so they can initiate the Litecoin transfer to your Ledger Nano S.
- Wait for the Litecoin transaction to be confirmed on the blockchain. Ledger Live will usually display the transaction as “Pending” until it is confirmed.
- Once the transaction is confirmed, the received Litecoin funds will be visible in your Ledger Live app and your Ledger Nano S wallet.
Remember to always double-check the receiving address when receiving cryptocurrency. Any mistakes in the address may result in the loss of funds. It is recommended to use the “Copy” button in Ledger Live to ensure accuracy.
With the proper receiving address shared and the transaction confirmed, you have successfully received Litecoin on your Ledger Nano S. You can view your updated balance and transaction history in the Ledger Live app.
Next, learn how to send Litecoin using your Ledger Nano S in Step 8.
Step 8: Send Litecoin Using Your Ledger Nano S
Sending Litecoin from your Ledger Nano S allows you to transfer your funds to another Litecoin address. This step-by-step guide will walk you through the process of sending Litecoin using your Ledger Nano S:
- Ensure your Ledger Nano S is connected to your computer.
- Launch the Ledger Live app on your computer.
- In the Ledger Live app, navigate to the Litecoin account from which you want to send funds.
- Click on the “Send” button, usually represented by an arrow pointing downwards.
- Enter the recipient’s Litecoin address in the designated field. Double-check the address to avoid any mistakes.
- Specify the amount of Litecoin you wish to send to the recipient.
- Optionally, you can include a description or note for the transaction.
- Review the transaction details to ensure accuracy.
- Unlock your Ledger Nano S by entering your PIN code on the device.
- Follow the on-screen instructions in the Ledger Live app to confirm and complete the transaction.
- Wait for the Litecoin transaction to be confirmed on the blockchain. The transaction status will be displayed in Ledger Live.
- Once the transaction is confirmed, the sent Litecoin funds will be deducted from your Ledger Nano S account and transferred to the recipient’s Litecoin address.
It is crucial to double-check the recipient’s address and transaction details before confirming the transaction. Once a transaction is initiated, it is usually irreversible, and any mistakes may result in a loss of funds.
With the successful completion of the transaction, you have now sent Litecoin using your Ledger Nano S. You can view the transaction details in your Ledger Live app, as well as monitor the transaction on the Litecoin blockchain.
Now let’s move on to the next step, where you will learn how to verify transactions on your Ledger Nano S.
Step 9: Verify Transactions on Your Ledger Nano S
Verifying transactions on your Ledger Nano S is an important step to ensure the accuracy and security of your cryptocurrency transfers. By verifying transactions, you can confirm that the transaction details displayed on your Ledger Nano S match the information shown on your computer or other connected device.
Follow these steps to verify transactions on your Ledger Nano S:
- Make sure your Ledger Nano S is connected to your computer or device.
- Open the Ledger Live app on your computer or device.
- In the Ledger Live app, navigate to the Litecoin account that you want to verify transactions for.
- Look for the transaction that you wish to verify in the transaction history.
- On your Ledger Nano S, navigate to the Litecoin app and open it.
- Scroll through the transaction details on your Ledger Nano S screen to ensure that they match the details shown in Ledger Live.
- Check the sender’s address, recipient’s address, and transaction amount to verify their accuracy.
- If the transaction details match, you can be confident that the transaction is valid and secure.
- If you notice any discrepancies or suspicious activity, do not confirm the transaction and contact Ledger support for assistance.
Verifying transactions on your Ledger Nano S adds an extra layer of security, as it allows you to independently validate the transaction details displayed on your computer or device. By ensuring that the information on your Ledger Nano S matches the information in Ledger Live, you can mitigate the risk of unauthorized or incorrect transactions.
Now that you know how to verify transactions, you can confidently monitor and validate the transfers made through your Ledger Nano S. In the next step, you will learn how to update the Litecoin app on your Ledger Nano S.
Step 10: Update the Litecoin App on Your Ledger Nano S
Updating the Litecoin app on your Ledger Nano S is crucial for ensuring that you have the latest features, bug fixes, and security enhancements. Here’s the step-by-step process to update the Litecoin app:
- Connect your Ledger Nano S to your computer using the USB cable.
- Open the Ledger Live app on your computer.
- In the Ledger Live app, click on the “Manager” tab located on the left sidebar.
- Ensure that your Ledger Nano S is detected by the Ledger Live app. If not, try reconnecting or restarting the device.
- Scroll through the list of installed apps and locate the Litecoin app.
- If an update is available for the Litecoin app, you will see an “Update” button next to it.
- Click on the “Update” button to initiate the update process.
- Follow the on-screen prompts and instructions provided by the Ledger Live app to complete the update.
- During the update process, your Ledger Nano S may display messages and instructions. Follow them accordingly.
- Wait for the update to complete. This may take a few minutes, so be patient and avoid disconnecting the device prematurely.
- Once the update is finished, your Litecoin app will be up to date, and you can safely disconnect your Ledger Nano S from the computer or device.
Regularly updating the Litecoin app on your Ledger Nano S not only ensures that you have access to the latest features but also helps maintain the overall security and stability of your device. It is recommended to check for updates periodically and perform the necessary updates when available.
Good job! You now know how to update the Litecoin app on your Ledger Nano S. In the final step, we will provide some troubleshooting tips to help you overcome any issues you may encounter while installing the Litecoin Wallet to your Ledger Nano S.
Step 11: Troubleshooting Tips for Installing Litecoin Wallet to Ledger Nano S
While installing the Litecoin Wallet to your Ledger Nano S, you may encounter some issues. Here are some troubleshooting tips to help you overcome common problems:
1. Ensure firmware and software are up to date: Make sure your Ledger Nano S firmware and the Ledger Live app are both updated to the latest versions. Outdated firmware or software can cause compatibility issues and hinder the installation process. Keep your devices up to date for optimal performance.
2. Check USB connections: Verify that the USB cable is securely connected to both your Ledger Nano S and your computer or laptop. Try using a different USB port or cable to rule out any potential connection issues. A proper connection is crucial for proper communication between the devices.
3. Restart devices: Sometimes, a simple restart can resolve temporary glitches. Disconnect and reconnect your Ledger Nano S, close the Ledger Live app, and restart your computer or device. Then, attempt the installation process again to see if the issue has been resolved.
4. Disable antivirus or firewall: Antivirus or firewall software can sometimes interfere with the installation process. Temporarily disable any such software and try installing the Litecoin Wallet to your Ledger Nano S again. Remember to re-enable the software after the installation is complete.
5. Try a different computer or browser: If you are experiencing persistent issues, try using a different computer or browser. This helps determine if the problem is specific to your setup or device. Some compatibility issues may arise due to browser settings or other computer-related factors.
6. Seek support from Ledger: If all else fails, reach out to Ledger’s customer support for further assistance. They have dedicated resources to help troubleshoot and resolve issues related to the installation process. Visit Ledger’s official website for contact details or access their online support resources.
By following these troubleshooting tips, you can overcome common obstacles and successfully install the Litecoin Wallet to your Ledger Nano S. Don’t hesitate to seek assistance if needed, as Ledger’s support team is available to help you throughout the process.
Congratulations! You have completed all the steps to install the Litecoin Wallet to your Ledger Nano S. You are now ready to securely store and manage your Litecoin funds using your Ledger Nano S device.