
Checking the Compatibility of the New Power Supply
Before you begin the process of installing a new power supply in your desktop computer, it is crucial to ensure that it is compatible with your system. Failure to do so may result in damage to your hardware or inefficient power delivery. Follow these steps to check the compatibility of your new power supply:
- Check the wattage requirements: The wattage requirement of your new power supply should match or exceed the combined power consumption of all your computer components. To determine the wattage needed, consider the power draw of your CPU, GPU, RAM, hard drives, and any other peripherals. Refer to the specifications of each component or use an online power supply calculator to estimate the total power requirement.
- Verify the form factor: Power supplies come in various form factors, such as ATX, microATX, and SFX. Check the form factor of your current power supply and make sure the new one is compatible with your computer case. Most desktop cases support ATX form factor power supplies, but it is always wise to double-check.
- Confirm the connectors: Take note of the types and number of connectors required by your system. Ensure that the new power supply has the necessary connectors for your motherboard, graphics card, storage drives, and any other devices. Common connectors include the 24-pin ATX connector, 8-pin CPU power connector, SATA power connectors, and PCIe connectors for graphics cards.
- Consider modular or non-modular: Decide whether you want a modular or non-modular power supply. Modular power supplies allow you to detach unused cables, resulting in a cleaner and more organized setup. Non-modular power supplies have fixed cables, which may lead to cable clutter and restricted airflow in the case.
By carefully verifying the compatibility of your new power supply before installation, you can avoid any potential issues and ensure a smooth and successful upgrade process. Once you have ensured compatibility, you can proceed to gather the necessary tools and equipment for the installation.
Gathering the Necessary Tools and Equipment
Before you can begin the installation process, it is essential to gather all the necessary tools and equipment. Having everything on hand will save you time and ensure a smooth installation. Here are the items you will need:
- Screwdriver: You will need a screwdriver, usually a Phillips or flat-head screwdriver, to open and close the computer case. Depending on your computer case, you may also need a hex or Torx screwdriver for certain screws.
- Anti-static wrist strap: An anti-static wrist strap is crucial to protect your computer components from electrostatic discharge (ESD). It prevents static electricity from damaging sensitive parts during the installation process. If you do not have an anti-static wrist strap, make sure to frequently touch a grounded metal object to discharge any static electricity buildup before handling your computer components.
- Cable ties or Velcro straps: These are useful for managing cable clutter inside your computer case. They help organize the cables and improve airflow, which in turn enhances the overall cooling efficiency of your system.
- Thermal paste (optional): If you are replacing the CPU cooler or removing the existing one, you may need thermal paste. Thermal paste ensures proper heat transfer between the CPU and the cooler, improving cooling efficiency. However, not all CPU coolers require thermal paste, as some come with pre-applied thermal material.
- Extra screws (optional): In some cases, you may need additional screws or standoffs to mount the new power supply securely. It is always a good idea to have a variety of computer screws readily available, just in case.
By gathering these tools and equipment beforehand, you will be prepared to install the new power supply without interruptions. Make sure all the tools are in good working condition to avoid any complications during the installation process. Once you have all the necessary items, you are ready to proceed to the next step: shutting down and unplugging the computer.
Shutting Down and Unplugging the Computer
Before you start working on your desktop computer, it is crucial to shut it down properly and disconnect it from the power source. This ensures your safety and prevents any potential damage to the computer components during the installation process. Follow these steps to shut down and unplug your computer:
- Save your work: Before shutting down, save any open files or projects you are working on. Close all the running applications and ensure that you have properly saved your work to avoid data loss.
- Shut down the computer: Click on the “Start” button in the Windows taskbar and select “Shutdown” or “Restart” from the options. Wait for your computer to completely shut down before proceeding to the next step. If your computer is unresponsive, press and hold the power button for a few seconds to force it to shut down.
- Unplug the power cord: Once your computer is completely shut down, reach behind the tower or the back of the case, and unplug the power cord from the wall outlet. This step ensures that there is no electrical connection and reduces the risk of accidental electrical shocks while working on the internal components.
- Press the power button: To discharge any remaining electrical charge, press and hold the power button on the front of your computer tower for a few seconds. This helps to dissipate any stored energy in the capacitors.
Once you have shut down your computer and disconnected it from the power source, you can move on to the next stage of the installation process: opening the computer case.
Opening the Computer CaseTo access the internal components of your desktop computer and install the new power supply, you need to open the computer case. Follow these steps to safely open the computer case:
- Gather necessary precautions: Before you start, ensure you are working on a clean and static-free surface. Consider wearing an anti-static wrist strap or frequently touching a grounded metal object to discharge any static electricity that could potentially harm your computer’s components.
- Determine the case type: Different computer cases have different methods of opening. Most common cases have either a side panel or a top panel that can be removed. Identify the type of case you have and locate the screws or latches holding the panel in place.
- Remove the screws or latches: Use a screwdriver, either Phillips or flat-head depending on your case, to loosen and remove the screws that secure the panel. Alternatively, if your case has latches, release them by pushing or sliding them towards the open position.
- Slide or lift off the panel: Once the screws or latches are removed, carefully slide the side panel towards the back of the case or lift it off to expose the internal components. Take note of any cables that may be connected to the panel and gently detach them if necessary.
- Set aside the panel: Place the removed panel in a safe and easily reachable location. This way, you can quickly and securely reattach it once the installation is complete.
When opening the computer case, be gentle and careful to avoid any damage to the case or the internal components. Take your time and ensure that you have a clear view of the internal components before proceeding to the next step: removing the old power supply.
Removing the Old Power Supply
Before you can install the new power supply, you need to remove the old one from your desktop computer. Follow these step-by-step instructions to safely remove the old power supply:
- Identify the power supply: Locate the power supply unit (PSU) inside your computer case. It is usually positioned at the top or bottom rear of the case. Take note of how the cables are connected to the PSU and any screws or mounting brackets holding it in place.
- Disconnect power cables: Carefully detach all the power cables connected to the old power supply. Start with the 24-pin ATX power connector that supplies power to the motherboard. Next, remove any additional power connectors, such as the 4-pin or 8-pin CPU power connector, PCIe connectors, and SATA power connectors for storage devices. Ensure that you squeeze the release tabs on the connectors before pulling them out to prevent any damage.
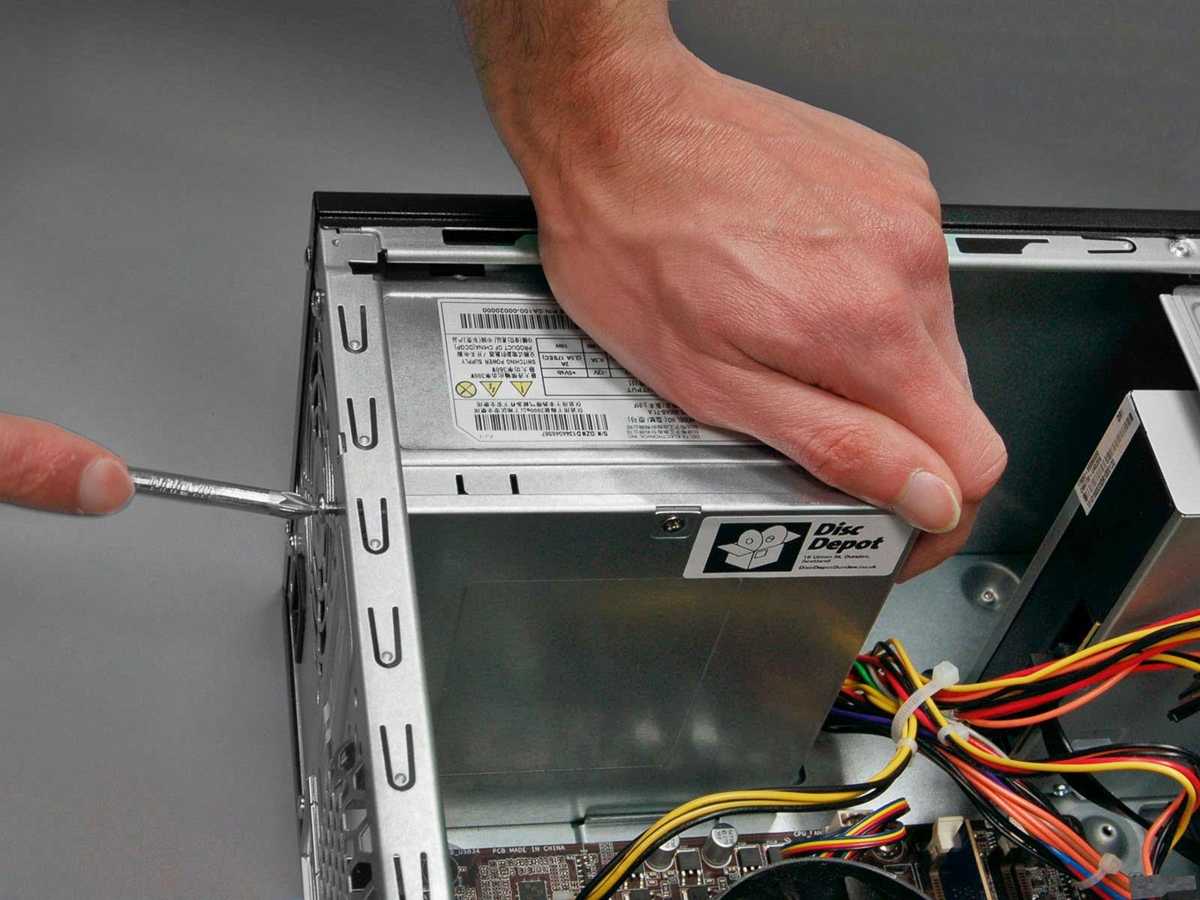
- Remove screws or mounting brackets: Use a screwdriver to remove any screws or mounting brackets securing the power supply to the computer case. Typically, there are four screws holding the PSU in place. Carefully unscrew them in a counterclockwise direction. Set aside the screws and brackets in a safe place for reinstallation if needed.
- Slide or wiggle out the power supply: Once all the cables and screws are removed, gently slide the old power supply towards the back of the case or wiggle it out, depending on the design of your computer case. Be cautious not to touch any other components inside the case to avoid accidentally damaging them.
- Set aside the old power supply: Once the old power supply is removed, place it in a safe location, such as an anti-static bag or a padded surface. You may want to keep it as a backup or dispose of it responsibly according to your local regulations.
By carefully following these steps, you can safely remove the old power supply from your computer case. With the old power supply out of the way, you are now ready to proceed with the installation of the new power supply in the next section.
Installing the New Power Supply
Now that you have removed the old power supply, it’s time to install the new one in your desktop computer. Follow these step-by-step instructions to safely install the new power supply:
- Position the new power supply: Take the new power supply and align it with the mounting holes in your computer case. Make sure the fan of the power supply is facing inward and towards the interior of the case for proper airflow.
- Secure the power supply: Using the screws or mounting brackets that you set aside earlier, secure the new power supply to the case. Tighten the screws in a clockwise direction until they are snug but be cautious not to overtighten them, as it may damage the case or the power supply.
- Connect the power cables: Begin by connecting the 24-pin ATX power connector to the corresponding port on the motherboard. Ensure it is fully inserted and that the latch clicks into place. Proceed to connect the necessary power cables to your other components, such as the CPU power connector, PCIe connectors for your graphics card, and SATA power connectors for your storage drives. Ensure a secure connection for each cable.
- Manage the cables: Take the time to organize and manage the cables inside the case to improve airflow and aesthetics. Utilize cable ties or Velcro straps to secure the cables together and keep them neatly arranged. Ensure that the cables do not obstruct any fans or moving parts inside the case.
- Double-check connections: Before closing the computer case, double-check all the cable connections to ensure they are properly seated. Also, ensure that no cables are being pinched or caught between any components.
By following these steps, you can successfully install the new power supply in your desktop computer. Once you have completed the installation, the next step is to connect the cables and peripherals in the upcoming section.
Connecting the Cables and Peripherals
Now that you have installed the new power supply in your desktop computer, it’s time to connect the necessary cables and peripherals. Follow these step-by-step instructions to ensure proper connectivity:
- Motherboard power connections: Connect the 24-pin ATX power connector from the power supply to the corresponding port on the motherboard. Make sure it is securely inserted and the latch clicks into place.
- CPU power connection: If your motherboard requires additional power for the CPU, connect the necessary CPU power connector from the power supply. Depending on the motherboard, this can be a 4-pin or 8-pin connector.
- Peripheral power connections: Connect the necessary power cables to your peripheral devices, such as hard drives, solid-state drives, optical drives, and any other storage devices. Use the SATA power connectors from the power supply and ensure a secure connection.
- Graphics card power connections: If you have a dedicated graphics card, connect the necessary power cables from the power supply to the graphics card. This is typically done using PCIe power connectors.
- Other device connections: Connect any other devices that require power, such as case fans, CPU coolers, and LED strips. Verify the appropriate power connectors for each device and ensure they are properly connected.
- Peripherals: Reconnect any peripherals that you unplugged during the power supply installation, such as keyboard, mouse, monitor, and speakers. Ensure that all connections are secure and properly seated to avoid any issues.
Once you have connected all the necessary cables and peripherals, you can proceed to the next step: closing the computer case to finalize the installation. Remember to double-check all connections to ensure a successful setup.
Closing the Computer Case
After successfully connecting all the cables and peripherals, it’s time to close the computer case. Follow these steps to securely close the case and protect the internal components:
- Position the side panel: Take the side panel that you removed earlier and position it back onto the computer case. Align the screw holes or latches with the corresponding slots on the case.
- Slide or push the panel into place: Depending on the design of your computer case, gently slide the side panel towards the front of the case or firmly push it to close it. Ensure that the panel is flush against the case and properly secured.
- Reinsert and tighten the screws: If your case uses screws to secure the side panel, reinsert and tighten them using a screwdriver in a clockwise direction. Be cautious not to overtighten the screws, as it may damage the case threads or strip them.
- Double-check integrity: Once the side panel is in place and secured, give the computer case a small shake or tap to ensure that it is stable and properly closed. Check for any loose or rattling parts inside the case and adjust if necessary.
- Organize cables: Take a moment to organize any remaining cables inside the case. Use cable ties or Velcro straps to group and secure the cables, ensuring they do not obstruct any fans or components. This will improve airflow and maintain a tidy interior.
By carefully following these steps, you can safely close the computer case and ensure proper protection for the internal components. Once the case is securely closed, you are ready for the final step: powering on the computer and testing the new power supply.
Powering On and Testing the New Power Supply
Now that you have successfully installed the new power supply and closed the computer case, it’s time to power on the system and test the functionality of the new power supply. Follow these steps to ensure a smooth startup:
- Double-check connections: Before powering on the computer, quickly double-check all of the cable connections inside the case. Ensure that all cables are properly seated and securely connected to their respective ports.
- Plug in the power cord: Connect the power cord to the new power supply and plug the other end into a grounded electrical outlet. Double-check the connection to ensure it is secure.
- Switch on the power supply: Locate the power switch on the back of the power supply and flip it to the “on” position. Some power supplies may also have an additional switch on the front or top of the case. Ensure that it is switched on as well.
- Power on the computer: Press the power button on the front of your computer case or the corresponding button on your keyboard. The computer should boot up, and you should see the fans spinning and the lights turning on.
- Listen for any unusual noises: Pay attention to any unusual noises coming from the hardware, such as grinding or clicking sounds. If you hear any unusual noises, power off the computer immediately and investigate the source of the problem.
- Check for proper functionality: Once the computer has booted up, check for the proper functioning of all the components. Verify that the motherboard, graphics card, hard drives, and other peripherals are recognized and functioning as expected.
- Monitor system stability: Use the computer for a period of time, running various applications and tasks, to monitor system stability. Keep an eye out for any abnormalities such as sudden shutdowns, freezing, or overheating issues.
If everything appears to be working properly and the system is running smoothly without any issues, congratulations! You have successfully installed and tested your new power supply. However, if you encounter any problems or inconsistencies, refer to the troubleshooting section for guidance on addressing common issues.
Troubleshooting and Common Issues
While installing a new power supply in your desktop computer is generally a straightforward process, sometimes you may encounter certain issues or complications. Here are some common troubleshooting steps to address potential problems:
- No power or startup: If your computer doesn’t power on or start up after installing the new power supply, check the power connections. Ensure that the 24-pin ATX connector is securely plugged into the motherboard. Double-check that all power cables are properly connected. If the issue persists, try using a different power outlet or testing the power supply with a different computer (if possible) to determine if it is a faulty unit.
- Fan or noise issues: If the new power supply’s fan is excessively noisy or not spinning, check if the fan is obstructed by any cables or debris. Ensure the fan is properly connected to the power supply. If the fan still doesn’t work, it may be a faulty fan motor. In such cases, consider contacting the manufacturer for support or replacing the power supply if it’s within the warranty period.
- Overheating or system instability: If your computer experiences frequent overheating or instability issues after installing the new power supply, double-check the power and cooling connections. Make sure the fans are properly functioning, and there is adequate airflow inside the case. Also, ensure that all cables are neatly organized and do not obstruct the cooling fans. If the problem persists, it may be unrelated to the power supply, and it may be necessary to investigate other potential causes, such as faulty hardware or inadequate cooling.
- Incorrect power cable connections: If you notice that certain components, such as hard drives or graphics cards, are not working properly after installing the new power supply, check the power cable connections. Ensure that you have connected the appropriate power cables to each component. If necessary, consult the manuals or documentation provided with your components to identify the correct power connections.
- System doesn’t recognize hardware: If your computer fails to recognize certain hardware components, such as graphics cards or storage devices, ensure that they are securely connected and powered. Check the device drivers and update them if necessary. Sometimes, a firmware update may be required for certain components to work correctly with a new power supply.
If you encounter any other issues or complexities during or after the installation of the new power supply, consult the documentation or resources provided by the power supply manufacturer. Additionally, seeking technical support from the manufacturer or a professional can provide further assistance in resolving specific issues.