
Why Format an SD Card?
Formatting an SD card is an essential process that every camera owner should be familiar with. When you format an SD card, you prepare it for use by creating a file system that enables your camera to read and write data efficiently. It also helps to organize your files and prevent potential issues that could arise from a fragmented or corrupted card.
Here are a few reasons why formatting an SD card is important:
- Optimal Performance: Over time, an SD card can become fragmented, resulting in slower read and write speeds. By formatting the card, you can optimize its performance, ensuring smooth operation during shooting and playback.
- Reliability: Formatting helps to detect and correct any file system errors or inconsistencies that may have occurred on the card. This ensures that your photos and videos are stored properly and reduces the risk of data loss.
- Data Organization: Formatting allows you to start with a clean slate, enabling you to create a logical and organized file structure on your SD card. This makes it easier to locate and manage your files.
It’s important to note that formatting an SD card erases all the data stored on it. Therefore, it is crucial to back up any important files before proceeding with the formatting process.
Now that we understand the importance of formatting an SD card, let’s explore the different formatting options available for various SD card types and how to perform them correctly.
Different Types of SD Cards and Their Formatting Options
SD (Secure Digital) cards come in different types and capacities, each with its own formatting options. It’s important to understand the differences between these card types and their recommended formatting methods to ensure compatibility and optimal performance. Here are the most common types of SD cards and their formatting options:
- SDHC (Secure Digital High Capacity): SDHC cards have a storage capacity of up to 32GB. These cards are formatted using the FAT32 file system, which is compatible with most devices, including cameras, smartphones, and computers. It is the default file system for SDHC cards.
- SDXC (Secure Digital eXtended Capacity): SDXC cards have a capacity range of 64GB to 2TB. They are formatted using the exFAT (Extended File Allocation Table) file system, which supports larger file sizes and is compatible with devices that support the exFAT format.
- MicroSD Cards: MicroSD cards are smaller versions of SD cards and are commonly used in smartphones, drones, and action cameras. The formatting options for MicroSD cards are the same as their SD card counterparts, depending on the capacity and device compatibility.
- CompactFlash (CF) Cards: Although not an SD card, it is worth mentioning CompactFlash cards, as they are still used in professional-grade cameras and other devices. These cards have their own formatting options and support file systems such as FAT16 and exFAT.
When formatting an SD card, it is essential to check the recommended formatting method for your specific camera. Different camera manufacturers may have different recommendations, so consult your camera’s user manual or the manufacturer’s website for guidance.
It’s worth noting that some cameras have a built-in format function that allows you to format the SD card directly within the camera settings. This is a convenient option as it ensures compatibility and optimizes the card for use with your camera.
In the next section, we will discuss the importance of backing up your SD card before formatting and the steps to perform this essential task.
Checking Your Camera’s Recommended Formatting Method
Before formatting your SD card, it’s crucial to ensure that you follow your camera’s recommended formatting method. Different camera manufacturers may have specific requirements and guidelines for formatting SD cards. Here’s how you can check your camera’s recommended formatting method:
- Consult the User Manual: The first step is to refer to your camera’s user manual. The manual usually contains detailed instructions on how to format the SD card and any specific considerations for your camera model.
- Manufacturer’s Website: Visit the website of the camera manufacturer and search for information about recommended SD card formatting. Many manufacturers provide online support documents, FAQs, or knowledge base articles that address formatting procedures and best practices.
- Online Communities and Forums: Engage with online communities and photography forums dedicated to your camera brand or model. Fellow photographers often share their experiences, tips, and recommended formatting practices, which can provide valuable insights.
- Contact Customer Support: If you’re unable to find the recommended formatting method through the above sources, reach out to the camera manufacturer’s customer support. They can provide you with accurate and up-to-date information regarding SD card formatting specific to your camera.
It’s important to note that following the recommended formatting method ensures compatibility and proper functioning of your SD card with your camera. Deviating from the recommended method, especially with older or specialized cameras, may result in issues such as freezing, incompatibility, or loss of data.
Now that you have checked your camera’s recommended formatting method, the next step before formatting is to back up any important data on your SD card. In the following section, we will discuss the importance of backing up and provide guidance on how to perform this important task.
Backing Up Your SD Card Before Formatting
Before formatting an SD card, it is crucial to back up any important files to prevent potential data loss. Formatting erases all the data on the card, so taking the time to back up your files ensures that you have a copy of your valuable photos and videos. Here’s how you can back up your SD card before formatting:
- Connect SD Card to Computer: Insert your SD card into a card reader and connect it to your computer. Ensure that the computer recognizes the SD card and displays it as a removable storage device.
- Create a New Folder: Open the SD card on your computer and create a new folder to store your backup files. You can name it appropriately, such as “SD Card Backup” or “Camera Files Backup.”
- Copy Files to the Backup Folder: Select and copy all the important files from your SD card and paste them into the newly created backup folder. This ensures that you have a duplicate set of files stored on your computer.
- Verify File Integrity: Once the file transfer is complete, take a moment to verify that the backup files are intact and accessible. Open a few random files from the backup folder to ensure that they open correctly.
- Store Backup in a Safe Location: After verifying the backup files, it’s essential to store them in a safe location. Consider using an external hard drive, cloud storage service, or another reliable backup solution to ensure the longevity and availability of your files.
By following these steps to back up your SD card, you can rest assured that your valuable photos and videos are safely stored before proceeding with the formatting process. This extra precaution protects your precious memories and allows you to restore them if the need arises.
Now that you have successfully backed up your SD card, you can proceed with formatting it. In the next sections, we will discuss the steps to format an SD card using both a computer and a camera, along with the different file system options available.
Formatting an SD Card Using a Computer (Windows/Mac)
Formatting an SD card using a computer is a straightforward process that allows you to prepare the card for use with your camera. Here are the steps to format an SD card on both Windows and Mac operating systems:
Formatting an SD Card on Windows:
- Insert the SD Card: Insert your SD card into the card reader connected to your Windows computer.
- Open File Explorer: Open the File Explorer or My Computer window on your computer.
- Locate the SD Card: In the File Explorer window, locate the SD card under the “This PC” or “Devices and Drives” section. It is usually labeled with a drive letter (e.g., “E:”, “F:”, etc.)
- Right-click and Format: Right-click on the SD card drive and select “Format” from the context menu.
- Select File System and Allocation Unit Size: In the Format window, choose the desired file system (usually recommended by the camera manufacturer) and the allocation unit size. For most SD cards, the default options are sufficient.
- Label the SD Card: Optionally, you can enter a volume label for the SD card to help distinguish it from other drives.
- Start the Formatting Process: Click on the “Start” button to begin the formatting process.
- Confirmation: A confirmation window may appear, notifying you that all data on the SD card will be erased. If you have backed up your files, confirm the formatting process by clicking “OK.”
- Wait for Formatting to Complete: The formatting process may take a few moments to complete. Once finished, you will see a confirmation message.
- Eject the SD Card: Safely eject the SD card from your computer after the formatting process is complete.
Formatting an SD Card on Mac:
- Insert the SD Card: Insert your SD card into the card reader connected to your Mac computer.
- Open Disk Utility: Open the “Applications” folder, go to “Utilities,” and launch “Disk Utility.”
- Locate the SD Card: In the Disk Utility window, locate the SD card listed on the left sidebar. Click on it to select.
- Erase the SD Card: Click on the “Erase” tab at the top of the Disk Utility window.
- Select File System: Choose the desired file system (e.g., FAT32, exFAT) from the “Format” drop-down menu. Follow the recommendations of the camera manufacturer for the most suitable file system.
- Name the SD Card: Enter a name for the SD card in the “Name” field or leave it as the default.
- Start the Erasing Process: Click on the “Erase” button to start the erasing and formatting process.
- Confirmation: A confirmation window will appear, warning that erasing the disk will delete all data. If you have backed up your files, click on “Erase” to confirm.
- Wait for Formatting to Complete: The formatting process may take some time. Once completed, you will see a confirmation message.
- Eject the SD Card: Safely eject the SD card from your Mac computer.
Formatting an SD card using a computer is an efficient way to ensure compatibility and optimal performance with your camera. Next, we will discuss how to format an SD card using the camera itself for Canon, Nikon, and Sony cameras.
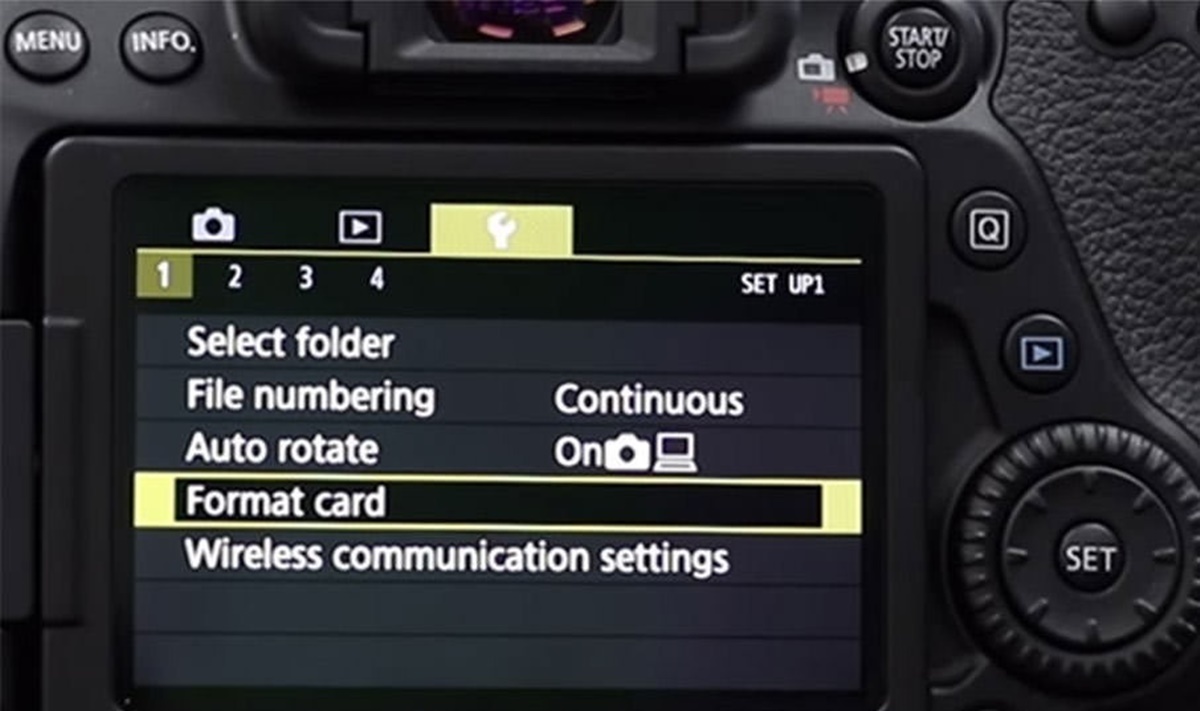
Formatting an SD Card Using a Camera (Canon/Nikon/Sony)
Formatting an SD card using your camera is a convenient option, as it allows you to optimize the card specifically for your camera model. Here are the steps to format an SD card using Canon, Nikon, and Sony cameras:
Canon:
- Insert the SD Card: Insert the SD card into the memory card slot on your Canon camera.
- Access the Menu: From the camera’s menu, navigate to the settings or setup menu.
- Select Format: Look for the “Format” or “Format Card” option in the menu. Use the camera’s navigation buttons to select it.
- Confirmation: A confirmation message will appear on the screen, indicating that all data on the SD card will be erased. If you have backed up your files, confirm the formatting process by selecting “OK” or the appropriate option.
- Format the SD Card: Press the button designated to format the card (usually marked with a trash bin or a dedicated “Format” button).
- Wait for Formatting to Complete: The camera will format the SD card, which may take a few seconds. Once completed, a confirmation message will be displayed.
- Eject the SD Card: Safely remove the SD card from the camera after the formatting process is complete.
Nikon:
- Insert the SD Card: Insert the SD card into the memory card slot on your Nikon camera.
- Access the Menu: Press the menu button on the camera to access the menu settings.
- Select Format Memory Card: From the menu, navigate to the setup or utility section and look for the “Format Memory Card” option.
- Choose Format: Select the “Format Memory Card” option and press the appropriate button (e.g., “OK” or the shutter release button).
- Confirmation: A confirmation message will appear on the screen, stating that formatting will erase all data on the SD card. If you have backed up your files, confirm the formatting process by selecting “Yes” or the appropriate option.
- Format the SD Card: The camera will format the SD card, which may take a few moments. Once completed, a confirmation message will be displayed.
- Remove the SD Card: Safely remove the SD card from the camera after the formatting process is complete.
Sony:
- Insert the SD Card: Insert the SD card into the memory card slot on your Sony camera.
- Access the Menu: Press the menu button on the camera to access the menu settings.
- Select Format: Navigate to the setup or settings menu and look for the “Format” or “Format Memory Card” option.
- Confirm Formatting: Select the “Format” option and confirm the formatting process by selecting “Yes” or the appropriate option when prompted.
- Initiate Formatting: Press the button to initiate the formatting process. The camera will format the SD card, which may take a few seconds.
- Formatting Completion: Once completed, a confirmation message will be displayed on the screen.
- Remove the SD Card: Safely remove the SD card from the camera after the formatting process is complete.
Formatting an SD card using your camera’s built-in function ensures compatibility and optimizes the card for use with your specific camera model. Now that you understand how to format an SD card using both a computer and a camera, let’s delve into the different file system options and quick format vs. full format in the following sections.
Understanding File Systems (FAT32, exFAT, NTFS)
When formatting an SD card, you have the option to choose the file system that determines how data is organized and stored on the card. Understanding the different file systems can help you make an informed decision based on compatibility and specific requirements. Here are the most common file systems used for SD cards:
FAT32 (File Allocation Table 32):
FAT32 is the most compatible file system and is widely supported by cameras, computers, and other devices. It has a maximum file size limit of 4GB, which means if you have larger video files, FAT32 may not be the best choice. Additionally, FAT32 has less efficient disk space utilization compared to other file systems. However, if you plan on using the SD card with older devices or non-Windows operating systems, FAT32 is a suitable option.
exFAT (Extended File Allocation Table):
exFAT is an improved version of FAT32, designed to overcome its limitations. It has a much larger file size limit of up to 16 exabytes (EB) and better disk space utilization. exFAT is highly compatible with modern devices, including cameras, computers, and media players. It is especially useful when dealing with large video files, such as those captured in high-definition or 4K formats. If your camera and other devices support exFAT, it is a recommended file system choice for larger file compatibility and better performance.
NTFS (New Technology File System):
NTFS is primarily used on Windows computers and offers several advanced features. It supports large file sizes and allows for more efficient disk space utilization compared to FAT32. NTFS also provides encryption, file compression, and file permissions, making it suitable for advanced data management. However, it may have limited compatibility with cameras and other non-Windows devices. If you intend to use the SD card primarily with Windows-based devices and require the advanced features of NTFS, it can be a viable option.
When choosing the file system for your SD card, consider the compatibility of your camera and other devices you plan to use the card with. It’s important to follow the recommendations provided by your camera manufacturer, as some devices may have specific requirements or limitations for certain file systems.
Next, we will discuss the differences between quick format and full format and help you determine which option to choose when formatting your SD card.
Quick Format vs. Full Format: Which One to Choose?
When formatting an SD card, you may have the option to perform a quick format or a full format. Understanding the differences between these formatting methods can help you make an informed decision based on your specific needs. Here’s a comparison of quick format and full format:
Quick Format:
A quick format is a faster method of formatting that only erases the file system information on the SD card. It does not fully erase the data stored on the card. Quick formatting essentially prepares the file system for immediate use without going through the time-consuming process of erasing each file on the card.
The advantage of a quick format is the speed at which it completes the formatting process. It takes significantly less time compared to a full format, making it a convenient choice when you need to quickly prepare the SD card for use. However, it’s important to note that a quick format does not fully erase the existing data on the card. The data is still recoverable using specialized software until it is overwritten by new data.
Full Format:
A full format, also known as a complete format or low-level format, erases the entire content of the SD card, including the file system and all data stored on it. This thorough formatting process ensures that any remnants of previous data are completely removed from the card. Full formatting is recommended if you want to completely wipe the SD card or if you encounter persistent issues with the card.
The advantage of a full format is that it provides a clean slate, preparing the SD card for optimal performance and minimizing the risk of data corruption or errors. However, it’s important to note that a full format takes longer to complete compared to a quick format. The duration may vary depending on the size and capacity of the SD card.
When deciding between a quick format and a full format, consider the following factors:
- Purpose: If you’re preparing the SD card for immediate use or simply need to free up space quickly, a quick format is suitable. However, if you want to ensure complete data erasure or resolve persistent issues, a full format is recommended.
- Data Security: If you’re concerned about data privacy and want to ensure that the previous data cannot be recovered, a full format is the better choice.
- Time: If time is a constraint and you need to use the SD card as quickly as possible, a quick format is the more convenient option. However, if time is not a critical factor, a full format provides a more thorough formatting process.
Ultimately, the choice between a quick format and a full format depends on your specific requirements and preferences. It’s important to note that regular formatting, whether quick or full, does not provide complete data erasure. If your goal is to securely dispose of the SD card, physical destruction or using specialized data erasure tools is recommended.
In the next section, we will discuss common formatting errors and how to fix them, ensuring a smooth formatting process for your SD card.
Common Formatting Errors and How to Fix Them
Formatting an SD card is generally a straightforward process. However, errors can occasionally occur that prevent successful formatting. Here are some common formatting errors and the steps to fix them:
Error Message: “Windows was unable to complete the format.”
This error message indicates that Windows encountered an issue while attempting to format the SD card. Here are some potential solutions:
- Check Write Protection: Ensure that the SD card is not write-protected. Some SD cards have a physical lock switch on the side. Make sure it is in the unlocked position.
- Use Disk Management: Try using the Disk Management utility in Windows to format the SD card. Right-click on the Start button, select “Disk Management,” locate the SD card, right-click on it, and choose “Format.”
- Try a Different Computer or Card Reader: If the issue persists, try formatting the SD card on a different computer or using a different card reader. This can help determine if the problem is with the card or the computer.
Error Message: “The format did not complete successfully.”
If you encounter this error message, it means that the formatting process was interrupted or encountered a problem. Here’s how you can resolve it:
- Retry the Formatting Process: Sometimes, the error can be temporary. Close any open programs accessing the SD card, safely remove and reinsert the card, and try formatting again.
- Check for Disk Errors: Run a disk check utility (such as Windows’ CHKDSK) to scan and fix any errors on the SD card. Right-click on the SD card drive in File Explorer, select “Properties,” go to the “Tools” tab, and click on “Check.”
- Format in Safe Mode: If the formatting error persists, try formatting the SD card while booted in Safe Mode. Safe Mode helps to isolate and diagnose potential software conflicts that may be causing the formatting issue.
Error Message: “The card is not recognized” or “No memory card inserted.”
If your camera or computer does not recognize the SD card, follow these steps to resolve the issue:
- Clean the Contacts: The metal contacts on the SD card or the card reader may be dirty or dusty. Gently clean the contacts with a soft cloth or use a can of compressed air to blow away any debris.
- Check Compatibility: Ensure that the SD card is compatible with your device. Some older devices may have limitations on the maximum capacity or supported file systems of SD cards.
- Try a Different Slot or Device: If available, try inserting the SD card into a different memory card slot or using a different device to see if the issue is specific to one slot or device.
If none of these solutions resolve the formatting errors, it is possible that the SD card is physically damaged or faulty. In such cases, it may be necessary to replace the SD card with a new one.
By addressing these common formatting errors, you can ensure a smooth and successful formatting process for your SD card. Now you are equipped with the knowledge to overcome formatting issues and optimize your SD card for use in your camera or other devices.