
What is TWRP?
TWRP, short for Team Win Recovery Project, is a custom recovery software for Android devices. It is an essential tool for Android enthusiasts and power users looking to flash custom ROMs, create backups, and perform various system-related tasks that go beyond the capabilities of the stock recovery.
TWRP offers a user-friendly interface with touch-based controls, making it easy to navigate and perform actions on your Android device. It provides a range of features and functionalities that can enhance your Android experience, including:
- Flashing Custom ROMs: TWRP allows you to install custom ROMs, which are modified versions of the Android operating system. Custom ROMs offer additional features, customization options, and performance improvements that are not found in the stock Android.
- Creating Backups: TWRP enables you to create full system backups, including the operating system, apps, and data. These backups provide a safety net in case anything goes wrong during the flashing process or if you want to revert to a previous state.
- Wiping Your Device: TWRP allows you to wipe various partitions on your device, such as the system, cache, and data partitions. This is useful if you want to perform a clean installation of a custom ROM or if you’re troubleshooting issues with your device.
- Mounting Storage: TWRP allows you to mount external storage devices, such as SD cards or USB drives, directly from the recovery. This enables you to access and transfer files between your device and external storage.
- Installing ZIP Files: TWRP supports the installation of ZIP files, which can include custom ROMs, mods, root packages, and various system modifications. This flexibility allows you to customize your device and explore different Android configurations.
Overall, TWRP is a powerful tool that opens up a world of possibilities for Android users. It provides advanced features and functionalities that can help you unleash the full potential of your device. Whether you want to flash custom ROMs, create backups, or explore various system modifications, TWRP is an invaluable asset in your Android customization journey.
Preparing Your Device
Before you can start flashing custom ROMs using TWRP, there are a few preparatory steps you need to take to ensure a smooth and successful process. These steps include:
- Researching Your Device: It’s important to gather information about your specific device model, including its manufacturer, variant, and supported custom ROMs. This will help you find the right ROMs and avoid compatibility issues.
- Backup Your Data: Take the time to backup your important data, such as contacts, messages, photos, and other files. While flashing custom ROMs doesn’t usually result in data loss, it’s always better to be safe than sorry.
- Ensure Sufficient Battery Level: Make sure your device has a sufficient battery level before starting the process. A fully charged battery or at least 50% battery level is recommended to prevent any interruptions during the flashing process.
- Enable USB Debugging: On your Android device, go to Settings -> Developer Options (if available) or About Phone -> tap on Build Number multiple times until you see a message indicating that Developer Options have been enabled. Then, go back to Settings -> Developer Options and enable USB Debugging.
- Unlock the Bootloader: Most devices require the bootloader to be unlocked before flashing custom ROMs. This process varies depending on the device manufacturer and model. Research and follow the specific instructions for your device to unlock the bootloader.
- Install USB Drivers: Ensure that the appropriate USB drivers are installed on your computer. These drivers allow your computer to recognize and communicate with your device when it is connected via USB cable.
- Charge Your Device: Connect your device to a power source or ensure it has enough charge to avoid any disruptions during the flashing process. It’s best to keep your device connected to a power source throughout the process to prevent any unexpected shutdowns.
By following these preparatory steps, you will set a solid foundation for flashing custom ROMs using TWRP. Taking the time to research, backup your data, enable USB debugging, unlock the bootloader, install USB drivers, and charge your device will ensure a smooth and hassle-free flashing experience.
Unlocking the Bootloader
Before you can proceed with flashing custom ROMs using TWRP, you will need to unlock the bootloader on your Android device. Unlocking the bootloader gives you administrative privileges and allows you to make system-level changes, including flashing custom recoveries and ROMs. However, it’s important to note that the process of unlocking the bootloader can vary depending on the manufacturer and model of your device. Here’s a general guide on how to unlock the bootloader:
- Backup Your Data: It’s always recommended to backup your important data before proceeding with unlocking the bootloader, as this process may wipe your device.
- Enable Developer Options: On your Android device, go to Settings -> About Phone -> tap on Build Number multiple times until you see a message indicating that Developer Options have been enabled.
- Enable OEM Unlock and USB Debugging: Once Developer Options are enabled, go to Settings -> Developer Options and enable both OEM Unlock and USB Debugging.
- Boot into Fastboot Mode: Power off your device and then hold down the Volume Down and Power buttons simultaneously to boot into Fastboot Mode or bootloader mode. The key combination may vary based on your device, so check the device manufacturer’s instructions.
- Connect Your Device to Your Computer: Use a USB cable to connect your device to your computer.
- Install ADB and Fastboot: You will need to install the Android Debug Bridge (ADB) and Fastboot tools on your computer. These tools allow you to communicate with your device in Fastboot mode. You can download the ADB and Fastboot tools from the Android Developer website.
- Open Command Prompt or Terminal: Open a Command Prompt or Terminal window on your computer.
- Confirm Device Connection: In the Command Prompt or Terminal window, enter the command “fastboot devices”. If your device is successfully connected, you will see its serial number in the output.
- Unlock the Bootloader: In the Command Prompt or Terminal window, enter the command “fastboot oem unlock”. This will initiate the bootloader unlocking process. Follow the on-screen instructions and confirm the bootloader unlock on your device.
- Reboot Your Device: Once the bootloader unlock process is complete, enter the command “fastboot reboot” in the Command Prompt or Terminal window to reboot your device.
After following these steps, the bootloader on your Android device should be successfully unlocked. It’s important to note that unlocking the bootloader may void your device’s warranty and can potentially have risks. Make sure to read and understand the specific instructions provided by your device manufacturer or consult reliable sources for your specific device model to ensure a safe unlocking process.
Installing TWRP Recovery
Once you have unlocked the bootloader on your Android device, the next step is to install TWRP recovery. TWRP is a custom recovery that allows you to perform various system-level tasks and is essential for flashing custom ROMs. Here’s a general guide on how to install TWRP recovery:
- Download the TWRP Image: Visit the official TWRP website or relevant XDA Developers forum thread and download the TWRP image file (.img) for your specific device model.
- Enable USB Debugging: On your Android device, go to Settings -> Developer Options and enable USB Debugging.
- Power Off Your Device: Completely power off your device.
- Boot into Fastboot Mode: Press and hold down the Volume Down and Power buttons simultaneously to boot into Fastboot Mode or bootloader mode. The button combination may vary based on your device, so check the device manufacturer’s instructions.
- Connect Your Device to Your Computer: Use a USB cable to connect your device to your computer.
- Install ADB and Fastboot: Ensure that the ADB and Fastboot tools are installed on your computer. These tools allow you to communicate with your device in Fastboot mode. You can download the ADB and Fastboot tools from the Android Developer website.
- Open Command Prompt or Terminal: Open a Command Prompt or Terminal window on your computer.
- Flash TWRP Recovery: In the Command Prompt or Terminal window, navigate to the location where you downloaded the TWRP image file. Then, enter the command “fastboot flash recovery twrp.img” (replace “twrp.img” with the actual name of the TWRP image file).
- Reboot into TWRP: Once the TWRP image is successfully flashed, reboot your device by entering the command “fastboot reboot”. Immediately press the appropriate key combination to boot into recovery mode (e.g., Volume Up + Power).
- Verify TWRP Installation: In the TWRP recovery menu, check if your device recognizes TWRP as the active recovery. If TWRP successfully loads, it means the installation was successful.
After following these steps, you should have TWRP recovery installed on your device. TWRP will now be your default recovery option, allowing you to perform a variety of tasks, including flashing custom ROMs, creating backups, and more. It’s important to note that the installation process can vary depending on your device model, so always consult reliable sources and follow specific instructions for your device to ensure a successful installation.
Downloading Custom ROMs
Now that you have TWRP recovery installed on your device, you can start exploring and downloading custom ROMs to enhance your Android experience. Custom ROMs are modified versions of the Android operating system that offer additional features, customization options, and performance improvements. Here’s how you can download custom ROMs:
- Research and Identify Compatible ROMs: Look for custom ROMs that are specifically built for your device model. Join Android forums and communities, such as XDA Developers, to find ROMs that are well-tested, trusted, and supported by a strong user community.
- Visit the Official ROM Websites: Visit the official websites of the custom ROM developers to find the latest releases and downloads. These websites often provide detailed information about the ROM, including features, installation instructions, and compatibility.
- Verify ROM Authenticity: Ensure that you are downloading ROMs from reliable sources to avoid downloading modified or malicious versions. It’s recommended to download ROMs from reputable developers or official sources to maintain the integrity and security of your device.
- Check ROM Requirements: Verify the requirements and prerequisites for each ROM before downloading. Some ROMs may require specific versions of TWRP recovery or have specific instructions for flashing. Make sure to read and understand the requirements before proceeding.
- Download the ROM Zip File: Once you have identified the custom ROM you want to install, download the ROM’s zip file to your computer. Ensure that you download the version intended for your specific device model.
- Verify the ROM File: After downloading the ROM file, it’s a good practice to verify its integrity using checksums or comparing the file’s hash with the provided information on the ROM’s official website. This helps ensure that the ROM file has not been tampered with.
- Transfer the ROM to Your Device: Connect your Android device to your computer using a USB cable and transfer the downloaded ROM zip file to the internal storage or SD card of your device. Remember the location where you transferred the file for easier access during the installation process.
Downloading custom ROMs is an exciting part of customizing your Android device. Just make sure to research, verify authenticity, and follow the specific requirements and instructions provided by the ROM developers to ensure a smooth and successful installation process.
Transferring ROMs to Your Device
Once you have downloaded custom ROMs onto your computer, the next step is to transfer them to your Android device. Transferring ROMs to your device allows you to easily access and flash them using TWRP recovery. Here’s how you can transfer ROMs to your device:
- Connect Your Device to Your Computer: Use a USB cable to connect your Android device to your computer.
- Select File Transfer Mode: On your Android device, when prompted, select the “File Transfer” or “Transfer files” mode. This will allow your computer to access and transfer files to your device’s internal storage or SD card.
- Locate the Downloaded ROM: On your computer, navigate to the folder where you downloaded the custom ROM. Keep the folder open for easy access.
- Access Your Device’s Storage: On your computer, open the File Explorer (Windows) or Finder (Mac). Locate your connected Android device under the “Devices” or “This PC” section.
- Transfer the ROM to Your Device: In the File Explorer or Finder window, navigate to the desired location on your device’s internal storage or SD card where you want to transfer the ROM. Then, simply drag and drop the ROM file from your computer’s folder to the desired location on your device.
- Wait for the Transfer to Complete: The file transfer process may take a few seconds or minutes, depending on the size of the ROM file and the speed of the USB connection. Ensure that the transfer is complete before disconnecting your device from the computer.
- Safely Disconnect Your Device: Once the transfer is complete, safely disconnect your Android device from your computer by clicking on the “Eject” or “Safely Remove” option in the File Explorer or Finder. This will prevent any potential data corruption or loss.
By following these steps, you can easily transfer custom ROMs from your computer to your Android device. Once the ROMs are transferred, you can move on to the next steps of booting into TWRP recovery and flashing the custom ROMs onto your device to enhance its functionality and customization options.
Booting into TWRP Recovery
Once you have TWRP recovery installed on your Android device and custom ROMs transferred to it, you’re ready to boot into TWRP recovery. Booting into TWRP recovery allows you to access the recovery menu and perform various actions such as flashing ROMs, creating backups, and wiping partitions. Here’s how you can boot into TWRP recovery:
- Power Off Your Device: Ensure that your Android device is powered off completely.
- Boot into Recovery Mode: Press and hold the specific key combination for recovery mode on your device. The key combination can vary depending on the device manufacturer and model. Common key combinations include Volume Up + Power, Home + Power, or a dedicated recovery boot key.
- Access TWRP Recovery: Once in recovery mode, your device should automatically boot into TWRP recovery. TWRP will load a customized interface with various options and settings.
- Verify TWRP Installation: Check if TWRP successfully boots and displays the main recovery menu. This menu will provide you with various actions and options that can be performed within TWRP recovery, such as flashing ROMs, creating backups, and wiping partitions.
It’s important to note that the process of booting into TWRP recovery can slightly differ depending on the device model and manufacturer. Some devices might require additional steps, such as using specific software or tools to boot into recovery mode. Therefore, it’s suggested that you refer to the device manufacturer’s documentation or search for device-specific instructions to ensure the correct booting procedure.
Once you successfully boot into TWRP recovery, you’ll have full access to its features and functionalities. From here, you can proceed with actions such as installing custom ROMs, creating backups, wiping partitions, and more, to customize and optimize your Android device according to your preferences.
Creating a Backup
Creating a backup is an essential step before making any significant changes to your Android device, such as flashing custom ROMs or performing system modifications. Taking a backup using TWRP recovery ensures that you have a copy of your device’s current state, allowing you to restore it if anything goes wrong during the flashing process. Here’s how you can create a backup using TWRP recovery:
- Boot into TWRP Recovery: Power off your device and boot into TWRP recovery by following the specific steps mentioned earlier in the “Booting into TWRP Recovery” section.
- Access the TWRP Main Menu: Once in TWRP recovery, you’ll be presented with the main menu. From here, you can navigate through the different options using the touch screen or physical buttons (if applicable).
- Select “Backup”: In the TWRP main menu, tap on the “Backup” option. This will take you to the backup screen, where you can customize your backup settings.
- Choose Backup Options: On the backup screen, you’ll see a list of partitions that can be included in the backup. By default, the “System” and “Data” partitions are selected. You can also choose to include other partitions such as “Boot”, “Recovery”, and “Vendor” based on your preferences.
- Choose a Storage Location: TWRP offers different storage options, such as internal storage, SD card, or USB OTG. Select the desired storage location for your backup. Make sure you have enough free space in the selected storage to accommodate the backup files.
- Swipe to Start Backup: Once you have selected the desired partitions and storage location, swipe the slider at the bottom of the screen to start the backup process. TWRP will begin creating a complete snapshot of your device’s current state.
- Wait for the Backup to Complete: The backup process may take a few minutes, depending on the size of the selected partitions and the speed of your device’s internal storage. It’s important to keep the device plugged in or ensure sufficient battery level during the backup process to prevent any interruptions.
- Verify the Backup: Once the backup process is complete, TWRP will display a success message. You can navigate back to the main menu and go to the backup location to verify that the backup files have been created successfully.
Creating a backup using TWRP recovery gives you peace of mind by providing a snapshot of your device’s current state. This allows you to restore your device to its previous state if anything goes wrong during the flashing process or if you decide to revert to the original ROM. Regularly creating backups is a good habit to minimize the risk of data loss and ensure a smooth Android customization experience.
Wiping Your Device
When flashing custom ROMs or performing system modifications, it is often recommended to perform a wipe of your device’s partitions. Wiping your device helps ensure a clean installation of the custom ROM and minimizes the chance of encountering compatibility issues or residual files from previous installations. TWRP recovery provides an easy way to wipe specific partitions on your device. Here’s how you can perform a wipe using TWRP recovery:
- Boot into TWRP Recovery: Power off your device and boot into TWRP recovery by following the specific steps mentioned earlier in the “Booting into TWRP Recovery” section.
- Access the TWRP Main Menu: Once in TWRP recovery, you’ll be presented with the main menu. From here, you can navigate through different options using the touch screen or physical buttons (if applicable).
- Select “Wipe”: In the TWRP main menu, tap on the “Wipe” option. This will take you to the wipe screen, where you can choose which partitions to wipe.
- Select the Partitions to Wipe: On the wipe screen, you’ll see a list of available partitions. By default, the “Dalvik/ART Cache” and “Cache” partitions are selected. Additionally, you can choose to wipe the “System” and “Data” partitions if you want a complete clean installation.
- Swipe to Start the Wipe: Once you have selected the desired partitions, swipe the slider at the bottom of the screen to start the wipe process. TWRP will begin wiping the selected partitions, removing all data and files stored within them.
- Wait for the Wipe to Complete: The wipe process may take a few moments, depending on the size of the selected partitions and the speed of your device’s storage. It’s important to let the process complete without interrupting it.
- Go Back to the Main Menu: Once the wipe process is complete, return to the TWRP main menu by using the navigation buttons or gestures provided.
Performing a wipe using TWRP recovery helps ensure a clean installation of the custom ROM and clears any residual files from previous installations. However, it’s important to note that wiping the “Data” partition will erase all your personal data, including apps, settings, and files. Make sure you have a backup of your important data before proceeding with the wipe process.
By performing a wipe using TWRP recovery, you’re preparing your device for the installation of the custom ROM and reducing the chances of encountering compatibility issues or conflicts. It’s recommended to perform a wipe before flashing a new ROM or making significant system modifications for a smoother and more reliable Android customization experience.
Installing a Custom ROM
After preparing your device, unlocking the bootloader, installing TWRP recovery, and transferring the custom ROM to your device, you’re now ready to proceed with installing the custom ROM. Here’s a step-by-step guide on how to install a custom ROM using TWRP recovery:
- Boot into TWRP Recovery: Power off your device and boot into TWRP recovery by following the specific steps mentioned earlier in the “Booting into TWRP Recovery” section.
- Access the TWRP Main Menu: Once in TWRP recovery, you’ll be presented with the main menu. From here, use the touch screen or physical buttons (if applicable) to navigate through the options.
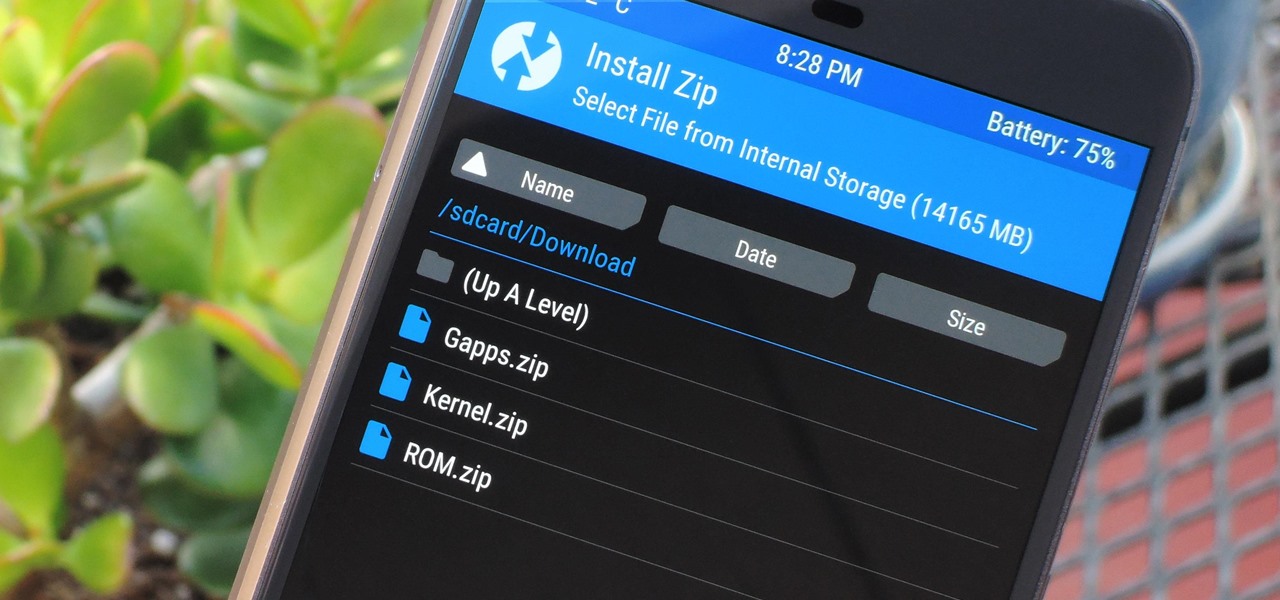
- Select “Install”: In the TWRP main menu, tap on the “Install” option. This will allow you to browse and select the custom ROM zip file for installation.
- Navigate to the Custom ROM Zip File: In the “Install” screen, locate the directory where you transferred the custom ROM zip file. Tap on the custom ROM zip file to select it.
- Confirm Custom ROM Installation: Once you have selected the custom ROM zip file, you’ll be presented with a screen to confirm the installation. Swipe the slider at the bottom of the screen to start the installation process.
- Wait for the Installation to Complete: The installation process may take a few minutes, depending on the size of the custom ROM zip file and the speed of your device’s storage. It’s important to let the process complete without interrupting it.
- Wipe Cache and Dalvik Cache: After the installation is complete, it’s recommended to wipe the cache and Dalvik cache for a cleaner installation. Go back to the main menu, select “Wipe,” and choose the “Cache” and “Dalvik/ART Cache” partitions. Swipe the slider to initiate the wiping process.
- Reboot Your Device: Once the cache and Dalvik cache are wiped, go back to the main menu and select “Reboot.” Then, choose “System” to reboot your device into the newly installed custom ROM.
After following these steps, your device will boot into the custom ROM you installed using TWRP recovery. The first boot may take slightly longer than usual as the system sets up the new ROM. Once the device has booted successfully, you’ll be able to explore the features and customization options offered by the custom ROM, enhancing your Android experience.
It’s important to note that the process of installing a custom ROM can vary depending on your device and the custom ROM you’re installing. Always refer to the specific instructions provided by the ROM developer or the official documentation to ensure a successful installation.
Clearing the Cache and Dalvik Cache
Clearing the cache and Dalvik cache is a recommended step after installing a custom ROM or making significant system modifications on your Android device. Clearing the cache helps improve system performance, resolves potential compatibility issues, and ensures a smoother overall user experience. Here’s how you can clear the cache and Dalvik cache using TWRP recovery:
- Boot into TWRP Recovery: Power off your device and boot into TWRP recovery by following the specific steps mentioned earlier in the “Booting into TWRP Recovery” section.
- Access the TWRP Main Menu: Once in TWRP recovery, you’ll be presented with the main menu. From here, use the touch screen or physical buttons (if applicable) to navigate through the options.
- Select “Wipe”: In the TWRP main menu, tap on the “Wipe” option. This will take you to the wipe screen, where you can choose the partitions you want to clear.
- Select “Cache” and “Dalvik/ART Cache” Partitions: On the wipe screen, you’ll see a list of available partitions. Tap on the “Cache” partition to select it and ensure it has a checkmark. Similarly, tap on the “Dalvik/ART Cache” partition to select it.
- Swipe to Start the Wipe: Once you have selected the cache and Dalvik cache partitions, swipe the slider at the bottom of the screen to initiate the wiping process. TWRP will clear the cache and Dalvik cache partitions, removing any temporary files and cached data.
- Wait for the Wipe to Complete: The wipe process typically completes quickly. Once the wipe is finished, you’ll see a message indicating that the cache and Dalvik cache have been cleared.
- Go Back to the Main Menu: Once the cache and Dalvik cache are cleared, return to the TWRP main menu by using the navigation buttons or gestures provided.
Clearing the cache and Dalvik cache using TWRP recovery can help improve the performance and stability of your Android device. By removing temporary files and cached data, you can free up storage space and ensure a smoother user experience while using the custom ROM or performing system modifications.
It’s important to note that clearing the cache and Dalvik cache will not delete any personal data or installed apps on your device. You can perform this action without worrying about losing any important data. However, it’s always a good practice to create a backup of your data before making any significant changes to your device, just in case.
By regularly clearing the cache and Dalvik cache, you can maintain the optimal functioning of your Android device and ensure that it continues to deliver the best performance and user experience.
Rebooting Your Device
After performing system modifications or installing a custom ROM using TWRP recovery, rebooting your device is the final step in the process. Rebooting allows the changes to take effect and ensures that your device starts up with the new settings or custom ROM. Here’s how you can reboot your device after using TWRP recovery:
- Complete the Actions or Installations in TWRP Recovery: Before rebooting your device, ensure that you have completed any necessary actions or installations in TWRP recovery. This includes flashing a custom ROM, creating backups, wiping partitions, or clearing the cache.
- Return to the TWRP Main Menu: If you’re currently in a specific menu or action screen within TWRP recovery, navigate back to the main menu using the provided buttons or gestures.
- Select “Reboot”: In the TWRP main menu, tap on the “Reboot” option. This will take you to the reboot screen, where you can choose the type of reboot you want to perform.
- Choose the Reboot Option: On the reboot screen, you’ll see different reboot options, such as “System”, “Recovery”, or “Bootloader”. Select the appropriate option based on your intended action.
- Swipe to Start the Reboot: Once you have selected the desired reboot option, swipe the slider at the bottom of the screen to initiate the reboot process. TWRP will perform the requested reboot and your device will start up accordingly.
- Wait for the Reboot to Complete: The reboot process usually takes a few moments. You’ll see the device manufacturer’s logo or the custom ROM’s boot animation, indicating that the reboot is in progress.
Rebooting your device after using TWRP recovery is crucial to finalize the changes you have made. It ensures that your device starts up with the new ROM or settings, allowing you to experience the updated features and functionality.
It’s important to note that the specific reboot options and labels may differ depending on your device and the custom ROM you have installed. Always refer to the provided options or consult the custom ROM documentation for accurate instructions on rebooting your device.
After the reboot is complete, your device will start up with the new settings or custom ROM you have installed. Take some time to explore and familiarize yourself with the features and improvements offered by the new ROM. Enjoy the enhanced performance and customization possibilities that come with a custom ROM!
Troubleshooting Common Issues
While the process of flashing custom ROMs using TWRP recovery is generally straightforward, you may encounter some common issues along the way. It’s important to be prepared and know how to troubleshoot these issues to ensure a successful installation and optimal performance. Here are some common issues and their troubleshooting steps:
- Boot Loop: If your device gets stuck in a boot loop, where it continuously restarts without fully booting up, it may indicate an incompatible or improperly installed custom ROM. To resolve this issue, reboot into TWRP recovery, wipe the cache and Dalvik cache, and try reinstalling the custom ROM. If the problem persists, try installing a different ROM compatible with your device.
- Invalid Zip File: If TWRP recovery displays an error message stating that the custom ROM zip file is invalid or corrupt, it may indicate an incomplete or improperly downloaded file. Make sure to download the ROM again and verify its integrity using checksums or comparing the file’s hash with the provided information on the ROM’s official website.
- Unable to Mount External Storage: If TWRP recovery is unable to mount external storage, such as an SD card or USB drive, make sure it is properly inserted or connected. Additionally, ensure that the storage device is formatted in a compatible file system (e.g., FAT32 or exFAT) and that it doesn’t contain any errors or corruption.
- Installation Aborted: If TWRP recovery aborts the installation process and displays an error message, it may indicate an issue with the zip file or an incompatible installation method. Double-check that you are using the correct and compatible custom ROM for your device. Also, try using a wired connection to transfer the ROM file to your device and ensure a stable internet connection if you’re installing the ROM over the air (OTA).
- Lack of Compatibility: If you experience issues with specific features or functionalities after installing a custom ROM, it’s possible that the ROM is not fully compatible with your device. Research and ensure that the custom ROM is well-tested, supported, and compatible with your specific device model to avoid potential issues.
- Bricked Device: In rare cases, incorrect installation or modification of system files can lead to a bricked device, rendering it unusable. To recover a bricked device, you may need to seek assistance from advanced users or official support channels specific to your device. Research and follow the recommended recovery methods for your device to restore its functionality.
If you encounter any of these issues or other unexpected behavior during the flashing process or while using a custom ROM, it’s essential to remain calm and take appropriate troubleshooting steps. Thoroughly research the specific issue, consult relevant online forums or communities, and seek guidance from experienced users to help you resolve the problem.
Remember, flashing custom ROMs involves risks, and it’s crucial to proceed with caution and understanding. Always follow the provided instructions, be diligent in your research, and make backups to ensure you have a safety net in case anything goes wrong.