
Common Problems During the POST
The Power-On Self Test (POST) is a crucial process that occurs when you start your computer. It checks the hardware components to ensure that they are functioning properly before the operating system loads. However, sometimes problems can arise during the POST. Let’s explore some common issues and their solutions.
1. No Power
If your computer fails to power on, ensure that the power cord is securely plugged in and that the power outlet is functioning. Check the power supply unit for any signs of damage, such as burning smells or debris. If everything appears to be in order, consider using different power cables or testing the power supply on another machine.
2. BIOS Beep Codes
Beep codes are an important diagnostic tool used by the computer’s BIOS to tell you if there are any hardware errors. These codes can vary depending on the manufacturer. Consult your motherboard’s manual or the manufacturer’s website to decipher the meaning of the beep codes specific to your system. This will help identify the faulty hardware component.
3. Black or Blank Screen
If you’re greeted with a black or blank screen during the POST, it could be due to several reasons. Check the monitor connection to ensure it is properly seated. Test the monitor’s cable on another computer or try a different cable altogether. If the issue persists, it might be a problem with the graphics card or the display itself.
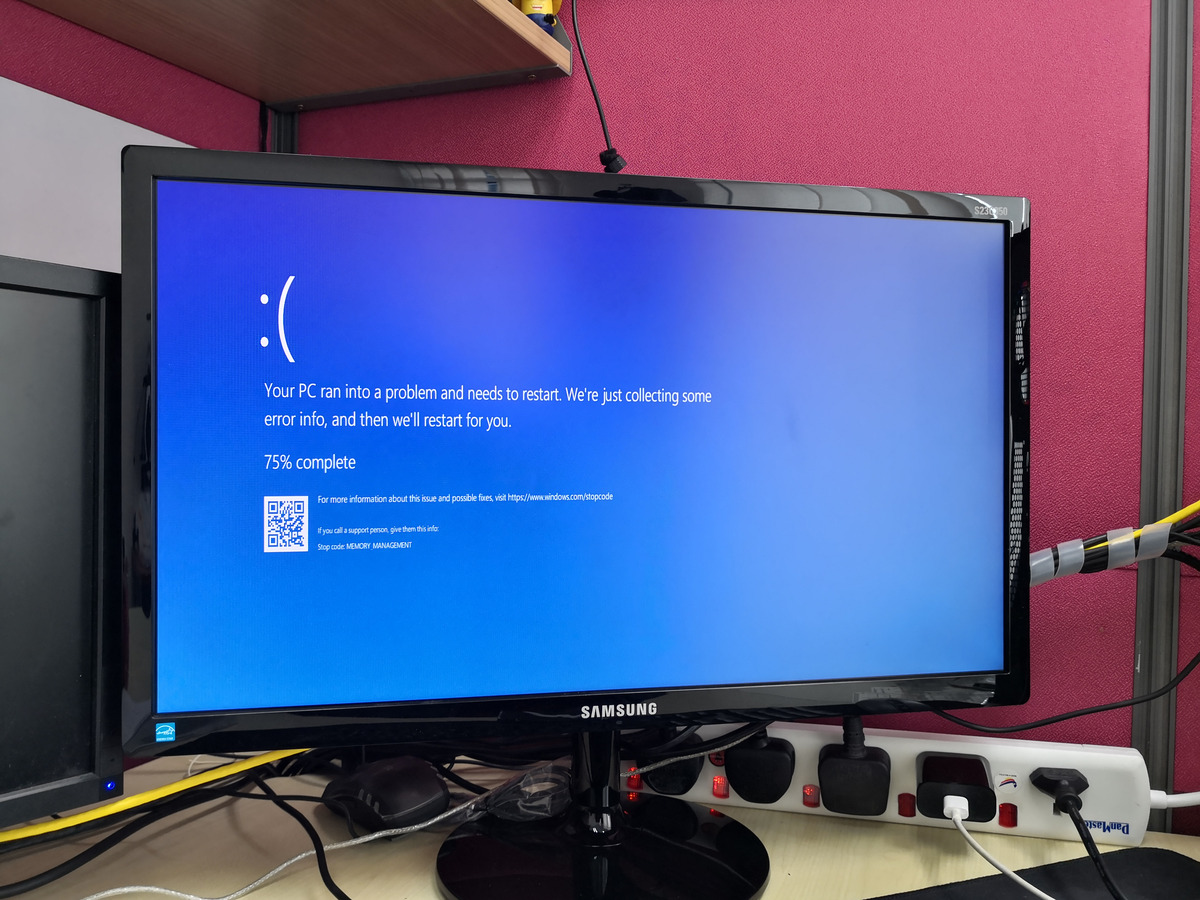
4. Memory Related Errors
If you encounter memory-related errors, such as “Memory Parity Error” or “No Memory Detected,” it could indicate an issue with your RAM modules. Try reseating the memory sticks and ensure they are inserted correctly. If the problem persists, test the modules one at a time in different slots to identify any faulty RAM.
5. Graphics Card Problems
If you notice artifacts, flickering, or no display at all, it could signify a problem with the graphics card. Ensure that the card is securely inserted into the motherboard’s PCIe slot. Additionally, check if the card requires additional power connections from the power supply and that they are properly connected.
6. Hard Drive Issues
If your computer fails to detect the hard drive, check the connections between the hard drive and the motherboard. Ensure that the SATA cables are firmly plugged in. Additionally, running a diagnostic tool like CHKDSK or SMART utilities can help identify any drive-related issues.
7. Motherboard or CPU Failures
In rare cases, the POST failure could be due to a faulty motherboard or CPU. If you have tried all the troubleshooting steps and the issues persist, you may need to consult a professional to diagnose and repair the hardware. They can perform more advanced tests and replacements if necessary.
8. Keyboard and Mouse Problems
If your keyboard or mouse is unresponsive during the POST, try connecting them to different USB ports. Additionally, check for any damage to the cables or connectors. If the devices still don’t work, try using different peripherals to determine if the issue lies with the hardware itself.
By addressing these common problems during the POST, you can ensure a smooth boot-up process and resolve any hardware-related issues that may be affecting your computer’s performance.
Troubleshooting No Power Issues
No power issues can be frustrating when trying to start your computer. Here are some troubleshooting steps to resolve this common problem.
1. Check power connections:
Ensure that the power cord is securely plugged into the computer and the power outlet. Sometimes, the cable may become loose or disconnected, preventing power from reaching the system.
2. Verify power outlet:
Make sure that the power outlet is functioning properly. Test it by plugging in another device and see if it powers on. If the outlet is not working, try using a different one.
3. Examine power supply unit (PSU):
The PSU is responsible for supplying power to your computer’s components. Inspect it for any signs of damage, such as burnt smells, charred circuits, or physical debris. If you find any issues, consider replacing the power supply unit.
4. Test with different power cable:
If the power cable seems fine, try using a different one to rule out any cable-related issues. Sometimes, the cable itself can be defective, preventing power from reaching the computer.
5. Use a different power outlet or power strip:
If you are using a power strip, unplug the computer from it and directly connect it to a power outlet. Sometimes, power strips can malfunction and prevent power from reaching the system.
6. Reset the power supply unit:
Switch off the power supply unit, unplug the power cord, and hold down the power button on the computer for 15 seconds. This will discharge any residual power and reset the PSU. Plug in the power cord and try turning on the computer again.
7. Check for motherboard indicator lights:
Some motherboards have indicator lights that illuminate when the power supply is working correctly. Check if any of these lights are on or blinking. If none of the lights are lit, it could indicate a problem with the PSU or motherboard.
8. Seek professional help:
If you have followed these troubleshooting steps and your computer still doesn’t power on, it may require the expertise of a professional technician. They can diagnose and repair any hardware issues that may be causing the no-power problem.
By following these steps, you can effectively troubleshoot and resolve no power issues with your computer. Remember to always exercise caution and seek professional assistance if needed.
Dealing with BIOS Beep Codes
When your computer encounters hardware errors during the POST, the BIOS may generate beep codes to indicate the specific issue. Understanding these beep codes can help you diagnose and troubleshoot the problem efficiently. Here’s how to deal with BIOS beep codes:
1. Listen to the beeps:
When you power on your computer, pay attention to the number and pattern of beeps. Each beep sequence corresponds to a specific error. For instance, one short beep followed by two long beeps might indicate a video card problem.
2. Consult your motherboard manual:
Refer to the documentation that came with your motherboard or visit the manufacturer’s website for a comprehensive list of beep codes specific to your system. The manual typically includes a section that explains all the possible error codes and their meanings.
3. Identify the error:
Once you have identified the beep pattern, cross-reference it with the codes listed in your manual. This will help you pinpoint the hardware component that is causing the problem. For example, a continuous beep might indicate a RAM error.
4. Inspect the indicated component:
Check the hardware component that corresponds to the identified beep code. Ensure that it is properly seated and connected. If necessary, remove and reinsert the component to ensure a secure connection.
5. Test with known working components:
If you have spare components available, such as RAM modules or a graphics card, consider swapping out the indicated hardware with known working ones. This will help you confirm if the issue is with the component itself or another factor.
6. Clear CMOS:
If you are still unable to resolve the error, try resetting the CMOS (Complementary Metal-Oxide-Semiconductor) settings on your motherboard. Follow the instructions provided in your motherboard manual to access and clear the CMOS.
7. Seek professional assistance:
If the beep code persists even after trying the above steps, it is advisable to seek professional help from a certified technician. They have the expertise to diagnose the issue further and provide the necessary repairs or replacements.
Dealing with BIOS beep codes can be a useful troubleshooting technique to identify hardware errors during the POST. By following these steps, you can effectively interpret beep codes and take appropriate actions to resolve the underlying issues.
Resolving Black or Blank Screen Issues
Experiencing a black or blank screen when starting your computer can be frustrating. This issue can arise due to various reasons, including hardware or software problems. Here are some steps to help you resolve black or blank screen issues:
1. Check the monitor connection:
Ensure that the monitor cable is securely connected to the computer and the monitor itself. Sometimes, a loose connection can cause a black screen. Try unplugging and re-plugging the cable to ensure a proper connection.
2. Verify monitor power:
Check if the monitor is receiving power. Is the power indicator light on? If not, ensure that the monitor is plugged into a power outlet and turned on. Some monitors have separate power buttons that need to be pressed to activate them.
3. Test with a different cable:
If possible, try using a different video cable, such as HDMI, DVI, or VGA, to connect your computer to the monitor. A faulty or damaged cable can cause display issues. Also, consider testing the monitor on a different computer to rule out any potential monitor-related problems.
4. Check the graphics card:
If you have a dedicated graphics card, ensure that it is properly seated in its slot on the motherboard. Gently remove and reinsert the card, making sure it is secure. If your computer has an integrated graphics card, skip this step as it is not removable.
5. Access Safe Mode:
Try booting your computer in Safe Mode. This mode loads the basic drivers and services necessary for the system to function. If you can successfully enter Safe Mode, it suggests that an incompatible driver or software might be causing the black screen. Uninstall recently installed software or update drivers to troubleshoot the issue.
6. Perform a hard reset:
Turn off your computer, unplug the power cord, and remove the battery (if applicable). Press and hold the power button for about 30 seconds to discharge any residual power. Reconnect the power cord and battery (if applicable), and then turn on your computer.
7. Check for hardware failures:
If none of the above steps resolve the black screen issue, it could indicate a hardware failure. Faulty RAM, a malfunctioning graphics card, or a problematic motherboard might be the cause. In such cases, it is advisable to seek professional assistance for further diagnostics and repairs.
Resolving black or blank screen issues requires a systematic approach to identify the underlying problem. By following these steps, you can improve your chances of resolving the issue and getting your computer’s display back up and running.
Fixing Memory Related Errors
Memory-related errors can cause various issues like system crashes, system instability, or even prevent your computer from booting. If you encounter memory-related errors during the POST, here are some steps to help you fix the problem:
1. Reseat the RAM modules:
Turn off your computer, unplug the power cord, and open the case. Locate the RAM modules on the motherboard and gently remove them. Clean the gold contacts on the RAM sticks with a soft cloth and reseat them firmly back into the slots. Ensure that they are inserted correctly and locked into place.
2. Test the RAM modules individually:
If reseating the RAM did not resolve the issue, one or more of the modules might be faulty. Remove all but one RAM module and start your computer. If it boots successfully, power it down, add another module, and repeat the process until all modules are tested individually. This helps identify any problematic RAM sticks.
3. Check for compatibility:
Make sure that the RAM modules are compatible with your motherboard. Check the manufacturer’s website for compatibility information or consult your motherboard’s manual. Mismatched RAM can cause errors, so ensure that the modules meet the required specifications.
4. Update BIOS:
In some cases, outdated BIOS firmware can cause memory-related errors. Visit your motherboard manufacturer’s website and check if there are any BIOS updates available for your model. Follow the instructions provided to update the BIOS and check if it resolves the issue.
5. Test the RAM with a diagnostic tool:
Use a reliable memory diagnostic tool to test the RAM for errors. Memtest86 is a popular tool that can be booted from a USB drive. Run the test overnight to thoroughly check for any memory problems. If errors are detected, it usually indicates a faulty RAM module that needs to be replaced.
6. Check the RAM slots and motherboard:
Inspect the RAM slots on the motherboard for any physical damage or debris. Clean the slots gently with compressed air if necessary. Also, examine the motherboard for any signs of damage or bulging capacitors, as they can cause memory-related errors. If there are any visible issues, consult a professional for further assistance.
7. Seek professional help:
If you have exhausted all the above steps and are still experiencing memory-related errors, it may be time to seek professional assistance. A computer technician can run advanced diagnostics and recommend the best course of action, such as replacing faulty RAM or performing motherboard repairs.
By following these steps, you can troubleshoot and fix memory-related errors on your computer. Remember to handle RAM modules and the motherboard with care to avoid any further damage.
Addressing Graphics Card Problems
A graphics card is an essential component for displaying visuals on your computer. If you are experiencing graphics card problems, it can manifest as display artifacts, screen flickering, no display at all, or poor graphics performance. Here are some steps to help you address graphics card issues:
1. Check connections:
Ensure that the graphics card is securely seated in its PCIe slot on the motherboard. Sometimes, a loose connection can cause display problems. Gently remove and reinsert the graphics card, making sure it is properly aligned and firmly seated.
2. Verify power connections:
Check if your graphics card requires additional power connections from the power supply. Ensure that these connections are securely plugged in and providing sufficient power to the graphics card. Loose or inadequate power connections can result in display issues.
3. Update graphics card drivers:
Outdated or incompatible graphics card drivers can cause various display problems. Visit the manufacturer’s website and download the latest drivers for your specific graphics card model. Install the drivers and restart your computer to see if it resolves the issue.
4. Test with another display:
If you are experiencing display issues, try connecting your computer to a different monitor or TV. This helps determine if the problem lies with the graphics card or the display itself. It can also be helpful to use a known working cable to rule out any potential cable-related issues.
5. Check for overheating:
Graphics cards can overheat, causing performance problems or even system crashes. Check if the fans on the graphics card are running and not obstructed by dust or debris. Clean the fans and ensure proper airflow in your computer case. Consider using graphics card management software to monitor temperatures and adjust fan speeds if necessary.
6. Test with alternate graphics card:
If possible, test your computer with an alternate graphics card. This can help determine if the issue is specific to your graphics card or if other factors are at play. If the alternate card works fine, it may indicate a problem with your original graphics card that requires further troubleshooting or replacement.
7. Seek professional help:
If you have tried all the above steps and are still experiencing graphics card problems, it might be time to seek professional help. A technician can diagnose the issue more accurately and provide further guidance or repairs.
Addressing graphics card problems requires thorough troubleshooting to identify the root cause. By following these steps, you can improve your chances of resolving the issues and restoring optimal display performance on your computer.
Handling Hard Drive Issues
The hard drive is a vital component of your computer that stores and retrieves data. If you encounter hard drive issues, it can lead to data loss, system crashes, or booting problems. Here are some steps to handle hard drive issues:
1. Check connections:
Ensure that the cables connecting the hard drive to the motherboard and power supply are securely plugged in. A loose or disconnected cable can cause the hard drive to be unresponsive or undetectable by the system.
2. Look for signs of physical damage:
Inspect the hard drive for any physical damage, such as dents, bent connectors, or visible circuit board damage. If there are signs of physical damage, it may be necessary to replace the hard drive.
3. Run disk diagnostics:
Most hard drive manufacturers provide diagnostic tools that can check the health and performance of your hard drive. Run a disk diagnostic scan to identify any potential errors or bad sectors on the drive. If errors are detected, some tools may attempt to repair them, but it is recommended to backup your data first.
4. Check for excessive disk fragmentation:
Fragmentation can slow down your hard drive’s performance. Run a disk defragmentation tool to consolidate fragmented files and optimize disk access. This can improve overall system performance and reduce the risk of errors.
5. Test with another SATA cable:
If you suspect a faulty SATA cable is causing issues, try using a different cable. Sometimes, cables can become damaged or fail, leading to data transfer errors or the inability to detect the hard drive. Testing with a known working cable can help narrow down the cause of the problem.
6. Perform a disk check:
Run a disk check utility, such as CHKDSK (Check Disk) on Windows, to scan for and fix file system errors on the hard drive. This can help resolve issues related to corrupted files or directories that may be causing problems with the drive’s functionality.
7. Backup important data:
If the hard drive shows signs of failure or is experiencing frequent errors, it is crucial to backup important data immediately. Use a reliable backup solution to create a backup of all your critical files and folders to prevent data loss in case of a complete hard drive failure.
8. Seek professional assistance:
If the above steps do not resolve the hard drive issues, it may be necessary to seek professional help. Data recovery specialists or computer technicians can provide advanced diagnostics, repair services, or data recovery options to salvage important data from a failing hard drive.
Handling hard drive issues requires a careful approach to ensure data integrity and system functionality. By following these steps, you can troubleshoot and address common hard drive problems that may arise.
Addressing Motherboard or CPU Failures
Motherboard and CPU failures can result in a range of system issues and errors. These components are crucial for the proper functioning of your computer. If you suspect a motherboard or CPU failure, here are some steps to address the problem:
1. Diagnose the problem:
Identifying whether the issue is due to a motherboard or CPU failure can be challenging. If your computer does not turn on at all or shows no signs of life, it could point to a motherboard problem. However, if your computer powers on but experiences frequent crashes, overheating, or other abnormal behavior, it might indicate a CPU issue.
2. Check for physical damage:
Inspect the motherboard and CPU for any visible signs of physical damage, such as burnt components or leaking capacitors. Damaged components may indicate the cause of the failure. If you find physical damage, it is recommended to consult a professional for further assistance or consider replacing the faulty component.
3. Test with known working components:
If possible, test the CPU and motherboard with known working components. For example, you can try using a different CPU or graphics card to eliminate the possibility of the issue lying with these components. This helps narrow down the cause of the failure and identify the faulty component.
4. Check power supply:
A malfunctioning power supply can sometimes cause symptoms resembling motherboard or CPU failure. Test the power supply unit (PSU) with a known working PSU or use a PSU tester to check its voltage outputs. If the PSU is faulty, replace it and check if the motherboard or CPU failure symptoms persist.
5. Reset BIOS settings:
Resetting the BIOS (Basic Input/Output System) settings to default can sometimes resolve issues caused by misconfigured settings. Refer to your motherboard manual for instructions on how to reset the BIOS. Note that this may reset any custom settings you have made, so take caution before proceeding.
6. Seek professional help:
If you have exhausted all the above steps and are still experiencing motherboard or CPU-related problems, it is advisable to seek professional assistance. A qualified technician can perform advanced diagnostics, repair or replace the faulty component, and ensure your computer is back up and running smoothly.
Addressing motherboard or CPU failures requires technical expertise and sometimes specialized equipment. It is essential to approach these issues carefully to avoid further damage to the components. By following these steps, you can troubleshoot and address potential motherboard or CPU failure-related problems.
Solving Keyboard and Mouse Problems
Keyboard and mouse problems can be frustrating as they hinder your ability to interact with your computer. If you’re experiencing issues with your keyboard or mouse, here are some steps to help you solve the problem:
1. Check physical connections:
Ensure that your keyboard and mouse are securely connected to the appropriate ports on your computer. If they are connected via USB, try plugging them into different USB ports to rule out any port-related issues. Also, inspect the cables for any signs of damage or fraying.
2. Replace or recharge batteries:
If you’re using wireless peripherals, check the battery levels. If the batteries are low, replace them with fresh ones or recharge them if they are rechargeable. Sometimes, keyboard and mouse performance issues can occur when the batteries are running low.
3. Restart your computer:
A simple computer restart can often help resolve keyboard and mouse problems. Restarting your computer can refresh the system and recalibrate the peripherals.
4. Update or reinstall drivers:
Outdated or corrupt drivers can cause keyboard and mouse issues. Visit the manufacturer’s website and check if there are any new driver updates available for your specific keyboard and mouse models. If you can’t find updated drivers, try uninstalling and reinstalling the existing drivers.
5. Use keyboard/mouse troubleshooting tools:
Both Windows and Mac operating systems have built-in troubleshooting tools that can help identify and resolve keyboard and mouse problems. These tools can be accessed through the Control Panel or System Preferences, depending on your operating system.
6. Test with different peripherals:
If possible, try using a different keyboard and mouse to see if the issue persists. This will help determine if the problem is with the peripherals themselves or with your computer. If the problem is isolated to your specific keyboard or mouse, consider replacing them.
7. Check for software conflicts:
Some installed software or drivers can interfere with the functioning of your keyboard or mouse. Try booting your computer in Safe Mode to see if the problem persists. If the keyboard and mouse work fine in Safe Mode, it suggests that a software conflict may be the cause.
8. Seek professional help:
If you have tried all the above steps and are still experiencing keyboard or mouse problems, it may be necessary to seek professional help. A computer technician can diagnose the problem and provide further assistance or hardware replacements if needed.
By following these steps, you can troubleshoot and resolve keyboard and mouse problems, ensuring smooth and accurate input interaction with your computer.