
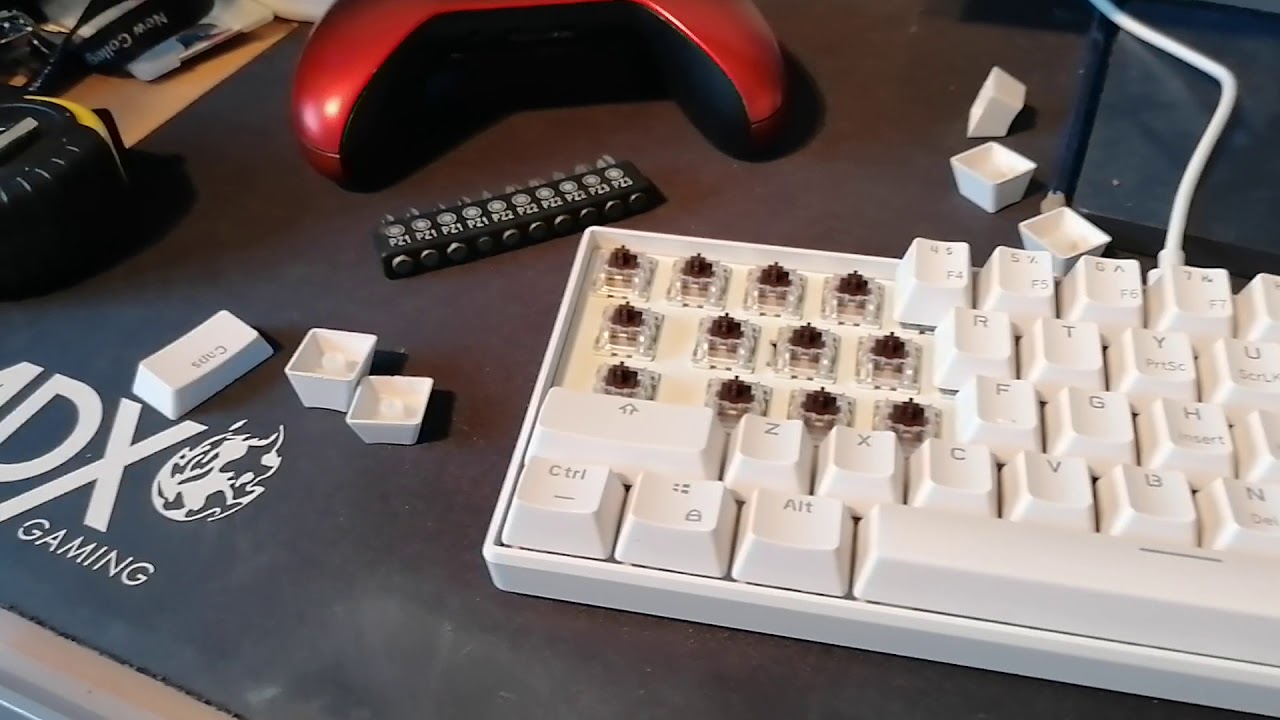
Check for Physical Damage
When you encounter a mechanical keyboard key that is not working, the first step is to check for physical damage. Over time, keyboards can accumulate dust, debris, and even spillage, which can lead to malfunctioning keys. Here are some steps to check for physical damage:
- Inspect the keycap: Gently remove the keycap of the non-working key and check for any visible signs of damage. Look for cracks, chips, or loose components that may prevent the key from functioning properly.
- Examine the switch: If the keycap looks fine, examine the switch underneath. Mechanical keyboards have individual switches beneath each key that can get damaged. Look for any signs of corrosion, bent pins, or dirt that may be interfering with the switch’s performance.
- Try a different keycap: To rule out the possibility of a faulty keycap, swap the non-working keycap with a keycap from a functioning key. If the issue persists, it is likely not related to the keycap itself.
- Inspect the PCB: Carefully remove the keyboard’s keycap and inspect the printed circuit board (PCB) underneath. Look for any signs of damage, such as burn marks, broken traces, or loose connections.
Remember to perform these checks with caution and avoid applying excessive force, as it may cause further damage to the keyboard. If you notice any physical damage, it may be necessary to replace the affected key or seek professional assistance.
Keep in mind that physical damage is not the only potential cause of a non-working key. If no visible damage is found, proceed to the following sections for additional troubleshooting steps.
Clean the Keyboard
Another common cause of a mechanical keyboard key not working is debris and dirt build-up. Over time, dust, crumbs, and other particles can accumulate between the key switches, preventing proper contact and causing keys to become unresponsive. Cleaning the keyboard may help resolve the issue. Here’s how you can clean your keyboard:
- Disconnect the keyboard: Before starting the cleaning process, make sure to unplug the keyboard from your computer to avoid any potential damage.
- Remove the keycaps: Gently remove the keycaps using a keycap puller or by carefully prying them off with a small tool. Be careful not to use excessive force to prevent damaging the keycaps or switches.
- Shake out debris: Turn the keyboard upside down and gently shake it to dislodge any loose debris or particles trapped between the keys.
- Use compressed air: Utilize a can of compressed air or a small handheld air blower to blow away any remaining dust or dirt. Hold the can upright and use short bursts of air to avoid moisture or propellant residue from getting inside the keyboard.
- Clean the keycaps: If the keycaps are dirty, you can clean them individually by using a mild detergent or keyboard cleaning solution. Apply a small amount of the cleaning solution to a microfiber cloth and gently wipe the keycaps. Avoid submerging the keycaps in water or using harsh chemicals.
- Clean the switches and PCB: For a more thorough clean, you can use a small brush or cotton swabs dipped in rubbing alcohol to gently clean the switches and the PCB. Be careful not to drench the components in alcohol and allow ample time for the keyboard to dry before reconnecting it.
Once you’ve cleaned the keyboard and allowed it to dry completely, reassemble the keycaps and reconnect the keyboard to your computer. Test the previously non-working key to see if it has started working again. If the issue persists, proceed with the next troubleshooting steps to correct the problem.
Reinstall the Keyboard Driver
If your mechanical keyboard key is not working, it’s possible that the keyboard driver has become corrupted or outdated. Reinstalling the keyboard driver can help resolve the issue. Follow these steps to reinstall the keyboard driver:
- Open the Device Manager: Press the Windows key + R, type “devmgmt.msc”, and hit Enter. This will open the Device Manager window.
- Locate the keyboard driver: Expand the “Keyboards” category in the Device Manager and find your keyboard driver. It is usually named “Standard PS/2 Keyboard” or “HID Keyboard Device”.
- Uninstall the driver: Right-click on the keyboard driver and select “Uninstall device”. A confirmation dialog may appear; choose “Uninstall” to proceed.
- Restart your computer: After uninstalling the driver, restart your computer to allow Windows to reinstall the driver automatically.
- Windows will automatically detect and reinstall the keyboard driver upon startup. Once the driver is reinstalled, check if the previously non-working key is functioning properly.
If the keyboard driver was indeed the cause of the issue, reinstalling it should fix the problem. However, if the key is still not working, proceed to the next troubleshooting step.
Note: In some cases, your keyboard may require specific drivers provided by the manufacturer. Check the manufacturer’s website for any available driver updates and install them if necessary. Additionally, you can try connecting your keyboard to another USB port on your computer to rule out any port-related issues.
Test the Keyboard on Another Computer
If you’re still experiencing issues with a mechanical keyboard key not working, it’s important to rule out any potential problems with your computer. Testing the keyboard on another computer can help identify whether the issue is related to the keyboard itself or your computer’s settings. Here’s how to test the keyboard on another computer:
- Disconnect the keyboard from your current computer: Unplug the keyboard from your computer and any other connected devices.
- Connect the keyboard to another computer: Take the keyboard and connect it to another computer via the appropriate connector (USB, PS/2, etc.)
- Check for functionality: Once the keyboard is connected to the other computer, test the non-working key to see if it functions properly. Press the key several times to ensure consistent response.
- If the key works correctly on the other computer, it indicates that the issue may be specific to your computer. In this case, proceed to the next troubleshooting steps to address the problem on your computer.
- However, if the key still does not work on another computer, it suggests a hardware issue with the keyboard itself. In such cases, it may be necessary to replace the keyboard or seek professional assistance for further diagnosis and repair.
Testing the keyboard on another computer helps you determine if the issue is isolated to your computer or if it’s a hardware problem with the keyboard. It also helps rule out any driver or software-related issues specific to your system.
If the keyboard works fine on another computer, you can proceed with the next troubleshooting steps to address the problem on your original computer. On the other hand, if the key still doesn’t work, it’s time to consider hardware-related solutions or seek professional help.
Adjust Keyboard Settings
If a mechanical keyboard key is not working as expected, it’s worth checking the keyboard settings on your computer. Sometimes, certain settings or configurations can affect the functionality of individual keys. Follow these steps to adjust the keyboard settings:
- Access the Control Panel: Click on the Start menu and search for “Control Panel.” Open the Control Panel from the search results.
- Go to Keyboard Settings: In the Control Panel, search for the “Keyboard” or “Hardware and Sound” option and click on it.
- Open Keyboard Properties: Under the Keyboard settings, locate the “Keyboard Properties” or “Change Keyboard” option and click on it.
- Check the Language and Region settings: In the Keyboard Properties window, ensure that the correct language and region settings are selected. Incorrect settings might cause certain keys to behave unexpectedly. Make any necessary adjustments if required.
- Modify Accessibility settings: Some accessibility settings like Sticky Keys, Filter Keys, or Toggle Keys can interfere with the normal functioning of keys. In the Keyboard Properties window, click on the “Accessibility” tab and make sure these settings are turned off. Disable any unnecessary options that might affect key responsiveness.
- Apply changes and test the keyboard: Click “Apply” or “OK” to save the changes made to the keyboard settings. Test the non-working key to see if it functions correctly now.
After adjusting the keyboard settings, test the problematic key to determine if the changes have resolved the issue. If the key is still not working properly, continue to the next troubleshooting steps.
It’s important to note that keyboard settings may vary depending on your operating system version and manufacturer. Refer to the relevant documentation or online resources for more specific instructions based on your setup.
Use a Key Remapping Software
If you’ve tried the previous troubleshooting steps and a mechanical keyboard key is still not working, you can consider using a key remapping software. Key remapping allows you to reassign the function of keys on your keyboard, which can help resolve issues caused by specific key malfunctions. Here’s how to use key remapping software:
- Research key remapping software: Look for reputable key remapping software options that are compatible with your operating system. Examples include SharpKeys for Windows or Karabiner for macOS.
- Download and install the software: Visit the official website of the chosen key remapping software and download the appropriate version for your operating system. Follow the installation instructions to set it up on your computer.
- Open the key remapping software: Launch the key remapping software and navigate to the key remapping settings or options.
- Locate the non-working key: Look for the non-working key in the key remapping interface and select it. Then, choose a different key or function to assign to it.
- Save the changes: After remapping the key, save the changes within the key remapping software.
- Test the remapped key: Once the key remapping is complete, test the non-working key to see if it now functions as expected.
Using key remapping software can be a helpful workaround for a non-working key, allowing you to continue using your keyboard effectively. However, it’s important to note that this solution may not address the root cause of the problem, which could be a hardware issue. If the key continues to malfunction even after remapping, you may need to explore other options or seek professional assistance.
Additionally, remember that key remapping software is dependent on the underlying operating system and may have limitations or compatibility issues. It’s always wise to refer to the documentation provided by the software developer and test the remapped key thoroughly to ensure its functionality.
Reset Your Keyboard Settings
If you’re still facing a mechanical keyboard key not working, resetting the keyboard settings can help resolve any software-related issues that may be causing the problem. Resetting the settings will revert any custom configurations and preferences back to their default state. Here’s how you can reset your keyboard settings:
- Access the Control Panel: Open the Control Panel on your computer by clicking on the Start menu and searching for “Control Panel”.
- Go to Keyboard Settings: Within the Control Panel, search for the “Keyboard” or “Hardware and Sound” option and click on it.
- Open Keyboard Properties: Under the Keyboard settings, locate the “Keyboard Properties” or “Change Keyboard” option and click on it.
- Reset to default settings: In the Keyboard Properties window, look for the “Reset to Defaults” or “Restore Defaults” button. Click on it to reset the keyboard settings to their original configuration.
- Apply changes and test the keyboard: After resetting the keyboard settings, click “Apply” or “OK” to save the changes. Test the previously non-working key to see if it is functioning correctly now.
Resetting your keyboard settings can help eliminate any custom settings or configurations that might be causing the non-working key. It’s important to keep in mind that this solution primarily addresses software-related issues. If the key remains unresponsive after resetting the settings, it’s advisable to proceed with other troubleshooting steps or seek professional assistance.
Remember, the steps to reset keyboard settings may vary depending on your operating system version and manufacturer. If you encounter any difficulties or need specific guidance, refer to the relevant documentation or online resources for further assistance.
Replace the Faulty Key Switch
If none of the previous troubleshooting steps were successful in fixing a mechanical keyboard key that is not working, it’s possible that the key switch itself is faulty. Replacing the faulty key switch can often resolve the issue and restore the functionality of the non-working key. Here’s how you can replace a faulty key switch:
- Identify the faulty key switch: Using a keycap puller or a small tool, remove the keycap from the non-working key. This will expose the key switch underneath.
- Source a replacement key switch: Identify the specific type of key switch used in your mechanical keyboard (e.g., Cherry MX, Kailh, etc.). You can then purchase a replacement key switch of the same type from reputable keyboard part retailers.
- Prepare for switch replacement: Carefully desolder or remove the faulty key switch from the keyboard PCB. Refer to the manufacturer’s instructions or online tutorials for guidance on desoldering and soldering techniques.
- Install the replacement key switch: With the faulty key switch removed, insert the replacement key switch into the empty switch socket on the PCB. Ensure proper alignment and positioning to maintain compatibility.
- Solder the new switch: Use a soldering iron to secure the replacement key switch onto the PCB, making sure to establish strong and durable connections. Be cautious to avoid bridges or excess solder that may cause short circuits.
- Test the replaced key switch: After soldering the new switch, reassemble the keyboard and test the replaced key switch. Press the key multiple times to ensure proper functionality.
Replacing a faulty key switch requires a certain level of technical skill and knowledge in soldering. If you are uncomfortable or inexperienced with this process, it is advisable to seek assistance from a professional or a knowledgeable individual to ensure proper installation and minimize the risk of damage to your keyboard.
Not all keyboards have easily replaceable key switches, as it depends on the design and construction of the keyboard. If your keyboard does not have replaceable switches, it may be more prudent to consider replacing the entire keyboard instead.
By replacing the faulty key switch, you can address mechanical issues that could be causing the non-working key. However, if the key still does not function properly after replacing the key switch, it may indicate a different underlying problem, and further investigation or professional assistance might be necessary.
Seek Professional Help
If you have exhausted all the troubleshooting steps and a mechanical keyboard key is still not working, it may be time to seek professional assistance. Professional keyboard technicians or repair services have the expertise and specialized tools required to diagnose and fix more complex issues. Here’s what you can do to seek professional help:
- Research keyboard repair services: Look for reputable keyboard repair services or technicians in your area. Check online reviews and ratings to ensure their credibility and expertise in handling mechanical keyboards.
- Contact the professionals: Reach out to the keyboard repair services or technicians you have identified and discuss your keyboard issue. Provide them with the necessary details and information about the problem you’re experiencing. They may guide you through the next steps in the repair process.
- Consider the warranty: If your keyboard is still under warranty, check with the manufacturer or retailer to determine if the issue is covered by the warranty. They may offer repair or replacement options.
- Consult support forums or communities: If professional repair services are not readily available or feasible for you, consider seeking help from keyboard enthusiast communities or forums. They may have experienced individuals who can provide guidance or DIY solutions.
Professional help can be particularly useful when dealing with complex issues such as circuitry problems or issues with specific components of the keyboard. They have the expertise to diagnose and repair such problems, ensuring the proper functioning of your mechanical keyboard.
Remember to inquire about the estimated costs, turnaround time, and any warranties or guarantees provided by the professionals. It’s important to be well-informed and clear about the terms of the service before proceeding.
Seeking professional help can save you time, effort, and potential damage to your keyboard if you are not confident in performing repairs yourself. They can provide tailored solutions and technical expertise, offering you peace of mind when it comes to fixing your non-working keyboard key.