
Check for Debris or Dirt
One of the most common causes of a sticky key on a laptop is the accumulation of debris or dirt underneath the keycap. Over time, dust, crumbs, or other tiny particles may find their way into the keyboard, causing the keys to become sticky or unresponsive. Before attempting any other fixes, it is important to first check for and remove any visible dirt or debris.
Start by turning off the laptop and unplugging it from the power source. This minimizes the risk of accidentally pressing keys or causing any electrical damage during the cleaning process.
Next, gently turn the laptop upside down and give it a few taps on the back to dislodge any loose debris. This can help to loosen any larger particles that might be trapped underneath the keys.
After tapping the laptop, use a can of compressed air to blow away any remaining dirt or debris. Hold the can upright and aim the nozzle at an angle towards the affected key. Giving short bursts of air should dislodge the particles without causing any damage to the internal components of the laptop.
Once you have blown away the loose debris, inspect the key carefully for any remaining dirt or residue. Using a soft, lint-free cloth slightly dampened with water or rubbing alcohol, gently wipe the keycap and the area surrounding it. Be cautious not to use too much liquid, as it may seep into the keyboard and cause further issues.
Repeat this process for any other keys that are sticking. It is important to clean the entire keyboard thoroughly to prevent other keys from becoming sticky in the future.
By checking for and removing any debris or dirt, you can often resolve a sticky key issue easily and quickly. However, if the problem persists, there may be other underlying causes that need to be addressed.
Clean the Key and Surrounding Area
After checking for debris or dirt, the next step in fixing a sticky key on a laptop is to clean the key and the surrounding area. Sometimes, the stickiness can be caused by residue or grime that has built up on the keycap or the keyboard surface.
Start by dampening a soft, lint-free cloth with isopropyl alcohol or a mild cleaning solution. Avoid using excessive amounts of liquid, as it can seep into the keyboard and potentially damage the electronic components. It’s best to apply the cleaning solution to the cloth rather than directly to the key.
Gently rub the cloth over the sticky keycap, applying light pressure to remove any stubborn dirt or residue. Be sure to clean the entire surface of the key thoroughly, including the edges and corners. If necessary, you can use a cotton swab dipped in the cleaning solution to reach into small crevices.
After cleaning the keycap, move on to the surrounding area. Wipe down the area around the key, paying close attention to the edges and the gaps between the keys. Oftentimes, dirt or grime can accumulate in these spaces and contribute to a sticky key.
Additionally, if your laptop has a membrane-style keyboard (common in newer models), you may want to remove the keycaps themselves for a more thorough cleaning. Refer to your laptop’s manual or manufacturer’s website for instructions on safely removing the keycaps. Once removed, clean each keycap individually using the same method described above.
Allow the key and the surrounding area to air dry for a few minutes before reassembling and testing the key. Ensure that there is no moisture remaining on the keycap or in the keyboard before powering on your laptop.
Cleaning the key and the surrounding area is an effective way to eliminate sticky residues and restore the proper functioning of the key. However, if the issue persists, there may be other factors to consider in resolving the problem.
Use Compressed Air to Remove Dirt or Hair
If debris or hair is causing your laptop key to stick, using compressed air can provide an effective solution. As the name suggests, compressed air can forcefully blow away small particles that may be trapped underneath the key.
First, ensure that the laptop is turned off and unplugged from any power source. This precautionary measure reduces the risk of electrical damage and accidental key presses during the cleaning process.
Locate the key that is sticking and position the nozzle of the can of compressed air at an angle towards the affected key. Make sure to hold the can in an upright position to prevent any spraying of liquid, as most compressed air cans contain both compressed air and a small amount of liquid propellant.
With a gentle, yet firm, pressure on the can’s trigger, release short bursts of compressed air onto the key. This will dislodge any dirt, crumbs, or hair that may be causing the stickiness.
While using the compressed air, it’s important to focus on the targeted key and its surrounding area. Move the nozzle along the gaps between the keys to blow out any trapped debris. You can also tilt the laptop slightly to help remove any particles that may have fallen deeper into the keyboard.
After using the compressed air, examine the key for any remaining dirt or hair. If necessary, you can use a soft brush or a cotton swab lightly moistened with rubbing alcohol to gently clean the key surface.
Allow the key to dry completely before reassembling the laptop and testing the key’s functionality. It is advisable to wait for at least 10-15 minutes to ensure that any moisture from the cleaning process has evaporated.
If the key is no longer sticky after using compressed air, congratulations! You have successfully resolved the issue. However, if the problem persists, further troubleshooting may be required to determine the underlying cause.
Try Using a Can of Electrical Contact Cleaner
If you have tried cleaning the key and the surrounding area but the stickiness still persists, another option to consider is using a can of electrical contact cleaner. This specialized cleaning solution is designed to remove dirt, dust, and other contaminants from electrical components, including keyboard switches.
Before proceeding, it is crucial to turn off the laptop and unplug it from the power source to ensure safety and prevent any damage to the internal circuitry. Make sure the laptop is completely powered down before moving forward.
Find a can of electrical contact cleaner that is safe for use on electronic devices. It is best to choose a cleaner that does not contain any oils or lubricants, as they can make the stickiness worse. You can typically find electrical contact cleaner at electronics stores or online.
Hold the can upright and carefully insert the nozzle into the narrow gap around the sticky key. Give the key a few short sprays of the contact cleaner, directing the stream towards the affected area. Avoid excessive spraying, as it can lead to the cleaner seeping into the keyboard and potentially causing more issues.
After spraying the contact cleaner, press the key multiple times to allow the cleaner to seep into the switch mechanism. This can help loosen any residual dirt or debris that may be causing the stickiness. Give the key a few moments to dry before reassembling the laptop and testing its functionality.
If the issue persists, you may need to repeat the process or consider other troubleshooting options. It’s important to note that electrical contact cleaner can be effective for sticky keys caused by dirt or contamination, but if there is an underlying mechanical or hardware issue, further intervention may be required.
Remember to always follow the manufacturer’s instructions and recommendations when using any cleaning products or tools on your laptop. If you are unsure or uncomfortable performing these cleaning steps, it is advisable to consult a professional or contact the laptop manufacturer for assistance.
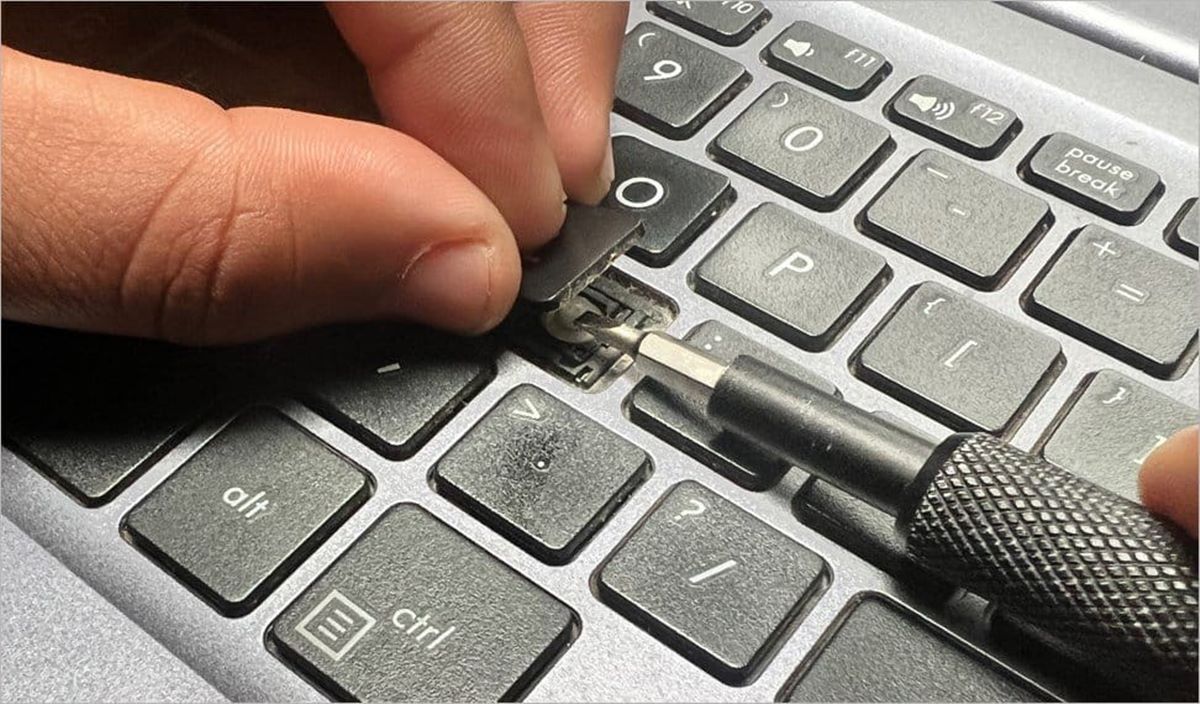
Remove the Key and Check for Damage
If cleaning and using contact cleaner have not resolved the sticky key issue on your laptop, it may be necessary to remove the key itself and inspect it for any visible damage. Sometimes, the keycap or the underlying mechanism may be damaged, causing the stickiness.
Before proceeding, ensure that your laptop is powered off and disconnected from any power sources. This step is crucial to avoid any accidental key presses or electrical damage during the removal process.
Start by locating the sticky key and gently lift the edge of the keycap using a small, flat tool like a flathead screwdriver or a plastic prying tool. Be careful not to apply too much force or use a tool that may scratch or damage the keycap or the surrounding area.
Once you have lifted the edge, gently pull upwards to remove the keycap from the keyboard. Some laptops may have a retention mechanism that keeps the keycap in place, so you may need to apply some gentle pressure or use a slight twisting motion to release it.
With the keycap removed, inspect it for any visible damage such as cracks, breaks, or warping. Also, check the area underneath the keycap and the underlying switch mechanism for any debris or signs of obstruction that may be causing the stickiness.
If you notice any damage to the keycap or the mechanism, it may be necessary to replace the keycap or contact the laptop manufacturer for further assistance. In some cases, the entire keyboard may need to be replaced if the issue is widespread.
Before reassembling the keycap, use a soft, lint-free cloth slightly dampened with water or rubbing alcohol to clean both the keycap and the exposed switch mechanism. Remove any dirt or residue that may have accumulated during the removal process.
Once cleaned and inspected, carefully place the keycap back into its original position on the keyboard. Apply gentle pressure until the keycap snaps back into place or until you feel it secure.
After reassembling the key, power on your laptop and test the key’s functionality. If the stickiness persists or if other keys are affected, it may be necessary to seek further assistance from a professional technician or contact the laptop manufacturer for additional troubleshooting steps.
Apply a Small Amount of Lubricant or Silicone Spray
If you have checked for debris, cleaned the key, and even removed it to inspect for damage but the key still feels sticky, applying a small amount of lubricant or silicone spray may help resolve the issue. This method can be particularly effective if the stickiness is caused by friction within the key mechanism.
Before proceeding, make sure your laptop is turned off and disconnected from any power sources. It is essential to avoid any accidental key presses or potential damage to the internal components.
Locate a suitable lubricant specifically designed for keyboard mechanisms. Silicone-based lubricants or silicone spray are often recommended as they provide smooth and long-lasting lubrication without damaging the delicate parts.
Using the applicator or spray nozzle, apply a small amount of the lubricant directly onto the affected key mechanism. Ensure that you only apply a thin, even layer to avoid excess accumulation that could create additional issues.
Gently press the key multiple times to distribute the lubricant and allow it to penetrate the mechanism. This will help reduce friction and improve the smoothness of the key’s movement.
Let the lubricant sit for a few minutes, allowing it to fully penetrate and settle into the mechanism. It is crucial to give it enough time to work before reassembling the key and testing its functionality.
After the waiting period, remove any excess lubricant by wiping the key and its surrounding area with a soft, lint-free cloth. Be careful not to remove all the lubricant, as a thin layer is still needed to keep the key functioning smoothly.
Reassemble the key by carefully pressing it back into place on the keyboard. Apply gentle pressure until it snaps into position or feels secure.
Power on your laptop and test the key to see if the stickiness has been resolved. If the issue persists or if other keys are affected, it may be necessary to consult a professional technician or contact the laptop manufacturer for further assistance.
Remember, using lubricant or silicone spray should be done sparingly and with caution. Excessive application or using the wrong type of lubricant can cause more harm than good. If you are unsure or uncomfortable performing these steps, it is advisable to seek professional help.
Reassemble the Key and Test It Out
After cleaning, inspecting, and applying any necessary lubrication, the next step is to reassemble the key and test its functionality. Proper reassembly ensures that the key is securely in place and functions correctly without any stickiness.
Start by positioning the keycap back into its original place on the keyboard. Align the keycap with the switch mechanism underneath, making sure it is correctly aligned and centered over the switch.
Gently press down on the keycap with equal pressure on all sides until you hear or feel it snap back into place. Make sure the keycap is securely attached and doesn’t wiggle or feel loose.
Once the keycap is reassembled, it’s time to test its functionality. Power on your laptop and open a text editor or any application where you can type to evaluate the key’s response.
Press the key multiple times to ensure smooth and consistent operation. Observe if the stickiness is resolved and if the key registers each press accurately and consistently.
If the key still feels sticky or unresponsive, it may be necessary to repeat the cleaning or troubleshooting process, or consult a professional technician for further assistance.
Continue testing other nearby keys to ensure that the reassembled key did not impact the adjacent keys or introduce any new issues.
If the key is functioning smoothly and without stickiness, you can consider the reassembly process successful. However, it’s always a good idea to periodically clean and maintain your laptop keyboard to prevent any future issues.
Remember to follow the manufacturer’s guidelines and recommendations when handling and reassembling keyboard components. If you encounter any difficulties or are unsure about the reassembly process, consult the laptop’s manual or contact the manufacturer for assistance.
By reassembling the key properly and thoroughly testing its functionality, you can ensure that the sticky key issue is resolved and restore smooth typing experience on your laptop.
Consult a Professional or Manufacturer
If you have tried various troubleshooting methods and the sticky key issue on your laptop persists, it may be time to seek professional help. Consulting a professional technician or contacting the laptop manufacturer can provide valuable guidance and assistance in resolving the problem.
A professional technician who specializes in laptop repairs and keyboard issues can diagnose the underlying cause of the sticky key. They have the expertise and tools necessary to identify and fix any mechanical or hardware-related problems that may be causing the issue.
When consulting a professional technician, be sure to provide them with detailed information about the problem you’re facing, the steps you’ve taken to troubleshoot, and any specific observations or patterns you’ve noticed. This will help them in their diagnosis and ensure an efficient resolution.
Alternatively, you can reach out to the laptop manufacturer’s customer support or technical assistance team. They often have specific troubleshooting steps or recommendations tailored to their products. They may also be able to provide warranty service or assist with any repairs or replacement parts that may be needed.
When contacting the manufacturer, it’s advisable to have your laptop’s model and serial number on hand, as well as any relevant warranty information. This will help them provide you with accurate and tailored support to address the sticky key issue.
It’s important to note that if your laptop is still under warranty, opening and attempting repairs yourself may void the warranty. In such cases, it is best to consult the manufacturer or authorized service centers for assistance.
While seeking professional assistance may incur some additional costs, it can save you time, prevent further damage, and ensure a proper resolution to the issue.
Remember, if the sticky key problem persists or worsens, it’s always advisable to consult a professional or contact the laptop manufacturer for expert advice and assistance.
They will be able to guide you through potential solutions or recommend further actions to take to resolve the issue and restore your laptop’s keyboard functionality.