
Determine if your laptop screen is actually broken
Before attempting to fix a broken laptop screen, it’s important to first determine if the screen is indeed damaged. There are a few signs that can indicate a broken screen:
- Visible cracks or physical damage: If you can visibly see cracks or physical damage on the screen, it’s a clear indication that it is broken.
- No display: If the screen remains completely black or displays distorted images, it could be a sign of a broken screen.
- Flickering or lines on the screen: If the screen flickers or shows horizontal or vertical lines, it may indicate a broken display.
- No backlight: If the screen appears dark even when the laptop is powered on, it could be a result of a broken backlight.
- No response to external display: Connecting your laptop to an external monitor and receiving no display could suggest a broken laptop screen.
If you are experiencing any of these issues, it is highly likely that your laptop screen is broken. However, it’s also important to rule out other potential causes such as software or hardware malfunctions.
To help you further diagnose the problem, you can try some troubleshooting steps before concluding that the screen is broken:
- Restart your laptop: Sometimes, a simple restart can fix minor glitches that may cause screen display issues.
- Check the cables: Ensure that the display cables connecting the screen to the motherboard are properly seated and not loose or damaged.
- Update your graphics driver: Outdated or corrupt graphics drivers can often cause display problems. Check for updates and install the latest driver.
- Run a hardware diagnostic: Many laptops have built-in diagnostic tools that can help identify hardware issues. Run a diagnostic test to see if any problem is detected.
If after trying these troubleshooting steps the issue persists, it’s likely that your laptop screen is genuinely broken and needs to be replaced. In the following sections, we will guide you through the process of fixing a broken laptop screen.
Back up your data before getting started
Before you embark on the journey of fixing your broken laptop screen, it’s crucial to prioritize the safety of your data. The process of replacing a screen involves disassembling your laptop, which can pose a risk to your files if not done carefully. Therefore, it’s highly recommended to back up your data before getting started. Here’s how you can do it:
1. External Storage: The simplest way to back up your data is by connecting an external hard drive or USB flash drive to your laptop. Copy and paste all your important files, documents, photos, and videos to the external storage device. This ensures that even if something goes wrong during the screen replacement process, your data remains safe and accessible.
2. Cloud Storage: Another option is to utilize cloud storage services such as Google Drive, Dropbox, or OneDrive. These platforms offer secure online storage where you can upload and sync your files. This way, your data is backed up in real-time, and you can access it from any device with an internet connection.
3. Network Storage: If you have a home network or access to a network-attached storage (NAS) device, you can back up your data to this centralized location. Simply transfer your files to the designated folder on the network storage, ensuring that they are safely stored on a separate device.
Remember to double-check that all your important files have been successfully backed up before proceeding with the screen replacement. It’s better to be safe than sorry, and losing valuable data can be a frustrating experience.
Backing up your data not only protects your files during the repair process but also provides peace of mind. It allows you to focus on the screen replacement without worrying about potential data loss.
Once you have successfully backed up your data, you’re ready to move on to the next steps of fixing your broken laptop screen. In the following sections, we will guide you through the necessary tools, disassembly process, and installation of the new screen.
Gather necessary tools and materials
Prior to beginning the process of fixing your broken laptop screen, it’s essential to gather all the necessary tools and materials. Having everything prepared in advance will ensure a smooth and efficient repair process. Here’s a list of the tools and materials you’ll need:
- Screwdriver set: Different laptops may require different types of screwdrivers. It’s important to have a set with various sizes and types, such as Phillips and Torx, to handle the specific screws on your laptop.
- Replacement screen: To fix your broken laptop screen, you’ll need to purchase a compatible replacement screen. Make sure to find the exact model that matches your laptop’s specifications.
- Tweezers or prying tools: These tools will come in handy for delicately disconnecting cables and prying apart the different components of your laptop during the disassembly process.
- Microfiber cloth: A soft microfiber cloth is essential for cleaning the screen and removing any dust or smudges before installing the new screen.
- Electrical tape: Electrical tape is useful for securing and insulating any exposed wires or cables during the repair process.
- Plastic containers or trays: Keeping small screws and components organized is crucial. Use plastic containers or trays to store and separate different screws and parts as you disassemble your laptop.
- Anti-static wrist strap: While not mandatory, an anti-static wrist strap can help protect your laptop from electrostatic discharge (ESD), which could damage sensitive components.
Prior to purchasing any tools or materials, make sure to do thorough research to ensure compatibility with your specific laptop model. This will save you time and prevent any frustrations during the repair process.
By gathering all the necessary tools and materials before starting, you can avoid unnecessary interruptions and confidently proceed with fixing your broken laptop screen. In the upcoming sections, we will guide you through the disassembly process and the installation of the replacement screen.
Disassemble your laptop
Now that you have all the necessary tools and materials ready, it’s time to disassemble your laptop to access the broken screen. The disassembly process might vary depending on your laptop model, so it’s essential to refer to the manufacturer’s documentation or online resources for specific instructions. However, here are the general steps to disassemble a laptop:
1. Power off your laptop and disconnect all external devices: Before starting the disassembly process, make sure your laptop is turned off and disconnected from any power sources or peripherals.
2. Remove the battery: Most laptops have a removable battery. Locate the latch or release mechanism and slide it to unlock the battery. Gently remove the battery from its compartment.
3. Remove the bottom panel or keyboard: Depending on your laptop model, you may need to remove the bottom panel or the keyboard to access the screen. Use a screwdriver to unscrew the screws securing the panel or keyboard and carefully lift it off.
4. Disconnect cables and remove components: Inside your laptop, you’ll find various cables connecting the screen to the motherboard. Carefully disconnect these cables by gently pulling them out. Take note of their positions and connections for easier reassembly. Additionally, remove any other components that may be blocking access to the screen, such as the bezel or hinge covers.
5. Remove the broken screen: Once all the necessary components and cables are disconnected, you can now remove the broken screen. Lay the laptop down on a soft surface and gently detach the screen from its hinges, taking care not to damage any cables or connectors.
6. Store screws and components: As you disassemble your laptop, keep track of the screws and small components by placing them in separate containers or trays. Label them accordingly to avoid confusion during reassembly.
7. Clean the screen and components: Before installing the new screen, take a moment to clean the components, including the bezel and hinges, using a soft microfiber cloth. Remove any dust or smudges to ensure the optimal clarity of the new screen.
Remember: Each laptop model may have its unique disassembly process. It’s important to exercise caution and follow any specific instructions provided by the manufacturer. Taking pictures or videos of each step can also serve as a helpful reference during the reassembly process.
In the next section, you will learn how to carefully remove the broken screen and prepare for the installation of the replacement screen.
Carefully remove the broken screen
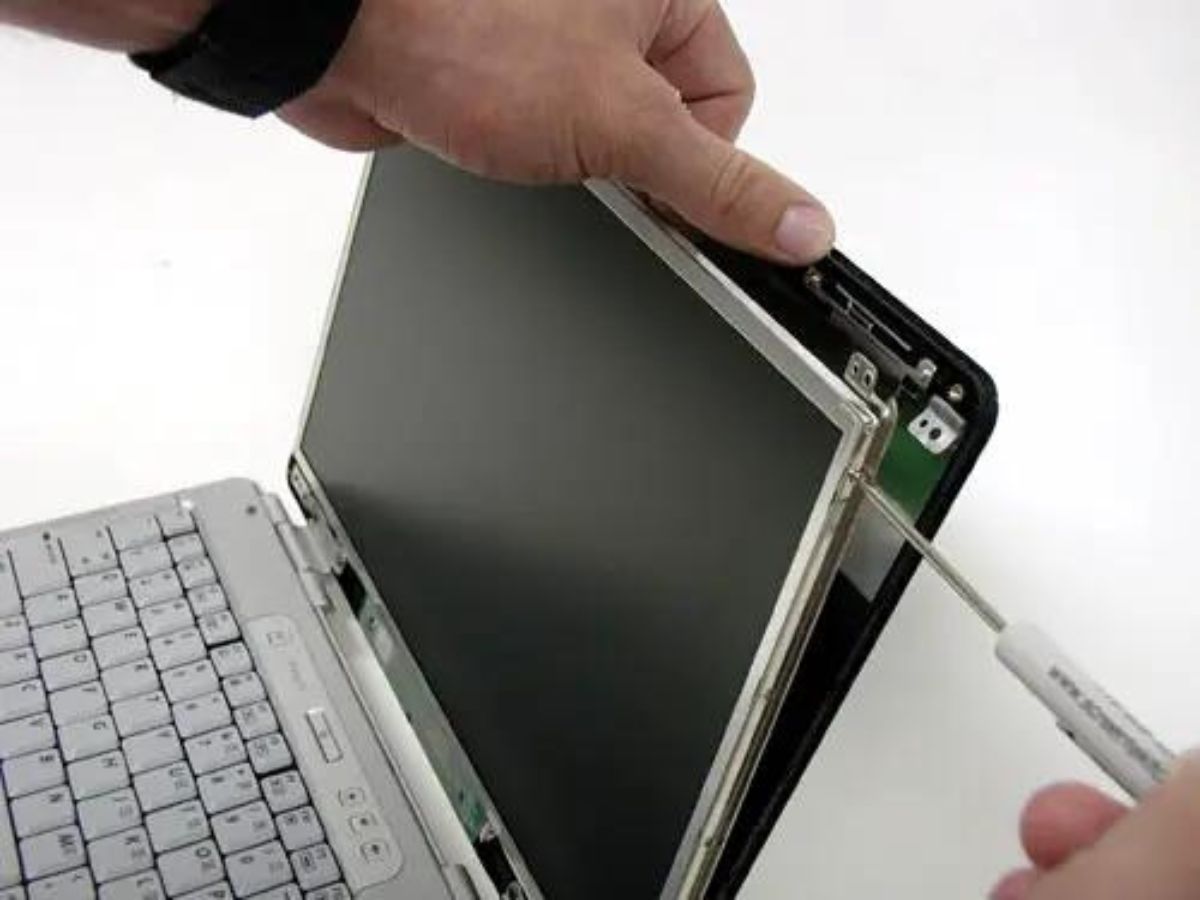
With the laptop disassembled, the next step is to carefully remove the broken screen. This requires precision and attention to detail to avoid causing any further damage. Follow these steps to safely remove the broken screen:
1. Locate the screen mounting brackets: Look for the metal brackets that hold the screen in place on either side. These brackets are typically secured with screws or clips.
2. Unscrew or unclip the brackets: Use a screwdriver or your fingers to unscrew any retaining screws or unclip the brackets. Place the screws or clips in a safe place, as you will need them later when installing the replacement screen.
3. Disconnect the video cable: Find the video cable attached to the back of the screen. It is usually a wide ribbon cable or a connector with several wires. Gently unplug the cable by pulling it straight out from the connector. Take care not to yank or twist the cable, as it can be delicate.
4. Remove any adhesive or tape: In some cases, there may be adhesive or tape securing the screen to the frame or bezel. Carefully peel off any adhesive or tape, ensuring not to damage the surrounding components.
5. Lift out the broken screen: Once all the screws, brackets, cables, and adhesive have been removed, gently lift out the broken screen. Keep it in a safe place or dispose of it appropriately, depending on local regulations for electronic waste.
Pro tip: As you remove the broken screen, pay attention to its orientation, position, and any markings or labels. This will help ensure proper alignment when installing the replacement screen.
Remember to handle the broken screen with care to avoid cuts from any sharp edges and to prevent any loose glass from causing injury. It’s crucial to properly dispose of the broken screen to prioritize safety and environmental considerations.
Now that the broken screen has been removed, we can move on to the next step: purchasing a replacement screen. In the following section, we will guide you through the process of finding and purchasing the right replacement screen for your laptop.
Purchase a replacement screen
Now that you have successfully removed the broken screen from your laptop, the next step is to purchase a suitable replacement screen. It’s crucial to find a replacement screen that matches the specifications and compatibility of your laptop model. Here’s how you can go about purchasing a replacement screen:
1. Identify your laptop model: Note down the exact make and model of your laptop. The model information is usually located on a sticker on the bottom of the laptop or in the system information settings.
2. Check the screen size and resolution: Measure the size of your old screen diagonally from corner to corner. The most common sizes are 13.3 inches, 15.6 inches, and 17.3 inches. Additionally, determine the resolution of your old screen, such as 1366×768 or 1920×1080 pixels.
3. Research reputable suppliers: Look for reputable suppliers of laptop replacement screens online. Check for reviews and ratings from previous customers to ensure the reliability and quality of the screens they provide.
4. Find a compatible replacement screen: Use the information gathered about your laptop model, screen size, and resolution to search for a compatible replacement screen from the chosen supplier. Make sure the replacement screen matches the specifications of your old screen.
5. Consider the type of screen: Determine the type of screen you want to purchase, such as LCD (liquid crystal display), LED (light-emitting diode), or OLED (organic light-emitting diode). Each type has its own features, so it’s important to choose the one that suits your needs and budget.
6. Compare prices and warranty: Compare prices from different suppliers and check if they offer any warranty or return policy. It’s important to consider both the cost and the reliability of the supplier when making your decision.
7. Place your order: Once you have chosen a suitable replacement screen, add it to your cart and proceed to the checkout process. Provide accurate shipping and payment information to ensure a smooth and timely delivery.
Tip: If you’re unsure about the compatibility or need further assistance, don’t hesitate to reach out to the supplier’s customer support for guidance.
By following these steps, you can confidently purchase a replacement screen that is compatible with your laptop. In the next section, we will guide you through the process of installing the new screen into your laptop.
Install the new screen
Now that you have purchased a compatible replacement screen, it’s time to install it into your laptop. Follow these steps to successfully install the new screen:
1. Prepare the new screen: Carefully unpack the new screen, ensuring not to touch the surface. Remove any protective film or coverings from the screen to reveal the display. Take note of any markings or labels on the new screen for correct alignment.
2. Connect the video cable: Locate the video cable connector on the back of the new screen. Match it with the corresponding connector on the laptop motherboard. Gently plug in the video cable, ensuring a secure connection without forcing or bending the cables.
3. Secure the new screen: Position the new screen in the laptop, aligning it with the screw holes and brackets. Carefully secure the screen in place using the original or replacement brackets and screws. Be cautious not to overtighten the screws, as it may damage the screen or the laptop frame.
4. Reconnect other cables and components: Reconnect any other cables and components that were disconnected during the disassembly process, such as the bezel, hinge covers, and any additional video or power cables. Follow the markings or labels made during disassembly to ensure correct connections.
5. Test the new screen: Before fully reassembling the laptop, power it on and check if the new screen functions properly. Look for any abnormalities in the display, such as flickering, lines, or dimness. If the screen is working correctly, proceed to the next step. Otherwise, double-check the connections and troubleshooting steps.
6. Reassemble the laptop: Once the new screen has been tested and confirmed to be working, carefully reassemble the laptop by following the reverse order of the disassembly steps. Replace the keyboard or bottom panel, screw in all the necessary screws, and insert the battery back into its compartment.
7. Power on and calibrate: Power on the laptop and make any necessary adjustments to the display settings, such as brightness or resolution, to ensure optimal viewing experience. Use calibration tools or software to fine-tune the colors and contrast if needed.
By following these steps, you can successfully install the replacement screen into your laptop. It’s important to handle the new screen with care and double-check all connections to ensure proper functionality. In the next section, we will go over the process of reassembling your laptop and testing the new screen.
Reassemble your laptop
With the new screen successfully installed and tested, it’s time to reassemble your laptop and bring it back to its fully functional state. Follow these steps to reassemble your laptop:
1. Replace the keyboard or bottom panel: If you removed the keyboard or bottom panel during the disassembly process, carefully place it back in its original position. Ensure that all the screw holes align correctly.
2. Screw in all necessary screws: Using the appropriate screwdriver, securely fasten all the screws that hold the laptop components together. Start with the ones that secure the keyboard or bottom panel, and then work your way around the laptop, tightening each screw for a snug fit. Take care not to overtighten, as it may damage the hardware or strip the screws.
3. Insert the battery: Reinsert the laptop battery into its compartment, making sure it clicks into place. Ensure that the battery is installed in the correct orientation according to the manufacturer’s instructions.
4. Test all connections: Double-check all the connections from the disassembly process, including video cables, power cables, and other components. Ensure that everything is securely connected and in the proper position.
5. Power on your laptop: Press the power button to turn on your laptop. It should boot up and display on the new screen. Check for any abnormalities in the display, such as flickering or distorted images. If everything looks fine, proceed to the next step.
6. Perform a test run: While your laptop is powered on, test the new screen by opening and closing the laptop lid, adjusting the viewing angles, and performing various tasks. Verify that the screen responds correctly to these actions and displays the content accurately.
7. Calibrate and adjust settings: If necessary, calibrate the new screen and adjust the display settings to your preference. This can include brightness, contrast, and color settings.
By carefully following these steps, you can successfully reassemble your laptop and ensure that the new screen is fully functional. Take your time during this process to avoid mistakes and ensure a seamless result. In the final section, we will provide troubleshooting tips to help you address any potential issues that may arise.
Test the new screen
After reassembling your laptop with the new screen, it’s essential to thoroughly test the screen to ensure its functionality and performance. Follow these steps to test the new screen:
1. Power on your laptop: Press the power button and boot up your laptop. Allow it to fully start up and reach the desktop or home screen.
2. Check the display quality: Examine the new screen for any abnormalities such as flickering, blurriness, or color distortion. Pay attention to the overall clarity and sharpness of the display.
3. Verify the screen responsiveness: Interact with the screen by using the cursor or touchpad to open applications, navigate menus, and perform various tasks. Ensure that the screen responds accurately and without delay to your inputs.
4. Test different viewing angles: Adjust the angle of the screen by tilting it forward, backward, and from side to side. Verify that the display remains clear and visible from different angles without any significant color shifts or distortions.
5. Check for dead pixels: Carefully examine the screen for any dead pixels, which are visible as small black or colored dots. Display a solid color background on the screen and inspect it closely to identify any dead pixels. If you notice any, contact the supplier for a replacement or consult their warranty policy.
6. Test external connectivity: Connect your laptop to an external monitor or TV using an HDMI or VGA cable. Ensure that the display output is properly detected and appears correctly on the external screen. This test helps confirm that the new screen and the laptop’s graphics output are functioning correctly.
7. Run graphic-intensive applications: Open graphic-intensive applications or videos to assess the performance of the new screen. Check for any lag, stuttering, or visual artifacts that may indicate compatibility issues or inadequate screen performance.
If you encounter any issues during the testing process, double-check the connections and ensure that all cables are securely plugged in. If problems persist, consult the manufacturer’s documentation or reach out to their customer support for further assistance.
By thoroughly testing the new screen, you can identify and address any potential issues before fully relying on your laptop for daily use. Enjoy the crisp and clear display that the new screen brings to your laptop!
Troubleshooting tips
While fixing a broken laptop screen can be a straightforward process, there can be occasional challenges or issues that arise. Here are some troubleshooting tips to help you address common problems:
1. No display on the new screen: If the new screen doesn’t display anything, double-check the connections between the video cable and the motherboard. Ensure that the cable is securely plugged in. Restart your laptop and see if the display appears. If the issue persists, consider contacting the supplier for further assistance or replacement.
2. Flickering or lines on the screen: If you notice flickering or horizontal/vertical lines on the screen, it could indicate a loose or faulty video cable connection. Ensure that the video cable is properly seated in the connectors on both the screen and the motherboard. If the problem continues, try using a replacement video cable.
3. Dim or dark screen: If the new screen appears dim or dark, first adjust the brightness settings on your laptop. If the issue persists, double-check the connections and make sure the backlight cable is properly connected. If the problem continues, it could indicate a faulty backlight, requiring further troubleshooting or a replacement.
4. Touch screen not functioning: If your laptop has a touch screen and it doesn’t respond to touch inputs, ensure that the touch screen cable is securely connected. If it’s still not working, check your device manager for any reported issues with the touch screen driver or try reinstalling the drivers. If none of these steps resolve the issue, it could be a hardware problem, and you may need to contact technical support.
5. Screen resolution issues: If the new screen doesn’t display the correct resolution or appears at a lower resolution, update your graphics driver to the latest version. Adjust the display settings in your operating system to match the native resolution of the new screen. If the desired resolution is still not available, verify that the replacement screen is compatible with your laptop model.
6. Color accuracy or calibration problems: If you notice color inconsistencies or inaccuracies on the new screen, try calibrating it using the operating system’s display calibration tools. Adjust the color temperature, contrast, and saturation settings to achieve the desired color accuracy. If the issue persists, you may need to seek professional calibration or consult the supplier for further assistance.
Remember, troubleshooting steps may vary depending on your laptop model and the specific issue you encounter. Always refer to the manufacturer’s documentation or contact their customer support if you require additional guidance or if the troubleshooting steps mentioned above don’t resolve the problem.
By utilizing these troubleshooting tips, you can overcome common challenges and ensure optimal performance from your newly installed laptop screen.