
Assessing the damage
When your laptop screen is broken, it can be quite disheartening. However, before you embark on fixing it, it’s important to assess the extent of the damage. This will help you determine whether you can repair it yourself or if professional assistance is required.
Start by closely examining the screen for any visible cracks or shattered glass. Take note of any pixel discoloration, dead pixels, or flickering, as these are indicators of internal damage. Additionally, check if the screen is responsive to touch or if it has completely stopped working.
Next, connect an external monitor to your laptop to check if the problem lies solely with the screen or if there are other issues affecting the display. If the external monitor functions properly, it confirms that the problem is limited to the laptop screen itself.
Assessing the damage also includes evaluating the overall condition of the laptop. Check for any signs of physical trauma or water damage that might have caused the screen to break. This is important as it can help you identify the root cause of the problem and take appropriate steps to prevent it from happening again in the future.
Once you have assessed the damage and determined the extent of the issue, you can move on to the next steps in fixing your broken laptop screen. Remember, if you are unsure about the repairs or lack the necessary skills and tools, it is always recommended to seek professional help to avoid further damage to your laptop.
Backing up your data
Before you start repairing your broken laptop screen, it is crucial to back up your data to prevent any loss or damage. Here’s why:
Firstly, the repair process involves manipulating the internal components of your laptop. There is a slight risk of accidentally damaging your hard drive or other internal storage devices during the repair. By backing up your data, you can ensure that all your important files, documents, and media are safely stored elsewhere.
Secondly, if your laptop screen is completely non-functional, it can be challenging to access and retrieve your data after the repair. Having a backup ensures that you can easily restore your files once the repair is complete.
There are several ways to back up your data:
1. External Hard Drive or SSD: Connect an external storage device to your laptop and transfer all your important files. Make sure to organize and label them appropriately for easy retrieval.
2. Cloud Storage: Upload your data to a cloud storage service like Google Drive, Dropbox, or OneDrive. This way, your files are securely stored online and can be accessed from any device with an internet connection.
3. Network Attached Storage (NAS): If you have a NAS device at home, you can back up your data directly to it. NAS devices offer large storage capacities and can be accessed by multiple devices on your home network.
Remember to create a backup of not just your documents but also your settings, preferences, and application data if necessary. This will ensure that you have a complete backup of your laptop’s state before the repair.
Once you have successfully backed up your data, you can proceed with confidence to repair your broken laptop screen. Knowing that your important files are safe and secure will give you peace of mind throughout the repair process.
Gathering the necessary tools and supplies
Before you begin the process of fixing your broken laptop screen, it’s essential to gather the tools and supplies you’ll need. Having everything ready beforehand will make the repair process smoother and more efficient. Here is a list of the necessary items:
1. Replacement Screen: Obtain a compatible replacement screen for your laptop model. You can find this online or purchase it from a reputable computer hardware store.
2. Screwdriver Set: A set of precision screwdrivers is crucial for removing the screws that hold the screen and bezel in place. Make sure you have the appropriate sizes for your laptop.
3. Plastic Opening Tools: These tools are designed to pry open the plastic bezel without causing damage. They are especially useful for laptops with delicate frames.
4. Anti-static Wrist Strap: This strap is used to ground yourself and prevent electrostatic discharge that could damage sensitive components. It’s essential, especially when working with internal parts.
5. Cleaning Cloth and Solution: A microfiber cloth and a gentle cleaning solution are necessary to clean the screen and remove any dust or smudges before installation.
6. Adhesive Strips or Tape: Depending on your laptop model, you may need adhesive strips or tape to secure the new screen in place. Check the manufacturer’s instructions or online resources for specific details.
7. Workspace: Set up a clean, well-lit workspace with enough room to comfortably work on your laptop. Remove any clutter and ensure you have a stable surface to prevent accidental damage.
It’s important to ensure that all the tools and supplies you gather are of good quality, as using subpar tools may cause further damage to your laptop. If you’re unsure about any specific tools or supplies needed for your particular laptop model, refer to the manufacturer’s documentation or consult online resources for guidance.
Once you have gathered all the necessary tools and supplies, you are ready to proceed with removing the bezel or frame to access the broken screen and begin the repair process.
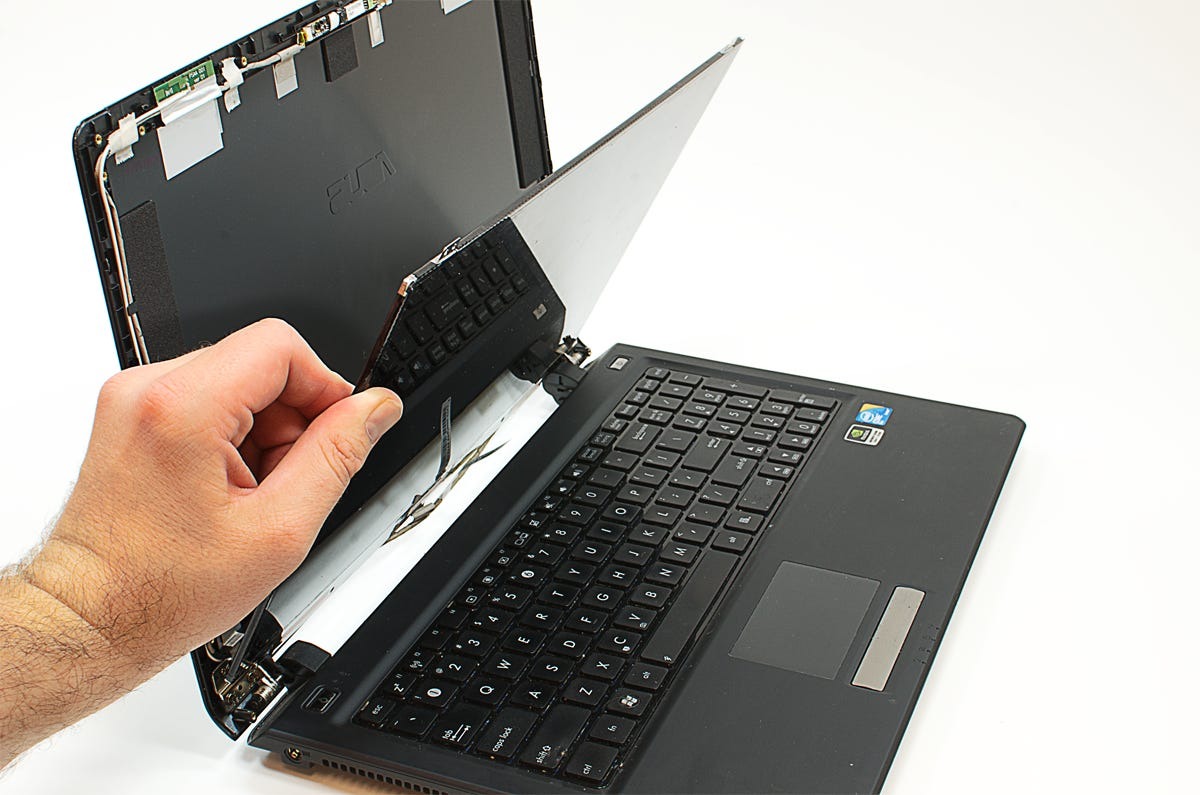
Removing the bezel or frame
Once you have gathered the necessary tools and supplies, the next step in fixing your broken laptop screen is removing the bezel or frame. The bezel refers to the plastic frame that surrounds the screen and holds it in place. Here’s how to do it:
1. Power Off and Disconnect: Make sure your laptop is powered off and disconnected from any power sources. This ensures your safety and prevents any electrical accidents.
2. Remove the Battery (If Possible): If your laptop has a removable battery, remove it before proceeding. This step is not applicable to laptops with integrated or non-removable batteries.
3. Locate and Remove the Screws: Carefully inspect the bezel for any screws that secure it. These are usually located on the bottom edge or at the corners of the bezel. Use the appropriate screwdriver to remove these screws and keep them in a safe place.
4. Pry Open the Bezel: Once the screws are removed, use a plastic opening tool or your fingers to gently pry open the bezel. Start at one corner and work your way around the edges. Be cautious and apply steady pressure to avoid damaging the plastic or the screen beneath.
5. Release the Bezel Clips: As you pry open the bezel, you may encounter small clips or tabs that hold it in place. Carefully release these clips by applying gentle pressure or using a plastic opening tool. Take your time and work methodically to avoid causing any damage.
6. Lift Off the Bezel: Once all the clips are released, carefully lift off the bezel from the screen. Set it aside in a safe place, as you will need to reattach it later after the repair is complete.
7. Inspect and Clean: With the bezel removed, take a moment to inspect the screen and surrounding area for any debris or dust. Use a clean, lint-free cloth and a gentle cleaning solution to wipe away any smudges or dirt.
By successfully removing the bezel or frame, you have now gained access to the broken laptop screen. You are now ready to proceed with the next steps of the repair process, which involve disconnecting the broken screen from the laptop’s internal components.
Disconnecting the broken screen from the laptop’s internal components
Now that you’ve removed the bezel or frame, the next step in repairing your broken laptop screen is disconnecting it from the internal components of the laptop. This involves detaching the cables that connect the screen to the motherboard. Here’s how to proceed:
1. Locate the Display Connector: Look for the display connector, which is a thin, flat cable that runs from the back of the screen to the motherboard. It is typically located near the bottom of the screen and may be secured with tape or a connector latch.
2. Remove the Tape or Connector Latch: If there is tape securing the connector, gently remove it. If there is a connector latch, carefully lift it to release the cable. Take note of how the latch functions, as you will need to reattach it later.
3. Disconnect the Display Connector: Once the tape or latch is removed, grip the sides of the connector firmly and gently pull it straight out from the socket. Avoid pulling on the cable itself as this can cause damage.
4. Remove any Additional Connectors: Depending on your laptop model, there may be additional cables or connectors attached to the screen. These can include webcam cables, Wi-Fi antenna wires, or touch screen connectors. Carefully disconnect these cables using the same method as the display connector.
5. Organize and Label the Cables: As you disconnect each cable, it’s essential to keep them organized and labeled. This will make the reassembly process much easier later on. Use small pieces of tape or labels to mark which cable goes where.
6. Inspect for Hidden Cables: Some laptops may have hidden cables that are not immediately visible. Carefully inspect the area around the screen for any hidden cables and disconnect them following the same procedure.
By successfully disconnecting the broken screen from the laptop’s internal components, you are now ready to proceed with removing the damaged screen from the laptop. This step will require careful handling to avoid any further damage, so be sure to follow the instructions carefully.
Removing the damaged screen from the laptop
With the broken laptop screen disconnected from the internal components, the next step in the repair process is removing the damaged screen from the laptop. Follow these steps to safely remove the broken screen:
1. Lay the Laptop Screen-Down: Carefully place your laptop screen-down on a soft, clean surface. This will prevent any further damage to the screen or other delicate components.
2. Locate the Mounting Brackets: The screen is typically held in place by mounting brackets on either side. These brackets are usually secured with screws. Identify and locate these brackets on the sides of the screen.
3. Remove the Mounting Bracket Screws: Use the appropriate screwdriver to remove the screws that secure the mounting brackets in place. Keep these screws in a safe place, as you will need them to install the new screen later on.
4. Carefully Lift the Damaged Screen: Once the screws are removed, gently lift the damaged screen from the bottom. Be cautious not to apply too much pressure or flex the screen too much, as this can cause further damage.
5. Set Aside the Damaged Screen: Place the damaged screen in a safe location, away from the workspace. Take care not to place it in a location where it could get damaged or in the way of other tools or materials.
6. Inspect for any Additional Screws: Some laptop models may have additional screws securing the screen to the laptop frame. Carefully inspect the area around the screen for any hidden screws and remove them, if necessary.
By successfully removing the damaged screen from your laptop, you have completed a crucial step in the repair process. Now, it’s time to install the new screen and connect it to the laptop’s internal components, which will be covered in the next section.
Installing the new screen
Now that you’ve removed the damaged screen from your laptop, it’s time to install the new screen. Follow these steps carefully to ensure a successful installation:
1. Prepare the New Screen: Start by unpacking the new screen and removing any protective films or coverings. Handle the new screen with care, holding it only by the edges to avoid smudging or damaging the display surface.
2. Align the New Screen: Position the new screen in the laptop’s frame, ensuring that the connectors and screw holes align with the corresponding openings in the laptop’s casing. Take your time to properly align the screen to avoid any installation complications later on.
3. Secure the Mounting Brackets: Place the mounting brackets on either side of the new screen and screw them into place using the screws you removed earlier. Make sure they are tightened securely but be careful not to overtighten as it may damage the delicate components.
4. Reconnect Cables and Connectors: Begin by reconnecting any additional cables or connectors that were previously disconnected, such as the display connector, webcam cables, Wi-Fi antenna wires, or touch screen connectors. Follow the same procedure you used to disconnect them, but in reverse order.
5. Reassemble the Laptop: Carefully place the bezel or frame back over the new screen. Start by lining up the tabs or clips along the edges and apply gentle pressure to snap it back into place. Ensure that it fits securely and evenly around the screen.
6. Reattach Screws and Components: If there were screws securing the bezel or frame, reattach them using the appropriate screwdriver. Take care not to overtighten and strip the screws. If there were any additional components like webcam covers or Wi-Fi antennas, reattach them as well.
7. Power On and Test: Once everything is reassembled, power on your laptop to test the new screen. Check for any display abnormalities, flickering, or dead pixels. Also, ensure that touch functionality (if applicable) is working properly. If any issues arise, double-check all connections and retrace your steps to ensure everything is properly installed.
By successfully installing the new screen and testing its functionality, you are one step closer to fully repairing your broken laptop. The next section will cover reconnecting the new screen to the laptop’s internal components, ensuring everything is reconnected securely.
Reconnecting the new screen to the laptop’s internal components
After successfully installing the new screen in your laptop, the next step is to reconnect it to the internal components of the laptop. These connections will ensure that the screen functions properly and displays the correct visuals. Follow these steps to reconnect the new screen:
1. Locate the Display Connector: Identify the display connector on the new screen. It is usually a thin, flat cable that connects the screen to the motherboard. Ensure that it is properly aligned and ready for connection.
2. Reconnect the Display Connector: Gently insert the display connector into the corresponding socket on the motherboard. Apply light pressure to ensure a secure connection, but be gentle to avoid damaging the connector or the motherboard.
3. Secure the Connector: If there was a latch or tape securing the display connector, reattach or reapply it to ensure that the connection remains secure. Make sure it is fitted properly and prevents the cable from coming loose.
4. Reattach Additional Cables: If there were any other cables or connectors that were previously disconnected, such as webcam cables, Wi-Fi antenna wires, or touch screen connectors, reconnect them following the same procedure as before.
5. Double-Check Connections: Once all the connections are made, double-check to ensure that all cables and connectors are securely attached. Give them a gentle tug to make sure they are not loose and will not come undone easily.
6. Put the Laptop Back Together: Carefully reassemble the laptop, ensuring that all components fit properly. Replace any screws or clips that were removed during the disassembly process. Take your time to make sure everything is aligned correctly.
7. Power On and Test: Power on your laptop and test the new screen. Check for any display issues or abnormalities. Ensure that the screen is functioning correctly and that all connections are working as intended.
By successfully reconnecting the new screen to the laptop’s internal components, you have completed a crucial step in the repair process. The next section will cover putting the bezel or frame back in place, giving your laptop a finished and polished look.
Putting the bezel or frame back in place
Once you have reconnected the new screen and ensured that it is functioning properly, the next step in repairing your broken laptop screen is to put the bezel or frame back in place. This will give your laptop a finished and polished look. Follow these steps to put the bezel or frame back in place:
1. Align the Bezel or Frame: Carefully position the bezel or frame around the new screen. Ensure that it is aligned properly with the edges of the screen and fits securely. Take note of any tabs, clips, or slots on the bezel or frame that need to be aligned.
2. Snap the Bezel or Frame into Place: Start at one corner and gently press the bezel or frame into place. Use even pressure and work your way around the edges, snapping it into place. Ensure that it fits snugly and evenly around the screen.
3. Secure the Bezel or Frame: If there were screws holding the bezel or frame in place, reinsert them using the appropriate screwdriver. Be careful not to overtighten the screws, as it can damage the plastic or the screen beneath.
4. Test the Bezel or Frame: Once the bezel or frame is secured, give it a light wiggle to ensure that it is fitted properly and doesn’t feel loose. Check for any gaps or unevenness in the fit. Adjust if necessary to ensure a snug and consistent fit.
5. Check for Proper Alignment: Take a step back and visually inspect the laptop from various angles to ensure that the bezel or frame is properly aligned and doesn’t appear crooked or misaligned. Make any necessary adjustments to achieve a symmetrical and aesthetically pleasing appearance.
6. Clean the Screen and Bezel: Use a clean, lint-free cloth and a gentle cleaning solution to wipe down the screen and remove any fingerprints, smudges, or dust particles. Also, clean the bezel or frame to remove any residue from the repair process.
By successfully putting the bezel or frame back in place, your laptop now has a polished and finished look. The next section will cover testing the new screen to ensure that it functions properly and troubleshooting common issues that may arise.
Testing the new screen
After putting the bezel or frame back in place, it is crucial to test the new screen to ensure that it functions properly. Follow these steps to perform a thorough test of the new screen:
1. Power On the Laptop: Power on your laptop and allow it to boot up completely. Observe the screen during the startup process to check for any abnormalities or display issues.
2. Check for Display Quality: Open up various applications and websites to test the display quality of the new screen. Look for vibrant colors, sharp images, and clear text. Ensure that there are no dead pixels or areas of discoloration.
3. Test Touch Functionality (If Applicable): If your laptop has a touchscreen, test its functionality by tapping and swiping on various areas of the screen. Verify that the touch response is accurate and consistent.
4. Adjust Brightness and Contrast: Test the screen’s brightness and contrast settings. Adjust them to your preference and confirm that the changes are reflected correctly on the screen.
5. Test Viewing Angles: Check the screen from different angles to ensure that there are no color or brightness shifts. The display should remain clear and consistent from various viewpoints.
6. Run a Video or Animation: Play a video or animation on your laptop to assess the screen’s ability to handle motion and display smooth visuals. Look for any lag, stuttering, or artifacting.
7. Test External Display Connectivity: Connect an external monitor to your laptop and ensure that it functions properly. Test the video output on the external display to confirm that it is clear and free from any issues.
8. Verify Touchpad Functionality: Check if the touchpad is working correctly after the screen replacement. Test various gestures, such as scrolling and zooming, to ensure smooth operation.
9. Perform a Functionality Check: Use your laptop normally for some time, performing tasks that you typically would. This will help identify any potential issues that may arise during regular usage.
If you encounter any problems during the testing process, double-check all connections and ensure that the screen is securely installed. If issues persist, consult professional assistance or refer to manufacturer support for further guidance.
By conducting a thorough test of your new screen, you can ensure that it is functioning properly, providing you with an optimal viewing experience for your laptop.
Troubleshooting common issues with the new screen
While installing a new screen in your laptop can greatly enhance its functionality, there may be instances where you encounter common issues. Here are some troubleshooting tips to help resolve common problems with the new screen:
1. Flickering Screen: If the new screen is flickering, ensure that all cable connections are secure. Check for loose or damaged cables and reconnect them firmly. If the issue persists, consult professional help to assess any potential hardware problems.
2. Display Distortion or Artifacts: In case you notice any unusual lines, distortions, or artifacts on the screen, it could indicate a faulty connection or a damaged screen. Double-check the display connector and cable connections, making sure they are properly seated. If the issue continues, consider using a different replacement screen.
3. Backlight Issues: If the screen appears too dark, adjust the brightness settings on your laptop. If the backlight is completely off, verify that the backlight cable is securely connected. If necessary, replace the backlight cable or seek professional assistance for further diagnosis.
4. Touchscreen Problems: When facing issues with touchscreen responsiveness, first clean the screen using a microfiber cloth. If the problem persists, ensure that the touchscreen cable is fully connected and undamaged. Calibrate the touchscreen or update the device drivers as needed.
5. Dead Pixels: Dead pixels are individual pixels that do not light up or display colors properly. If you encounter dead pixels on the new screen, check if they meet the manufacturer’s requirements for warranty replacement. Some manufacturers have specific policies for dead pixels.
6. Resolution or Refresh Rate Issues: If the screen resolution does not match the native resolution of the new screen or if the refresh rate is not optimal, adjust the display settings in your operating system. Update the graphics drivers if necessary to ensure compatibility.
7. Inconsistent Colors or Brightness: If you notice inconsistent colors or brightness levels across the screen, ensure that the new screen is securely installed. Calibrate the color and brightness settings using the appropriate software to achieve consistent results.
If all troubleshooting steps fail to resolve the issues, consider seeking professional assistance or contacting the manufacturer’s support for further guidance. They can provide specific troubleshooting steps or initiate a replacement if necessary.
By troubleshooting common issues that may arise with the new screen, you can ensure a smooth and optimal user experience with your laptop. Now, let’s move on to the final section, which offers tips for preventing future screen damage.
Tips for preventing future screen damage
To minimize the risk of future screen damage and maintain the longevity of your laptop screen, consider implementing the following tips:
1. Use a Protective Case or Sleeve: Invest in a sturdy laptop case or sleeve to provide physical protection for your laptop during transportation or when not in use. This will help guard against accidental drops and bumps.
2. Handle with Care: Always handle your laptop with care, both when opening and closing it and when carrying it from one place to another. Avoid placing heavy objects on top of your laptop or exerting excessive pressure on the screen.
3. Clean the Screen Properly: When cleaning the screen, use a soft, lint-free cloth or screen-cleaning solution specifically designed for screens. Avoid using harsh cleaners or rough materials that can scratch or damage the delicate surface.
4. Be Aware of Environmental Factors: Protect your laptop from extreme temperature conditions and excessive moisture. Avoid exposing your laptop to direct sunlight for extended periods, as it can cause damage to the screen and other internal components.
5. Use a Screen Protector: Consider using a screen protector to provide an additional layer of protection against scratches and smudges. Screen protectors are available in various materials, including tempered glass and film, and are easily removable and replaceable.
6. Avoid Eating or Drinking near your Laptop: Accidental spills can cause significant damage to your laptop screen. Keep all food and beverages away from your laptop to prevent liquid damage or crumbs from getting inside the keyboard or screen.
7. Be Mindful of Cables and Accessories: When connecting or disconnecting cables or accessories, handle them with care and avoid pulling or tugging on them unnecessarily. Rough handling can lead to damage or loosening of the screen’s connections.
8. Regularly Update and Maintain your Laptop: Perform regular software updates, scan for malware, and maintain your laptop’s overall health to ensure it is running smoothly. This can help avoid any software-related issues that may impact the performance of your screen.
By following these tips, you can greatly reduce the risk of screen damage and prolong the lifespan of your laptop. Prevention is key when it comes to maintaining the integrity of your laptop screen.