
Backup your data
Before you sell your iPad, it’s essential to back up all your data to ensure that you don’t lose any important information. Follow these simple steps to create a backup:
- Connect to Wi-Fi: Make sure your iPad is connected to a stable Wi-Fi network before proceeding with the backup process. This will ensure a smooth and uninterrupted backup.
- Open Settings: Locate the Settings app on your iPad’s home screen and tap on it to open the settings menu.
- Tap your Apple ID: Once in the settings menu, tap on your Apple ID at the top of the screen. If you’re not signed in, tap on “Sign in to your iPad” and enter your Apple ID and password.
- iCloud Backup: In the Apple ID settings, you’ll find an option for “iCloud.” Tap on it, and then select “iCloud Backup.”
- Toggle on iCloud Backup: On the iCloud Backup screen, toggle on the “iCloud Backup” option. This will enable automatic backups of your iPad to iCloud.
- Backup Now: To manually back up your iPad, tap on “Back Up Now” and wait for the backup process to complete. It may take several minutes depending on the size of your data and the speed of your internet connection.
By following these steps, you will create a backup of all your important data, including photos, videos, contacts, messages, and app data. This backup will come in handy if you ever need to restore your data to a new iPad or if you accidentally delete something from your current device.
Sign out of iCloud
Before selling your iPad, it’s crucial to sign out of your iCloud account to ensure the privacy and security of your data. Following these steps will guide you through the process:
- Open Settings: Locate the Settings app on your iPad’s home screen and tap on it to access the settings menu.
- Your Name: In the settings menu, look for your name or Apple ID at the top of the screen. Tap on it to access your Apple ID settings.
- iCloud: Within the Apple ID settings, you’ll find an option labeled “iCloud.” Tap on it to enter the iCloud settings.
- Scroll down: Scroll down within the iCloud settings until you find the “Sign Out” option. Tap on it to initiate the sign-out process.
- Confirm: A confirmation message will appear, letting you know that signing out of iCloud will disable data on this iPad. Tap on “Sign Out” to proceed.
- Enter Apple ID password: You will be prompted to enter your Apple ID password to verify your identity and complete the sign-out process. Once you’ve entered your password, tap on “Turn Off” to disable Find My iPad.
Signing out of iCloud ensures that your personal data, such as contacts, photos, documents, and app data, is no longer tied to your iPad. It also disables features like iCloud backup, Find My iPad, and iCloud Drive on the device, protecting your information from unauthorized access.
Remember to perform this step before erasing your iPad, as signing out of iCloud after the device is erased may prevent you from tracking or remotely erasing the iPad through Find My iPad.
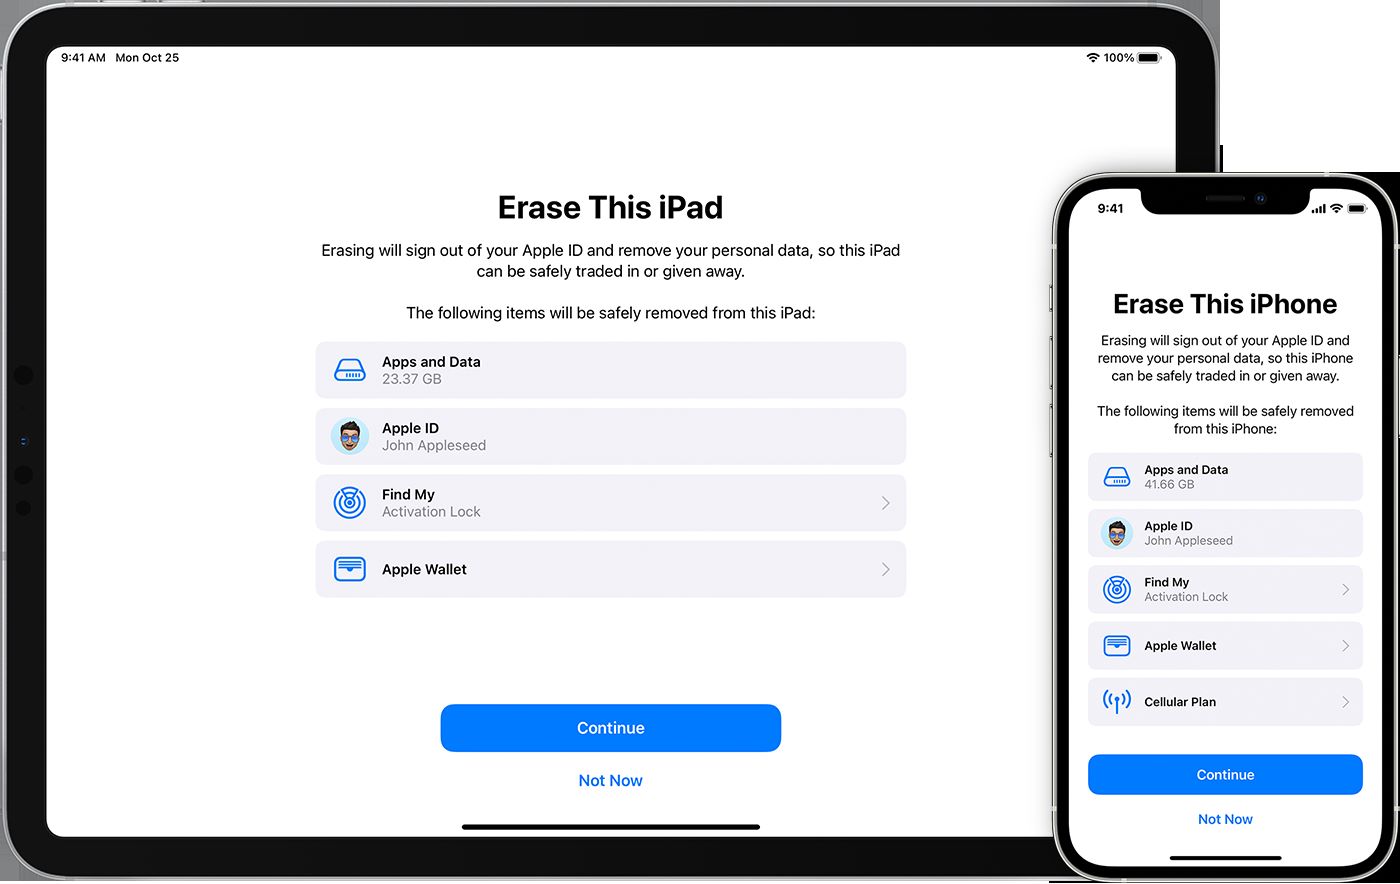
Erase all content and settings
When preparing your iPad for sale, it’s crucial to completely erase all the content and settings to ensure that your personal information is completely removed. Follow these steps to perform a full erase:
- Open Settings: Locate the Settings app on your iPad’s home screen and tap on it to access the settings menu.
- General: In the settings menu, scroll down and tap on “General.”
- Reset: Within the General settings, scroll down and tap on “Reset.”
- Erase All Content and Settings: In the Reset menu, tap on “Erase All Content and Settings.”
- Passcode: If a passcode is set on your iPad, you will be asked to enter it to proceed with the erase process.
- Confirmation: A warning message will appear, stating that this action will remove all media, data, and settings from your iPad. If you’re sure, tap on “Erase.”
- Apple ID password: If Find My iPad is enabled, you will be prompted to enter your Apple ID password to disable it and erase your iPad.
- Erase: After entering your Apple ID password, tap on “Erase” once again to confirm the action.
It may take a few moments for your iPad to erase all the content and settings. Once the process is complete, your iPad will restart, and you’ll be greeted with the initial setup screen as if you were setting up a new device.
By performing a complete erase, you ensure that all your personal information, accounts, apps, and files are removed from the iPad, restoring it to factory settings. This step is crucial to protect your privacy and prevent any potential misuse of your data.
Deactivate iTunes
Before selling your iPad, it’s important to deactivate iTunes to ensure that the device is no longer associated with your Apple ID and that the new owner can set up their own iTunes account. Follow these steps to deactivate iTunes on your iPad:
- Open the iTunes Store: Locate the iTunes Store app on your iPad’s home screen and tap on it to launch the app.
- Scroll down: Scroll down to the bottom of the iTunes Store screen until you see your Apple ID. Tap on it to view your account information.
- Sign Out: Tap on “Sign Out” to deactivate your Apple ID from iTunes on your iPad. You will be prompted to enter your Apple ID password to confirm the sign-out process.
By signing out of iTunes, your iPad will no longer be linked to your iTunes account, ensuring that the new owner can sign in with their own Apple ID and enjoy a seamless iTunes experience.
It’s important to note that deactivating iTunes on your iPad does not remove any apps or media content from the device. It simply disassociates it from your iTunes account, allowing the new owner to personalize their iTunes experience without any interference.
Additionally, make sure to remove any auto-downloads or subscriptions from iTunes on your computer to fully disconnect your iPad from your iTunes account.
Remove your SIM card (if applicable)
If your iPad has a SIM card slot and you’ve been using it with a cellular data plan, it’s important to remove the SIM card before selling the device. This ensures that your personal data and cellular service are not accessible to the new owner. Here’s how you can remove the SIM card:
- Locate the SIM card slot: The SIM card slot on your iPad is typically located on the side or top of the device, depending on the model. Use a SIM eject tool or a paperclip to eject the SIM card tray.
- Eject the SIM card tray: Insert the SIM eject tool or unbent paperclip into the small hole on the SIM card tray. Apply gentle pressure until the tray pops out.
- Remove the SIM card: Carefully pull out the SIM card tray from your iPad. In the tray, you’ll find the SIM card. Remove it by gently sliding it out.
- Replace the SIM card tray (if necessary): If you’re selling your iPad without a SIM card, leave the SIM card slot empty. If you’re including the SIM card with the sale or transferring it to another device, place it back into the SIM card tray and insert the tray back into the iPad until it clicks into place.
By removing the SIM card, you prevent any potential unauthorized access to your cellular data and phone number. This step also allows the new owner to use their own SIM card or activate a new cellular plan without any issues.
If you’re unsure whether your iPad has a SIM card slot, refer to the user manual or contact the manufacturer for assistance. It’s better to double-check and remove the SIM card if applicable to ensure the security and privacy of your personal data.
Disable Find My iPad
Before selling your iPad, it’s essential to disable the “Find My iPad” feature to ensure a smooth transition for the new owner. Taking this step will allow them to set up and use the device without any issues. Here’s how you can disable Find My iPad:
- Open Settings: Locate the Settings app on your iPad’s home screen and tap on it to access the settings menu.
- Your Name: In the settings menu, look for your name or Apple ID at the top of the screen. Tap on it to access your Apple ID settings.
- iCloud: Within the Apple ID settings, you’ll find an option labeled “iCloud.” Tap on it to enter the iCloud settings.
- Find My iPad: Scroll down within the iCloud settings until you find “Find My iPad” and tap on it.
- Toggle off Find My iPad: On the Find My iPad screen, you’ll see a toggle button next to “Find My iPad.” Safely toggle it off by tapping on it. You may be asked to enter your Apple ID password to confirm this action.
Once Find My iPad is disabled, your iPad will no longer be associated with your Apple ID, allowing the new owner to set up the device and use it without any activation lock hurdles.
Disabling Find My iPad is crucial for a seamless transition of ownership. It ensures that the new owner can enjoy all the features and functionalities of the device without any limitations or restrictions set by your Apple ID.
Remember to perform this step before erasing the device or signing out of your iCloud account, as Find My iPad is a security feature designed to protect your iPad and your personal information if it gets lost or stolen.
Remove personal information from apps and accounts
When preparing to sell your iPad, it’s important to remove any personal information stored within apps and accounts to protect your privacy. Follow these steps to ensure that your personal data is deleted from your iPad:
- Review installed apps: Go through the apps installed on your iPad and remove any apps that contain personal data or login information. This can include social media apps, email clients, banking apps, and shopping apps.
- Sign out of accounts: Open each app and sign out of your accounts or profiles. This will prevent the new owner from accessing your personal information.
- Clear app data: Some apps store data locally on your iPad. To remove this data, go to the Settings app, select the app you want to clear, and tap on “Clear Data” or a similar option. This will delete any cached files or personal information associated with the app.
- Revoke app permissions: In the Settings app, navigate to “Privacy” and review the permissions granted to apps. Disable any permissions that are no longer necessary or that could expose personal data.
- Clear browsing data: If you use a web browser app on your iPad, clear your browsing data, including history, cookies, and cache. This ensures that your browsing habits and stored login information are removed.
- Delete saved passwords: Go to the Settings app and navigate to “Passwords” or “Passwords & Accounts.” Remove any saved passwords that are no longer needed.
- Reset autofill data: In the Settings app, go to “Safari” (or the browser app you use) and tap on “Autofill.” Clear any saved information, such as contact details or credit card numbers.
By diligently removing personal information from apps and accounts, you minimize the risk of your data being accessed by someone else. Taking these steps ensures that the next owner of your iPad will have a clean slate to set up their own accounts and profiles without any traces of your personal information.
Remember, it’s always a good practice to regularly review and remove personal information from apps and accounts even if you’re not selling your iPad. Protecting your privacy should always be a priority.
Delete all photos, videos, and files
Before selling your iPad, it’s important to delete all your personal photos, videos, and files to protect your privacy and ensure that none of your sensitive information is accessible to the new owner. Follow these steps to remove all media files from your iPad:
- Open the Photos app: Locate the Photos app on your iPad’s home screen and tap on it to launch the app.
- Select all the media: In the Photos app, tap on the “Select” button located at the top right corner of the screen. You can now select multiple photos, videos, or files by tapping on them.
- Delete selected media: After selecting the desired photos, videos, or files, tap on the trash can icon at the bottom right corner of the screen. A confirmation prompt will appear, asking if you want to delete the selected items. Tap on “Delete [number] Items” to proceed.
- Empty Recently Deleted album: Deleted items are temporarily stored in the “Recently Deleted” album. To permanently delete them and free up storage space, go to the Albums tab in the Photos app, select “Recently Deleted,” and tap on “Select” at the top right corner. Then, tap on “Delete All” to clear the album.
By deleting all your photos, videos, and files, you ensure that your personal and sensitive media content is no longer accessible on the iPad. This step protects your privacy and prevents any potential misuse or unauthorized access to your media.
It’s important to note that deleting media from your iPad does not completely erase them. To ensure the complete removal of your data, remember to perform a full erase as mentioned earlier in this guide.
If you have important files or media that you want to keep, make sure to transfer them to another device or backup storage before deleting them from your iPad.
Disable Activation Lock
Activation Lock is a security feature designed to protect your iPad in case it’s lost or stolen. Before selling your iPad, it’s important to disable Activation Lock to ensure a smooth setup for the new owner. Follow these steps to disable Activation Lock:
- Open Settings: Locate the Settings app on your iPad’s home screen and tap on it to access the settings menu.
- Your Name: In the settings menu, look for your name or Apple ID at the top of the screen. Tap on it to access your Apple ID settings.
- iCloud: Within the Apple ID settings, you’ll find an option labeled “iCloud.” Tap on it to enter the iCloud settings.
- Find My iPad: In the iCloud settings, scroll down until you find “Find My iPad” and tap on it.
- Toggle off Find My iPad: To disable Activation Lock, toggle off the “Find My iPad” option by tapping on it. You may be asked to enter your Apple ID password to confirm this action.
By disabling Activation Lock, you ensure that the new owner will be able to set up the iPad without any activation hurdles. They’ll be able to sign in with their own Apple ID or create a new one to personalize the device.
Remember to disable Activation Lock before performing a complete erase or signing out of your iCloud account. Disabling Activation Lock after the fact may render the iPad unusable until the correct iCloud credentials are provided.
Disabling Activation Lock is an important step in preparing your iPad for sale. It ensures that the device is ready for the next owner to enjoy without any activation restrictions tied to your Apple ID.