
What is G-Sync?
G-Sync is a technology developed by Nvidia that aims to provide a smoother and more fluid gaming experience by synchronizing the refresh rate of the display with the frame rate of the graphics card. Traditional displays have a fixed refresh rate, typically 60Hz or 144Hz, which means that the display refreshes its image 60 or 144 times per second regardless of the frame rate outputted by the graphics card. This can result in stuttering, tearing, and input lag, especially when the frame rate fluctuates.
G-Sync addresses these issues by allowing the graphics card to dynamically control the refresh rate of the display. This means that the display refreshes only when a new frame is ready to be shown, eliminating stuttering and tearing. The result is a smoother and more responsive gaming experience.
To achieve this, G-Sync requires a compatible monitor and an Nvidia graphics card. The monitor must have a G-Sync module built-in, which is responsible for handling the dynamic refresh rate. Nvidia graphics cards from the Pascal architecture onward support G-Sync.
G-Sync also introduces a feature called variable refresh rate (VRR), which allows the display to adapt its refresh rate to match the frame rate outputted by the graphics card in real-time. This means that if the frame rate drops below the monitor’s maximum refresh rate, the display will automatically adjust to avoid stuttering. Likewise, if the frame rate increases beyond the monitor’s maximum refresh rate, G-Sync will engage a technology called “overdrive” to ensure that the image remains crisp and sharp.
Overall, G-Sync is a valuable technology for gamers who prioritize smoothness and responsiveness in their gameplay. By eliminating stuttering, tearing, and input lag, G-Sync enhances the visual experience and provides a competitive edge by allowing players to react faster and more accurately in fast-paced games.
Checking Compatibility
Before enabling G-Sync on your monitor, it’s important to ensure that your setup is compatible with this technology. Here are a few things to check:
- Monitor Compatibility: G-Sync requires a monitor with a built-in G-Sync module. You can check if your monitor supports G-Sync by visiting Nvidia’s official G-Sync compatibility list. If your monitor is not listed, it doesn’t mean it’s incompatible, but it’s always best to confirm.
- Graphics Card Compatibility: G-Sync is supported by Nvidia graphics cards starting from the Pascal architecture (GTX 10 series and newer). Check if your graphics card falls into this category to ensure compatibility.
- Monitor Connection: G-Sync works via either DisplayPort or HDMI. Make sure your monitor is connected to your graphics card using either of these interfaces, as G-Sync won’t function if you’re using a VGA or DVI connection.
- Monitor Settings: Some monitors require manual activation of G-Sync in their settings. Access your monitor’s OSD (on-screen display) menu and navigate to the display settings to enable G-Sync if it’s available.
If you discover that your monitor is not G-Sync compatible, there is an alternative technology called FreeSync, which is developed by AMD. FreeSync provides a similar adaptive sync experience and is supported by AMD graphics cards. However, it’s important to note that G-Sync and FreeSync are not compatible with each other, so ensure that you have the appropriate graphics card for the technology you want to use.
By taking the time to check the compatibility of your monitor and graphics card, you can ensure that G-Sync will work properly and deliver the optimal gaming experience on your system.
Updating Graphics Card Drivers
Before enabling G-Sync on your monitor, it’s crucial to ensure that you have the latest drivers installed for your graphics card. Driver updates often include optimizations and bug fixes that can improve G-Sync performance and compatibility. Here’s how you can update your graphics card drivers:
- Identify Your Graphics Card: Determine the make and model of your graphics card. This can usually be found in your system specifications or by using third-party software like GPU-Z.
- Nvidia Graphics Cards:
- Visit Nvidia’s official website: https://www.nvidia.com
- Navigate to the “Drivers” section.
- Enter the details of your graphics card (make, model, operating system) in the search fields.
- Download the latest driver available for your graphics card and operating system.
- Follow the on-screen instructions to install the driver.
- AMD Graphics Cards:
- Visit AMD’s official website: https://www.amd.com
- Navigate to the “Support & Drivers” section.
- Select the appropriate options for your graphics card, operating system, and product family.
- Download the latest driver available for your graphics card and operating system.
- Follow the on-screen instructions to install the driver.
It’s important to note that during the driver installation process, you may be given the option to perform a clean installation, which removes previous driver settings. While it’s not necessary, a clean installation can sometimes resolve issues related to driver conflicts.
After updating your graphics card driver, reboot your computer to ensure that the changes take effect. It’s also a good idea to periodically check for driver updates, as new releases may provide further improvements to G-Sync compatibility and performance.
By keeping your graphics card drivers up to date, you can ensure that you’re getting the most out of your hardware, including the seamless and responsive gaming experience enabled by G-Sync.
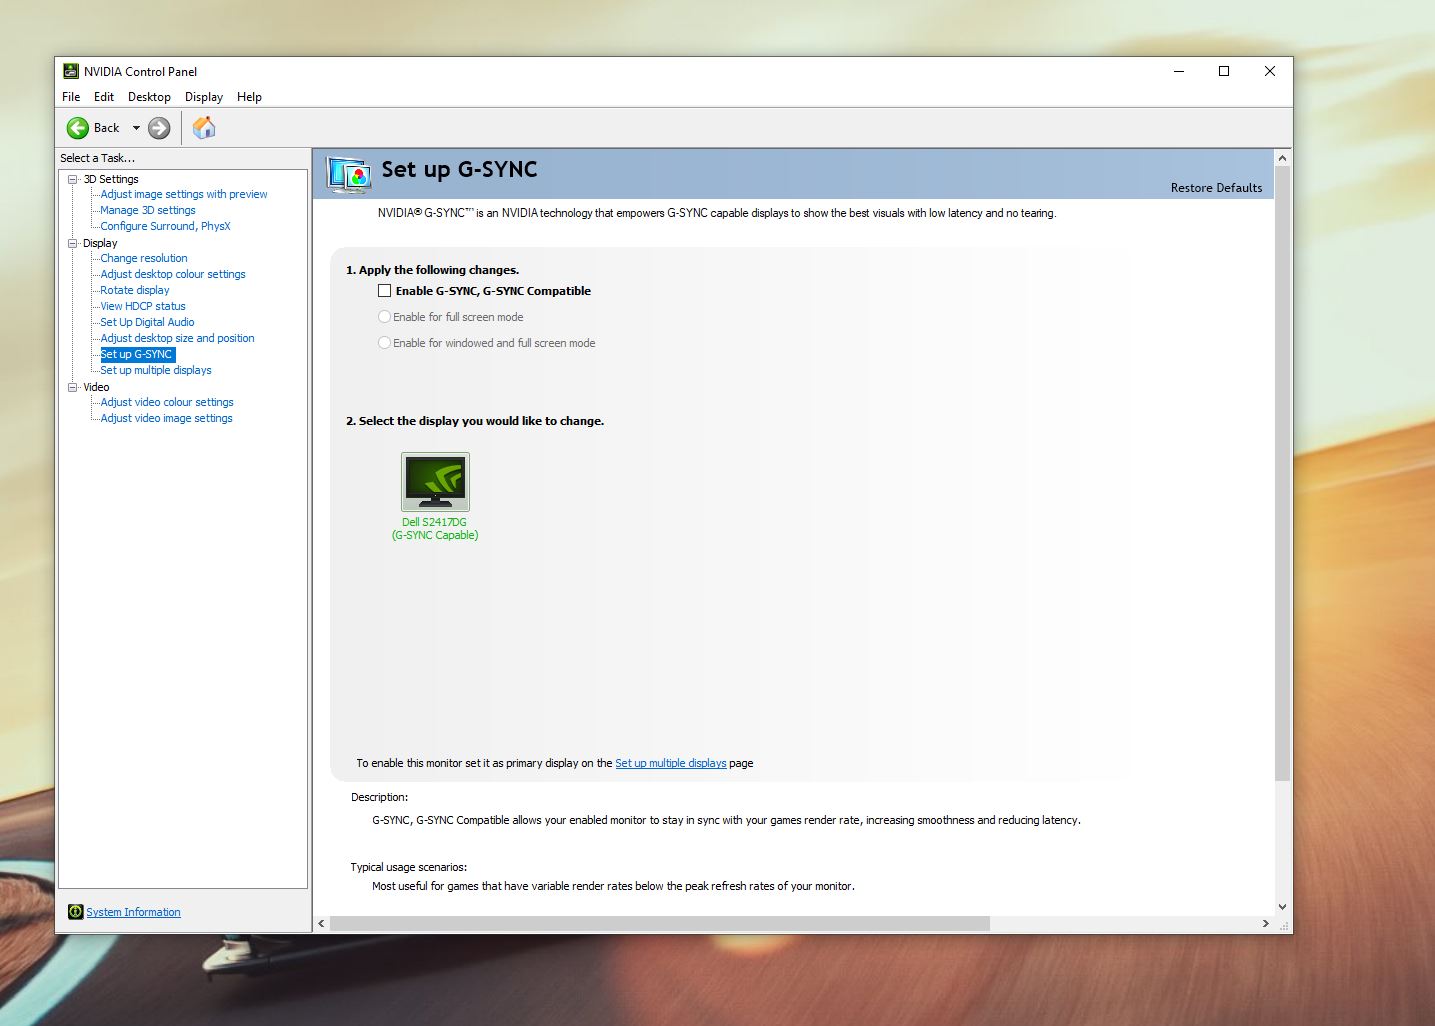
Enabling G-Sync in Nvidia Control Panel
Once you’ve confirmed that your monitor is G-Sync compatible and you’ve updated your graphics card drivers, the next step is to enable G-Sync in the Nvidia Control Panel. Here’s how you can do it:
- Open the Nvidia Control Panel: Right-click on your desktop and select “Nvidia Control Panel” from the context menu. Alternatively, you can open it from the Windows Start menu by searching for “Nvidia Control Panel.”
- Navigate to the Display Section: In the Nvidia Control Panel, click on “Display” in the left-hand menu.
- Enable G-Sync: Under the “Display” section, click on “Set up G-Sync.”
- Enable G-Sync for Full Screen Mode: In the “Set up G-Sync” window, check the box next to “Enable G-Sync, G-Sync Compatible.”
- Enable G-Sync for Windowed and Full Screen Mode: If you want G-Sync to also work in windowed mode, check the box next to “Enable G-Sync Compatible for windowed and full-screen mode.”
- Apply the Changes: Click on “Apply” to save the changes.
Once you’ve enabled G-Sync in the Nvidia Control Panel, your monitor will start to utilize its variable refresh rate capabilities, providing a smoother and more responsive gaming experience. It’s important to note that G-Sync may not work in all games by default. Some games may require additional settings to be changed in their graphics options menu to enable G-Sync. Check the individual game’s settings to ensure G-Sync is enabled for optimal performance.
It’s also worth mentioning that enabling G-Sync may introduce a slight input lag. However, the benefits of smoother gameplay and reduced tearing typically outweigh this minor increase in latency.
By following these steps, you can ensure that G-Sync is correctly enabled in the Nvidia Control Panel and take full advantage of the technology’s benefits for a superior gaming experience.
Enabling G-Sync in Windows Settings
In addition to enabling G-Sync in the Nvidia Control Panel, you may also need to enable it in the Windows settings to ensure that G-Sync functions properly. Here’s how you can do it:
- Open the Windows Display Settings: Right-click on your desktop and select “Display settings” from the context menu. Alternatively, you can access this through the Windows Start menu by searching for “Display settings.”
- Access the Graphics Settings: Scroll down in the Display settings window and click on “Graphics settings.”
- Choose the App to Customize: Under the Graphics settings window, click on “Browse” and select the application or game that you want to enable G-Sync for.
- Set the Graphics Performance Preference: After selecting the application, click on “Options” and choose “High performance.”
- Apply the Changes: Click on “Save” to apply the changes and enable G-Sync for the selected application.
- Repeat for Other Applications: If you want to enable G-Sync for additional applications or games, follow steps 3-5 for each one.
Enabling G-Sync in the Windows settings ensures that G-Sync is active and functioning for the specified applications or games. This step is necessary to ensure a consistent G-Sync experience across your system.
It’s important to note that not all applications and games may appear in the Graphics settings window. Some older or less common applications may not be recognized. In such cases, G-Sync will still be active if it has been enabled in the Nvidia Control Panel for the global setting.
By enabling G-Sync in both the Nvidia Control Panel and the Windows settings, you can ensure that G-Sync is fully enabled for your system, providing a smoother and more immersive gaming experience without any stuttering or tearing.
Testing G-Sync
Once you have enabled G-Sync on your monitor and configured the necessary settings, it is important to test whether G-Sync is working as intended. Here are a few methods to help you confirm if G-Sync is active:
- Monitor On-Screen Display: Most G-Sync monitors have an on-screen display (OSD) feature that can display the current refresh rate. Check the OSD to see if the refresh rate is varying according to your game’s frame rate.
- Refresh Rate Verification Tools: You can use certain third-party tools, such as “NVIDIA G-Sync Pendulum Demo” or “Blur Busters UFO Test,” to verify the G-Sync functionality. These tools can display a moving object or animation while showing the current refresh rate in real-time.
- Frame Rate Monitoring Tools: Utilize software tools like FRAPS, MSI Afterburner, or NVIDIA GeForce Experience’s FPS counter to monitor your game’s frame rate. While playing a game, if the displayed frame rate matches or closely follows the monitor’s refresh rate, it indicates that G-Sync is active.
- Visual Experience: Play games or run applications that can push your graphics card to its limits. With G-Sync enabled, you should notice a significant reduction in screen tearing and smoother gameplay, especially during moments of high motion or rapid camera panning.
- Disable G-Sync: As a final test, you can disable G-Sync and observe the difference in gameplay. Disabling G-Sync should reintroduce screen tearing and other artifacts if G-Sync was previously active.
Remember that G-Sync is designed to work within a specific refresh rate range. If your in-game frame rate exceeds the maximum refresh rate of your monitor, G-Sync will no longer be active. To reap the full benefits of G-Sync, ensure that your frame rate stays within the supported range of your monitor.
By conducting these tests, you can ensure that G-Sync is functioning correctly on your system. The visual improvements and smooth gaming experience provided by G-Sync will validate that the technology is indeed active and enhancing your gameplay.
Troubleshooting G-Sync Issues
While G-Sync is designed to provide a seamless and improved gaming experience, there may be instances where you encounter issues or difficulties. Here are some common troubleshooting steps to help resolve G-Sync-related problems:
- Update Graphics Card Drivers: Ensure that you have the latest graphics card drivers installed. Outdated or incompatible drivers can often cause issues with G-Sync. Visit the official website of your graphics card manufacturer to download and install the latest drivers.
- Check DisplayPort/HDMI Connection: Verify that your monitor is connected to your graphics card using a certified DisplayPort or HDMI cable. Faulty or incompatible cables can cause display issues or prevent G-Sync from functioning properly. Try using a different cable or port to see if the issue is resolved.
- Disable V-Sync and Other Sync Technologies: Disable vertical sync (V-Sync) and any other sync technologies, such as FreeSync or Fast Sync, that may conflict with G-Sync. These technologies can sometimes interfere with G-Sync and lead to display issues or performance inconsistencies.
- Check Application and Game Settings: Ensure that G-Sync is enabled within your application or game settings if applicable. Some games may have their own adaptive sync options that need to be configured separately. Verify that G-Sync is selected as the preferred display technology within the game settings.
- Monitor Firmware Update: Check if there are any firmware updates available for your G-Sync enabled monitor. Manufacturers periodically release firmware updates to address bugs or improve compatibility. Visit the manufacturer’s website or contact their support for assistance in updating your monitor’s firmware.
- Disable Overclocking: If you have overclocked your graphics card or monitor, try reverting to the default factory settings. Overclocking can sometimes disrupt the functionality of G-Sync and lead to stability issues or visual anomalies.
- Restore Nvidia Control Panel Settings: Resetting the Nvidia Control Panel settings to their default values can help resolve any conflicting configurations that may be causing issues. Open the Nvidia Control Panel, navigate to the “Manage 3D settings” section, and click on “Restore” to reset the settings.
- Contact Customer Support: If you have followed the above steps and are still experiencing problems with G-Sync, consider seeking assistance from the customer support of your monitor or graphics card manufacturer. They may be able to provide specific guidance or troubleshooting for your particular hardware setup.
By diligently troubleshooting any issues that arise with G-Sync, you can ensure that you are able to fully enjoy the benefits of this technology and resolve any obstacles to a smooth and immersive gaming experience.