
What is G-Sync and Freesync?
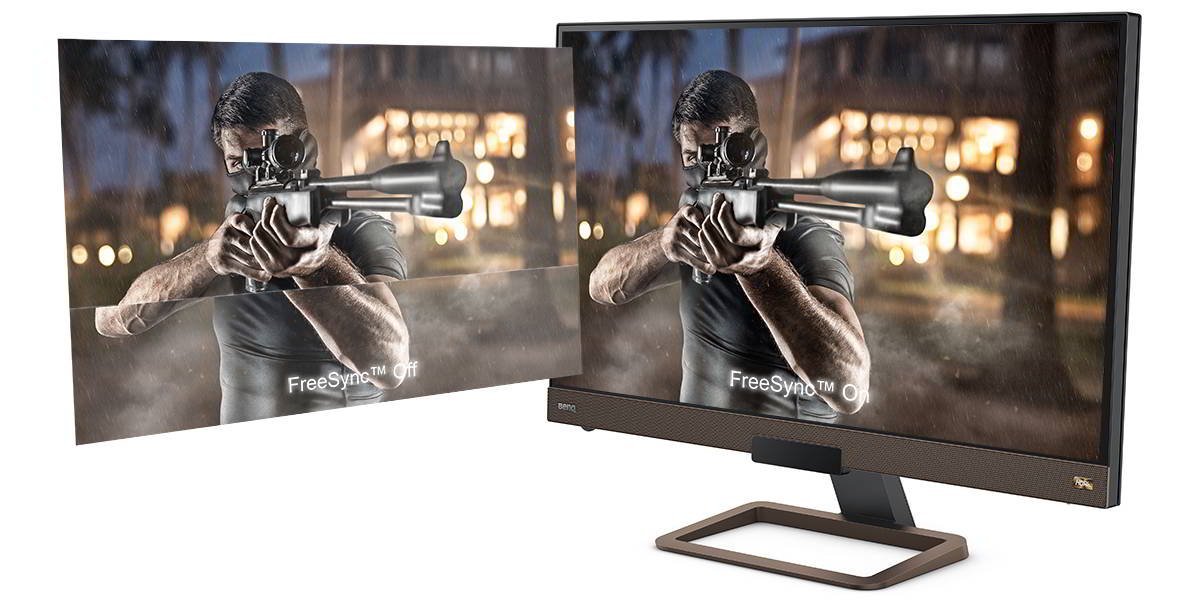
G-Sync and Freesync are both adaptive sync technologies designed to eliminate the issues of screen tearing and stuttering while gaming. They work by synchronizing the refresh rate of the monitor with the output of the graphics card, resulting in smoother and tear-free visuals.
G-Sync is NVIDIA’s proprietary technology, while Freesync (also known as AMD FreeSync) is an open standard technology developed by AMD. Both technologies aim to provide a better gaming experience, but there are some key differences between them.
G-Sync requires a dedicated hardware module to be installed in the monitor, making G-Sync monitors typically more expensive. On the other hand, Freesync works by leveraging the existing DisplayPort standard, making it more affordable and widely available.
Compatibility wise, G-Sync is only compatible with NVIDIA graphics cards, while Freesync is compatible with both AMD and NVIDIA graphics cards. However, NVIDIA recently announced that they are now supporting certain Freesync monitors, expanding the compatibility options for NVIDIA users.
Another difference is the range of variable refresh rates (VRR) supported by each technology. G-Sync monitors typically offer a wider range of VRR, allowing for smoother gameplay across different frame rates. Freesync monitors, on the other hand, can have varying levels of VRR support, with some offering limited ranges.
Ultimately, the choice between G-Sync and Freesync depends on your specific circumstances and preferences. If you have an NVIDIA graphics card and are willing to invest in a G-Sync monitor, you can benefit from its wider range of VRR and guaranteed performance. However, if you have an AMD graphics card or prefer a more affordable option, Freesync provides a viable alternative.
Compatibility Check
Before enabling G-Sync or Freesync on your monitor, it’s important to ensure that your hardware meets the necessary requirements. Here’s a compatibility checklist to follow:
- Graphics Card: G-Sync requires an NVIDIA graphics card, while Freesync is compatible with both AMD and NVIDIA graphics cards. Check the specifications of your graphics card to determine its compatibility.
- Driver Support: Make sure you have the latest drivers installed for your graphics card. Both NVIDIA and AMD regularly release driver updates that optimize the performance of G-Sync and Freesync. Visit the official websites of the respective manufacturers to download and install the latest drivers.
- Monitor Compatibility: G-Sync requires a monitor that is specifically certified for G-Sync. These monitors have a dedicated G-Sync module built-in. Freesync, on the other hand, works with monitors that support the FreeSync standard. Ensure that your monitor is compatible with the technology you wish to enable.
- DisplayPort Version: Check if your monitor and graphics card support the required DisplayPort version for G-Sync or Freesync. G-Sync typically requires DisplayPort 1.2 or higher, while Freesync can work with DisplayPort 1.2a or HDMI 2.0.
- Monitor Cable: Make sure you are using a high-quality DisplayPort cable or HDMI cable to connect your monitor to your graphics card. A faulty or low-quality cable can cause issues with G-Sync or Freesync functionality.
By conducting a compatibility check, you can ensure that your hardware meets the requirements for enabling G-Sync or Freesync. This will help you avoid any compatibility issues or unexpected behavior when trying to enable and use these technologies.
Enabling G-Sync on NVIDIA Graphics Card
If you have an NVIDIA graphics card and a G-Sync compatible monitor, you can enable G-Sync through the NVIDIA Control Panel. Here’s how:
- Right-click on your desktop and select “NVIDIA Control Panel” from the context menu. This will open the NVIDIA Control Panel.
- In the left panel, under the “Display” category, click on “Set up G-Sync.”
- In the right panel, check the box next to “Enable G-Sync, G-Sync Compatible.”
- Choose whether you want G-Sync to be enabled for full screen mode only or windowed and full screen mode. Note that enabling G-Sync for windowed mode may not be supported on all monitors.
- Click on “Apply” to save the changes.
Once you have enabled G-Sync, your monitor should start utilizing G-Sync technology to synchronize the refresh rate with your graphics card, providing a smoother gaming experience.
It’s worth noting that not all monitors that claim G-Sync compatibility will be automatically recognized by the NVIDIA Control Panel. In some cases, you may need to manually enable G-Sync compatibility for specific monitors.
To manually enable G-Sync compatibility for a monitor:
- Go to the NVIDIA Control Panel and click on “Manage 3D settings.”
- Click on the “Program Settings” tab.
- Select the program or game for which you want to enable G-Sync compatibility.
- Under the “Specify the settings for this program” section, locate the “Monitor Technology” option and select “G-Sync Compatible.”
- Click on “Apply” to save the changes.
By following these steps, you can enable G-Sync on your NVIDIA graphics card and enjoy the benefits of adaptive sync technology for a smoother and tear-free gaming experience.
Enabling G-Sync on AMD Graphics Card
If you have an AMD graphics card and a compatible monitor with AMD FreeSync technology, enabling FreeSync is a straightforward process. Here’s how you can do it:
- Right-click on your desktop and select “AMD Radeon Settings” from the context menu. This will open the AMD Radeon Settings control panel.
- In the AMD Radeon Settings window, click on the “Display” tab located at the bottom of the screen.
- Under the “Radeon FreeSync” section, toggle the switch to enable FreeSync.
- Click on “Apply” to save the changes.
Once you have enabled FreeSync, your monitor will start synchronizing its refresh rate with your AMD graphics card, providing a smoother and tear-free gaming experience.
It’s important to note that not all monitors with AMD FreeSync technology are automatically recognized by the AMD Radeon Settings control panel. In some cases, you may need to manually enable FreeSync for specific monitors.
To manually enable FreeSync for a monitor:
- Go to the AMD Radeon Settings control panel and click on the “Display” tab.
- Click on the “Specs” button located next to the “Radeon FreeSync” section.
- A list of connected displays will appear. Select the display for which you want to enable FreeSync.
- Toggle the switch to enable FreeSync for the selected display.
- Click on “Apply” to save the changes.
By following these steps, you can enable AMD FreeSync on your AMD graphics card and experience the benefits of adaptive sync technology for smoother gameplay without screen tearing or stuttering.
Updating Graphics Card Drivers
Keeping your graphics card drivers up-to-date is crucial for optimal performance and compatibility with G-Sync or Freesync. Here’s how you can update your graphics card drivers:
- NVIDIA Graphics Card:
- Visit the official NVIDIA website (https://www.nvidia.com/drivers) and navigate to the “Drivers” section.
- Enter the required information about your graphics card model and operating system.
- Click on the “Search” or “Download” button to find and download the latest drivers.
- Once downloaded, run the installer and follow the on-screen instructions to update your drivers.
- Restart your computer after the installation process is completed.
- AMD Graphics Card:
- Go to the official AMD website (https://www.amd.com/en/support) and select the “Drivers & Support” section.
- Choose the appropriate options from the dropdown menus to specify your graphics card model and operating system.
- Click on the “Submit” or “Search” button to find and download the latest drivers.
- Once downloaded, run the installer and follow the on-screen instructions to update your drivers.
- Restart your computer after the installation process is completed.
Updating your graphics card drivers ensures that you have the latest software optimizations and bug fixes, which can positively impact the performance and compatibility of G-Sync or Freesync.
Remember to regularly check for driver updates to stay up-to-date with the latest improvements and features from both NVIDIA and AMD. By doing so, you can ensure that your graphics card is optimized for the best gaming experience with G-Sync or Freesync.
Adjusting Display Settings
After enabling G-Sync or Freesync, you may need to make some adjustments to your display settings to further optimize your gaming experience. Here are a few settings you can consider tweaking:
- Refresh Rate: Make sure that your monitor’s refresh rate is set to its maximum supported value. This ensures that G-Sync or Freesync can work effectively across a wide range of frame rates.
- V-Sync: In some cases, it may be necessary to disable V-Sync in games or in the graphics card control panel to prevent conflicts with G-Sync or Freesync. Experiment with different V-Sync settings to find the configuration that works best for your setup.
- Overclocking: Some monitors support overclocking, allowing you to increase the refresh rate beyond the manufacturer’s specifications. If your monitor supports it, you can try overclocking the refresh rate to achieve even smoother gameplay.
- Color and Contrast: Adjusting the color settings, brightness, contrast, and gamma levels can enhance the visual quality of your games. Experiment with these settings to find the balance that suits your preferences.
- Black Frame Insertion: Some monitors offer a black frame insertion (BFI) feature, which can help reduce motion blur. Enable this feature if your monitor supports it and see if it improves the overall clarity during fast-paced gaming.
It’s important to note that not all monitors have the same display settings, and the options available to you may vary depending on your specific monitor model. Refer to your monitor’s user manual or manufacturer’s website for detailed instructions on adjusting these settings.
Remember, the goal is to find the settings that provide the best balance between smooth gameplay and visual quality. Take the time to fine-tune and experiment with different configurations until you achieve the desired results.
By adjusting your display settings appropriately, you can optimize the performance and visual experience of G-Sync or Freesync, allowing you to fully enjoy the benefits of adaptive sync technology while gaming.
Troubleshooting G-Sync Issues
While G-Sync technology is generally reliable, you may encounter some issues or unexpected behavior when enabling and using it. Here are a few troubleshooting steps you can try to resolve G-Sync-related issues:
- Update Graphics Card Drivers: Ensure that you have the latest graphics card drivers installed. Outdated or incompatible drivers can cause issues with G-Sync. Visit the official website of your graphics card manufacturer and download the latest drivers.
- Check Monitor Compatibility: Confirm that your monitor is certified for G-Sync. Not all monitors claiming G-Sync compatibility may work optimally with the technology. Check the manufacturer’s website or contact their support to verify compatibility.
- Disable V-Sync in Games: In some cases, enabling V-Sync in games can interfere with G-Sync functionality. Try disabling V-Sync within the game settings or the graphics card control panel to see if it resolves any issues.
- Restart G-Sync Through NVIDIA Control Panel: If you experience inconsistent or erratic behavior with G-Sync, you can try restarting it through the NVIDIA Control Panel. Disable and then re-enable G-Sync in the “Set up G-Sync” section to refresh its functionality.
- Reset Monitor Settings: If you’ve made changes to your monitor settings, such as overclocking or adjusting color options, try resetting them to their default values. This can sometimes resolve compatibility issues or unexpected behavior.
- Switch DisplayPort or HDMI Ports: Occasionally, certain ports on the graphics card or monitor may have compatibility issues. Try connecting your monitor to a different DisplayPort or HDMI port to see if it resolves the problem.
- Perform a Clean Driver Installation: If none of the above steps work, you can attempt a clean installation of the graphics card drivers. Use a driver removal tool to completely uninstall the current drivers, then reinstall the latest drivers from scratch.
If you have exhausted these troubleshooting steps and are still experiencing issues with G-Sync, it may be helpful to consult the support forums or reach out to the customer support of your graphics card manufacturer or monitor manufacturer for further assistance.
Remember that G-Sync issues can sometimes be specific to certain games or system configurations, so it’s important to keep your drivers and games updated to ensure compatibility and optimal performance.
Getting the Most out of G-Sync
Now that G-Sync is enabled on your compatible monitor, here are some tips to help you maximize your gaming experience:
- Optimize In-Game Settings: Adjust the graphics settings in your games to ensure a balance between visual quality and performance. Higher frame rates will make better use of G-Sync’s capabilities, so consider lowering the graphical settings to achieve higher FPS.
- Utilize FPS Limiters: If your graphics card consistently produces frames beyond your monitor’s refresh rate, using an FPS limiter can help prevent unnecessary strain on your GPU and reduce input lag. Experiment with different FPS limit values to find the optimal balance.
- Explore Custom Resolution Scaling: Some games provide the option to adjust the resolution scaling, allowing you to render the game at a lower resolution while maintaining a sharp image on your monitor. This can help improve performance without sacrificing too much visual fidelity.
- Enable “Fast Sync” with G-Sync: NVIDIA provides an option called “Fast Sync” that can be enabled alongside G-Sync. This combination helps eliminate input lag by allowing your graphics card to render frames beyond the monitor’s refresh rate while still utilizing G-Sync technology.
- Ensure Sufficient Cooling: G-Sync can significantly improve gaming performance, leading to increased GPU utilization. Make sure your graphics card stays well-cooled by maintaining proper airflow in your PC case and cleaning any dust buildup on fans or heat sinks.
- Explore Third-Party Frame Rate Limiters: Some third-party software, such as RivaTuner Statistics Server, offers advanced frame rate limiting options. These tools provide additional flexibility in fine-tuning your frame rate to complement G-Sync’s capabilities.
- Upgrade to a Higher Refresh Rate Monitor: If you’re still using a lower refresh rate monitor, consider upgrading to a higher refresh rate display to fully take advantage of G-Sync. Monitors with refresh rates of 144Hz or higher can provide an even smoother gaming experience.
- Stay Informed: Keep an eye on NVIDIA’s official website and forums for driver updates and announcements related to G-Sync technology. Regularly updating your graphics card drivers will ensure that you benefit from the latest optimizations and improvements for G-Sync.
By following these tips, you can maximize the potential of G-Sync and enjoy a more immersive and responsive gaming experience with reduced screen tearing and stuttering.