
Checking the Status of the Flash Drive
Before ejecting a flash drive from your Chromebook, it’s essential to ensure that there are no active operations or files being accessed from the drive. This helps you prevent data loss or corruption. Checking the status of the flash drive is a simple yet necessary step to take before proceeding with the ejecting process.
To check the status of the flash drive on your Chromebook, follow these steps:
- Locate the clock icon in the bottom right corner of your Chromebook’s screen. This icon represents the system tray.
- Click on the clock icon to open the status menu.
- In the status menu, you will find various icons representing different system processes and devices. Look for an icon that resembles a USB flash drive or a removable storage device. This icon indicates that a flash drive is connected to your Chromebook.
- Hover your mouse pointer over the flash drive icon to display a tooltip that provides information about the drive, such as its name, capacity, and file system format.
If the tooltip displays any information that suggests an ongoing operation or files being accessed from the flash drive, it is important to wait until the activity is complete before ejecting the drive. This ensures that all data is safely written to the drive and minimizes the risk of potential data loss or corruption.
On the other hand, if the tooltip displays no activity or indicates that the flash drive is not in use, you can proceed to eject the drive without any concern. This means that there are no active operations or files being accessed from the flash drive, making it safe to remove.
Locating the Files App on Your Chromebook
The Files app on your Chromebook is where you can manage and access files stored either locally or on external storage devices, including flash drives. If you’re not familiar with the location of the Files app on your Chromebook, follow the steps below to find it:
- Click on the app launcher icon in the bottom left corner of your Chromebook’s screen. This icon resembles a circle with dots inside.
- In the app launcher, you’ll see a grid of icons representing various apps and tools available on your Chromebook.
- Scroll through the app grid until you find the ‘Files’ app. It is typically represented by a folder icon.
- Once you locate the ‘Files’ app, click on its icon to launch it.
Alternatively, you can also use the search bar in the app launcher to find the ‘Files’ app quickly. Simply click on the search bar, type ‘Files,’ and select the ‘Files’ app from the search results.
Once you’ve successfully launched the Files app, you’ll be presented with a user interface that allows you to navigate through your local storage, external storage devices, and even cloud storage services like Google Drive. The Files app provides a convenient and centralized location for managing and accessing all your files on your Chromebook.
Now that you know how to find the Files app on your Chromebook, you’re ready to proceed with ejecting your flash drive by following the next steps.
Opening the Files App
Once you have successfully located the Files app on your Chromebook, the next step is to open it. The Files app provides a user-friendly interface that allows you to manage and access your files, including your connected flash drive. Follow these steps to open the Files app:
- Click on the ‘Files’ app icon that you located in the previous step. The Files app will open, displaying your local storage and any connected external storage devices.
- Upon opening the Files app, you will see a sidebar on the left-hand side of the window. This sidebar contains options to navigate through different locations and storage devices.
- If your flash drive is already connected to your Chromebook, it should appear in the sidebar under ‘Devices.’ Look for the name or label of your flash drive and click on it to select it.
- The main area of the Files app window will now display the contents of your flash drive. You can navigate through the folders and files on the flash drive using the file browser interface.
With the Files app open and your flash drive selected, you can now proceed to the next step, which involves navigating to the specific files or folders you want to access or manage. The Files app offers a range of features and options for organizing, copying, moving, and deleting files on your Chromebook.
Now that you have successfully opened the Files app and selected your flash drive, continue reading to learn how to navigate to the files or folders on your flash drive that you wish to interact with.
Navigating to the Flash Drive
Now that you have the Files app open on your Chromebook and your flash drive selected, you can easily navigate to the specific files or folders you want to access or manage. Follow these steps to navigate to your flash drive:
- In the Files app, look for the file browser interface in the main area of the window. This is where the contents of your flash drive are displayed.
- If you have multiple storage devices connected to your Chromebook, including internal storage and external drives, you may see them listed in the file browser interface. Locate and select the flash drive from the list.
- The file browser interface will now display the contents of your flash drive, including any folders and files contained within it. To navigate further, you can click on folder icons to open them and explore their contents.
- If you need to go back to the previous level or directory, you can use the back arrow button located at the top left corner of the file browser interface.
By navigating through the folders and files on your flash drive, you can access the specific content you need. Whether it’s documents, media files, or any other type of data, the Files app makes it easy to locate and manage files on your Chromebook.
Once you have successfully navigated to the desired files or folders on your flash drive, you can proceed with the next step: unmounting the flash drive from the Files app to safely remove it from your Chromebook.
Unmounting the Flash Drive from the Files App
Before physically removing your flash drive from your Chromebook, it is important to unmount it from the Files app to ensure that all read and write operations have been completed. Unmounting the flash drive properly helps prevent data loss or potential damage to the drive. Follow these steps to unmount your flash drive from the Files app:
- In the Files app, make sure you are in the view that displays the contents of your flash drive.
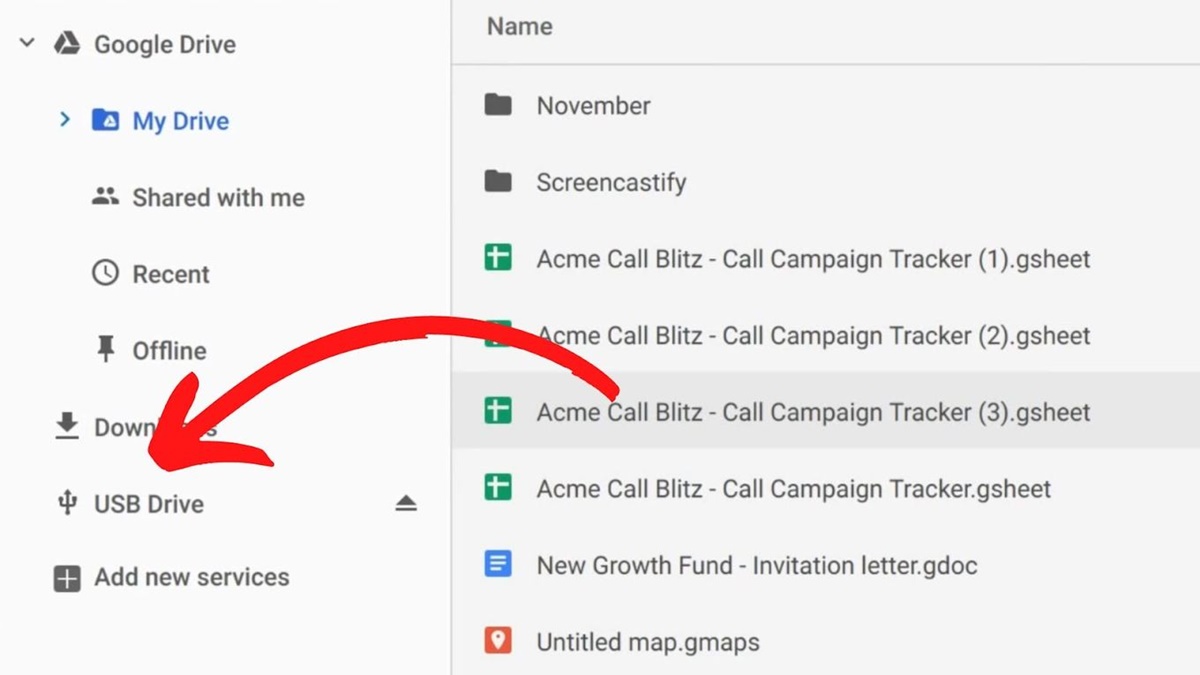
- Look for the name or label of your flash drive in the sidebar under ‘Devices.’
- Right-click on the name or label of your flash drive.
- If you are using a Chromebook with a trackpad, you can perform a two-finger click to simulate a right-click.
- A context menu will appear with several options. Select the option that says ‘Eject.’
After selecting ‘Eject,’ the Files app will safely unmount the flash drive from your Chromebook. This ensures that any pending read or write operations are completed before the drive is disconnected.
Once the unmounting process is complete, you can safely remove the flash drive from your Chromebook without the risk of data loss or corruption.
Please remember to wait for the confirmation notification from the Files app before physically removing the flash drive. This notification will indicate that the drive has been successfully unmounted and is safe to remove.
Now that you have successfully unmounted the flash drive from the Files app, proceed to the final section to learn how to safely remove the flash drive from your Chromebook.
Safely Removing the Flash Drive from the Chromebook
After unmounting the flash drive from the Files app, the final step is to physically remove it from your Chromebook. Safely removing the flash drive ensures that you minimize the risk of damaging the drive or losing any data. Follow these steps to safely remove the flash drive from your Chromebook:
- Ensure that you have received the confirmation notification from the Files app, indicating that the flash drive has been successfully unmounted.
- Check the physical location of the USB ports on your Chromebook. Most Chromebooks have the USB ports on either side of the device.
- Gently grasp and pull the flash drive out of the USB port with an even pressure. Be careful not to apply excessive force or to yank the drive out abruptly.
- Once the flash drive is completely disconnected from the USB port, safely store it in a protective case or container to prevent any physical damage when not in use.
It is important to note that removing the flash drive while read or write operations are still active can result in data loss or damage to the drive. Therefore, always make sure to follow the process of unmounting the flash drive from the Files app before physically disconnecting it.
By safely removing the flash drive, you ensure the integrity of your data and maintain the longevity of your device’s USB ports.
With the flash drive successfully removed, you have completed the process of ejecting a flash drive from your Chromebook. By following these steps, you can prevent any potential data loss or damage, and safely manage your external storage devices on your Chromebook with ease.