
Check for water damage
When your iPhone or iPod gets wet, the first step is to assess the extent of the water damage. Water can cause various issues, such as corrosion and internal damage, so it’s crucial to determine how severe the situation is. Here are some steps to help you check for water damage:
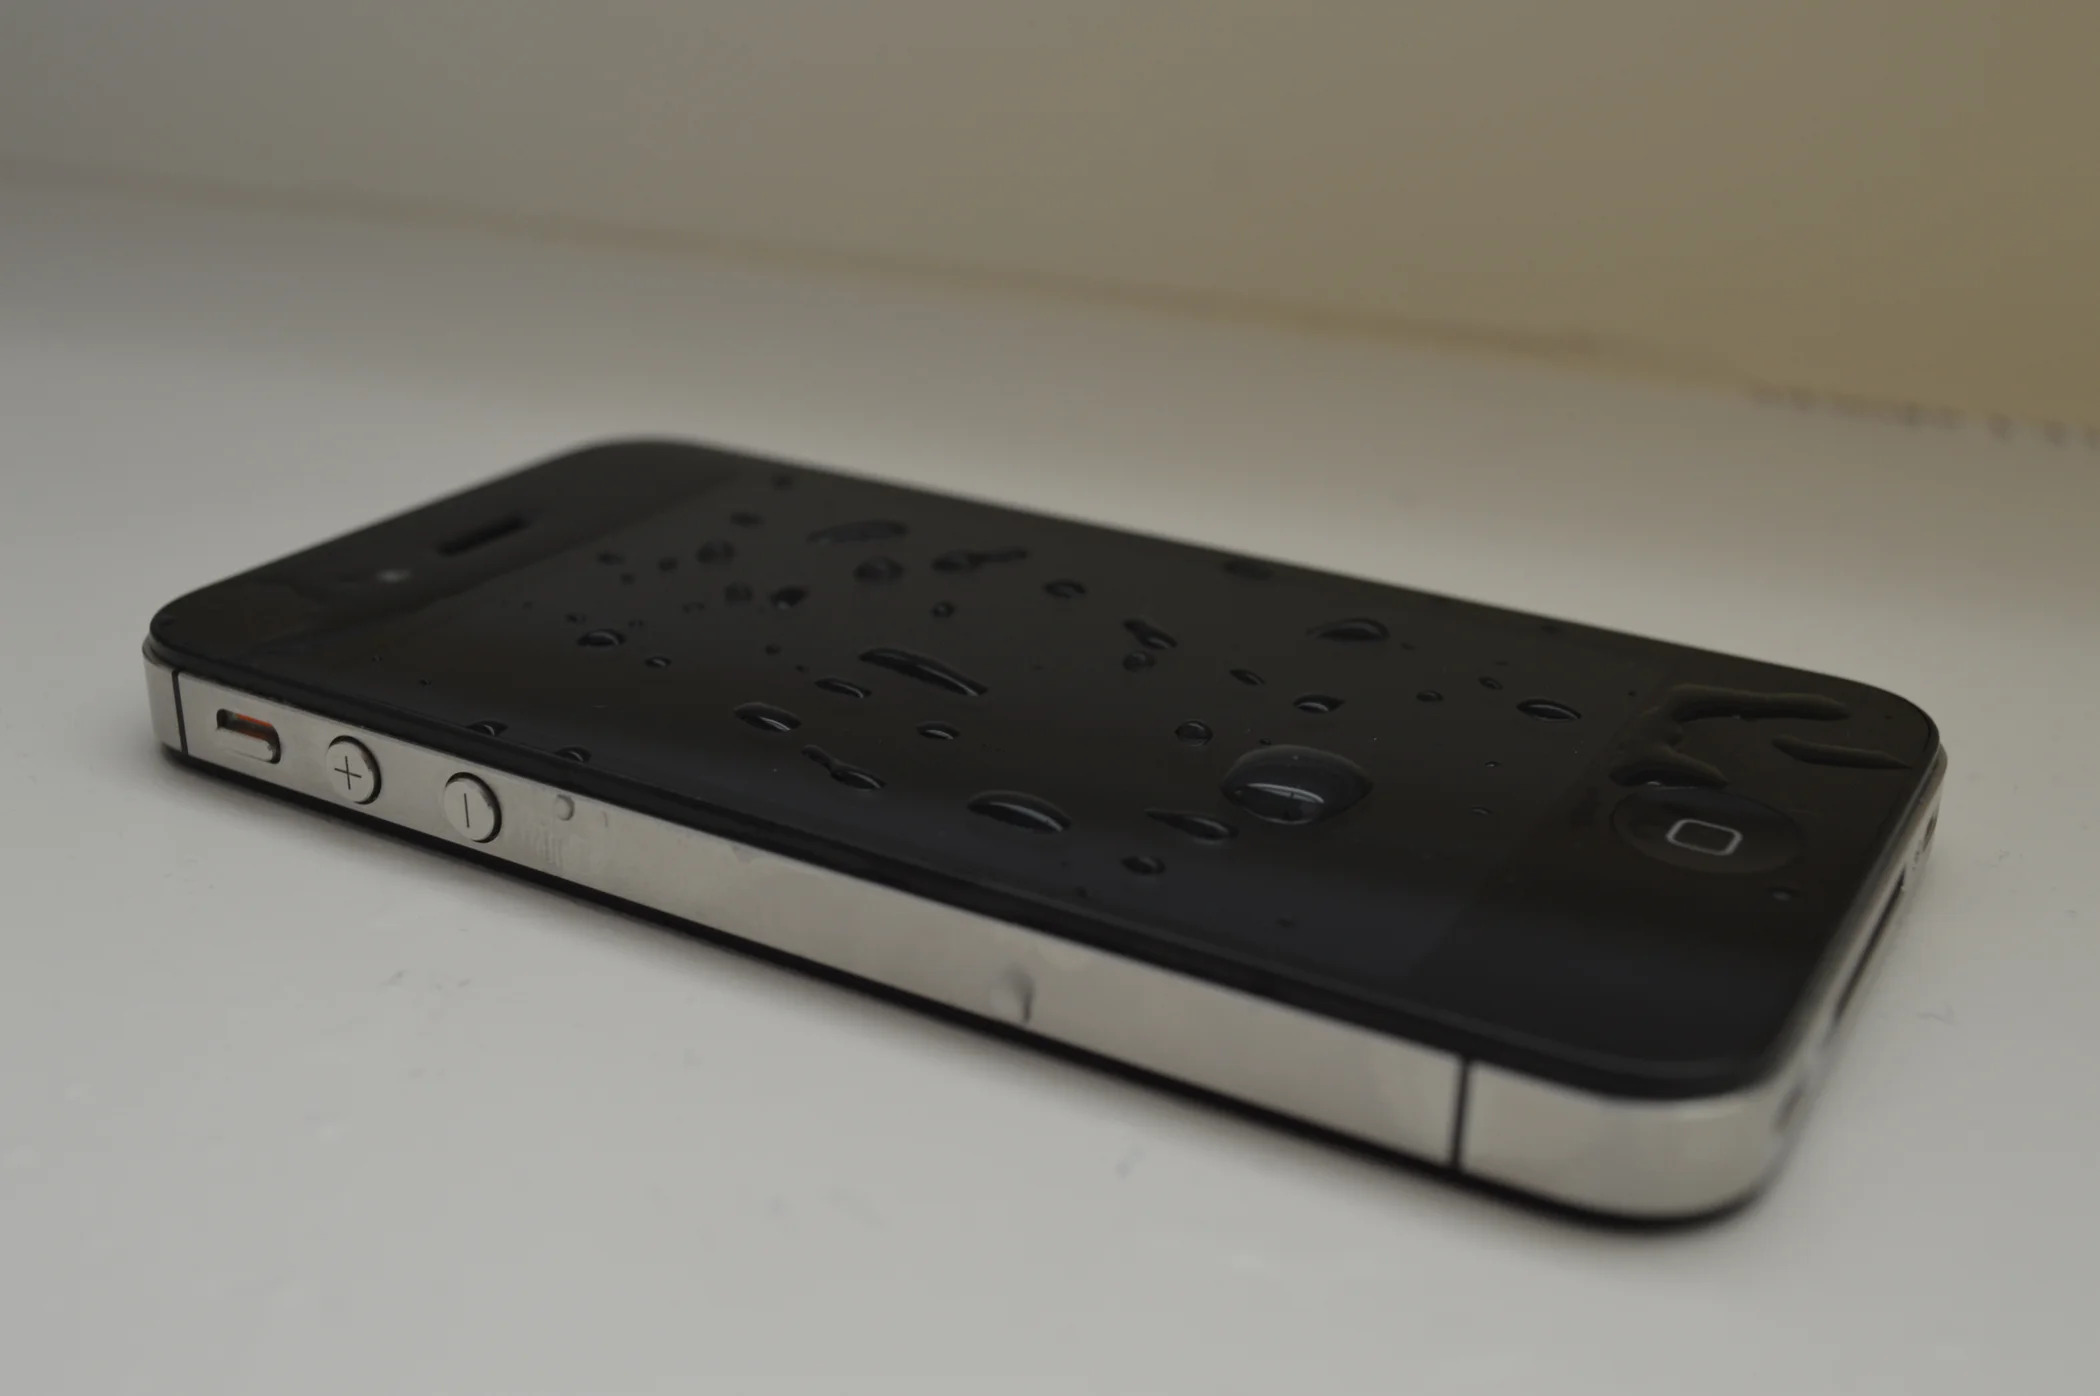
- Inspect the external indicators: Examine the device for any visible signs of water damage. Look for water droplets, moisture under the screen, or a red or pink coloration in the Liquid Contact Indicator (LCI) located in the charging port or headphone jack. These indicators can provide initial clues about the water exposure.
- Check the functionality: Power on the device and test all its features, including the screen, buttons, speakers, microphone, and headphone jack. If any of these components are malfunctioning or unresponsive, it’s likely that water has infiltrated the device.
- Inspect the internal indicators: If you have experience with electronics, you can carefully open up the device to examine the internal components. Look for signs of corrosion, such as discolored or greenish patches on the circuit board or connectors. These indicators suggest that water has caused damage to the internal parts.
It’s important to note that even if your device does not show any immediate signs of water damage, it’s still necessary to proceed with the drying and fixing process as a precautionary measure. Water can seep into small crevices and cause damage over time, so it’s better to be safe than sorry.
Power off the device immediately
When you realize that your iPhone or iPod has come into contact with water, the first and most crucial step is to power off the device immediately. Even if it seems to be functioning fine, turning off the power can help prevent any potential short circuits or further damage to the internal components.
To power off your device, press and hold the power button until the “Slide to power off” slider appears on the screen. Slide the slider to the right to turn off the device completely. If your device is unresponsive, you can force a shutdown by pressing and holding both the power button and the volume down button simultaneously until you see the Apple logo disappear.
By turning off the device, you minimize the risk of any electrical currents interacting with the water inside, which could lead to permanent damage. Remember, every second counts when dealing with water damage, so act quickly to power off your device as soon as you become aware of the situation.
Do not attempt to charge or use the device while it’s wet, as this can further exacerbate the damage. Water and electricity do not mix well, and using the device in this state can pose a safety hazard. It’s important to prioritize the safety of yourself and the device by keeping it powered off until it’s properly dried and fixed.
Remove any accessories or cases
When dealing with a wet iPhone or iPod, it’s essential to remove any accessories or cases attached to the device. This step is crucial as it allows for better airflow and access to the device’s ports and buttons, making the drying process more effective. Here’s what you should do:
- Unplug any cables: If your device is connected to any charging cables or headphones, disconnect them immediately. Leaving them attached could hinder the drying process and increase the risk of further damage.
- Take off the case: If you have a protective case on your device, remove it carefully. Some cases may have trapped water inside, which can continue to seep into your iPhone or iPod if not removed promptly.
- Remove SIM card: For iPhones, locate the SIM card tray on the side of the device and use a SIM card ejector tool or a small paperclip to open the tray. Remove the SIM card and set it aside in a safe place. Removing the SIM card helps prevent potential damage to the card and allows for better drying of the device.
By removing accessories, cases, and the SIM card, you create better ventilation and ensure that no trapped water remains in the device. This step also allows for easier access to the device’s buttons, ports, and other areas that may require attention during the drying and fixing process. Remember to handle these elements with care and keep them in a safe place while you work on restoring your iPhone or iPod.
Shake out excess water
After removing any accessories or cases from your wet iPhone or iPod, the next step is to shake out any excess water. Shaking the device gently can help dislodge water droplets that may be trapped in the ports, speaker grilles, or other crevices. Here’s what you should do:
- Hold the device securely: With a firm grip on your iPhone or iPod, ensure that your hand is positioned in a way that prevents accidental drops.
- Turn the device upside down: Flip the device upside down to allow gravity to assist in draining out any water that may have entered.
- Gently shake the device: Shake the device in a controlled manner, aiming to dislodge any excess water. Be careful not to shake it too vigorously, as this can cause further damage.
While shaking the device, you may notice water droplets or moisture being expelled from the ports, such as the charging port, headphone jack, or speaker grilles. By shaking out excess water, you enhance the chances of drying out the device successfully and preventing further damage from prolonged exposure to water.
It’s important to note that shaking the device can only remove some of the excess water. To ensure thorough drying, you will need to proceed with the following steps and use other methods to eliminate moisture trapped within the device.
Do not use heat to dry the device
When attempting to dry a wet iPhone or iPod, it’s crucial to avoid using any form of heat to accelerate the drying process. While it may be tempting to use a hairdryer, oven, or microwave, applying heat can actually cause more harm than good. Here’s why you should avoid heat:
Risk of further damage: Heat can cause the internal components of your device to expand rapidly, leading to warping, melting, or irreversible damage. High temperatures can also damage the battery, leading to a decrease in performance or even a complete battery failure.
Risk of thermal shock: Introducing sudden or extreme temperature changes to your device can cause thermal shock. This occurs when the internal components expand or contract at different rates, potentially resulting in cracked or damaged circuitry.
Liquid evaporation: Using heat to dry your device can cause water to evaporate too quickly, leaving behind residue and minerals. This residue can lead to corrosion and further damage to the internal components over time.
Electrical hazards: Applying heat to a wet device can increase the risk of electrical hazards, such as sparks or short circuits. Water is a good conductor of electricity, and combining heat with moisture can create dangerous situations.
Instead of relying on heat, opt for methods that promote gentle drying and moisture removal, such as using absorbent materials or desiccants, as they effectively wick away moisture without subjecting the device to unnecessary risks. By avoiding heat, you can protect your iPhone or iPod from additional damage and increase the chances of a successful recovery.
Use absorbent materials to wick away moisture
After removing excess water from your wet iPhone or iPod, it’s time to employ absorbent materials to help wick away moisture from the device. These materials can effectively draw out remaining water, further aiding in the drying process. Here’s what you can do:
- Grab a clean, lint-free cloth: Start by using a soft, absorbent cloth or microfiber towel to gently pat the exterior of your device. This will help absorb any lingering water on the surface.
- Focus on the ports and openings: Use a cotton swab or toothpick wrapped with a small piece of the cloth to carefully wipe around the charging port, headphone jack, speaker grilles, and any other openings. Be gentle to avoid pushing any moisture further into these areas.
- Utilize moisture-absorbing packs: Place your iPhone or iPod in a resealable bag along with moisture-absorbing packs, such as silica gel packets or desiccant pouches. These packs can be found in packaging for various products or can be purchased online or at certain stores. They will help draw moisture out of the device over time.
- Replace the materials regularly: Check the absorbent materials periodically and replace them if they become saturated. This ensures maximum moisture removal and prevents the risk of re-introducing moisture back into the device.
Using absorbent materials allows for a continual extraction of moisture from your device. By gently patting and wiping the exterior and using moisture-absorbing packs, you help facilitate the drying process and minimize the risk of water damage to the internal components. Be patient and allow sufficient time for the materials to work, ensuring that the device is thoroughly dry before moving on to the next step.
Use a vacuum cleaner or compressed air to remove water
When dealing with a wet iPhone or iPod, it’s important to remove as much water as possible from the device’s internal components. One effective method to achieve this is by using a vacuum cleaner or compressed air. These tools can help dislodge and remove water from hard-to-reach areas. Here’s how you can use them:
- Choose a vacuum cleaner or compressed air: Use a vacuum cleaner with a small nozzle attachment or a can of compressed air with a thin nozzle. Make sure you select a low-pressure option to avoid damaging the device.
- Power off the device and remove any remaining accessories: Before using the vacuum cleaner or compressed air, ensure that the device is powered off and that no accessories, such as charging cables or headphones, are attached.
- Hold the device securely: With a firm grip on your iPhone or iPod, position it in a way that allows for steady and controlled cleaning.
- Start cleaning: If using a vacuum cleaner, gently hold the nozzle near the ports, speaker grilles, and any other areas where water may be trapped. Allow the vacuum to draw out any remaining moisture. If using compressed air, use short bursts of air to blow out the water.
- Repeat if necessary: If you can still see or hear water being expelled from the device during the vacuuming or blowing process, continue the process until no more water is visible or audible.
Using a vacuum cleaner or compressed air helps remove stubborn water droplets that may be trapped in small crevices and openings. By carefully directing the suction or air, you increase the chances of successfully drying out your device. However, exercise caution when using compressed air to avoid applying excessive pressure or holding the can too close to the device, as this can damage internal components.
Remember, this step should be done after shaking out excess water and using absorbent materials to minimize the remaining moisture. It’s an additional measure aimed at accelerating the drying process and ensuring a successful recovery of your iPhone or iPod.
Submerge the device in a bag of rice or silica gel packets
One popular and widely used method to dry a wet iPhone or iPod is to submerge the device in a bag filled with rice or silica gel packets. Both options are known for their ability to absorb moisture effectively. Here’s how you can use them:
- Choose rice or silica gel packets: You can opt for either rice or silica gel packets, depending on what you have available. Rice is a common household item, while silica gel packets are often found in packaging for various products or can be purchased online or at certain stores.
- Prepare a sealable bag: Select a sealable plastic bag that is large enough to comfortably fit your iPhone or iPod. Ensure that the bag is clean and free of any moisture before proceeding.
- Place the device in the bag: Carefully put your iPhone or iPod inside the bag, ensuring it is fully immersed in the rice or surrounded by the silica gel packets. Seal the bag tightly to create an airtight environment.
- Leave it undisturbed for at least 48 hours: Set the bag aside in a dry location and allow your device to sit undisturbed for a minimum of 48 hours. This timeframe provides ample opportunity for the rice or silica gel to absorb the moisture from your device.
The rice or silica gel acts as a desiccant, drawing out the residual moisture from your iPhone or iPod. While rice is a commonly used alternative, silica gel packets tend to be more effective due to their higher moisture-absorbing properties. Regardless of which option you choose, make sure to keep the bag sealed to maintain a controlled environment and prevent the introduction of additional moisture.
After the designated drying period, carefully remove your device from the rice or silica gel and inspect it for any remaining moisture. If you notice any signs of moisture, proceed with additional drying methods or seek professional assistance to ensure that your device is thoroughly dried before reinserting the battery or attempting to power it on.
Wait patiently for at least 48 hours
After employing various methods to dry your wet iPhone or iPod, it’s crucial to exercise patience and allow sufficient time for the drying process to take place. Waiting for at least 48 hours is recommended to ensure that all moisture is properly removed from the device. Here’s why waiting is essential:
Complete moisture removal: Even if your device appears dry on the outside, there may still be residual moisture inside. Waiting for an extended period allows for thorough evaporation of the remaining moisture, reducing the risk of damage to the internal components.
Preventing premature attempts to power on: It can be tempting to test the device or plug it in for charging before the recommended drying time is complete. However, doing so increases the likelihood of short circuits, electrical damage, or further corrosion if any moisture remains. Patience is key to ensuring a successful recovery.
Minimizing long-term damage: Rushing the drying process can lead to inadequate moisture removal, which may result in long-term damage to your iPhone or iPod. By waiting patiently for at least 48 hours, you maximize the chances of restoring your device to proper functionality and preventing future issues.
While waiting, store your device in a dry and well-ventilated area. Avoid exposing it to extreme temperatures, moisture, or direct sunlight, as these factors can impede the drying process or cause additional damage. Keep in mind that the drying time may vary depending on factors such as the extent of water exposure and the device model.
Exercise patience and resist the urge to rush the process. Waiting for a sufficient duration allows for a thorough drying process and increases the likelihood of a successful recovery of your iPhone or iPod.
Test the device before charging or turning it on
Before plugging in your iPhone or iPod or attempting to power it on after it has been wet, it’s crucial to thoroughly test the device to ensure that it is completely dry and functioning properly. Testing the device before applying any power helps minimize the risk of further damage and provides peace of mind. Here’s what you should do:
- Inspect for visible signs of moisture: Carefully examine the device for any signs of remaining moisture. Check the exterior, ports, buttons, and screen for any water droplets or condensation. If any moisture is present, continue the drying process until it is completely dry.
- Reinsert the battery (if applicable): If you have a removable battery, reinsert it into the device only if you are confident that both the battery and the device are completely dry. Make sure to handle the battery with care and align it correctly.
- Power on the device: Press and hold the power button to turn on the device. If it powers on smoothly and the screen lights up without any glitches or unusual behavior, proceed to the next step. However, if you encounter any problems, power off the device immediately and seek professional assistance.
- Test all functions: Once the device is powered on, go through its various features. Test the screen responsiveness, buttons, speakers, microphone, Wi-Fi connectivity, and any other functionalities that may be relevant to your device. Ensure that everything is working as expected.
- Connect to a charger: If your device passed the initial tests and functions properly, you can now connect it to a charger. Use the original charging cable and adapter that came with your device, and be cautious of any unusual heat, sparks, or smoke during the charging process.
It’s important to thoroughly test your device before applying power to avoid any potential complications caused by residual moisture or lingering issues. If you encounter any problems during the testing phase or notice unusual behavior, discontinue use immediately and seek professional assistance.
By following these steps and ensuring that your device is completely dry and functioning properly, you can confidently proceed with using your iPhone or iPod and minimize the risk of any long-term damage resulting from water exposure.