
Why Disable Chrome Extensions and Plug-Ins?
Chrome extensions and plug-ins are powerful tools that enhance the functionality of the Chrome browser. They provide additional features and customization options, allowing users to tailor their browsing experience according to their needs. However, there are situations where disabling extensions and plug-ins becomes necessary.
One of the main reasons to disable Chrome extensions and plug-ins is for troubleshooting purposes. Sometimes, conflicts may arise between extensions or plug-ins and cause issues such as browser crashes, slow performance, or webpage loading problems. By disabling these add-ons, you can identify the problematic extension or plug-in and resolve the issue.
Another reason to disable extensions and plug-ins is to improve overall browser performance. Some extensions and plug-ins consume significant system resources, leading to a slower browsing experience. Disabling unnecessary or resource-hungry add-ons can help speed up your browser and optimize its performance.
There are also security concerns associated with using certain extensions and plug-ins. While most Chrome add-ons are safe and beneficial, there have been cases where malicious extensions or plug-ins have been discovered. These can pose a threat to your privacy and security by collecting your browsing data or injecting unwanted ads. Disabling suspicious or untrusted extensions and plug-ins is essential to safeguard your online privacy.
Furthermore, disabling extensions and plug-ins can help declutter your browser interface. With numerous add-ons installed, the Chrome toolbar can become crowded and overwhelming. Disabling the ones you rarely use or no longer need can help simplify your browsing experience and make it more efficient.
It’s worth mentioning that disabling extensions and plug-ins does not permanently remove them from your browser. You can easily re-enable them whenever you need their functionality or when you have resolved the issues they were causing.
Overall, disabling Chrome extensions and plug-ins can be beneficial for troubleshooting, improving performance, enhancing security, and simplifying your browser interface. By understanding the reasons behind disabling them, you can make informed decisions regarding which extensions and plug-ins to enable or disable based on your specific needs and priorities.
How to Disable Chrome Extensions
Chrome provides several methods to disable extensions, depending on your preference and the number of extensions you wish to disable. Here are some of the most common methods:
Method 1: Disabling Extensions Through the Chrome Menu
1. Open the Chrome browser on your computer.
2. Click on the three-dot menu icon in the top-right corner of the browser window.
3. From the dropdown menu, hover over “More tools” and then click on “Extensions.”
4. You will be redirected to the Chrome Extensions page. Locate the extension you want to disable and toggle off the switch next to it.
Method 2: Disabling Extensions through the Chrome Settings
1. Open the Chrome browser and click on the three-dot menu icon.
2. Select “Settings” from the dropdown menu.
3. In the left-hand sidebar, click on “Extensions.”
4. On the Extensions page, you will see a list of your installed extensions. To disable an extension, toggle off the switch next to it.
Method 3: Disabling Multiple Extensions Through the Chrome Extensions Page
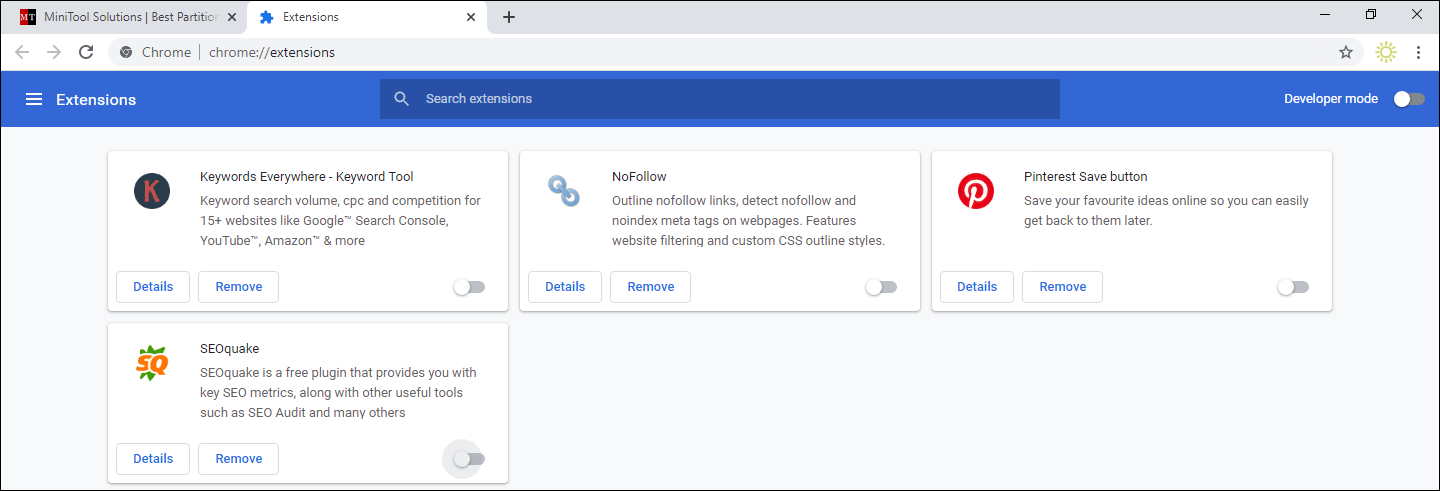
1. Open the Chrome browser and go to the Chrome Extensions page by typing “chrome://extensions” into the address bar.
2. In the top-right corner of the page, enable the “Developer mode” toggle switch.
3. Once you have enabled Developer mode, you will see additional options for each extension. Locate the extensions you wish to disable and click on the “Disable” button next to each one.
Method 4: Disabling Specific Extensions through the Chrome Task Manager
1. Open the Chrome browser and click on the three-dot menu icon.
2. Select “More tools” and then click on “Task manager” from the dropdown menu.
3. In the Task Manager, find the extension you want to disable under the “Extensions” tab.
4. Click on the extension and then click on the “End process” button to disable it.
Method 5: Disabling Extensions Through the Chrome Flags Menu
1. Open the Chrome browser and type “chrome://flags” into the address bar.
2. In the search bar on the Flags page, type “Extensions Toolbar Menu” and select “Enabled” from the dropdown menu.
3. Relaunch Chrome by clicking on the “Relaunch” button at the bottom of the page.
4. After relaunching, you will see a new Extensions menu icon in the top-right corner of the browser window. Click on this icon to access your extensions and disable or enable them as needed.
These methods provide various options for disabling Chrome extensions based on your preference. Remember that you can always re-enable a disabled extension by following the same steps and toggling the switch to the “On” position.
Method 1: Disabling Extensions Through the Chrome Menu
Disabling extensions through the Chrome menu is a straightforward method that allows you to quickly toggle off the extensions you want to disable. Here’s how you can do it:
1. Start by opening the Chrome browser on your computer.
2. Look for the three-dot menu icon located in the top-right corner of the browser window. Click on it to open the dropdown menu.
3. From the dropdown menu, hover over the “More tools” option and then click on “Extensions.”
4. You will be redirected to the Chrome Extensions page, which displays all the extensions installed in your browser.
5. Take a moment to review the list of extensions and identify the one(s) you want to disable.
6. To disable an extension, locate it in the list and toggle off the switch next to it. The switch will turn gray, indicating that the extension has been disabled.
7. Repeat the process for any other extensions you wish to disable.
Disabling extensions through the Chrome menu is especially helpful if you only want to disable a few individual extensions or if you want to disable them temporarily for troubleshooting purposes. It provides a quick and convenient way to manage your extensions without having to access the browser settings or extensions page separately.
Keep in mind that disabling an extension will immediately stop it from running or performing any actions in your browser. However, the extension is not permanently removed from your browser, and you can easily re-enable it by toggling the switch back to the “On” position.
Disabling extensions through the Chrome menu is a simple and effective method to control and customize the functionality of your browser. Whether you need to troubleshoot issues, optimize performance, or simply declutter your browser interface, this method offers a convenient way to manage your Chrome extensions with just a few clicks.
Method 2: Disabling Extensions through the Chrome Settings
Another method to disable Chrome extensions is through the Chrome settings. This method provides a more comprehensive view of your extensions and allows you to manage them with ease. Here’s a step-by-step guide on how to disable extensions through the Chrome settings:
1. Begin by launching the Chrome browser on your computer.
2. Locate the three-dot menu icon in the top-right corner of the browser window. Click on it to open the dropdown menu.
3. From the dropdown menu, select the “Settings” option.
4. In the left-hand sidebar of the Settings page, click on “Extensions.”
5. You will now be directed to the Extensions page, which displays a list of all the extensions currently installed in your Chrome browser.
6. Take a moment to review the list and identify the extensions you want to disable.
7. To disable an extension, locate it in the list and toggle off the switch next to it. The switch will gray out, indicating that the extension has been disabled.
8. Repeat the process for any other extensions you wish to disable.
Disabling extensions through the Chrome settings provides a more in-depth view of your extensions, making it easier to manage multiple extensions simultaneously. It allows you to make changes to your extension settings, access additional options, and ensure a seamless browsing experience tailored to your preferences.
It’s important to note that disabling an extension through the Chrome settings automatically stops it from running or performing any actions in your browser. However, the extension is not permanently removed, and you can easily re-enable it by toggling the switch back to the “On” position.
Disabling extensions through the Chrome settings offers a convenient way to customize your browsing experience by enabling or disabling extensions based on your specific needs and preferences. Whether you want to optimize performance, enhance security, or simplify your browser interface, this method provides a comprehensive approach to managing your Chrome extensions effectively.
Method 3: Disabling Multiple Extensions Through the Chrome Extensions Page
If you have several extensions installed in your Chrome browser and want to disable multiple extensions at once, you can use the Chrome Extensions page. This method allows you to conveniently manage and disable multiple extensions with just a few steps. Here’s how you can disable multiple extensions through the Chrome Extensions page:
1. Open the Chrome browser on your computer.
2. In the address bar, type “chrome://extensions” and press Enter. This will take you directly to the Chrome Extensions page.
3. In the top-right corner of the page, you will find a toggle switch labeled “Developer mode.” Enable this switch by clicking on it.
4. Once you have enabled Developer mode, additional options will appear for each extension listed on the page.
5. Review the list of installed extensions and locate the ones you want to disable.
6. For each extension you wish to disable, find the “Disable” button located next to it. Click on the button to disable the corresponding extension.
7. Repeat this process for all the extensions you want to disable.
Disabling multiple extensions through the Chrome Extensions page is particularly useful when you want to disable several extensions simultaneously. It not only saves time but also allows you to have a better overview of all your extensions and make changes efficiently.
Remember that disabling an extension through the Chrome Extensions page immediately stops it from running or performing any actions in your browser. However, the extension remains installed and can be easily re-enabled by clicking on the “Enable” button next to it.
By utilizing the Chrome Extensions page, you have a convenient way to disable multiple extensions at once, declutter your browser, and optimize its performance according to your specific needs. Whether it’s for troubleshooting purposes or to streamline your browsing experience, this method provides an effective solution for managing and disabling multiple extensions in Chrome.
Method 4: Disabling Specific Extensions through the Chrome Task Manager
The Chrome Task Manager provides an alternative way to disable specific extensions in Chrome. By using the Task Manager, you can locate and disable individual extensions that may be causing issues or consuming excessive resources. Here’s how you can disable specific extensions through the Chrome Task Manager:
1. Start by opening the Chrome browser on your computer.
2. Click on the three-dot menu icon located in the top-right corner of the browser window.
3. From the dropdown menu, hover over “More tools” and then click on “Task manager.”
4. The Chrome Task Manager will open, displaying a list of all the processes and extensions running in your browser.
5. In the Task Manager, navigate to the “Extensions” tab to view the list of extensions currently active in your browser.
6. Locate the extension you want to disable. You can identify it by its name, alongside the amount of memory and CPU it is currently using.
7. Click on the extension to select it, and then click on the “End process” button located at the bottom-right corner of the Task Manager window.
8. The selected extension will be immediately disabled and will no longer be active in your browser.
By using the Chrome Task Manager to disable specific extensions, you have more control over individual extensions in your browser. This method is especially useful when you need to pinpoint and address issues caused by specific extensions or when you want to manage extensions that are using excessive system resources.
It’s important to note that disabling an extension through the Task Manager only temporarily stops it from running. If you want to permanently disable an extension, you will need to use one of the other methods mentioned earlier, such as the Chrome menu or the Chrome settings.
With the Chrome Task Manager, you have a powerful tool at your disposal to manage and disable specific extensions in your browser. This method allows for finer control and troubleshooting, ensuring a smoother and more efficient browsing experience.
Method 5: Disabling Extensions Through the Chrome Flags Menu
The Chrome Flags menu provides advanced experimental features and settings that are not yet fully supported or enabled by default in the browser. By utilizing the Flags menu, you can disable extensions and gain more control over their functionality. Here’s how you can disable extensions through the Chrome Flags menu:
1. Open the Chrome browser on your computer.
2. In the address bar, type “chrome://flags” and press Enter. This will take you to the Chrome Flags page.
3. On the Flags page, you will see a search bar at the top. Type “Extensions Toolbar Menu” into the search bar and press Enter.
4. From the search results, find the “Extensions Toolbar Menu” flag and click on the corresponding dropdown menu.
5. Select “Enabled” from the options listed in the dropdown menu.
6. Once you have enabled the “Extensions Toolbar Menu” flag, a prompt will appear at the bottom of the page, asking you to relaunch the browser. Click on the “Relaunch” button to restart Chrome and apply the changes.
7. After relaunching, you will notice a new Extensions menu icon in the top-right corner of the browser window. Click on this icon to access a list of your enabled extensions.
8. From the Extensions menu, you can disable or enable extensions by toggling the switches next to each extension name.
Disabling extensions through the Chrome Flags menu provides a unique experimental approach to manage your extensions. It offers additional control and customization options, making it ideal for users who want to explore advanced features or troubleshoot specific extension-related issues.
It’s important to note that the Chrome Flags menu is intended for advanced users, as the experimental features and settings may not be fully stable or compatible with all extensions. Exercise caution when making changes in the Flags menu, and if any issues arise, you can easily revert back to the default settings.
By utilizing the Chrome Flags menu to disable extensions, you can explore and experiment with different feature combinations to optimize your browsing experience. This method provides a unique level of flexibility and customization, allowing you to tailor Chrome to your specific needs and preferences.
How to Disable Chrome Plug-Ins
Chrome plug-ins are additional software components that add functionality to the browser, such as media players and document viewers. However, there may be instances where you need to disable plug-ins to troubleshoot issues or improve performance. Here are the methods to disable Chrome plug-ins:
Method 1: Disabling Plug-Ins Through the Chrome Menu
1. Open the Chrome browser on your computer.
2. Click on the three-dot menu icon in the top-right corner of the browser window.
3. From the dropdown menu, hover over “More tools” and then click on “Extensions.”
4. In the Extensions page that opens, find the “Manage plug-ins” link at the bottom of the page and click on it.
5. You will be redirected to the Chrome Plug-Ins page, where you can see the list of active plug-ins.
6. Locate the plug-in you want to disable and click on the “Disable” switch or button next to it. The switch will toggle off, indicating that the plug-in is now disabled.
Method 2: Disabling Plug-Ins through the Chrome Settings
1. Open the Chrome browser and click on the three-dot menu icon.
2. Select “Settings” from the dropdown menu.
3. In the left-hand sidebar, click on “Privacy and security.”
4. Scroll down to the “Site settings” section and click on “Additional content settings.”
5. Select “Plug-ins” from the list of content settings.
6. On the Plug-ins page, you will see a list of plug-ins installed in your browser. Toggle off the switch next to the plug-in you want to disable.
Method 3: Disabling Specific Plug-Ins through the Chrome Plug-Ins Page
1. Open the Chrome browser and type “chrome://plugins” in the address bar.
2. Press Enter to go to the Chrome Plug-Ins page.
3. Locate the specific plug-in that you want to disable from the list.
4. Click on the “Disable” link or button next to the plug-in to disable it.
Method 4: Disabling Plug-Ins through the Chrome Flags Menu
1. Open the Chrome browser and type “chrome://flags” into the address bar.
2. Press Enter to access the Chrome Flags page.
3. In the search bar on the Flags page, type “Enable NPAPI” and select “Disabled” from the dropdown menu.
4. Relaunch Chrome by clicking on the “Relaunch” button at the bottom of the page.
Please note that NPAPI plug-ins will no longer work in Chrome after following this method.
Disabling Chrome plug-ins can help resolve compatibility issues, improve performance, and enhance security. By following these methods, you can easily disable plug-ins according to your specific needs and preferences. Keep in mind that you can always re-enable plug-ins by following the same steps and toggling the switches back to the “On” position.
Method 1: Disabling Plug-Ins Through the Chrome Menu
One way to disable plug-ins in Chrome is through the Chrome menu. This method allows you to quickly access the plug-ins settings and disable specific plug-ins as needed. Here are the steps to disable plug-ins through the Chrome menu:
1. Open the Chrome browser on your computer.
2. Click on the three-dot menu icon located in the top-right corner of the browser window. This will open a dropdown menu.
3. From the dropdown menu, hover over “More tools” and then click on “Extensions.”
4. In the Extensions page that appears, scroll to the bottom and locate the “Manage plug-ins” link. Click on it.
5. You will be redirected to the Chrome Plug-Ins page, where you can see a list of all the active plug-ins installed in your browser.
6. In the list, find and locate the plug-in you want to disable.
7. Next to the plug-in, you will see a “Disable” switch or button. Click on it to disable the plug-in. The switch will turn off, indicating that the plug-in has been disabled.
By using the Chrome menu to disable plug-ins, you have a straightforward method to quickly access and manage plug-ins in your browser. This method is especially useful when you need to disable specific plug-ins for troubleshooting purposes, or if you want to enhance your browsing experience by reducing the number of active plug-ins.
It’s important to note that disabling a plug-in through the Chrome menu only temporarily stops it from running. If you want to permanently disable a plug-in, you will need to use one of the other methods mentioned earlier, such as the Chrome settings or the Chrome plug-ins page.
By utilizing the Chrome menu to disable plug-ins, you have an easy and efficient way to take control of the plug-ins running in your Chrome browser. Whether you want to troubleshoot issues or optimize performance, this method provides a simple solution to manage and disable plug-ins according to your specific needs.
Method 2: Disabling Plug-Ins through the Chrome Settings
Another method to disable plug-ins in Chrome is through the Chrome settings. This method gives you more control over the plug-ins installed in your browser and allows you to enable or disable them with ease. Here’s how you can disable plug-ins through the Chrome settings:
1. Open the Chrome browser on your computer.
2. Click on the three-dot menu icon located in the top-right corner of the browser window to open the dropdown menu.
3. From the dropdown menu, select “Settings” to access the Chrome settings page.
4. In the left-hand sidebar of the settings page, scroll down and click on “Privacy and security.”
5. Under the “Privacy and security” section, click on “Site settings.”
6. Scroll down to the “Additional content settings” section and click on “Plug-ins.”
7. On the Plug-ins settings page, you will see a list of plug-ins installed in your Chrome browser.
8. To disable a plug-in, simply toggle off the switch next to it. The switch will turn gray, indicating that the plug-in has been disabled.
Using the Chrome settings to disable plug-ins gives you a more comprehensive view of the plug-ins installed in your browser. This method allows you to manage plug-ins individually, enabling or disabling them based on your preferences and needs.
It’s important to note that disabling a plug-in through the Chrome settings will prevent it from running or performing any actions in your browser. However, the plug-in is not permanently removed, and you can easily re-enable it by toggling the switch back on.
By utilizing the Chrome settings to disable plug-ins, you have a convenient way to customize your browsing experience by enabling or disabling plug-ins according to your specific needs. Whether you want to troubleshoot issues, streamline your browser, or optimize performance, this method provides a comprehensive approach to managing and disabling plug-ins in Chrome.
Method 3: Disabling Specific Plug-Ins through the Chrome Plug-Ins Page
If you want to disable specific plug-ins in Chrome, you can do so through the Chrome Plug-Ins page. This method allows you to have a comprehensive view of all installed plug-ins and gives you the ability to disable them individually. Here’s how you can disable specific plug-ins through the Chrome Plug-Ins page:
1. Open the Chrome browser on your computer.
2. Type “chrome://plugins” in the address bar and press Enter. This will direct you to the Chrome Plug-Ins page.
3. On the Plug-Ins page, you will see a list of all the plug-ins currently installed in your browser.
4. Locate the specific plug-in you want to disable from the list.
5. Next to the plug-in, you will find a “Disable” link or button. Click on it to disable the plug-in.
6. The plug-in will be immediately disabled and will no longer run in your browser.
Disabling specific plug-ins through the Chrome Plug-Ins page offers a straightforward method to manage and disable individual plug-ins. It is especially useful when you need to troubleshoot issues related to a particular plug-in or if you want more control over the plug-ins running in your browser.
It’s important to note that disabling a plug-in through the Chrome Plug-Ins page only temporarily stops it from running. If you want to permanently disable a plug-in, you will need to use one of the other methods mentioned earlier, such as the Chrome menu or the Chrome settings.
By utilizing the Chrome Plug-Ins page to disable specific plug-ins, you have a convenient way to customize your browsing experience according to your preferences. Whether you want to optimize performance, resolve compatibility issues, or enhance security, this method provides an effective solution to manage and disable plug-ins in Chrome based on your specific needs.
Method 4: Disabling Plug-Ins through the Chrome Flags Menu
The Chrome Flags menu offers access to experimental features and settings in Chrome, including the ability to disable plug-ins. By using the Flags menu, you can have more control over the functionality of plug-ins in your browser. Here’s how you can disable plug-ins through the Chrome Flags menu:
1. Open the Chrome browser on your computer.
2. Type “chrome://flags” into the address bar and press Enter. This will take you to the Chrome Flags menu.
3. On the Flags page, you will see a search bar at the top of the page. Enter “Enable NPAPI” into the search bar and select “Disabled” from the dropdown menu.
4. After making the selection, you will see a prompt at the bottom of the page to relaunch Chrome. Click on the “Relaunch” button to apply the changes.
5. Once Chrome restarts, the selected flag will disable the NPAPI plug-ins.
By disabling NPAPI plug-ins through the Chrome Flags menu, you can control the use of these plug-ins in your browser. It’s important to note that NPAPI plug-ins will no longer function in Chrome after disabling them using this method.
The Chrome Flags menu offers advanced customization options, but it should be used with caution. Since the Flags menu contains experimental features, they may not be fully stable or compatible with all plug-ins. If any issues arise, you can easily revert back to the default settings by accessing the Flags menu again and selecting the “Default” option for the respective flag.
By utilizing the Chrome Flags menu to disable plug-ins, you gain more flexibility in customizing your browsing experience. Whether you want to optimize performance or streamline your browser interface, this method provides an experimental approach to managing and disabling plug-ins based on your specific needs and preferences.