
Why should you delete your Google Purchase History?
When it comes to online privacy, it’s important to have control over the information you share with companies like Google. One aspect of your digital footprint that you might not be aware of is your Google Purchase History. Every time you make a purchase through Google services like Google Pay or Google Shopping, your transaction details are stored in your account. While this might seem harmless at first, there are several reasons why you should consider deleting your purchase history.
First and foremost, deleting your Google Purchase History helps protect your privacy. By removing this information from your account, you decrease the chances of your purchase history being accessed by unauthorized individuals. This is especially important if you share your Google account with others or if your account has been compromised in any way.
Moreover, deleting your purchase history can help prevent targeted ads. Google uses your purchase data to tailor advertisements to your preferences. While some might find this convenient, others may feel uncomfortable knowing that their buying habits are being used for targeted advertising. By clearing your purchase history, you can limit the amount of personalized ads you receive and maintain a greater level of online anonymity.
Another reason to delete your Google Purchase History is to declutter your account. Over time, your purchase history can become filled with outdated or irrelevant transactions, making it frustrating to search for specific orders or information. By periodically cleaning up your purchase history, you can keep your account organized and make it easier to find the information you need.
Additionally, deleting your purchase history can also be beneficial when it comes to managing your finances. If you use Google Pay or other payment services linked to your Google account, having an accurate and up-to-date record of your transactions can be helpful. By removing older or unnecessary purchases, you can have a clearer overview of your financial activities and budget more effectively.
Lastly, deleting your purchase history is a simple way to take control of your personal data. It allows you to decide what information is stored and accessible within your Google account. By actively managing your online presence, you can minimize the data collected and retain a greater sense of privacy and security.
How does Google track your purchase history?
As one of the largest tech companies in the world, Google has access to vast amounts of user data, including your purchase history. Understanding how Google tracks this information is key to taking control of your online presence.
Google tracks your purchase history through various means, primarily by linking your purchases to your Google account. Whenever you make a purchase using a service like Google Pay or Google Shopping, the details of that transaction are associated with your account. This includes information such as the items purchased, the date and time of the transaction, and the amount spent.
In addition to directly tracking purchases made through Google services, Google also collects information from receipts and email confirmations sent to your Gmail account. By scanning your email for purchase-related messages, Google can extract relevant data such as order details, shipping information, and even tracking numbers. This allows them to compile a comprehensive picture of your online shopping activity.
Furthermore, Google may also gather purchase information from third-party apps and websites that you link to your Google account. These can include external shopping platforms, retail websites, or even loyalty programs that are tied to your Google profile. By connecting your account to these services, you give Google access to your purchase history beyond their own platforms.
It’s worth noting that while Google does track your purchase history, they claim to use this information primarily to improve their services and provide you with personalized experiences. This can include showing you more relevant ads or offering recommendations based on your past purchases. However, some users find this level of tracking invasive and opt to delete their purchase history to maintain their privacy.
To summarize, Google tracks your purchase history by linking transactions to your Google account, scanning your Gmail for purchase-related emails, and collecting data from third-party apps and websites that you connect to your Google profile. This extensive tracking allows Google to create a detailed profile of your purchasing habits, which they use to personalize their services and show you targeted advertisements.
Step 1: Access your Google Account settings
Deleting your Google Purchase History is a simple process that starts with accessing your Google Account settings. Follow these steps to get started:
1. Open a web browser and go to the Google homepage.
2. Click on the profile icon in the top right corner of the screen. If you’re not already signed in, enter your Google account credentials to log in.
3. From the drop-down menu, select “Google Account.” This will take you to your account settings page.
4. On the left navigation panel, click on “Data & personalization.” This will bring up a list of options related to your data and privacy settings.
5. Scroll down until you find the section labeled “Activity controls.” Here, you’ll find various options for managing the data that Google collects about your online activities.
6. Locate the “Web & App Activity” option and click on it. This will take you to the settings page for your web and app activity.
By accessing your Google Account settings, you gain control over the data that Google collects and stores about your online activities. This includes your purchase history, search history, and other interactions with Google services.
It’s important to note that modifying your account settings not only allows you to delete your purchase history but also gives you the ability to customize various privacy and data preferences according to your preferences.
Now that you’ve accessed your Google Account settings, you’re ready to move on to the next step: deleting your Google Purchase History.
Step 2: Go to your Google Purchases page
Once you have accessed your Google Account settings, the next step is to navigate to the Google Purchases page. Here’s how:
1. From the “Data & personalization” section on your account settings page, locate the “Manage your purchases, subscriptions & reservations” option. Click on it.
2. You will be redirected to the Google Purchases page, where you can view and manage your purchase history.
On the Google Purchases page, you will find a comprehensive list of all your past transactions made through Google services. Each entry will include details such as the date of purchase, the items bought, the merchant, and the method of payment used.
By accessing the Google Purchases page, you gain visibility into your purchase history and can review the information stored by Google. This includes not only purchases made through Google services like Google Pay or Google Shopping but also those gathered from your Gmail receipts and receipts from linked third-party apps or websites.
It’s worth noting that the Google Purchases page is separate from your browsing history or search history. It focuses specifically on the transactions you have made using Google services and the associated information collected.
Now that you have arrived at the Google Purchases page, you can move on to the next step: viewing and deleting your purchase history.
Step 3: View and delete your purchase history
Now that you have reached the Google Purchases page, you can proceed to view and delete your purchase history. Follow these steps:
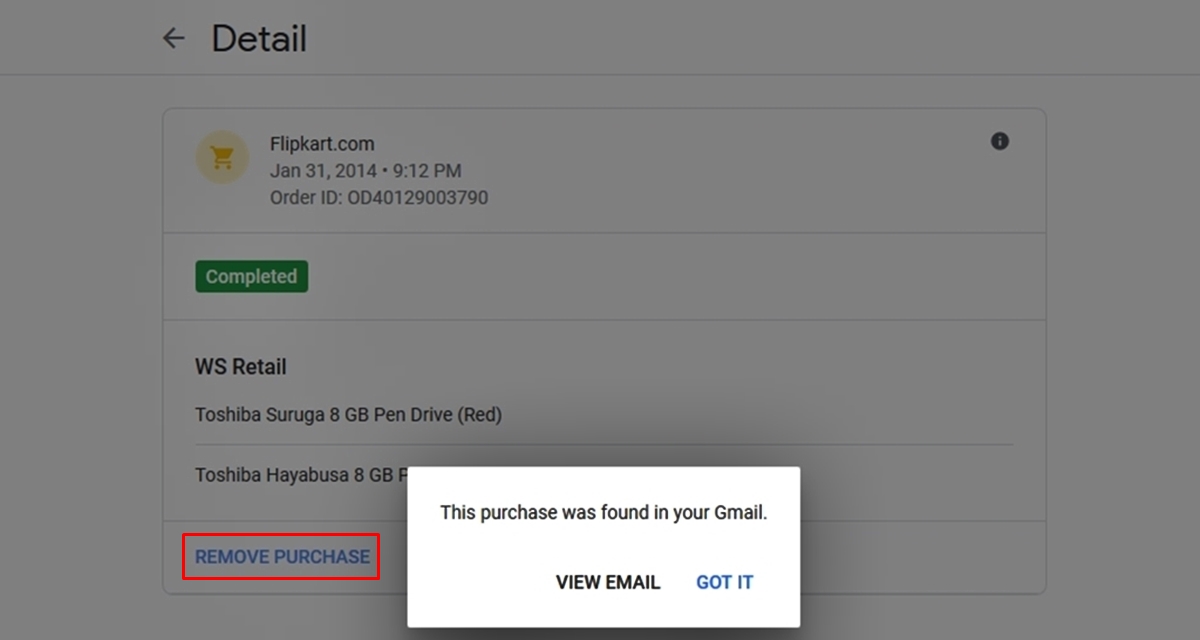
1. On the Google Purchases page, you will see a list of your past transactions. Scroll through the list to locate the specific purchase you want to delete.
2. Click on the purchase entry to expand the details and view more information about the transaction.
3. To delete a specific purchase, click on the “Delete” button next to the transaction details. A confirmation message will appear, asking you to confirm the deletion. Click “Delete” again to confirm and remove the purchase from your history.
4. Repeat this process for each purchase you want to delete. You can remove as many individual transactions as necessary.
Alternatively, if you want to delete multiple purchases at once, you can click on the “Delete all” button or select multiple entries using the checkboxes next to each transaction, and then click on the “Delete” button at the top or bottom of the page to remove them in bulk.
By viewing and deleting your purchase history, you have greater control over the information stored by Google. This allows you to manage your privacy and ensure that only relevant and necessary data is associated with your account.
It’s important to note that deleting a purchase from your history does not affect the actual purchase itself. It only removes the record from your Google account. The transaction details may still be present in receipts or records from the merchant, so keep that in mind.
Now that you know how to view and delete your purchase history, you can proceed to the next step: modifying your purchase history settings.
Step 4: Modify your purchase history settings
After deleting specific purchases from your Google Purchase History, you may want to modify your purchase history settings to further customize your privacy preferences. Follow these steps to make changes to your purchase history settings:
1. From the Google Purchases page, click on the gear icon or the “Settings” link, usually located in the upper-right corner of the page.
2. You will be directed to the settings page specific to your purchase history. Here, you have several options to customize how Google handles and stores your purchase data.
3. To disable purchase tracking altogether, toggle off the “Web & App Activity” option. Remember that turning off this setting may affect other features and services that rely on your web and app activity data, such as personalization and recommendations.
4. If you prefer to keep purchase tracking enabled but want to limit the information stored, you can choose to pause the collection of purchase history temporarily. Select the “Pause” option, which will temporarily stop Google from saving future purchase activity. This can be helpful if you want to prevent any new purchases from being associated with your account.
5. In the settings page, you may also find additional options related to purchase history, such as managing connected apps or services that share purchase data with Google. You can review and modify these settings according to your preferences.
By modifying your purchase history settings, you have the ability to customize how Google handles your purchase data. This gives you greater control over the information stored and shared by Google, enhancing your privacy and personalization options.
Remember to review these settings periodically, especially if any changes occur in your purchasing habits or if you want to ensure that your preferences align with your current privacy needs.
Now that you have modified your purchase history settings, you are ready to move on to the next step: clearing your browsing history.
Step 5: Clear your browsing history
In addition to managing your Google Purchase History, clearing your browsing history can further enhance your privacy and remove any traces of your online activities. Follow these steps to clear your browsing history:
1. Open a web browser and click on the menu icon (usually represented by three vertical dots) located in the upper-right corner of the window.
2. From the menu, select the “History” or “History & Recent Tabs” option. This will open a new tab displaying your browsing history.
3. In the browsing history tab, you will see a list of websites and pages you have visited. Depending on your browser, you may have different options for clearing your history.
4. Look for a button or link that says “Clear history” or “Clear browsing data.” Click on it.
5. A settings page will appear, allowing you to customize what data you want to delete. Select the option to clear your browsing history.
6. Optionally, you can choose to clear other data such as cookies, cached files, or saved passwords. However, keep in mind that clearing these may log you out of websites and remove stored settings.
7. Once you have selected the desired options, click on the “Clear” or “Delete” button to remove your browsing history.
By clearing your browsing history, you erase the record of websites you have visited, searches you have made, and other browsing activities. This can help maintain your privacy, prevent targeted advertising, and remove any stored information that you no longer need.
Remember to periodically clear your browsing history, especially if you share your device with others or want to ensure a fresh start when it comes to your online activities. Each browser may have slightly different options and steps, so consult your browser’s documentation if you encounter any difficulties.
Now that you have cleared your browsing history, you can proceed to the final step: disabling personalized ads.
Step 6: Disable personalized ads
Disabling personalized ads can further enhance your online privacy by preventing Google from tailoring advertisements based on your browsing and purchase history. Follow these steps to disable personalized ads:
1. Open a web browser and go to the Google Ad Settings page. You can directly access it by visiting https://adssettings.google.com.
2. Sign in to your Google account if you are not already signed in.
3. On the Ad Settings page, you will see a section labeled “Ad personalization.” Here, you can control how Google tailors ads for you.
4. Toggle off the switch or checkbox for “Ad personalization.” This will disable Google’s ability to use your browsing history, app usage, and other data to customize the ads you see.
5. Optionally, you can also review and modify other settings related to ads, such as the option to control ads based on your interests and demographic information.
6. Once you have made the desired changes, click on the “Turn off” or “Save” button to save your settings.
By disabling personalized ads, you limit the amount of data that Google uses to target advertisements to your preferences. This helps protect your privacy and ensures that the ads you see are less tailored to your personal information.
Keep in mind that while disabling personalized ads reduces targeted advertising, you may still see ads based on general factors such as your location or the content of the webpage you are visiting.
To maintain your privacy over time, periodically revisit the Ad Settings page to verify and update your preferences as needed.
Congratulations! By following these steps, you have completed all the necessary actions to delete your Google Purchase History, clear your browsing history, and disable personalized ads. With these measures in place, you can enjoy a greater level of privacy and control over your online activities.