
What are System Error Memory Dump Files?
System Error Memory Dump files, also known as minidump files or crash dump files, are a type of file that is generated by operating systems when a critical error or crash occurs. These files contain a snapshot of the system’s memory at the time of the crash, providing valuable information that can be analyzed to identify the cause of the error.
When a system encounters a serious error, such as a blue screen of death (BSOD) or an unrecoverable system freeze, it automatically creates a memory dump file. This file contains details about the state of the system, including information about running processes, device drivers, and the contents of system memory.
The purpose of these memory dump files is to assist in troubleshooting system crashes. They can be used by technicians or developers to diagnose and fix software or hardware issues that caused the crash. By examining the memory dump file, experts can gain insights into the specific error, enabling them to identify the root cause and provide appropriate solutions.
Memory dump files come in various formats depending on the operating system being used. For example, Windows systems generate .dmp files, while Mac systems generate .crash files. Linux systems typically generate core dump files. Regardless of the format, the information contained within these files is crucial for diagnosing system errors effectively.
It is worth noting that memory dump files can consume a significant amount of disk space, especially if frequent crashes occur. Therefore, it is important to periodically delete these files to free up storage and optimize system performance.
Now that we understand what system error memory dump files are, let’s delve into why it is important to delete them regularly.
Why Should You Delete System Error Memory Dump Files?
Regularly deleting system error memory dump files is crucial for maintaining the overall health and performance of your computer. Here are several reasons why you should consider deleting these files:
- Free up disk space: System error memory dump files can occupy a significant amount of storage space on your computer. If left unchecked, these files can accumulate over time and consume valuable disk space. By deleting them, you can reclaim that space and ensure that your computer has enough room for important files and applications.
- Improve system performance: The presence of large memory dump files can negatively impact system performance. When your computer has limited available disk space, it can slow down file transfers, software installations, and overall system responsiveness. Deleting memory dump files helps alleviate this burden and allows your computer to run more smoothly.
- Enhance system stability: By deleting memory dump files, you can reduce the likelihood of encountering recurring system crashes or errors. If your computer is consistently experiencing crashes, it may be due to the accumulation of corrupted or outdated dump files. Deleting them can help resolve these issues and improve the stability of your system.
- Protect sensitive information: Memory dump files may contain sensitive information about your system, including passwords, personal data, or confidential files. If your computer falls into the wrong hands, these files can be exploited for malicious purposes. By regularly deleting memory dump files, you minimize the risk of unauthorized access to your sensitive information.
- Facilitate troubleshooting: Deleting old memory dump files ensures that you have a clean slate for future troubleshooting. If you experience a new system error, having up-to-date memory dump files can provide more accurate diagnostic information. It allows technicians or developers to analyze the most recent system state and identify the underlying causes of the error more effectively.
As you can see, regularly deleting system error memory dump files offers several benefits, including freeing up disk space, improving system performance, enhancing system stability, protecting sensitive information, and facilitating troubleshooting. Now that you understand the importance of deleting these files, let’s explore how to delete system error memory dump files on different operating systems.
Step-by-Step Guide to Delete System Error Memory Dump Files on Windows
If you’re using a Windows operating system and want to delete system error memory dump files, follow these simple steps:
- Open File Explorer: On your desktop, click on the “File Explorer” icon or press the “Windows Key + E” to open the File Explorer window.
- Navigate to the Dump Files folder: In the File Explorer window, locate the “This PC” or “My Computer” section on the left-hand pane. Click on it to expand the options. Next, double-click on the “Local Disk (C:)” or the drive where your operating system is installed.
- Find the dump files: In the drive’s root folder, locate and open the “Windows” folder. Within the Windows folder, find and open the “Minidump” folder. This is where the system error memory dump files are stored.
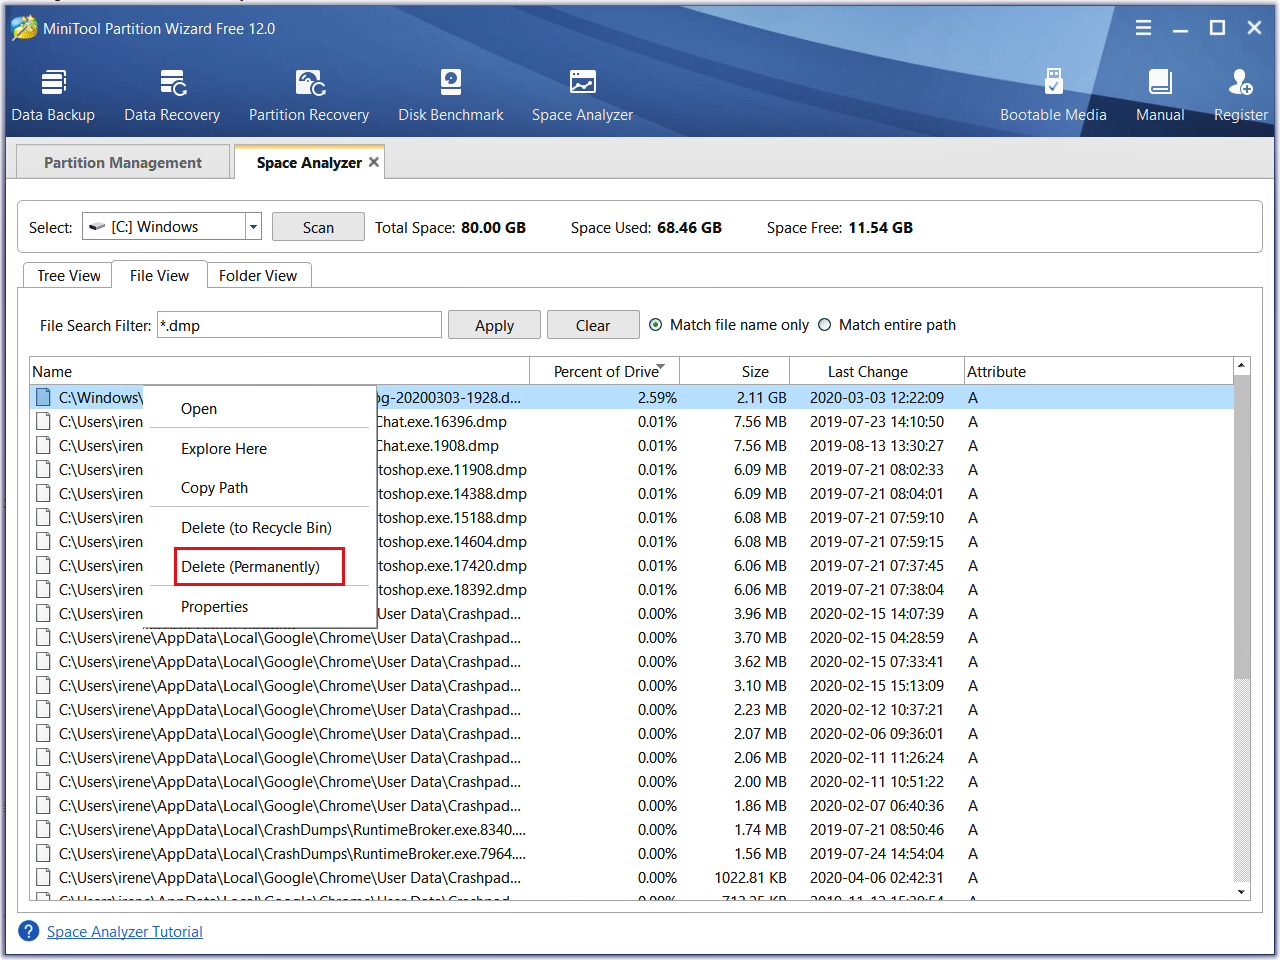
- Select and delete the dump files: Once inside the Minidump folder, you will see a list of files with .dmp extension. Select the files you want to delete by clicking on them while holding down the “Ctrl” key. Alternatively, you can press “Ctrl + A” to select all files. Right-click on the selected files and choose “Delete” from the context menu.
- Confirm deletion: A confirmation dialog will appear asking if you are sure you want to delete the files. Click “Yes” to confirm and delete the system error memory dump files.
- Empty the Recycle Bin: Once you have deleted the dump files, it is recommended to empty the Recycle Bin to permanently remove them from your system. Right-click on the Recycle Bin icon on your desktop and select “Empty Recycle Bin” from the menu.
That’s it! You have successfully deleted the system error memory dump files on your Windows computer. Repeat these steps periodically to keep your system clean and optimized.
Step-by-Step Guide to Delete System Error Memory Dump Files on Mac
If you’re a Mac user and want to delete system error memory dump files, follow these steps:
- Open Finder: Click on the Finder icon in your Dock, or press “Command + Space” and type “Finder” to search for and open the Finder.
- Go to the Utilities folder: In the Finder window, click on “Go” in the menu bar, and then select “Utilities” from the drop-down menu.
- Open the Console: Within the Utilities folder, locate and open the “Console” application. The Console provides access to various logs, including crash logs.
- Find and delete the crash logs: In the Console window, on the left-hand side, you will see a list of logs. Look for “User Diagnostic Reports” and click on it to expand the folder. This folder contains the crash logs that you can delete. Select the logs you want to remove by clicking on them while holding down the “Command” key. Right-click on the selected logs and choose “Move to Trash” from the context menu.
- Empty the Trash: To permanently delete the crash logs, click on the Trash icon in your Dock to open the Trash. Once inside the Trash, click on “Finder” in the menu bar and select “Empty Trash” from the drop-down menu. Confirm the deletion when prompted.
That’s it! You have successfully deleted the system error memory dump files, known as crash logs, on your Mac. Regularly clearing these crash logs can help improve system performance and free up disk space.
Step-by-Step Guide to Delete System Error Memory Dump Files on Linux
If you’re using a Linux-based operating system and want to delete system error memory dump files, follow these steps:
- Open Terminal: Click on the Terminal icon in your desktop environment or press “Ctrl + Alt + T” to open the Terminal.
- Access the dump file directory: In the Terminal, use the “cd” command to navigate to the directory where the memory dump files are stored. The exact location may vary depending on your Linux distribution, but common locations include “/var/crash” and “/var/lib/systemd/coredump/”. For example, you can use the command “cd /var/crash” to go to the “/var/crash” directory.
- List the dump files: Use the “ls” command to list the contents of the directory. You should see the system error memory dump files listed.
- Delete the dump files: To delete specific dump files, use the “rm” command followed by the file name. For example, if the dump file is named “core.1234”, you can use the command “rm core.1234” to delete it. If you want to delete all dump files in the directory, you can use the wildcard character “*”. For example, the command “rm *” will delete all files in the current directory.
- Confirm deletion: The Terminal will not ask for confirmation when deleting files, so be cautious when using the “rm” command. Once deleted, the files cannot be easily recovered.
That’s it! You have successfully deleted the system error memory dump files on your Linux system. Remember to exercise caution when using the Terminal and double-check the files you are deleting to avoid unintentional deletions.
Best Practices to Manage System Error Memory Dump Files
Effective management of system error memory dump files can help optimize your computer’s performance and ensure a smooth computing experience. Here are some best practices to follow:
- Regularly delete dump files: Make it a habit to delete system error memory dump files regularly. This prevents the accumulation of unnecessary files and frees up valuable disk space.
- Automate the deletion process: Consider using automated tools or scripts to delete dump files on a scheduled basis. This ensures that the cleanup process is performed consistently and reduces the chances of forgetting to delete the files manually.
- Enable a small dump file size: Adjust the settings of your operating system to create smaller-sized memory dump files. This saves disk space and reduces the impact on system performance during the file creation process.
- Monitor system errors: Keep an eye on the frequency and type of system errors you encounter. If you notice persistent or recurring issues, it may indicate an underlying problem that needs attention. Analyzing the memory dump files associated with these errors can provide valuable insights for resolving the issues.
- Backup important files: Before deleting memory dump files, ensure that any important files or data are properly backed up. This minimizes the risk of unintentionally losing crucial information in case of accidental deletion.
- Stay up-to-date: Keep your operating system and software up-to-date with the latest patches and updates. This helps prevent known system errors that may generate memory dump files.
- Seek professional assistance: If you are unsure about analyzing or deleting memory dump files, seek help from a professional technician or IT support. They can provide guidance and ensure that the files are handled correctly.
By following these best practices, you can effectively manage system error memory dump files and improve the stability and performance of your computer. Remember, regular maintenance and monitoring are key to maintaining a healthy system and preventing potential issues.