
Clearing Individual Conversations
If you use Skype for chatting with friends, colleagues, or clients, you might find yourself wanting to clear individual conversations from time to time. Whether it’s to declutter your chat history or to remove sensitive information, Skype makes it easy to delete specific conversations. Follow these steps to clear individual conversations:
- Open Skype on your device and sign in to your account.
- Navigate to the chat list and locate the conversation you want to delete.
- Right-click on the conversation or press and hold it until a menu appears.
- Select the option to delete the conversation. This action will permanently remove the chat from your Skype account.
By following these simple steps, you can quickly clear individual conversations and ensure your chat history remains organized and clutter-free. It’s worth noting that deleting a conversation removes it from your account, but it doesn’t affect the conversation on the other person’s account. They will still have access to the chat unless they also delete it from their end.
Remember, clearing individual conversations is a handy feature when you want to manage your chat history on Skype. Use it to keep your conversations private, free up space, and maintain a neat and organized chat list.
Clearing Multiple Conversations
If you’re looking to clear multiple conversations on Skype, you’ll be pleased to know that there’s an efficient way to do so. Instead of deleting each conversation individually, Skype provides an option to clear multiple conversations simultaneously. Follow the steps below to clear multiple conversations:
- Launch Skype and sign in to your account.
- Navigate to the chat list and locate the first conversation you want to clear.
- Hold down the Ctrl key (or Command key on Mac) on your keyboard.
- While keeping the Ctrl (or Command) key pressed, click on the other conversations you wish to delete. You’ll notice that each conversation gets selected as you click on it.
- Once you have selected all the conversations you want to clear, right-click on any of the selected conversations or press and hold them until a menu appears.
- Select the option to delete the conversations. This action will remove all the selected chats from your Skype account.
By using this method, you can easily clear multiple conversations in just a few steps. It’s important to note that clearing multiple conversations is irreversible, and the deleted chats cannot be recovered. Therefore, make sure you double-check your selections before confirming the deletion.
Whether you’re decluttering your chat list or clearing out old conversations, this feature allows you to efficiently manage and organize your Skype chat history. Take advantage of this convenient option to maintain a clean and tidy chat list on Skype.
Deleting Conversations on Windows
If you’re using Skype on a Windows computer, deleting conversations is a straightforward process. Follow the steps below to delete conversations on Skype for Windows:
- Launch the Skype application on your Windows computer.
- Sign in to your Skype account if you haven’t done so already.
- In the chat list, locate the conversation you want to delete.
- Right-click on the conversation or press and hold it to bring up the context menu.
- From the menu, select the “Delete Conversation” option.
- A confirmation prompt will appear asking if you want to delete the conversation. Click “Delete” to confirm.
Once you confirm the deletion, the conversation will be permanently removed from your Skype account on Windows. It’s important to note that this action is irreversible, and the chat cannot be recovered.
By following these simple steps, you can easily delete conversations on Skype for Windows. Whether you want to clear individual chats or remove multiple conversations, this method allows you to efficiently manage your chat history and keep your Skype account organized.
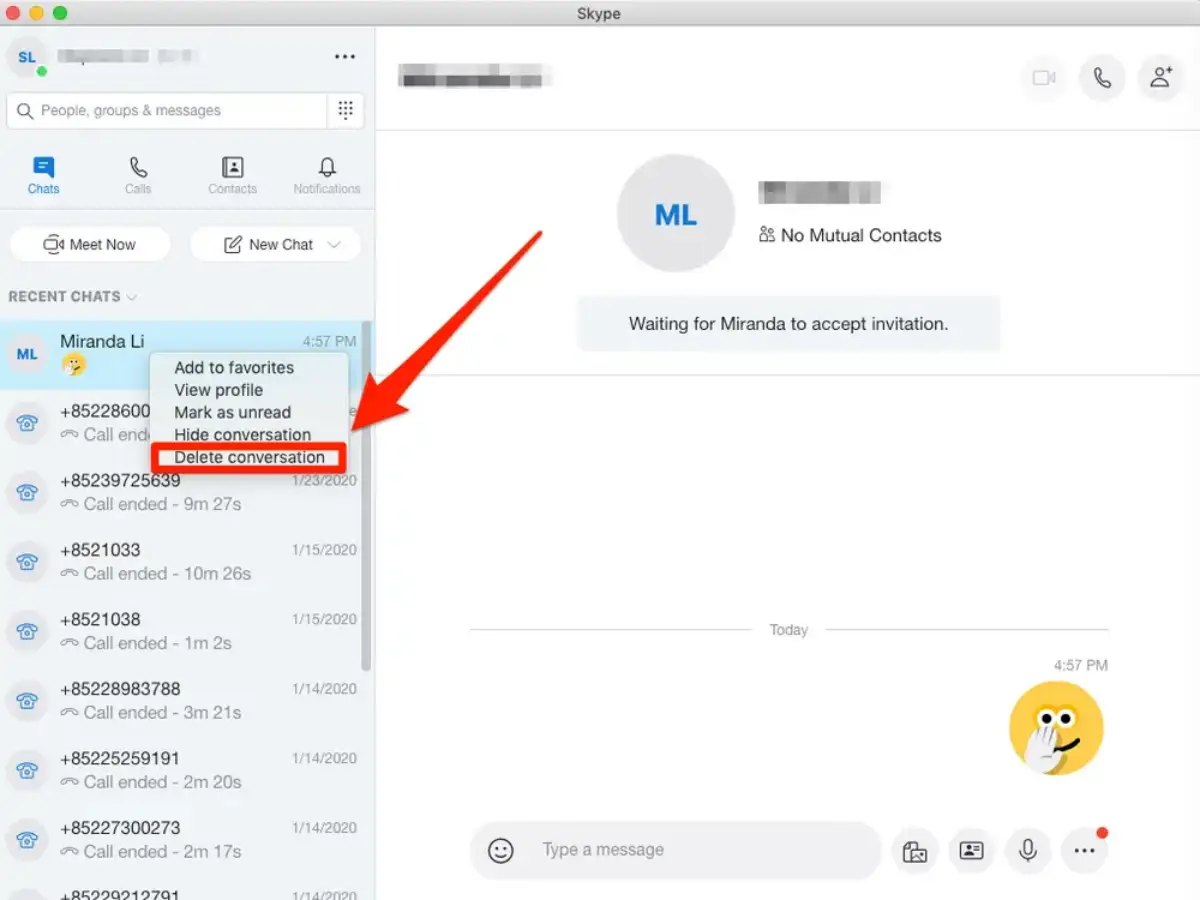
Deleting Conversations on Mac
If you’re using Skype on a Mac computer, you can easily delete conversations to keep your chat history organized. Follow these steps to delete conversations on Skype for Mac:
- Open the Skype application on your Mac computer.
- Sign in to your Skype account using your credentials.
- In the chat list, locate the conversation you want to delete.
- Right-click on the conversation or control-click it to open the contextual menu.
- From the menu, select the “Delete Conversation” option.
- A confirmation dialog box will appear asking if you want to delete the conversation. Click “Delete” to confirm.
Once you confirm the deletion, the conversation will be permanently removed from your Skype account on your Mac. It’s important to note that this action is irreversible, and the chat cannot be recovered.
With these simple steps, you can easily delete conversations on Skype for Mac. Whether you want to clear individual chats or remove multiple conversations, this method allows you to efficiently manage your chat history and keep your Skype account organized.
Deleting Conversations on Android
If you’re using Skype on an Android device, removing conversations is a straightforward process. Follow the steps below to delete conversations on Skype for Android:
- Open the Skype app on your Android device.
- Sign in to your Skype account if you haven’t done so already.
- In the chat list, locate the conversation you want to delete.
- Long-press on the conversation until a selection menu appears.
- Select the checkbox next to the conversation(s) you want to delete.
- Tap the trash bin icon or the “Delete” button at the top of the screen.
- A confirmation dialog will appear asking if you want to delete the selected conversation(s). Tap “Delete” to confirm.
Once you confirm the deletion, the conversation(s) will be permanently removed from your Skype account on your Android device. Please note that this action cannot be undone, and the chat cannot be recovered.
By following these simple steps, you can easily delete conversations on Skype for Android. Whether you want to clear individual chats or remove multiple conversations at once, this method allows you to efficiently manage your chat history and keep your Skype account organized.
Deleting Conversations on iOS
If you’re using Skype on an iOS device, deleting conversations is a simple process. Follow the steps below to delete conversations on Skype for iOS:
- Launch the Skype app on your iOS device.
- Sign in to your Skype account if you haven’t already.
- In the chat list, find the conversation you want to delete.
- Swipe left on the conversation until the “Delete” button appears on the right side.
- Tap the “Delete” button to remove the conversation.
- A confirmation message will appear asking if you want to delete the conversation. Tap “Delete” to confirm.
Once you confirm the deletion, the conversation will be permanently removed from your Skype account on your iOS device. It’s important to note that this action is irreversible, and the chat cannot be recovered.
By following these simple steps, you can easily delete conversations on Skype for iOS. Whether you want to clear individual chats or remove multiple conversations, this method allows you to efficiently manage your chat history and keep your Skype account organized.
Deleting Conversations on Web
If you use Skype on the web version, deleting conversations is a quick and easy process. Follow the steps below to delete conversations on Skype for Web:
- Open your preferred web browser and go to the Skype website.
- Sign in to your Skype account using your credentials.
- In the chat list, locate the conversation you want to delete.
- Hover your mouse over the conversation until a menu icon (three vertical dots) appears.
- Click on the menu icon and select the “Delete Conversation” option.
- A confirmation dialog will appear asking if you want to delete the conversation. Click “Delete” to confirm.
Once you confirm the deletion, the conversation will be permanently removed from your Skype account on the web. It’s important to note that this action is irreversible, and the chat cannot be recovered.
With these simple steps, you can easily delete conversations on Skype for Web. Whether you want to clear individual chats or remove multiple conversations, this method allows you to efficiently manage your chat history and keep your Skype account organized.
Clearing Skype Chat History
If you want to clear your entire Skype chat history, including all conversations and messages, there is a way to do so. Follow the steps below to clear your Skype chat history:
- Open the Skype application on your device.
- Sign in to your Skype account if you haven’t done so already.
- Click on your profile picture or avatar at the top left corner of the screen.
- In the drop-down menu, select “Settings” or “Options.”
- Look for the “Privacy” or “Privacy & Security” section.
- Find the option to “Clear chat history” or “Delete all chat history.”
- Click on this option to start the process of clearing your chat history.
- Depending on the size of your chat history, it may take a few moments to complete.
Once the process is complete, your entire Skype chat history will be cleared and deleted. It’s important to note that this action is irreversible, and all messages and conversations will be permanently removed from your Skype account.
Clearing your Skype chat history is a great option if you want to start fresh or if you value privacy and want to remove all traces of previous conversations. Just remember that once you clear your chat history, there’s no way to recover the deleted messages.
Preventing Skype from Saving Chat History
If you want to prevent Skype from saving your chat history altogether, there is a way to disable this feature. Follow the steps below to prevent Skype from saving your chat history:
- Open the Skype application on your device.
- Sign in to your Skype account if you haven’t already.
- Click on your profile picture or avatar at the top left corner of the screen.
- In the drop-down menu, select “Settings” or “Options.”
- Look for the “Privacy” or “Privacy & Security” section.
- Find the option to “Keep chat history” or “Save chat history.”
- Toggle off the switch or uncheck the box to disable the chat history feature.
- Save your changes, if necessary, and exit the settings menu.
Once you disable the chat history feature, Skype will no longer save your chat history on your device. It’s important to note that this action is irreversible, and any existing chat history on your device will be permanently deleted.
Disabling the chat history feature is useful if you value privacy and want to ensure that your conversations are not stored on your device or in the Skype cloud. However, keep in mind that by disabling this feature, you will not be able to access your chat history in the future.
If you change your mind and want to enable the chat history feature again, simply follow the same steps and toggle on the switch or check the box to save your chat history.