
Why You Should Delete Duplicate Contacts
Duplicate contacts can quickly clutter up your address book and make it difficult to find and reach the right people. While it may seem like a minor inconvenience, having duplicate contacts can lead to various problems and inefficiencies. Here are a few reasons why you should prioritize deleting duplicate contacts on your iPhone:
- Time-saving: Finding the right contact becomes time-consuming when you have multiple entries for the same person. By removing duplicates, you can streamline your address book and save valuable time.
- Reduced confusion: Duplicate contacts can create confusion when you’re trying to call or message someone. Having multiple entries for the same person can lead to accidental communication errors or overlooked important messages.
- Optimized organization: Your address book is designed to help you keep track of your contacts efficiently. Removing duplicate entries helps maintain a clean and organized structure, making it easier to locate and manage your contacts.
- Improved data accuracy: Duplicate contacts can lead to inconsistencies in contact details. For instance, different addresses or incorrect phone numbers can cause issues when you rely on your address book for communication or navigation purposes. Deleting duplicates ensures that your contact information remains accurate and up to date.
- Enhanced device performance: Large numbers of duplicate contacts can affect the performance of your iPhone. It can consume unnecessary storage space, strain the address book app, and impact overall device functionality. By removing duplicates, you can optimize your iPhone’s performance.
Now that you understand the importance of deleting duplicate contacts, it’s time to learn how to eliminate them efficiently. Whether you want to manually remove duplicates or use third-party apps, we’ve got you covered. Keep reading to find the method that suits you best.
How to Manually Delete Duplicate Contacts
If you prefer a hands-on approach, you can manually delete duplicate contacts on your iPhone. While this method requires some effort, it allows you to have complete control over the process. Here’s how you can do it:
- Open the Contacts app: Locate and launch the Contacts app on your iPhone. It usually comes pre-installed and can be easily accessed from the home screen.
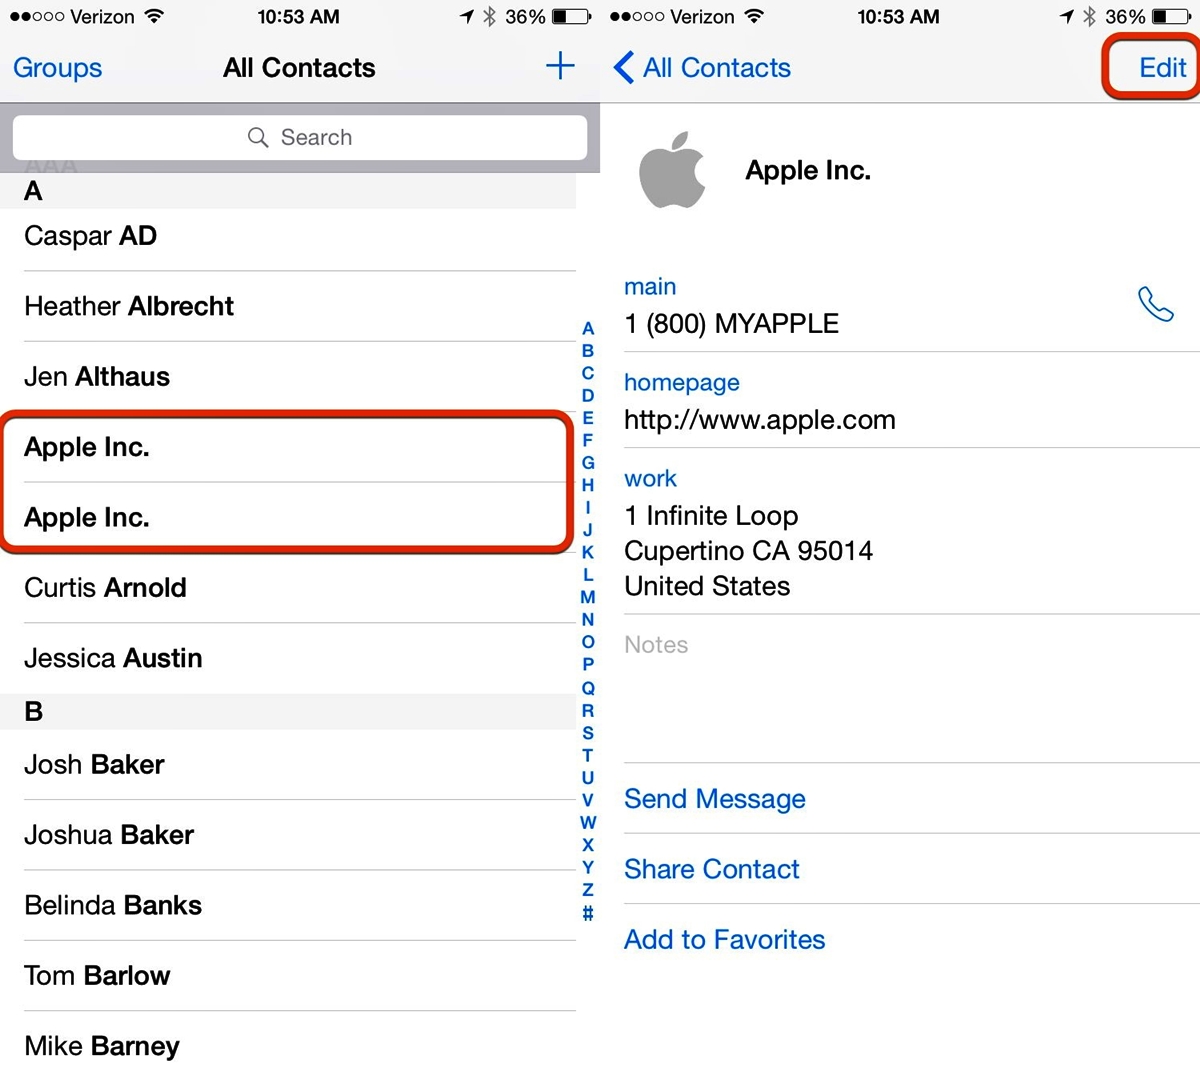
- Identify duplicate contacts: Scroll through your contacts list and look for entries that seem to be duplicates. Pay attention to names, phone numbers, and other contact details to identify potential matches.
- Select and merge contacts: Once you’ve identified duplicate contacts, tap on one of the duplicates to open its details. Then, tap on the “Edit” button in the top right corner. Scroll down and tap on the option “Link Contacts” or “Merge Contacts” (the exact wording may vary depending on your iOS version). Choose the duplicate contact you want to merge with the selected entry.
- Review and confirm: After linking or merging the contacts, review the merged details to ensure accuracy. Make any necessary changes or edits to ensure the merged contact has the correct information.
- Delete duplicate entries: Once you’ve successfully merged the contacts, return to your contacts list and locate the remaining duplicate entries. Repeat the linking and merging process until you have removed all duplicates from your address book.
Remember to exercise caution while manually deleting duplicate contacts, as accidentally merging or deleting the wrong entry can lead to data loss. Take your time and carefully review each step to ensure the process is carried out accurately.
Next, we’ll explore how you can leverage the built-in Contacts app features and iCloud to remove duplicate contacts automatically.
How to Use Built-in Contacts App to Remove Duplicates
Managing duplicate contacts on your iPhone becomes easier with the help of the built-in features of the Contacts app. Apple has introduced functionalities that allow you to identify and remove duplicate entries effortlessly. Follow these steps to utilize the built-in Contacts app to remove duplicates:
- Open the Contacts app: Launch the Contacts app on your iPhone by tapping on its icon from the home screen.
- Tap on “Groups”: At the top left corner of the app, tap on “Groups” to access the list of groups your contacts are organized into.
- Disable iCloud Contacts: Scroll down to locate the “iCloud” section and uncheck the box next to “Contacts.” This step ensures that you’re only viewing the contacts stored on your device and not those synced with iCloud.
- Select the “All Contacts” group: Go back to the list of groups and tap on “All Contacts” to display all the contacts stored on your device.
- Tap on “Edit”: In the top right corner, tap on the “Edit” button to enter the editing mode of the Contacts app.
- Scroll and identify duplicates: Scroll through the contacts list and look for potential duplicates. Pay attention to names, phone numbers, and other contact details to spot any duplicates.
- Select and merge contacts: When you find duplicate entries, tap on the contact you want to merge. Tap on the “Edit” button and scroll down to tap on “Link Contacts” or “Merge Contacts.” Choose the duplicate contact you want to merge with the selected entry.
- Review and confirm: After merging, review the merged contact details to ensure accuracy. Make any necessary edits or changes to ensure the merged contact contains the correct information.
- Delete remaining duplicates: Repeat the process for each duplicate entry until you have removed all duplicates from your address book.
The built-in Contacts app provides a convenient way to identify and merge duplicate contacts, streamlining the process and saving you valuable time. This approach is ideal for those who prefer using the native features of their iPhone to manage their contacts effectively.
In the next section, we will explore how you can utilize iCloud to remove duplicate contacts from your device.
How to Use iCloud to Remove Duplicate Contacts
If you have your contacts synced with iCloud, you can leverage this cloud-based service to remove duplicate contacts automatically. The iCloud Contacts feature allows you to merge and manage your contacts across multiple devices seamlessly. Follow these steps to use iCloud to remove duplicate contacts:
- Access iCloud on your computer: Open a web browser and go to iCloud.com. Sign in to your iCloud account using your Apple ID and password.
- Select “Contacts”: Once logged in, click on the “Contacts” icon to access your iCloud address book.
- Review and identify duplicates: Scroll through your contacts list and identify any potential duplicate entries. Pay attention to names, phone numbers, and other contact details to spot duplicates.
- Select duplicates: To select multiple contacts, hold down the “Ctrl” key (Windows) or the “Command” key (Mac) while clicking on the entries you want to merge.
- Merge selected contacts: After selecting the duplicate contact entries, click on the gear icon located at the bottom left corner of the screen. From the drop-down menu, click on “Merge Contacts” to merge the selected entries.
- Review and confirm: After merging, review the merged contact details to ensure accuracy. Make any necessary edits or changes to ensure the merged contact contains the correct information.
- Sync changes to your iPhone: Once you have finished merging and reviewing your contacts on iCloud, your changes will automatically sync to your iPhone. Open the Contacts app on your iPhone to verify that the duplicates have been removed.
Using iCloud to remove duplicate contacts provides a convenient way to manage your address book across multiple devices. By utilizing the cloud syncing capabilities of iCloud, you can ensure that your contacts stay consistent and up to date.
In the next section, we will explore how third-party apps can assist you in efficiently deleting duplicate contacts on your iPhone.
How to Use Third-Party Apps to Delete Duplicate Contacts
If you prefer a more automated and efficient approach to dealing with duplicate contacts, third-party apps can be a great solution. There are several apps available on the App Store that specialize in managing and removing duplicate contacts. Here’s how you can use third-party apps to delete duplicate contacts:
- Search for and install a duplicate contacts app: Open the App Store on your iPhone and search for “duplicate contacts” or “contact cleaner” apps. Read reviews and choose a reputable app that suits your needs. Install the selected app on your device.
- Open the duplicate contacts app: Once installed, launch the app on your iPhone.
- Grant necessary permissions: Follow the on-screen instructions to provide the app with the necessary permissions to access your contacts. This typically involves allowing the app to access your contacts and making changes to your address book.
- Scan for duplicate contacts: Use the app’s scanning feature to analyze your contacts and identify duplicates. The app will search for entries with similar names, phone numbers, or other contact details.
- Review and confirm: Once the scan is complete, the app will present you with a list of duplicate contacts. Review the list and confirm which duplicates you want to remove.
- Delete duplicate contacts: After confirming the duplicates for removal, tap on the option to delete them. The app will automatically delete the duplicate entries from your address book.
- Verify results: Open the Contacts app on your iPhone to ensure that the duplicate contacts have been successfully removed.
Using third-party apps can simplify the process of removing duplicate contacts on your iPhone. These apps often have advanced algorithms and features specifically designed to detect and remove duplicates efficiently.
In the next section, we will explore how you can prevent duplicate contacts from occurring in the future.
How to Prevent Duplicate Contacts in the Future
Preventing the occurrence of duplicate contacts in the future can save you time and frustration. Here are some effective strategies to help you avoid ending up with duplicate contacts on your iPhone:
- Consolidate contacts from various sources: If you have contacts stored in multiple accounts or sources, consider consolidating them into one central location. This helps minimize the risk of duplicates and makes it easier to manage your contacts.
- Regularly check for and merge duplicates: Develop a habit of regularly scanning your address book for duplicate entries. Manually merge them as soon as you spot duplicates to maintain a clean and organized contact list.
- Be mindful when syncing contacts: When syncing your contacts with various services or apps, double-check the settings to prevent unintended duplication. Ensure that you’re not unknowingly syncing duplicate contacts from different sources.
- Use contact management apps: Explore contact management apps that provide advanced features for deduplicating and managing contacts. These apps often come with intelligent algorithms that can automatically detect and merge duplicate entries.
- Avoid importing contacts multiple times: Exercise caution when importing contacts from different sources. Importing the same contacts multiple times can lead to duplicates. Be mindful of the sources you import from and ensure that you’re not importing contacts you already have.
- Regularly backup your contacts: Perform regular backups of your contacts to avoid any data loss that can result in duplicates. Having a recent backup allows you to restore your contacts if any duplicates accidentally occur or if you need to clean up your address book.
By implementing these prevention strategies, you can significantly reduce the likelihood of duplicate contacts appearing in the future. Maintaining a clean and organized address book enhances your productivity and ensures that you can easily reach the right people when needed.
Now that you know how to prevent duplicates, let’s move on to a bonus tip on how to merge duplicate contacts that might have slipped through the cracks.
Bonus Tip: How to Merge Duplicate Contacts
Even with the best prevention strategies, it’s possible that some duplicate contacts might still exist in your address book. To ensure a thorough cleanup, follow these steps to merge any remaining duplicate contacts:
- Open the Contacts app: Launch the Contacts app on your iPhone by tapping on its icon from the home screen.
- Search for duplicate contacts: Use the search bar at the top of the Contacts app to search for a specific contact name or details that might be associated with duplicates.
- Identify duplicate entries: Review the search results and identify any remaining duplicate entries for the same contact. Pay attention to names, phone numbers, and other contact details to ensure you’re merging the correct duplicates.
- Select and merge contacts: Tap on one of the duplicate contacts to view its details. Tap on the “Edit” button at the top right corner. Scroll down and tap on the option to “Link Contacts” or “Merge Contacts.” Choose the duplicate contact you want to merge with the selected entry.
- Review and confirm: After merging, review the merged contact details to ensure accuracy. Make any necessary changes or edits to ensure the merged contact has the correct information.
- Repeat the process: Continue searching for and merging duplicate contacts until you have thoroughly checked and merged all potential duplicates.
Merging duplicate contacts ensures that all relevant information is consolidated into a single entry, reducing clutter in your address book. Taking the time to merge any remaining duplicates provides a final touch to the cleanup process.
Congratulations! You have now learned various methods to delete, merge, and prevent duplicate contacts on your iPhone, ensuring a streamlined and organized address book.
Remember to regularly maintain and update your contacts to keep them accurate and up to date. With these strategies and tips, you can efficiently manage your contacts and enjoy a more seamless communication experience on your iPhone.