
Finding the Downloads folder on your Mac
When you download files on your Mac, they are typically saved to the Downloads folder by default. This folder serves as a centralized location where all your downloaded files accumulate. Whether you are new to using a Mac or simply unsure of where to find this folder, don’t worry – it’s easy to locate.
To access the Downloads folder on your Mac, follow these simple steps:
- Open a Finder window by clicking on the Finder icon in your dock, or by pressing Command + Space and typing “Finder.”
- In the Finder window, click on “Go” in the top menu bar.
- From the drop-down menu, click on “Downloads.”
Alternatively, you can also access the Downloads folder by clicking on the “Downloads” shortcut in the sidebar of any Finder window, or by pressing Command + Option + L.
Once you have located the Downloads folder, you will see all the files you have downloaded. This folder is typically organized by date, with the most recent downloads appearing first. If you have a large number of files in your Downloads folder, it may be useful to sort them by name, size, or other criteria to help you find specific files more easily.
Remember, the Downloads folder is not limited to just files you intentionally downloaded. It may also contain files that were automatically saved through various applications or browser settings. Keep this in mind when searching for specific files within the Downloads folder.
Now that you have found the Downloads folder on your Mac, you can start managing and deleting unwanted files to keep your system organized and free up storage space. In the next section, we will explore different methods for deleting files from the Downloads folder.
Deleting individual files from your Downloads folder
Over time, your Downloads folder can become cluttered with files you no longer need. To keep your Mac organized and free up storage space, it’s important to regularly delete unwanted files from your Downloads folder. Here are a few methods you can use to delete individual files:
- Navigate to the Downloads folder on your Mac as described in the previous section.
- Once you are in the Downloads folder, you can either:
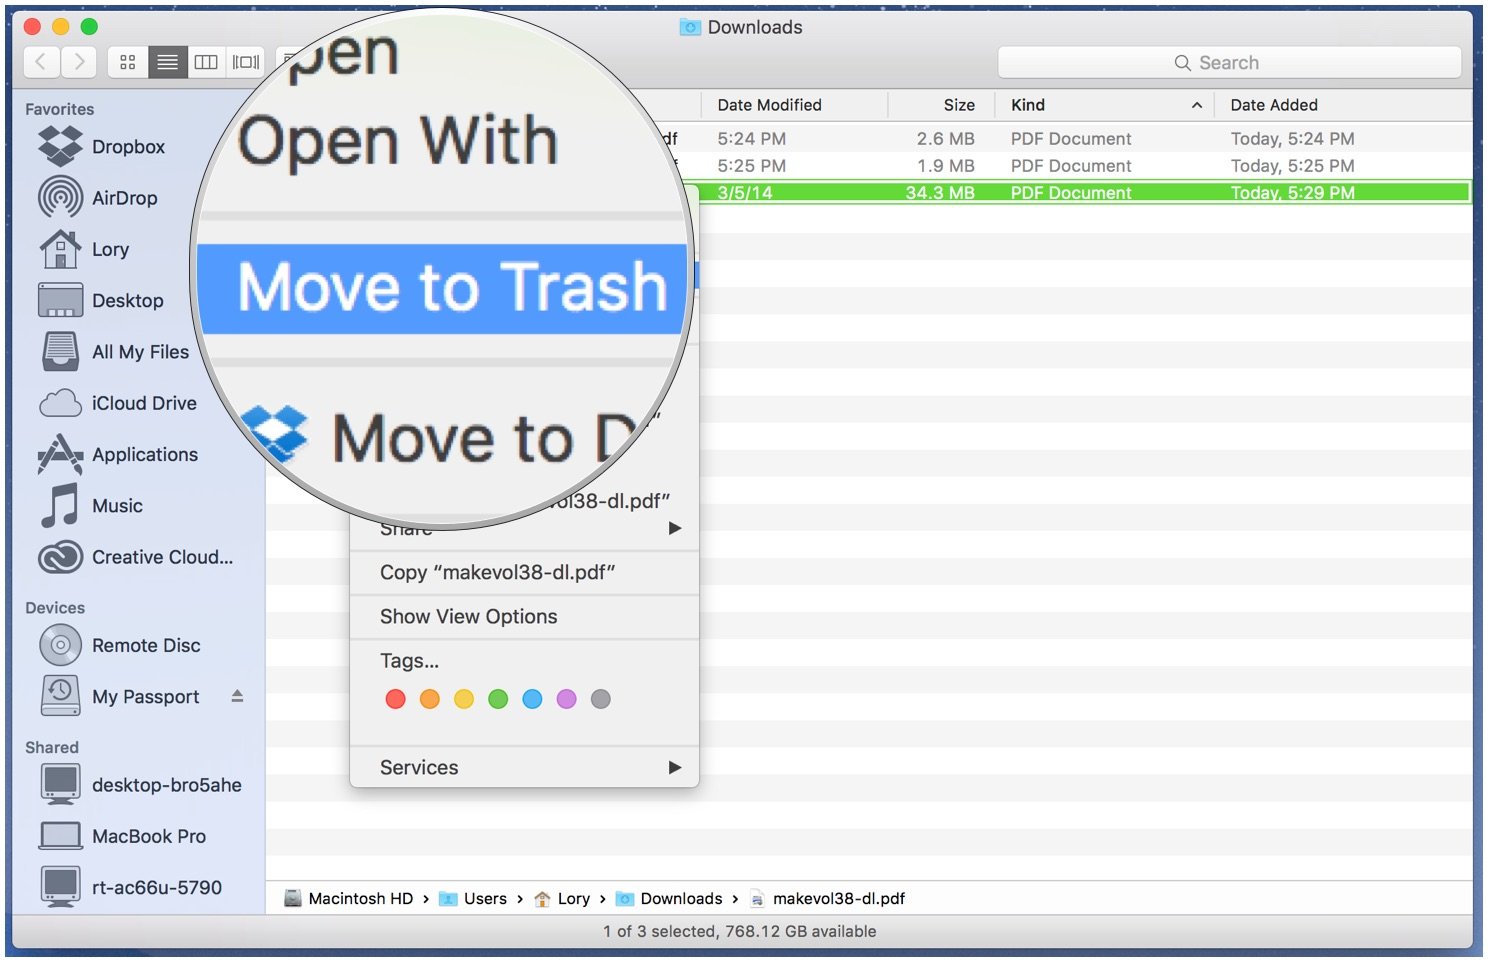
- Manually select the files you wish to delete by clicking and dragging to highlight them, then either right-click and select “Move to Trash” or press Command + Delete on your keyboard.
- Alternatively, you can individually right-click on a file and select “Move to Trash” from the context menu.
- Another method is to select a file and press Command + Delete on your keyboard to instantly move it to the Trash.
- Once you have moved the desired files to the Trash, you can empty the Trash by right-clicking on the Trash icon in your dock and selecting “Empty Trash.” This will permanently delete the files from your system.
It’s important to note that when you delete a file from your Downloads folder, it is moved to the Trash and still takes up storage space on your Mac. To completely free up the space, remember to empty the Trash.
If you accidentally delete a file and want to recover it, you can retrieve it from the Trash before emptying it. Simply open the Trash, locate the file, right-click on it, and select “Put Back.” The file will be restored to its original location in the Downloads folder.
Deleting individual files from your Downloads folder is a simple and effective way to keep your Mac organized and prevent it from becoming cluttered with unnecessary files. However, if you have a large number of files to delete or want to clear out your Downloads folder more efficiently, you may want to consider emptying the entire folder at once, which we will explore in the next section.
Emptying the entire Downloads folder at once
If your Downloads folder is filled with a large number of files or if you simply want to clear out the entire folder quickly, you can choose to empty the Downloads folder all at once. Here’s how:
- Navigate to the Downloads folder on your Mac using one of the methods mentioned earlier.
- Once you are in the Downloads folder, select all the files by pressing Command + A on your keyboard or by choosing “Select All” from the Edit menu.
- With all the files selected, either right-click on one of the selected files and choose “Move to Trash” from the context menu, or press Command + Delete on your keyboard.
- The selected files will be moved to the Trash. To completely free up storage space on your Mac, remember to empty the Trash. You can do this by right-clicking on the Trash icon in your dock and selecting “Empty Trash.”
It’s important to note that by emptying the entire Downloads folder, you will permanently delete all the files it contains. Therefore, make sure to double-check that you don’t need any of the files before proceeding with this method.
Emptying the entire Downloads folder at once is a convenient way to quickly declutter your Mac and regain storage space. However, if you find yourself needing to delete files from your Downloads folder frequently, you might want to consider setting up an automatic deletion system, which we will cover in the next section.
Setting up auto-delete for the Downloads folder
If you frequently download files and want to keep your Downloads folder organized without manual intervention, you can set up an automatic deletion system. This will help ensure that your Downloads folder doesn’t accumulate unnecessary files over time. Follow these steps to configure auto-delete for the Downloads folder:
- Open a Finder window and navigate to the Downloads folder on your Mac.
- Click on “View” in the top menu bar and select “Show View Options.”
- In the View Options window, enable the “Arrange by” option and choose “Date Added” from the drop-down menu.
- Check the “Sort by” option and select “Ascending” to organize files from oldest to newest.
- Click on the drop-down menu next to “Arrange” and select “Date Added.”
- Now, the files in your Downloads folder will be sorted by date, with the oldest files appearing first.
- To set up auto-delete, click on the gear icon at the top of the Finder window and select “New Smart Folder.”
- In the Smart Folder window, click on the “+” button in the top-right corner to add a search criterion.
- In the search criterion, choose “Date Added” from the first drop-down menu and select “is before” from the second drop-down menu.
- Adjust the date accordingly to specify how long you want files to remain in the Downloads folder before being automatically deleted.
- Click “Save” to create the smart folder.
- Now, any files that match the specified date criterion will automatically appear in the smart folder.
- To delete these files, simply select them and move them to the Trash.
By setting up auto-delete for the Downloads folder, you can ensure that files older than a certain date are automatically removed, reducing clutter and freeing up storage space on your Mac. This provides a hassle-free way of managing your Downloads folder without manual intervention.
If you prefer to use third-party software to manage your downloads and automate the deletion process, continue reading the next section for more information.
Using third-party software to manage your downloads
If you find yourself frequently downloading files and want more advanced options for managing your downloads, you can consider using third-party software specifically designed for this purpose. These applications offer additional features and customization options to streamline the download process and help you efficiently organize and delete files from your Downloads folder. Here are a few popular choices:
- CleanMyMac X: This comprehensive Mac maintenance tool not only helps you manage your downloads but also offers a range of other useful features. With CleanMyMac X, you can easily delete unnecessary files from your Downloads folder, freeing up valuable storage space with just a few clicks.
- AppCleaner: AppCleaner is a lightweight application that allows you to uninstall apps completely, including all associated files and folders. It also conveniently helps you manage your Downloads folder by locating and removing leftover files from deleted applications.
- Download Shuttle: Download Shuttle is a lightweight download manager that allows you to queue, pause, and resume downloads. It provides a clean and intuitive interface, making it easy to organize and manage your downloaded files. With the ability to set custom download folders, you can keep your Downloads folder clean and organized.
These are just a few examples of the many third-party software options available for managing your downloads on a Mac. Each application offers its unique set of features and benefits, so take the time to explore and find the one that best suits your needs.
Using third-party software can enhance your download management experience and provide you with a more efficient and organized way to handle your downloaded files. Whether you prefer a comprehensive maintenance tool or a lightweight download manager, there is sure to be a solution that meets your requirements.
Now that you have explored various methods for managing and deleting files from your Downloads folder, you can choose the approach that fits your workflow and preferences best. Whether you decide to manually delete files, empty the entire folder, set up auto-delete, or use third-party software, keeping your Downloads folder organized will help maintain an efficient and clutter-free Mac experience.