
Why is there a blank page?
Dealing with a blank page in a Word document can be frustrating. You may wonder how it got there in the first place and why it’s not easily deleted. Understanding the reasons behind the appearance of blank pages can help you tackle the issue effectively. Here are some possible explanations:
1. Hidden formatting: Sometimes, hidden formatting elements, such as spaces, page breaks, or section breaks, can cause a blank page to appear. These elements may have been inadvertently inserted while editing the document, resulting in an empty page.
2. Unintentional page breaks: Accidental page breaks, such as pressing the Enter key multiple times or using the “Page Break” function without realizing it, can create an empty page. It’s important to be mindful of these actions to prevent unintended blank pages.
3. Content overflow: If the content on the previous page extends beyond the margins, Word automatically adds a new page to accommodate the excess content. This can lead to an empty page if the document formatting is not adjusted properly.
4. Template issues: Some document templates may include default blank pages, particularly at the beginning or end of the document. These blank pages are designed for additional content or printing purposes, but they can be problematic when you need to get rid of them.
Now that you have an understanding of why a blank page may appear, let’s explore various methods to delete those pesky empty pages and get your Word document back to its desired format.
Method 1: Deleting a blank page using the Backspace key
If you have a blank page at the end of your Word document, one simple method to remove it is by using the Backspace key. Here’s how:
1. Place your cursor at the very end of the last content-filled page in your document. Ensure that there are no hidden formatting elements or page breaks after this point.
2. Press the Backspace key on your keyboard while holding down the Shift key. This combination will delete the blank page without affecting any other content or formatting in your document.
3. Repeat the Backspace + Shift key combination until the blank page is completely removed. Make sure to stop once your cursor reaches the end of the content on the previous page to avoid accidental deletion of important information.
Keep in mind that this method is most effective for removing a single blank page at the end of your document. If you encounter a blank page in another part of your document, try one of the alternative methods mentioned later in this article.
Deleting a blank page using the Backspace key is a quick and straightforward solution. However, it’s essential to double-check your document’s formatting and content to ensure the blank page doesn’t reappear due to hidden elements or other issues. Let’s explore other methods to delete blank pages in case the Backspace method doesn’t work for your specific situation.
Method 2: Selecting and deleting the blank page
If you have a blank page that is not at the end of your Word document, you can try selecting and deleting it using the selection tool. Follow these steps:
1. Position your cursor at the beginning of the blank page, just before any visible content.
2. Hold down the Shift key on your keyboard and then press the down arrow. This action will select the entire content of the blank page.
3. Once the blank page is selected, press the Delete key on your keyboard. The selected page will be removed from your document.
If the above steps don’t work, there might be hidden formatting elements or page breaks causing the blank page. In such cases, it’s advisable to reveal the formatting marks in Word to identify and delete the problematic elements. Here’s how:
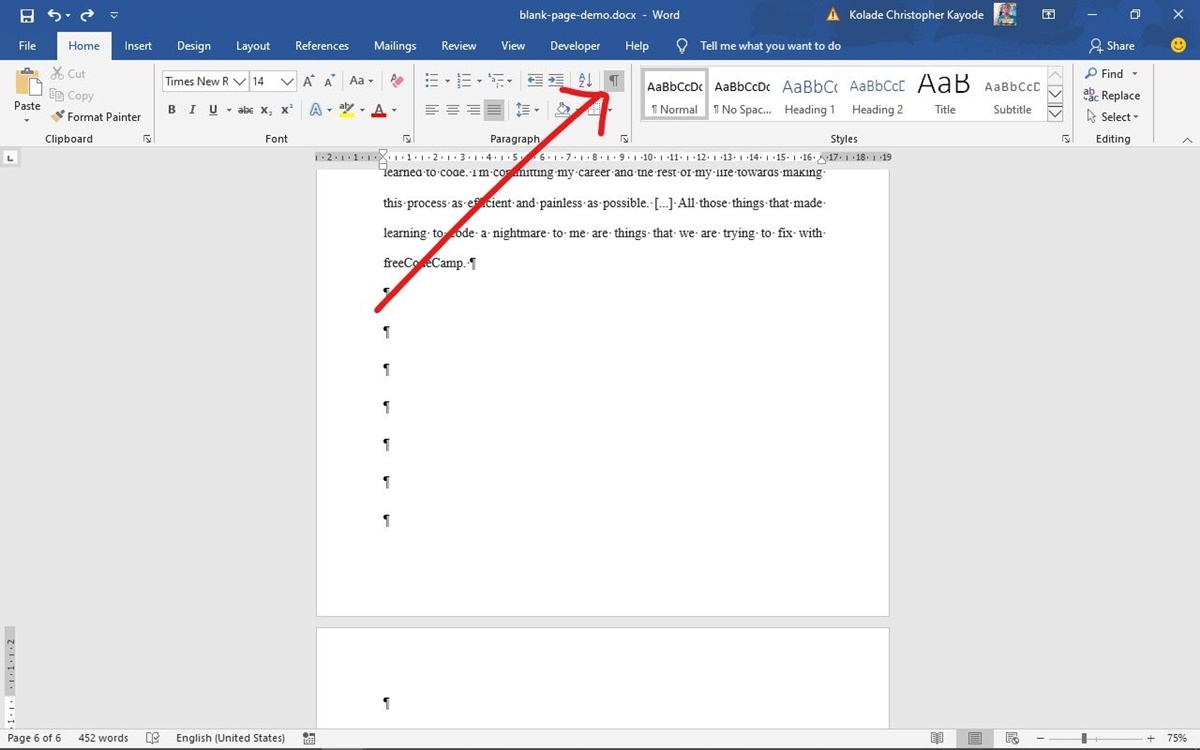
1. Go to the “Home” tab in the ribbon at the top of the Word window.
2. Click on the symbol that resembles a paragraph mark (¶) in the “Paragraph” section. This will display the formatting marks, including page breaks and other hidden elements.
3. Inspect the area where the blank page is located. Look for any unnecessary page breaks or large gaps between paragraphs, as these may be causing the blank page.
4. Delete any extra page breaks or adjust the spacing between paragraphs to remove the blank page. Make sure to turn off the display of formatting marks afterward by clicking on the paragraph mark symbol again.
By selecting and deleting the blank page or revealing and removing hidden formatting elements, you can effectively get rid of unwanted empty pages in your Word document. If these methods don’t work, don’t worry! There are still more techniques to explore in the following sections.
Method 3: Deleting a blank page using the Navigation pane
If you’re dealing with a blank page that is neither at the end of your Word document nor easily selectable, using the Navigation pane can be a handy solution. Here’s how to delete a blank page using the Navigation pane:
1. Open the Navigation pane by clicking on the “View” tab in the ribbon at the top of the Word window and checking the box next to “Navigation Pane” in the “Show” section.
2. In the Navigation pane, click on the “Pages” tab to view a thumbnail of each page in your document.
3. Look for the blank page you want to delete in the list of thumbnails. Open that page by clicking on its corresponding thumbnail.
4. Once the blank page is open, place your cursor at the beginning of the page, just before any visible content.
5. Press the Backspace key on your keyboard to delete the blank page. Ensure that you don’t delete any necessary content on the previous page.
If the Navigation pane doesn’t display the blank page thumbnail, it may be because the blank page is a result of hidden formatting elements or other issues. In such cases, consider using the other methods mentioned in this article to remove the page.
The Navigation pane offers a convenient way to navigate through your document and delete specific pages, including blank ones. It can be particularly useful for documents with a large number of pages where manually scrolling may be time-consuming. Let’s continue exploring more methods to tackle blank pages in Word.
Method 4: Adjusting the page margins to delete the blank page
If you’re unable to delete a stubborn blank page in Word using the previous methods, adjusting the page margins might just do the trick. Here’s how you can remove a blank page by tweaking the page margins:
1. Open the document that contains the blank page in Word.
2. Go to the “Layout” tab in the ribbon at the top of the Word window.
3. Click on the “Margins” button in the “Page Setup” section. A drop-down menu will appear.
4. From the drop-down menu, select the “Custom Margins” option. This will open the “Page Setup” dialog box.
5. In the “Page Setup” dialog box, adjust the top and bottom margins to reduce the overall page size. Decrease the margins by a small value, such as 0.1 or 0.2 inches.
6. Click on the “OK” button to apply the new margin settings to your document.
7. Check if the blank page has been automatically removed. If not, repeat the process and further decrease the margins until the blank page is eliminated.
By adjusting the page margins, you essentially make the content on each page occupy more space and eliminate any excess that may be causing the blank page. It’s important to note that this method may affect the overall layout of your document, so be sure to review and adjust it accordingly.
If the blank page persists even after adjusting the margins, consider exploring other methods mentioned in this article to solve the issue. The goal is to find the most effective method that works for your specific document and eliminate any unwanted blank pages.
Method 5: Deleting a blank page by revealing formatting marks
When dealing with a stubborn blank page in Word, revealing formatting marks can help identify hidden elements that may be causing the issue. Follow these steps to delete a blank page by revealing formatting marks:
1. Open the document in which the blank page is located in Word.
2. Go to the “Home” tab in the ribbon at the top of the Word window.
3. Click on the symbol that resembles a paragraph mark (¶) in the “Paragraph” section. This will reveal the formatting marks, including page breaks, spaces, and other hidden elements.
4. Carefully inspect the area where the blank page is located. Look for any unexpected page breaks, large spaces between paragraphs, or other unnecessary formatting marks that may be causing the blank page.
5. Once you identify any problematic formatting marks, delete them accordingly. Make sure not to remove any necessary content or formatting from your document.
6. After deleting the unwanted formatting marks, click on the paragraph mark symbol again to hide the formatting marks and revert to the normal view.
Revealing formatting marks allows you to see the underlying structure of your Word document and identify any hidden elements that may be causing the appearance of blank pages. By deleting the unnecessary formatting marks, you can effectively remove the blank page from your document.
If the blank page still persists after revealing and removing the formatting marks, consider exploring other methods mentioned in this article to resolve the issue. Each document can have complex formatting elements, and it may require a combination of methods to successfully delete the blank page.
Method 6: Clearing manual page breaks to delete the blank page
If you’re confronted with a blank page that seems to be caused by a manual page break, clearing it can easily resolve the issue. Here’s how you can delete a blank page by removing manual page breaks:
1. Open the Word document containing the blank page.
2. Make sure that the formatting marks, including page breaks, are visible. To display them, click on the symbol that resembles a paragraph mark (¶) in the “Paragraph” section on the “Home” tab.
3. Scroll to the blank page and identify the manual page break marker, which looks like a horizontal line across the page.
4. Position your cursor just before the manual page break marker on the blank page.
5. Press the Delete key on your keyboard to remove the manual page break. This action will merge the content from the previous page with the blank page, effectively deleting it.
6. Once you’ve deleted the manual page break, you can hide the formatting marks by clicking on the paragraph mark symbol again.
Clearing manual page breaks helps remove unwanted blank pages caused by intentional or accidental page breaks. However, it’s important to double-check your document’s layout and formatting to ensure that removing the page break doesn’t disrupt the content flow or formatting of the document.
If the blank page persists, consider exploring other methods mentioned in this article or seeking additional support to troubleshoot the underlying cause of the blank page. Understanding the source of the problem can help you find the most effective solution.
Method 7: Deleting a blank page by using the Go To feature
If you’re unable to locate the blank page visually, you can utilize the “Go To” feature in Word to navigate directly to it. Here’s how you can delete a blank page using the Go To feature:
1. Open the Word document that contains the blank page.
2. Press the Ctrl + G keys on your keyboard (or go to the “Home” tab and click on the “Find” button in the “Editing” section, then select “Go To” from the dropdown menu).
3. In the “Go To” dialog box that appears, type “page” in the “Enter page number” field.
4. Enter the page number of the blank page you want to delete and click on the “Go To” button.
5. Word will navigate to the specified page. Check if it is indeed a blank page without any visible content.
6. Once you confirm that the page is blank, place your cursor at the beginning of the page.
7. Press the Backspace or Delete key on your keyboard to remove the entire blank page.
The Go To feature allows you to jump directly to a specific page in your Word document, making it easier to locate and delete a blank page that may not be easily visible. If the blank page is still persisting, consider trying other methods mentioned in this article to resolve the issue.
Remember to double-check your document layout, formatting, and content flow after removing the blank page to ensure there are no unintended disruptions. With the Go To feature, you can efficiently navigate to the exact location of the blank page and remove it from your Word document.
Method 8: Deleting a blank page through Print Layout View adjustment
If you’re still unable to delete a stubborn blank page through the previous methods, adjusting the Print Layout View can help you identify and remove it. Here’s how you can delete a blank page by adjusting the Print Layout View:
1. Open the Word document containing the blank page.
2. Go to the “View” tab in the ribbon at the top of the Word window.
3. In the “Views” section, click on the “Print Layout” button to switch to the Print Layout View. This view displays your document as it would appear when printed.
4. Scroll through the document to locate the blank page. Pay attention to the page breaks and content placement.
5. If you see any excessive white space or gaps on a page, it might be the blank page you’re trying to remove.
6. Adjust the placement of content and formatting to ensure that the blank page is eliminated. You can try resizing images, adjusting text alignment, or removing unnecessary spaces to fill the page.
7. Once you’ve made the necessary adjustments, check if the blank page is no longer present in the Print Layout View.
By switching to Print Layout View and adjusting the content and formatting, you can identify and remove the blank page that may not be easily noticeable in other views. Ensure that the adjustments you make do not disrupt the overall document layout and flow.
If the blank page still persists, consider exploring other methods mentioned in this article or seeking further assistance to troubleshoot the underlying cause of the blank page. Each document can have unique formatting elements that require specific solutions to resolve the issue.
Additional tips to avoid blank pages in the future
Preventing the occurrence of blank pages in your Word documents can save you time and frustration. Here are some additional tips to help you avoid blank pages in the future:
1. Be mindful of page breaks: Pay attention to where you insert manual page breaks in your document. Ensure that they align with your desired page layout and content flow.
2. Check for hidden formatting elements: Keep an eye out for hidden formatting elements, such as extra spaces, unnecessary page breaks, or excessive paragraph spacing, that can unintentionally create blank pages. Regularly review and clean up your document formatting.
3. Use section breaks wisely: Section breaks can be useful for differentiating sections with unique formatting, headers, or footers. However, improper placement or overuse of section breaks can result in unexpected blank pages. Use section breaks strategically and adjust them as needed.
4. Preview your documents before printing: Previewing your document before printing can help you identify any potential blank pages and make necessary adjustments to your layout or content to ensure a smooth printing experience.
5. Print a test page: If you frequently encounter blank pages when printing, consider printing a test page to ensure that your document is formatted correctly. This can help you catch any formatting issues before printing the entire document.
6. Save and backup your work: Regularly saving your work and maintaining backups can be a lifesaver in case of accidental deletions or formatting errors that result in blank pages. It provides you with a safety net to revert to a previous version of the document if needed.
By following these additional tips, you can minimize the occurrence of blank pages in your Word documents and enhance your overall document editing and formatting experience. Remember to stay vigilant, review your formatting, and make necessary adjustments to ensure a seamless document flow without any unwanted empty pages.