
Why Should You Deactivate Facebook on iPhone?
Facebook has become an integral part of our lives, allowing us to connect with friends, share updates, and discover new content. However, there are several reasons why you might consider deactivating your Facebook account, especially when using it on your iPhone. Let’s explore a few of these reasons:
- Privacy Concerns: Facebook has faced criticism regarding the handling of user data and privacy issues. If you have concerns about your personal information being shared or accessed by third parties, deactivating your account can give you peace of mind.
- Distraction and Time Management: Facebook can be a major source of distraction, taking up significant chunks of your time. By deactivating your account on your iPhone, you can regain control over your time, be more productive, and focus on other tasks or activities.
- Mental Health: The constant stream of information, news, and updates on Facebook can sometimes take a toll on mental health. Deactivating your account can help reduce anxiety, comparison, and the pressure of constantly being connected.
- Improved Focus: Notifications from Facebook on your iPhone can interrupt your workflow and concentration. By deactivating your account, you can eliminate these distractions and create a more focused environment for work, studying, or other important activities.
- Reduced Social Pressure: Social media can sometimes create a sense of pressure to maintain a certain image, have a certain number of likes, or keep up with the posts of others. Deactivating Facebook on your iPhone allows you to step away from this pressure and embrace a more authentic and less competitive social experience.
While deactivating your Facebook account on your iPhone might seem daunting, it can have numerous benefits for your well-being and productivity. Now, let’s dive into the step-by-step process of deactivating Facebook on your iPhone.
Step 1: Update Facebook App
Before you proceed with deactivating your Facebook account on your iPhone, it’s recommended to ensure that you have the latest version of the Facebook app installed. Updating the app ensures that you have access to all the necessary features and a smooth deactivation process. Here’s how you can update the Facebook app on your iPhone:
- Open the App Store: Tap on the App Store icon on your iPhone’s home screen.
- Search for Facebook: In the App Store’s search bar, type “Facebook” and tap the search button.
- Find the Facebook App: Locate the Facebook app from the search results and tap on it.
- Update the App: If an update is available, you will see an “Update” button. Tap on it to download and install the latest version of the Facebook app.
- Enter Your Apple ID Password: If prompted, enter your Apple ID password or use Touch ID/Face ID to authorize the app update.
- Wait for the Update to Complete: The update process may take a few moments to complete, depending on your internet connection. Ensure that you have a stable internet connection during the update.
- Open the Updated Facebook App: Once the update is finished, you can open the updated Facebook app on your iPhone.
Updating the Facebook app on your iPhone ensures that you have the latest features and bug fixes, providing a seamless experience during the deactivation process. Now that you have updated the app, let’s move on to the next step of logging out of your Facebook account.
Step 2: Log out of Facebook
Before proceeding with deactivating your Facebook account on your iPhone, it’s important to log out of your account to ensure that you are not actively using the app. Here are the steps to log out of Facebook on your iPhone:
- Open the Facebook App: Tap on the Facebook app icon on your iPhone’s home screen to open it.
- Go to the Menu: In the bottom right corner of the app, you will see three horizontal lines. Tap on these lines to open the Facebook menu.
- Scroll Down and Tap on “Settings & Privacy”: Scroll down the menu until you see the “Settings & Privacy” option. Tap on it to access the settings.
- Select “Settings”: On the “Settings & Privacy” screen, tap on the “Settings” option to proceed.
- Tap on “Security & Login”: In the settings menu, you will see the “Security & Login” option. Tap on it to continue.
- Find the “Where You’re Logged In” Section: Scroll down until you find the “Where You’re Logged In” section. This will display a list of devices where you are currently logged in.
- Tap on “See More”: To view the full list of logged-in devices, tap on the “See More” option.
- Tap on the Three Dots: Next to your iPhone device listing, you will see three dots. Tap on them to open additional options.
- Choose “Log Out”: From the options that appear, select “Log Out” to log out of your Facebook account on your iPhone.
- Confirm Log Out: A pop-up window will appear asking for confirmation. Tap on “Log Out” to confirm and log out of your Facebook account.
Logging out of your Facebook account on your iPhone ensures that you are not actively using the app and allows you to proceed with the deactivation process smoothly. The next step involves deactivating your Facebook account. Let’s dive in!
Step 3: Deactivate Your Facebook Account
Now that you have logged out of your Facebook account on your iPhone, you are ready to proceed with deactivating your account. Deactivating your Facebook account temporarily disables it and hides your profile from other users. Here’s how you can deactivate your Facebook account on your iPhone:
- Open the Facebook App: Tap on the Facebook app icon on your iPhone’s home screen to open it.
- Go to the Menu: In the bottom right corner of the app, tap the three horizontal lines to open the Facebook menu.
- Scroll Down and Tap on “Settings & Privacy”: Scroll down the menu and tap on the “Settings & Privacy” option to access the settings.
- Select “Settings”: On the “Settings & Privacy” screen, tap on the “Settings” option to proceed.
- Tap on “Account Ownership and Control”: In the settings menu, you will find the “Account Ownership and Control” section. Tap on it to continue.
- Tap on “Deactivation and Deletion”: Under the “Account Ownership and Control” section, select “Deactivation and Deletion” to access the deactivation options.
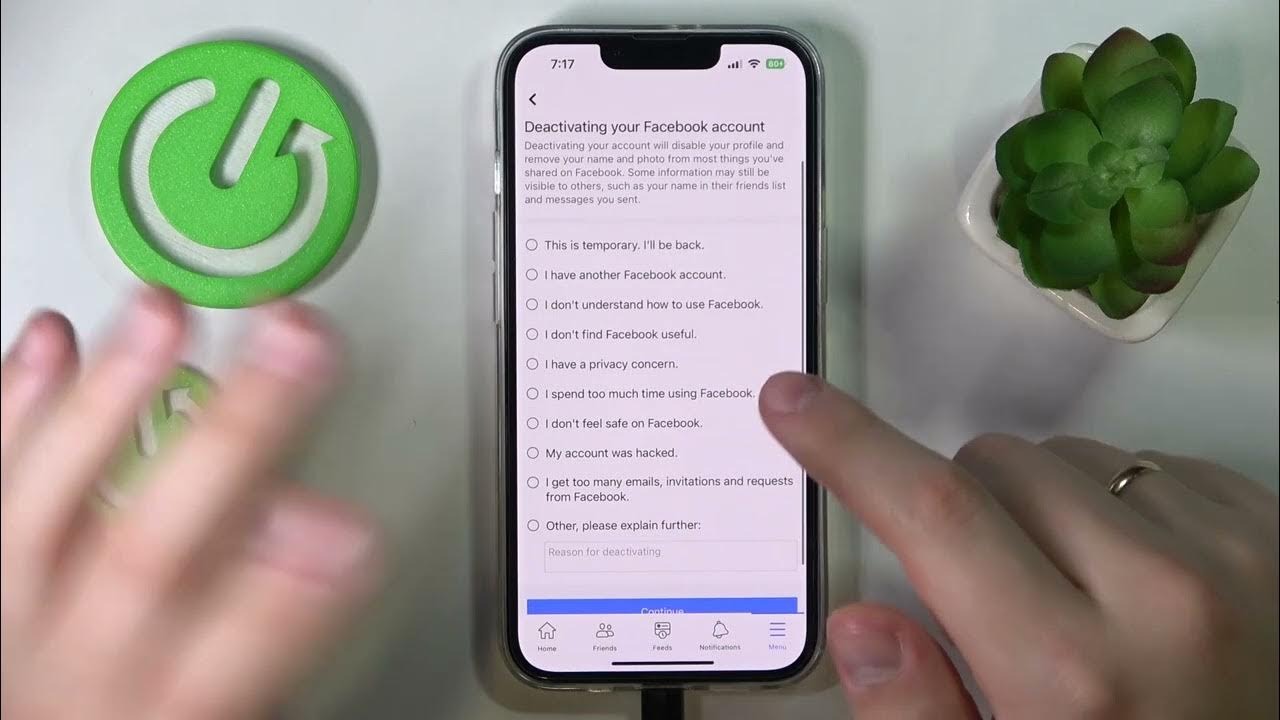
- Choose “Deactivate Account”: On the “Deactivation and Deletion” screen, tap on the “Deactivate Account” option to initiate the deactivation process.
- Provide a Reason: Facebook will ask you to select a reason for deactivating your account. Choose the reason that best represents your decision.
- Enter Your Facebook Password: To confirm your identity and the deactivation request, enter your Facebook account password when prompted.
- Tap on “Continue” or “Deactivate”: Depending on the version of the Facebook app, you may see either “Continue” or “Deactivate” as the final option. Tap on it to proceed and confirm the deactivation of your Facebook account.
Once you have completed these steps, your Facebook account will be deactivated, and your profile will be hidden from other users. It is important to note that deactivation is temporary, and you can reactivate your account at any time by logging back in. Now that you have deactivated your Facebook account, let’s move on to the next step of confirming the deactivation.
Step 4: Confirm Deactivation
After deactivating your Facebook account on your iPhone, it’s crucial to confirm the deactivation to ensure that your account is successfully deactivated. The confirmation process ensures that you have intentionally deactivated your account and verifies the deactivation. Here’s how you can confirm the deactivation of your Facebook account:
- Open the Facebook App: Tap on the Facebook app icon on your iPhone’s home screen to open it.
- Go to the Menu: In the bottom right corner of the app, tap the three horizontal lines to open the Facebook menu.
- Scroll Down and Tap on “Settings & Privacy”: Scroll down the menu and tap on the “Settings & Privacy” option to access the settings.
- Select “Settings”: On the “Settings & Privacy” screen, tap on the “Settings” option to proceed.
- Tap on “Account Ownership and Control”: In the settings menu, you will find the “Account Ownership and Control” section. Tap on it to continue.
- Tap on “Deactivation and Deletion”: Under the “Account Ownership and Control” section, select “Deactivation and Deletion” to access the deactivation options.
- Verify Deactivation: On the “Deactivation and Deletion” screen, you will see a message confirming the deactivation of your account. This message serves as a confirmation that your account is now deactivated.
By following these steps, you have successfully confirmed the deactivation of your Facebook account on your iPhone. Take a moment to ensure that you have received the confirmation message. Keep in mind that while your account is deactivated, your profile will not be visible to other users. However, certain information, such as messages you have sent, may still be visible to recipients. Now that you have confirmed the deactivation, let’s move on to the next step of deleting the Facebook app from your iPhone.
Step 5: Delete Facebook App
Once you have successfully deactivated your Facebook account, you may choose to take an additional step by deleting the Facebook app from your iPhone. Deleting the app removes it from your device, freeing up storage space and further minimizing your interaction with the platform. Follow these steps to delete the Facebook app:
- Find the Facebook App Icon: Locate the Facebook app on your iPhone’s home screen. It is represented by a blue square with a white lowercase “f” inside.
- Press and Hold the Facebook App Icon: Tap and hold your finger on the Facebook app icon until all the app icons on your home screen start to wiggle.
- Tapping the “X” Icon: A small “X” will appear on the upper-left corner of the Facebook app icon. Tap on this “X” to initiate the app deletion process.
- Confirm the Deletion: A pop-up message will appear, asking you to confirm the deletion of the app. Tap on “Delete” to remove the Facebook app from your iPhone.
- Exit Deletion Mode: Once the Facebook app is deleted, press the home button or swipe up from the bottom of your screen to exit the app deletion mode and return to your home screen. The Facebook app will no longer be visible.
Deleting the Facebook app from your iPhone can help you further distance yourself from the platform and minimize temptations to reactivate your account. However, keep in mind that deleting the app does not permanently delete your account. If you decide to reactivate your account in the future, you can simply reinstall the app from the App Store and log in with your credentials.
Now that you have successfully deleted the app, we can move on to the next step of clearing cache and cookies related to your Facebook account to ensure a clean break from the platform.
Step 6: Clear Cache and Cookies
After deactivating Facebook and removing the app from your iPhone, it’s a good practice to clear the cache and cookies associated with the Facebook app. Clearing the cache and cookies helps remove any residual data from your device, ensuring a clean break from the platform. Follow these steps to clear cache and cookies:
- Open the iPhone Settings: Locate the Settings app on your iPhone’s home screen and tap on it to open.
- Scroll Down and Tap on “Safari”: Scroll down the settings menu and find the “Safari” option. Tap on it to access Safari settings.
- Tap on “Clear History and Website Data”: In the Safari settings, tap on the “Clear History and Website Data” option. A confirmation message will appear.
- Confirm Clearing Data: Tap on “Clear History and Data” to confirm the clearing of cache and cookies associated with Safari, including the Facebook app.
By following these steps, you have successfully cleared the cache and cookies associated with the Facebook app on your iPhone. This ensures that no residual data is left behind and helps maintain your privacy and device performance. It is important to note that clearing the cache and cookies will also remove any saved login credentials for websites you have visited.
Now that your device is clear of any Facebook-related data, let’s move on to the next step of disconnecting Facebook from other apps or services you may have linked to your account.
Step 7: Disconnect Facebook from Apps
If you have connected your Facebook account to other apps or services, it’s important to disconnect them to ensure that your account is fully disassociated. By disconnecting Facebook from these apps, you prevent them from accessing your Facebook information and maintaining any connections. Follow these steps to disconnect Facebook from apps:
- Open the Facebook App: Tap on the Facebook app icon on your iPhone’s home screen to open it.
- Go to the Menu: In the bottom right corner of the app, tap the three horizontal lines to open the Facebook menu.
- Scroll Down and Tap on “Settings & Privacy”: Scroll down the menu and tap on the “Settings & Privacy” option to access the settings.
- Select “Settings”: On the “Settings & Privacy” screen, tap on the “Settings” option to proceed.
- Tap on “Apps and Websites”: In the settings menu, you will find the “Apps and Websites” option. Tap on it to access the connected apps and services.
- Review Connected Apps: On the “Apps and Websites” screen, you will see a list of apps and services connected to your Facebook account. Review the list carefully.
- Tap on an App: To disconnect a specific app from Facebook, tap on it from the list.
- Tap on “Remove App”: On the app details screen, tap on the “Remove App” option to disconnect it from your Facebook account.
- Confirm the Disconnection: A pop-up message will appear asking for confirmation. Tap on “Remove” to confirm and disconnect the app from your Facebook account.
- Repeat for other Apps: Repeat the process for any other connected apps or services that you want to disconnect from your Facebook account.
By following these steps, you have successfully disconnected Facebook from other apps or services that were previously linked to your account. This ensures that your Facebook information is no longer accessible or shared with these apps. It’s a critical step to maintain your privacy and minimize any potential data exposure.
Now that you have disconnected Facebook from connected apps, let’s move on to the next step of removing any Facebook widgets or shortcuts from your iPhone’s home screen.
Step 8: Remove Facebook Widget or Shortcut
To ensure a clean break from Facebook on your iPhone, it’s important to remove any remaining Facebook widgets or shortcuts from your home screen. Removing these visual reminders will help minimize your interaction with the platform. Follow these steps to remove the Facebook widget or shortcut:
- Locate the Facebook Widget or Shortcut: Look for the Facebook widget or shortcut on your iPhone’s home screen. This can typically be found by swiping left or right on your home screen or by checking your app library.
- Press and Hold the Widget or Shortcut: Press and hold your finger on the Facebook widget or shortcut until all the app icons on your home screen start to wiggle.
- Tap the “X” Icon: An “X” will appear on the upper-left or upper-right corner of the Facebook widget or shortcut, depending on your iOS version. Tap on this “X” to initiate the removal process.
- Confirm the Removal: A pop-up message will appear, asking you to confirm the removal of the Facebook widget or shortcut. Tap on “Remove” or “Delete” to proceed with the removal.
- Exit Editing Mode: Once the Facebook widget or shortcut is removed, press the home button or swipe up from the bottom of your screen to exit the editing mode and return to your home screen. The Facebook widget or shortcut will no longer be visible.
By following these steps, you have successfully removed the Facebook widget or shortcut from your iPhone’s home screen. This will help minimize any visual reminders of Facebook and support your efforts to stay disconnected from the platform.
Now that you have removed the widget or shortcut, it’s time for the final step: taking a break from social media altogether. Let’s explore this last step to complete your Facebook deactivation process.
Step 9: Take a Break from Social Media
Now that you have completed the steps to deactivate and disconnect Facebook on your iPhone, it’s time to embrace a well-deserved break from social media. Taking a break from social media can have numerous benefits for your mental health, productivity, and overall well-being. Here are some tips to help you make the most of your social media break:
- Set Clear Boundaries: Decide on a specific duration for your social media break. It could be a few days, a week, a month, or even longer, depending on your preference and goals.
- Replace Social Media Time: Use the extra time gained from being off social media to engage in activities that bring you joy and fulfillment. This could include hobbies, spending time with loved ones, exercising, reading, or pursuing personal goals.
- Practice Mindfulness: Be present in the moment and focus on the real-world experiences happening around you. Mindfulness can help reduce the urge to constantly check social media and promote a sense of calm and contentment.
- Redirect Energy towards Self-Reflection: Use this break to reflect on your relationship with social media and assess its impact on your life. Consider the positive and negative aspects, and evaluate how you can create a healthier and more balanced approach to using social media in the future.
- Connect in Real Life: Foster meaningful connections with friends, family, and the world around you. Engage in face-to-face conversations, plan activities together, and deepen your relationships offline.
- Explore New Interests: Use this break to explore new hobbies or interests that you have been meaning to pursue. Discover new passions, learn new skills, and expand your horizons.
- Practice Self-Care: Take time to prioritize self-care activities that contribute to your well-being. This could include practicing mindfulness, getting enough sleep, nourishing your body with healthy food, and engaging in activities that replenish your energy.
Remember, the purpose of taking a break from social media is to reconnect with yourself and the world around you. It’s an opportunity to refocus your attention, nurture personal growth, and find a healthier balance in your relationship with technology. Enjoy this time away from social media and embrace the positive impact it can have on your life.
Congratulations! You have successfully completed all the steps to deactivate your Facebook account on your iPhone and embark on a social media break. Use this time wisely, explore new possibilities, and enjoy the freedom of being disconnected. Should you decide to return to social media in the future, remember to approach it with intention and mindfulness.