
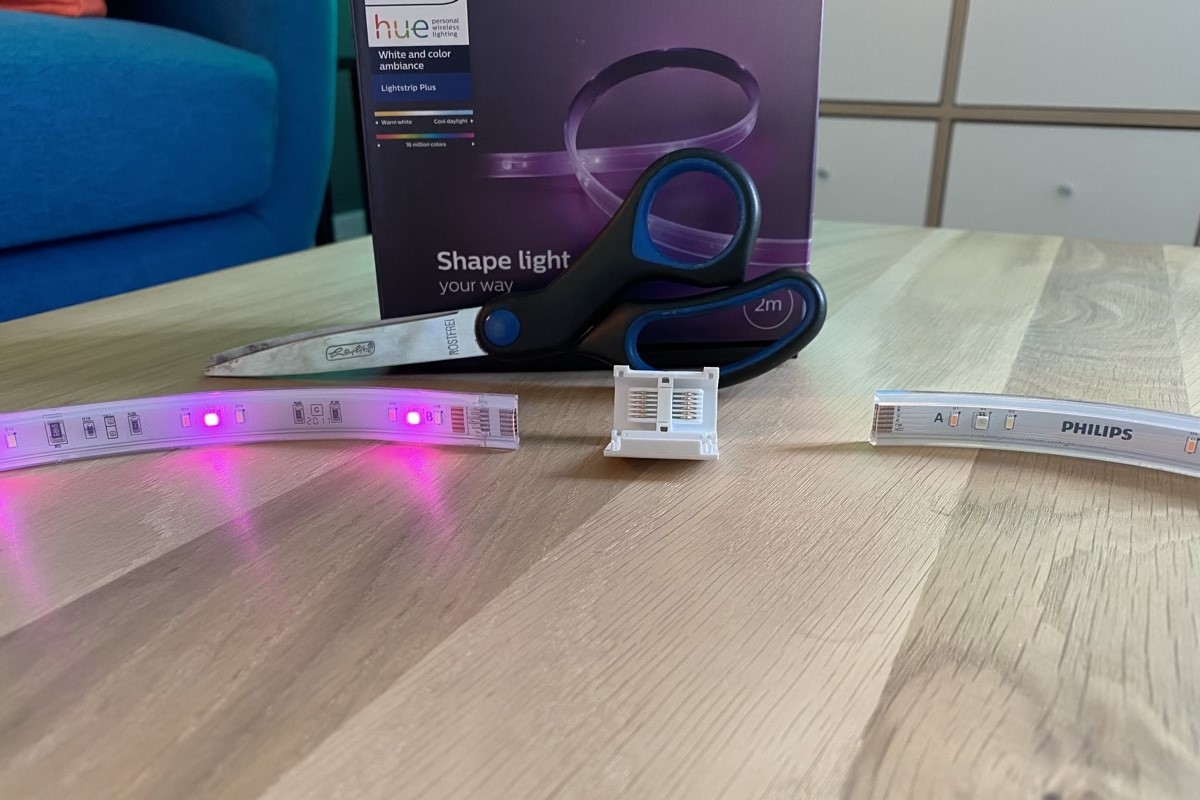
What You Will Need
Before you embark on cutting your Philips Hue Light Strip, it’s important to gather all the necessary tools and materials. Here’s a list of what you’ll need:
- Philips Hue Light Strip
- Scissors or a wire cutter
- Electrical tape or soldering kit (optional)
- Connectors (optional)
- Power source
- Extension cables (if needed)
The Philips Hue Light Strip is a versatile lighting solution that allows you to customize your home ambiance. However, there may be instances when you need to cut the light strip to fit a specific area or to create unique lighting configurations. Whether you are shortening the light strip or creating multiple segments, having the right tools and materials is crucial for a successful cutting process.
A pair of scissors or a wire cutter is essential for making precise cuts on the light strip. Ensure that the scissors or wire cutter is sharp to avoid damaging the strip during the cutting process.
If you plan on reattaching the cut sections or extending the light strip, having electrical tape or a soldering kit can come in handy. Electrical tape can be used to secure the cut ends and ensure a safe connection, while a soldering kit allows for a more permanent and secure connection.
Connectors are another optional item that can be used to join multiple segments of the light strip. These connectors provide a seamless and professional-looking connection, eliminating the need for soldering or electrical tape.
Remember to have a reliable power source for the light strip, whether it’s the original power adapter or an alternative power supply. Additionally, if you need to extend the distance between the light strip and the power source, make sure to have extension cables on hand.
By having these tools and materials ready, you’ll be well-prepared to cut your Philips Hue Light Strip with confidence and achieve the desired lighting setup.
Step 1: Determine the Cut Location
Before you start cutting your Philips Hue Light Strip, it’s essential to carefully plan and determine where you want to make the cut. Here’s what you need to consider:
1. Evaluate the area: Examine the space where you intend to install the light strip. Measure the length required and determine if any bends or corners need to be accommodated.
2. Identify the cut lines: Using a marker or a piece of tape, mark the precise locations on the light strip where you want to make the cuts. Be sure to double-check the measurements and ensure they align with your installation plans.
3. Consider the installation limitations: Take into account any limitations or restrictions that may affect the placement of the cut. For example, if your light strip needs to connect to a power source, ensure that the cut end can reach it without any issues.
4. Plan for connectors or extensions: If you’re planning to reconnect or extend the light strip after cutting, consider the placement of connectors or extension cables. Determine if you’ll need them and take note of where they should be positioned.
5. Test the lighting effects: If possible, temporarily install the light strip in the desired location and turn it on. This will give you an idea of how the lighting effects will look and help confirm your decision regarding the cut location.
Remember, patience and careful consideration of the cut location are key. Taking the time to plan and measure accurately will ensure a successful and visually appealing installation of your Philips Hue Light Strip.
Step 2: Prepare the Light Strip
Once you have determined the cut location for your Philips Hue Light Strip, it’s essential to properly prepare the strip before making any cuts. Follow these steps to ensure a smooth preparation process:
1. Power off the light strip: Before working with the light strip, make sure it is completely powered off. Disconnect it from the power source to avoid any electrical accidents.
2. Clean the area: Use a clean, dry cloth to wipe down the surface of the light strip. Removing any dust or debris will ensure a clean and precise cut.
3. Measure twice: Double-check the measurements of the cut location to ensure accuracy. Confirm that the marked lines align with your desired length or segment configuration.
4. Secure the ends (optional): If you are working with a waterproof light strip, you may need to remove the silicone cover from the cut ends. Carefully peel back the silicone cover to expose the copper pads on both sides of the strip.
5. Trim excess connectors (optional): If you are planning to use connectors to join cut sections of the light strip, ensure that any excess connectors or wires are trimmed off. This will make it easier to achieve a secure and seamless connection.
6. Prepare additional accessories (optional): If you’re using electrical tape or a soldering kit, prepare them as per the manufacturer’s instructions. Have them within reach, so you’re ready to make the necessary connections and secure the cut ends.
Taking the time to properly prepare the light strip will help ensure a successful cutting process and minimize the risk of damaging the strip. Once you’ve completed these preparation steps, you’re ready to move on to cutting the Philips Hue Light Strip at your designated location.
Step 3: Make the Cut
Now that you’ve prepared your Philips Hue Light Strip, it’s time to make the actual cut at the designated location. Here’s how to do it:
1. Use appropriate cutting tools: Ensure you have a pair of sharp scissors or a wire cutter that is suitable for cutting through the light strip. This will help you achieve clean and precise cuts without causing any damage to the strip.
2. Position the cutting tool: Place the cutting tool directly on the marked cut line of the light strip. Make sure to align the tool vertically to avoid any angled or uneven cuts.
3. Apply pressure and cut: Firmly squeeze the cutting tool to apply even pressure along the marked cut line. Slowly and steadily, make a clean cut through the light strip. Take your time and avoid rushing to ensure a smooth and accurate cut.
4. Double-check the cut: Once the cut is made, carefully inspect both ends of the light strip to ensure they are even and straight. If needed, make any necessary adjustments or refinements to achieve the desired result.
5. Secure the cut end: If you are not planning to reconnect the cut end immediately, you can use electrical tape to protect the exposed copper pads. Simply wrap the tape tightly around the cut end to provide insulation and protect it from dust or moisture.
Remember, precision is key when making the cut. Take your time and be cautious to avoid any accidental damage to the light strip. With a clean and accurate cut, you’re now ready to move on to the next step of the installation process.
Step 4: Reconnect the Cut End
After making the cut on your Philips Hue Light Strip, it’s time to reconnect the cut end if necessary. Follow these steps to reestablish a secure connection:
1. Assess your connection method: Depending on your preference and the availability of tools, you have a few options for reconnecting the cut end. You can choose to use connectors, electrical tape, or a soldering kit. Select the method that suits your needs.
2. Prepare the cut end: If you have removed the silicone cover from the cut end, make sure the copper pads are clean and free from any debris. Gently wipe them with a dry cloth to ensure a good connection.
3. Using connectors: If you’ve opted for connectors, carefully align the cut end of the light strip with the connector pins. Ensure that the positive and negative terminals are correctly matched. Follow the manufacturer’s instructions to secure the connection.
4. Using electrical tape: If you’re using electrical tape, position the cut end of the light strip so the copper pads are aligned. Wrap the tape tightly around the cut end, ensuring that both positive and negative pads are securely covered.
5. Soldering (optional): If you’re comfortable with soldering, you can achieve a more permanent and secure connection. Heat the soldering iron and carefully solder the corresponding copper pads of the cut end together. Be cautious not to overheat the pads or cause any soldering-related accidents.
6. Test the reconnection: Once the cut end is securely connected, plug in the light strip or turn on the power source to test the reconnection. Ensure that the lights turn on and the segment is functioning as expected.
Remember, the method of reconnecting the cut end may vary based on your personal preference and the specific requirements of your installation. Take your time to ensure a secure and reliable connection that will withstand extended use.
Step 5: Test and Install the Light Strip
Now that you’ve successfully reconnected the cut end of your Philips Hue Light Strip, it’s time to test it and proceed with the installation. Follow these final steps:
1. Power on the light strip: Ensure that the power source is ready and plug in the light strip. Turn on the power to confirm that the lights are functioning properly. Check for any flickering or dimming, as it could indicate an issue with the connection.
2. Adjust the lighting effects: If your Philips Hue Light Strip offers various lighting effects or colors, customize them according to your preference. Use the compatible smartphone app or control system to adjust the brightness, color, or any other desired settings.
3. Secure the light strip: Once you’re satisfied with the lighting effects, carefully install the light strip in its intended location. Use adhesive backing or mounting clips to secure it firmly, ensuring it stays in place and remains aesthetically pleasing.
4. Conceal the wiring (if necessary): If there are visible wires or cables from the light strip, consider ways to conceal them. Use cable channels, wire ducts, or adhesive clips to discreetly hide the wiring and create a clean and professional-looking installation.
5. Check for functionality: Give the entire light strip installation a final check. Make sure all the segments are properly connected and that the lights are evenly illuminated. Ensure that any additional features, such as color-changing or dimming, are functioning as expected.
6. Enjoy your customized lighting: With your Philips Hue Light Strip successfully cut, reconnected, and installed, it’s time to sit back and enjoy the ambiance it brings to your space. Experiment with different lighting scenes and create the perfect atmosphere for any occasion.
Remember to periodically check the light strip for any issues or loose connections and make necessary adjustments as needed. With proper care and maintenance, your Philips Hue Light Strip will provide long-lasting and stunning lighting effects for years to come.