
Choose the Right Philips Hue Light Strip
When it comes to installing a Philips Hue light strip under your cabinets, choosing the right light strip is crucial. The Philips Hue offers a variety of options to suit your needs, but it’s important to consider a few key factors before making your purchase.
The first thing to consider is the length of the light strip. Measure the area where you plan to install the light strip to ensure you get the right size. Philips Hue light strips are available in various lengths, ranging from one to five meters. Take into account the length of your cabinets and any additional spaces you want to illuminate.
Next, consider the brightness level that you need. The Philips Hue light strips come in different brightness options, ranging from the basic white light to the vibrant color-changing light. Determine the ambiance you want to create in your kitchen and choose the brightness level accordingly.
Additionally, think about whether you want a light strip that is flexible or rigid. If you have curved cabinets or unconventional installation spots, a flexible light strip will be easier to mold and adjust. On the other hand, a rigid light strip might be more suitable for straight cabinets and a cleaner, more structured look.
Finally, ensure that the light strip is compatible with your existing setup. Philips Hue light strips require a Philips Hue Bridge to connect and control them through the Philips Hue app. If you already have a Philips Hue system in place, make sure the light strip is compatible with your existing bridge. If you are new to Philips Hue, ensure that you have a bridge or plan to purchase one along with the light strip.
By considering these factors, you can choose the right Philips Hue light strip for your under cabinet installation. Whether you want a specific length, brightness level, flexibility, or compatibility, Philips Hue has a range of options to meet your needs and create the perfect lighting setup for your kitchen.
Measure and Plan
Before proceeding with the installation of the Philips Hue light strip under your cabinets, it is essential to measure and plan accordingly. By taking the time to measure accurately and create a detailed plan, you can ensure a smooth and efficient installation process.
Start by measuring the length and width of the area where you intend to install the light strip. Use a tape measure or ruler to measure the dimensions accurately. Take note of any obstacles or gaps that may affect the placement of the light strip.
Once you have the measurements, consider the positioning of the light strip. Determine whether you want to install it on the underside of the cabinets or along the back edges. This decision will depend on your desired lighting effect and the layout of your kitchen.
Next, plan the placement of the power supply. The power supply is an essential component of the Philips Hue light strip system, and it needs to be positioned strategically for easy access and functionality. Consider the proximity to an electrical outlet and ensure that the power supply is safely tucked away and protected from moisture or any potential hazards.
After measuring and planning the position of the light strip and power supply, it’s advisable to draft a rough sketch or diagram. This visual representation will serve as a guide during the installation process, helping you stay organized and ensuring that everything is installed correctly.
Take into account any additional accessories you may need, such as extension cables or connectors, to ensure that you have everything on hand when it’s time to install the light strip.
By measuring accurately and creating a detailed plan, you can avoid any unnecessary mistakes or delays during the installation process. Remember to refer back to your measurements and plan as you proceed with the installation, ensuring a seamless and successful setup of your Philips Hue light strip under your cabinets.
Clean the Surface
Before installing the Philips Hue light strip under your cabinets, it’s essential to ensure that the surface is clean and free from any dust, grease, or debris. Cleaning the surface properly will help the light strip adhere securely and maintain its longevity.
Start by clearing off any items or objects from the area where you plan to install the light strip. This will give you a clear workspace and allow you to clean the surface effectively. Remove any loose dirt, crumbs, or spills using a soft cloth or a mild cleaning solution.
Next, wipe down the surface with a slightly damp cloth to remove any stubborn stains or residue. If there is grease buildup, use a gentle grease-cutting cleaner or a mixture of warm water and dish soap. Be careful not to saturate the surface, as excess moisture can cause damage.
For surfaces that have a textured or uneven finish, you may need to use a brush with soft bristles to reach into the crevices and ensure a thorough cleaning. Gently scrub the surface, focusing on any areas that are particularly dirty or greasy.
After cleaning, dry the surface completely with a clean, dry cloth. Make sure there is no moisture left, as it can interfere with the adhesion of the light strip.
It’s also important to consider the material of your cabinets. Different types of materials may require specific cleaning methods or solutions. For example, if you have wooden cabinets, use a cleaner that is suitable for wood surfaces. If you have glass or metal cabinets, use cleaners designed specifically for those materials.
By taking the time to clean the surface properly, you ensure that the light strip will stick securely and maintain its adherence over time. A clean surface also enhances the overall aesthetic and ensures that the light is evenly distributed without any obstructions. So, make sure to thoroughly clean the surface before proceeding with the installation of your Philips Hue light strip under your cabinets.
Attach Mounting Clips to the Cabinets
Once you have chosen the right Philips Hue light strip and prepared the surface, it’s time to attach the mounting clips to your cabinets. The mounting clips will securely hold the light strip in place and ensure a clean and professional installation.
Start by positioning the mounting clips along the underside or edges of the cabinets, following your previously measured and planned layout. Ensure that the clips are evenly spaced, providing adequate support for the light strip.
Most Philips Hue light strips come with adhesive backing on the mounting clips, making them easy to attach. Peel the protective film from the adhesive side of the mounting clip and press it firmly onto the cabinet surface. Apply firm pressure for a few seconds to ensure a strong bond.
If the mounting clips do not have adhesive backing, use screws or other appropriate fasteners to secure them to the cabinets. Make sure to choose screws or fasteners that are appropriate for the material and thickness of your cabinets.
Continue attaching the mounting clips along the entire length of the cabinets, making sure they are aligned correctly and evenly spaced. If necessary, use additional mounting clips to provide extra support, particularly in corners or areas where the cabinets may have irregularities or curves.
As you attach the mounting clips, check that they are securely fastened and can hold the weight of the light strip. Give each clip a gentle tug to ensure it is properly attached and will not come loose over time.
Once all the mounting clips are in place, take a step back and visually inspect the alignment and placement. Make any adjustments, if necessary, to ensure that the mounting clips are positioned correctly and the light strip will be held in the desired location.
By attaching the mounting clips to your cabinets, you are one step closer to installing the Philips Hue light strip and achieving a beautifully illuminated space. Properly secured mounting clips ensure a secure and professional installation, allowing you to enjoy the full benefits of your Philips Hue light strip.
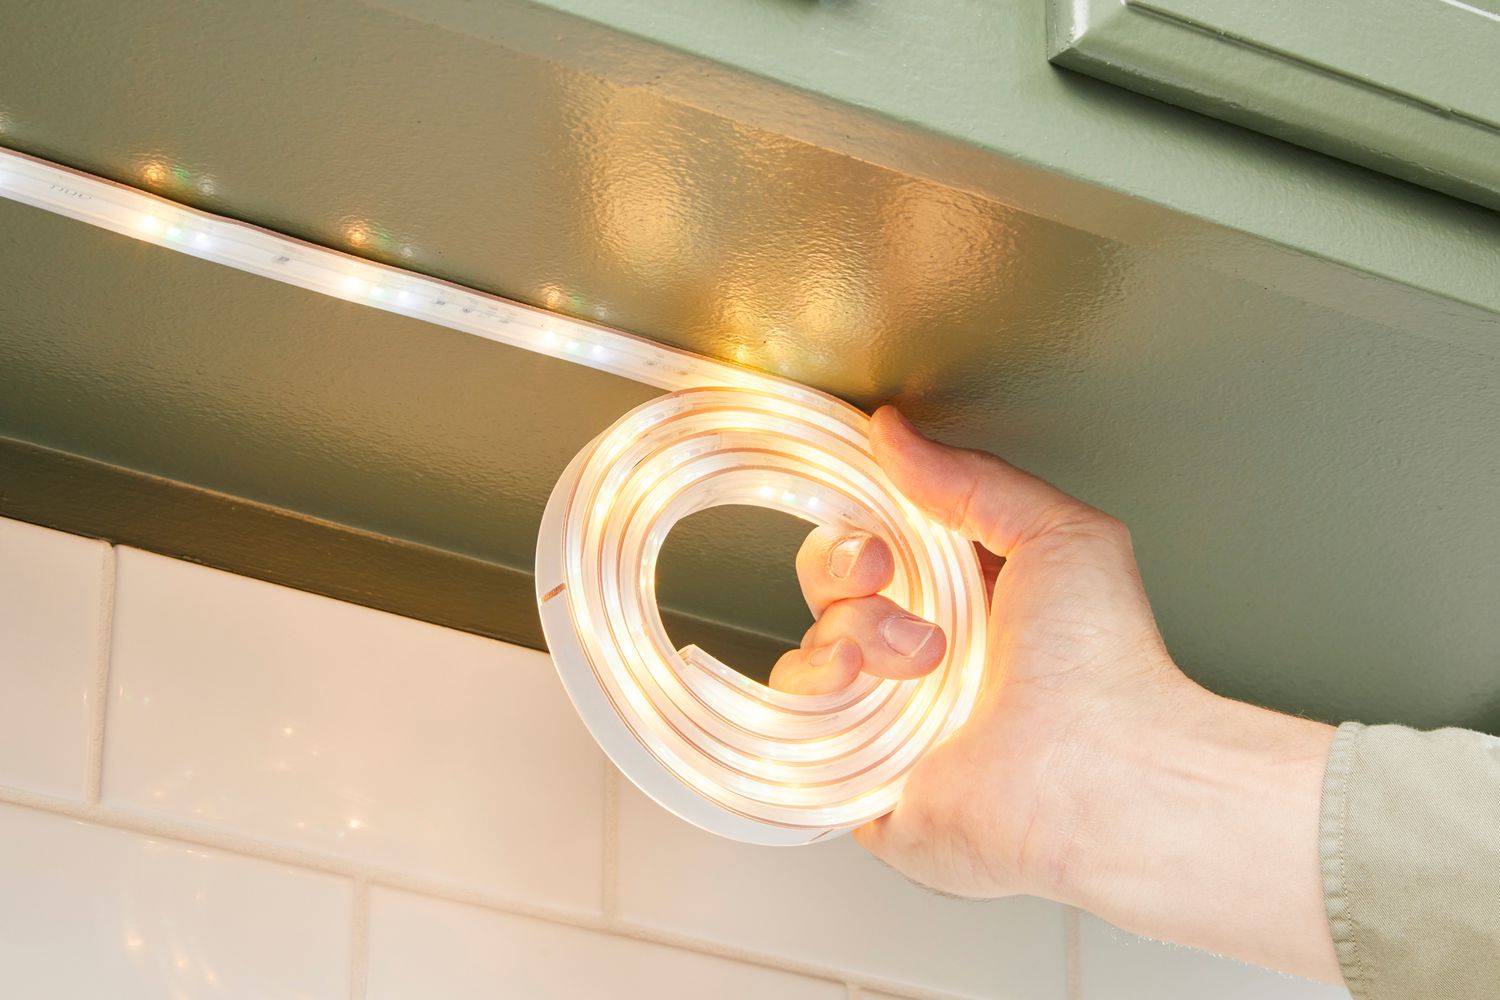
Mount the Light Strip
With the mounting clips in place, it’s time to mount the Philips Hue light strip under your cabinets. Properly mounting the light strip will ensure its stability and ensure that it illuminates the desired area effectively.
Start by carefully unrolling the light strip along the length of the cabinets, following the path of the mounting clips. Make sure that the light strip is aligned with the clips and that the adhesive side is facing down towards the surface.
Gently press the light strip onto the mounting clips, ensuring that it adheres securely. Apply even pressure along the entire length of the light strip to guarantee a strong bond. Take your time to ensure a smooth and wrinkle-free installation.
If you encounter any corners or angles as you continue mounting the light strip, carefully bend and adjust it to follow the desired path. Philips Hue light strips are flexible and can be shaped to fit various cabinet configurations.
Pay attention to any gaps or loose sections in the light strip as you mount it. If you notice any areas where the adhesive is not sticking properly, use additional adhesive or double-sided tape to secure those sections. This will ensure that the light strip remains in place and does not detach over time.
Continue mounting the light strip until you have reached the end of the cabinets. If necessary, trim any excess length of the light strip using scissors or a sharp knife, following the manufacturer’s instructions for cutting the strip.
Once the light strip is mounted, give it a final inspection to ensure that it is straight, evenly aligned, and securely attached to the mounting clips. Make any necessary adjustments or readjustments to achieve the desired look and functionality.
By properly mounting the Philips Hue light strip, you are one step closer to creating a stunning lighting display beneath your cabinets. A securely mounted light strip will provide years of reliable performance and enhance the ambiance of your kitchen or workspace.
Connect the Light Strip to the Power Supply
After mounting the Philips Hue light strip under your cabinets, the next step is to connect it to the power supply. Properly connecting the light strip to the power supply will provide the necessary electrical current to illuminate the LEDs and bring your lighting setup to life.
Start by locating the end of the light strip that has the connectors. Depending on the model you have, there may be either a male or female connector at the end. Align the connector with the corresponding connector on the power supply.
Gently push the connectors together until they are fully inserted and securely connected. You may hear a click or feel a slight resistance when the connectors are properly engaged.
To ensure a reliable connection, it’s advisable to secure the connectors with the provided clips or adhesive pads. These additional fasteners will help keep the connectors in place and prevent accidental disconnection.
Next, plug the power supply into a nearby electrical outlet. Make sure the power supply is placed in a location where it is easily accessible and does not obstruct any other electrical devices or appliances.
Before turning on the power, double-check that all connections are secure and properly aligned. Inspect the length of the light strip to ensure that there are no loose or disconnected sections.
Once you are confident in the connections, switch on the power supply, and the light strip should illuminate. If the light strip does not turn on, check the connections again, ensuring that they are well-seated and free from any obstructions or damage.
Pay attention to any instructions provided with your specific Philips Hue light strip model, as there may be additional steps or considerations for connecting the light strip to the power supply.
By properly connecting the light strip to the power supply, you are now ready to enjoy the radiant glow and customizability of your Philips Hue lighting system. A secure and reliable connection ensures that your light strip will operate smoothly and provide the desired lighting effect in your kitchen or workspace.
Hide the Wires
Once you have installed the Philips Hue light strip and connected it to the power supply, the next step is to hide the wires to achieve a clean and professional appearance. Hiding the wires will not only enhance the aesthetic appeal of your lighting setup but also eliminate any potential tripping hazards and ensure a safer environment.
Start by assessing the layout of your cabinets and identifying the best route for concealing the wires. Look for any available gaps, grooves, or channels where the wires can be tucked away discreetly.
If there are gaps between the cabinets and the wall, you can neatly run the wires behind and along these gaps to keep them out of sight. Use small adhesive clips or cable management solutions to secure the wires along the designated path.
In some cases, it may be necessary to drill small holes or notches in the cabinets to create a dedicated pathway for the wires. Make sure to measure and plan carefully before drilling to avoid any damage to the cabinets.
If your cabinets have a removable toe kick or a bottom panel, you can consider removing it and routing the wires underneath. This will provide a hidden space to run the wires and maintain a seamless finish.
Another option is to use wire raceways or conduits to enclose and hide the wires. These channels can be attached to the underside or back of the cabinets, providing a dedicated space for the wires to be neatly organized. Choose raceways or conduits that match the color and finish of your cabinets for a cohesive look.
Ensure that the wires are neatly bundled and secured along their hidden path. Use zip ties or Velcro straps to keep the wires organized, avoiding any tangled or messy appearance.
Once the wires are hidden, step back and inspect the overall appearance. Make any necessary adjustments or refinements to achieve a seamless and clean look. Ensure that no wires are protruding or visible from any angles.
By taking the time to hide the wires, you can create a polished and professional finish for your Philips Hue light strip installation. This attention to detail will elevate the overall aesthetics of your kitchen or workspace, showcasing the beauty of your illuminated cabinets without the distraction of unsightly wires.
Connect to a Philips Hue Bridge
To fully unlock the capabilities of your Philips Hue light strip under your cabinets, you’ll need to connect it to a Philips Hue Bridge. The bridge serves as the central hub that enables you to control and customize your lighting setup through the Philips Hue app and other compatible devices.
Start by ensuring that your Philips Hue Bridge is connected to a power source and connected to your home network via an Ethernet cable. It’s important to follow the manufacturer’s instructions for setting up and connecting the bridge to ensure a seamless integration.
Once the bridge is set up and connected, open the Philips Hue app on your mobile device. If you haven’t already, download the app from the App Store or Google Play Store and follow the on-screen instructions to set up an account.
In the app, navigate to the “Settings” or “Bridge” section. Follow the instructions provided to search for and connect the bridge to your network. This may involve pressing a button on the bridge or entering a unique code.
Once the bridge is connected to your network, the app will guide you through the process of discovering and adding devices to your setup. Follow the instructions specific to your Philips Hue light strip model to add it to your bridge.
Typically, this involves putting the Philips Hue app into pairing mode and then turning on the light strip. The app will detect the light strip and prompt you to assign it to a specific room or area in your home.
After successfully connecting the light strip to the bridge, you can start exploring the different features and options available in the app. Use the app to customize the colors, brightness, and effects of your light strip. You can create schedules, set timers, and even sync your lights with music or movies for an immersive lighting experience.
Keep in mind that the Philips Hue Bridge allows for integration with other smart home platforms and voice assistants such as Amazon Alexa, Google Assistant, or Apple HomeKit. Follow the instructions provided by the respective platform to connect and control your light strip with voice commands or through other compatible devices.
By connecting your Philips Hue light strip to a bridge, you unlock a world of possibilities for controlling and customizing your lighting. Enjoy the convenience and flexibility of managing your lights from your mobile device and integrating them seamlessly into your smart home ecosystem.
Set Up the Lights with the Philips Hue App
Once you have connected your Philips Hue light strip to the Philips Hue Bridge, it’s time to set up and control the lights using the Philips Hue app. The app provides a user-friendly interface that allows you to customize the colors, brightness, and effects of your light strip, creating the perfect ambiance for your space.
Start by opening the Philips Hue app on your mobile device. If you haven’t already, download the app from the App Store or Google Play Store and log in to your account.
In the app, you will see a list of your connected Philips Hue lights and accessories. Locate the entry for your light strip and tap on it to access the control options.
From here, you can adjust the color and brightness of the light strip using the color wheel and slider controls. Experiment with different shades and intensities to find the perfect lighting for your kitchen or workspace.
The Philips Hue app also offers various preset scenes and lighting effects that you can choose from. Whether you want a vibrant, disco-like atmosphere or a calm, soothing glow, the app provides a range of options to suit your mood and preference.
Additionally, you can set up schedules and timers for your light strip. This allows you to automate the lighting based on your daily routines or preferences. For example, you can program the light strip to turn on in the morning to simulate sunrise or automatically dim in the evening for a relaxed atmosphere.
Another exciting feature of the Philips Hue app is the ability to create and save your own custom scenes. Adjust the colors, brightness, and effects to your liking and save them as personalized scenes for easy access and quick changes in the future.
To enhance your lighting experience, consider exploring the additional features and integrations available within the Philips Hue app. You can sync your lights with music or movies for a dynamic lighting experience, or connect other smart home devices to create a seamless and integrated ecosystem.
Whether you prefer a soft and warm ambiance or a vibrant and colorful display, the Philips Hue app provides the tools to customize and control your light strip to suit your preferences and create the desired atmosphere in your space.
Enjoy Your New Philips Hue Light Strip!
Congratulations! You have successfully installed and set up your Philips Hue light strip under your cabinets. Now it’s time to sit back, relax, and enjoy the wonderful ambiance and versatility that your new lighting fixture brings to your kitchen or workspace.
With your Philips Hue light strip, you can effortlessly transform the atmosphere with just a few taps on your smartphone. Adjust the color and brightness to perfectly suit your mood, whether it’s a cozy dinner with loved ones or a productive work session.
Take advantage of the scheduling feature to automate your lighting, allowing you to wake up gently with a gradual sunrise effect or wind down with a calming, dimmed light in the evenings. The ability to create custom scenes and presets gives you the freedom to personalize your lighting to match any occasion or preference.
Explore the various lighting effects available to add an extra touch of magic to your space. From dynamic color transitions to synchronized lighting with music or movies, the Philips Hue light strip offers endless possibilities to create an immersive and captivating environment.
Don’t forget to integrate your light strip with other smart home devices and voice assistants. Whether you prefer to use Amazon Alexa, Google Assistant, or Apple HomeKit, you can effortlessly control your lights with voice commands and incorporate them into your existing smart home ecosystem.
Share the joy of your new Philips Hue light strip with friends and family. Impress them with the stunning lighting effects and showcase the convenience and flexibility that comes from having complete control over your lighting at your fingertips.
Remember to keep the Philips Hue app updated to access the latest features and enhancements. The app continues to evolve, providing even more possibilities and functionalities to enhance your lighting experience.
So, bask in the warm glow or immerse yourself in vibrant colors. Let your Philips Hue light strip create the perfect ambiance for any occasion, elevating the atmosphere and enhancing the overall aesthetic of your space. Enjoy the endless possibilities and make the most out of your new Philips Hue light strip!