
Why use spreadsheet templates?
Spreadsheets are versatile tools that can be used for a wide range of tasks, from organizing data to creating budgets and analyzing statistics. However, creating a spreadsheet from scratch can be time-consuming and requires a solid understanding of formulas and functions. This is where spreadsheet templates come in handy.
Using spreadsheet templates offers several benefits. Firstly, they save you precious time. Instead of starting from a blank document, templates provide pre-designed structures and formatting. This means you can focus on inputting your specific data and making minor adjustments, rather than spending hours setting up the layout and formulas.
Templates also ensure consistency and accuracy. They are designed by experts who understand the best practices for data organization and analysis. By utilizing these templates, you can be confident that your spreadsheets follow industry standards and maintain a professional appearance.
Furthermore, spreadsheet templates can improve productivity. They provide a framework that guides you through the process, ensuring that you don’t miss any important steps. This is particularly useful when dealing with complex calculations or intricate data structures. With templates, you can streamline your workflow and avoid potential errors.
Another advantage of using spreadsheet templates is the ease of customization. Most templates are designed to be flexible and allow for modifications to suit your specific needs. You can easily adjust column widths, add or remove sections, and tweak formulas to adapt the template to your unique requirements. This level of customization saves you from reinventing the wheel every time you create a new spreadsheet.
Lastly, spreadsheet templates can serve as a learning resource. By studying the structure and formulas used in templates, you can gain insights into different techniques and best practices. This not only helps improve your spreadsheet skills but also enhances your understanding of data analysis and presentation.
Planning your template
Before diving into creating a spreadsheet template, it’s essential to plan out the structure and purpose of your template. Taking the time to carefully plan your template will make the creation process smoother and ensure that it meets your specific needs. Here are some key steps to consider when planning your template:
1. Define the purpose: Start by clarifying the purpose of your template. Are you creating a budget template, project tracker, or sales report template? Clearly defining the purpose will help shape the layout, formulas, and data fields you need to include.
2. Identify data requirements: Determine the type of data you need to include in your template. Will you be tracking expenses, sales figures, or inventory levels? Make a list of the data fields or columns you’ll need to accommodate this information.
3. Consider data relationships: Think about how different data elements interact with each other. Are there any calculations or formulas that need to be applied? For example, if you are creating a budget template, you may need formulas to calculate totals and percentages.
4. Visualize the layout: Sketch out a rough layout of your template. Consider the placement of headers, labels, and data fields. Visualize the overall look and feel of the template to ensure it’s user-friendly and intuitive for others who will be using it.
5. Plan for flexibility: Anticipate potential changes or additions to your template in the future. Allow for flexibility by including extra columns or sections that can accommodate future data requirements or analysis.
6. Keep it organized: Ensure that the template is organized in a logical and structured manner. Use clear headings and labels to guide users through the different sections of the template. This will make it easier for others to input data and navigate the spreadsheet.
By taking the time to plan your template before diving into the creation process, you will save time and frustration in the long run. A well-thought-out plan ensures that your template meets your specific requirements and is designed in a way that maximizes its efficiency and usability.
Designing your template
Designing your spreadsheet template involves creating an appealing and easy-to-navigate layout that effectively presents your data. The design elements you choose will not only enhance the visual appeal but also contribute to the overall functionality of the template. Here are some key factors to consider when designing your template:
1. Choose a clean and organized layout: Start by selecting a layout that is clean, uncluttered, and visually appealing. Avoid overcrowding the spreadsheet with excessive text or unnecessary formatting. Use whitespace strategically to separate different sections and make the template easier to read and navigate.
2. Select a color scheme: Choose colors that are visually pleasing and align with the purpose of your template. Consider using colors that are consistent with your organization’s branding, if applicable. Use color sparingly to highlight important information or to distinguish different sections.
3. Optimize font style and size: Select a font style that is easy to read, such as Arial, Calibri, or Times New Roman. Use a legible font size, generally between 10 to 12 points, to ensure that the text is easily readable. Use bold or italic formatting sparingly to emphasize important information.
4. Implement a consistent header and footer: Include a header at the top of your template to provide a title and any other relevant information such as company name or logo. Consider adding a footer at the bottom for page numbers or additional notes. Having consistent header and footer elements throughout the template adds a professional touch.
5. Organize data with headers and labels: Use clear and descriptive headers and labels to categorize different data fields. Ensure that headers are placed at the top of each column or section to provide context and guide users. Use bold or larger font sizes for headers to make them stand out.
6. Utilize borders and gridlines: Apply borders and gridlines to help visually separate cells and sections. This makes it easier to follow rows and columns and improves readability. Experiment with different line styles and thickness to find a visually appealing option that suits your template.
7. Incorporate data visualization: Use charts, graphs, or conditional formatting to present data in a visually engaging manner. This can help users understand trends, patterns, and comparisons more effectively. However, use data visualization sparingly and only when it enhances the understanding of the data.
By paying attention to the design elements of your template, you can create a visually appealing and user-friendly spreadsheet. A well-designed template not only enhances the presentation of your data but also improves its readability, usability, and overall user experience.
Using Excel’s built-in templates
Excel provides a vast library of built-in templates that cover a wide range of needs, from tracking expenses to creating project plans. These templates are pre-designed and ready to use, saving you time and effort. Here’s how you can make the most of Excel’s built-in templates:
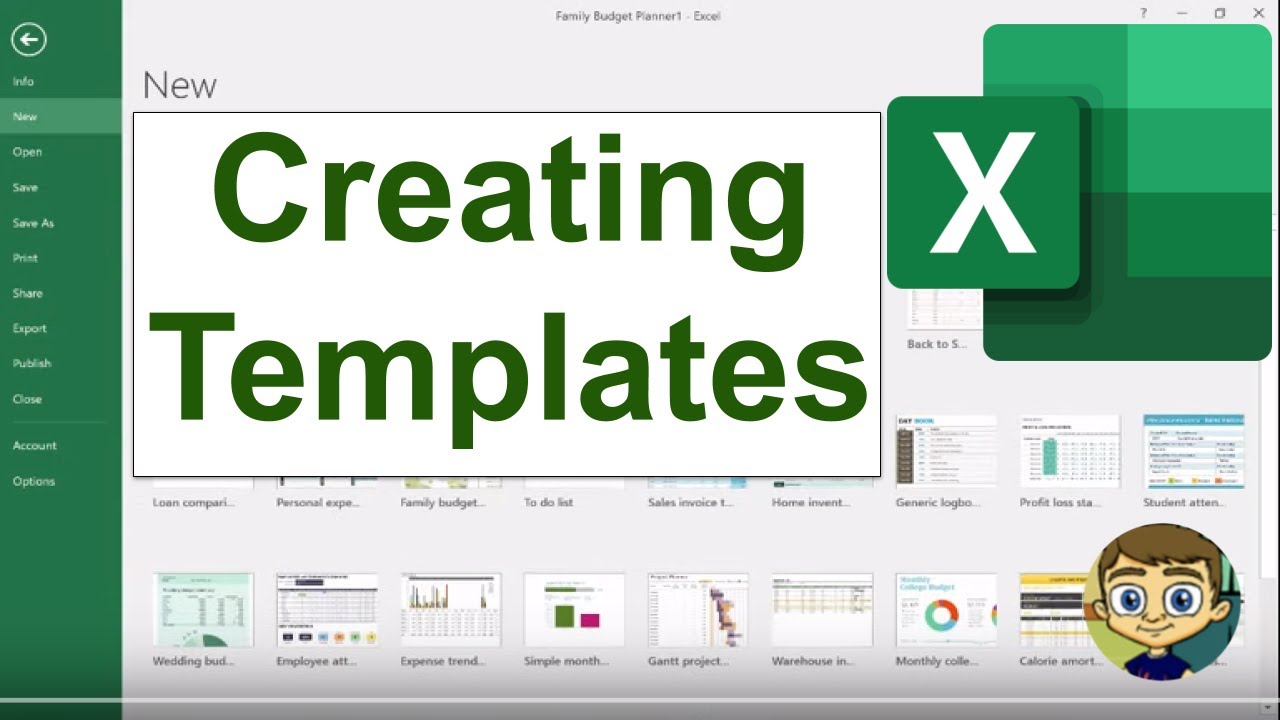
1. Accessing the template gallery: Open Excel and click on the “File” tab at the top left corner. From the drop-down menu, select “New” to access the template gallery. You can choose from the available templates in various categories like budgets, calendars, invoices, and more.
2. Exploring different categories: Excel offers a range of categories to choose from. Take some time to explore the different categories and browse through the templates available. You can filter templates by industry, type, or specific task to find the one that best suits your needs.
3. Previewing and selecting a template: Click on a template to get a preview and brief description. Take a moment to review the template and ensure it aligns with your requirements. Once you’ve found the right template, click on the “Create” or “Download” button to start working with it.
4. Customizing the template: Excel’s built-in templates are designed to be easily customizable. You can modify the layout, add or remove columns, and adjust formulas as per your specific needs. Take advantage of Excel’s extensive formatting options to customize fonts, colors, and styling to match your preferences or branding guidelines.
5. Inputting your data: Replace the dummy data in the template with your actual data. Carefully review the template’s instructions or guidelines, if provided, to ensure you input the data correctly. Take your time to double-check the accuracy of your data to ensure your template functions properly.
6. Saving and naming your template: Once you have customized the template with your data, it’s a good practice to save it with a new name. This allows you to keep the original template intact for future use. To save your template, click on the “File” tab and select “Save As.” Provide a name for your template and choose a location to save it on your computer.
7. Reusing and sharing templates: Excel allows you to share your customized templates with others. If you have colleagues or team members who can benefit from your template, you can share it with them using Excel’s sharing and collaboration features. This promotes consistency and efficiency within your organization.
Excel’s built-in templates provide a convenient starting point for creating professional and functional spreadsheets. By leveraging these templates, you can save time, ensure consistency, and benefit from Excel’s powerful features, ultimately improving your productivity and enhancing your data analysis capabilities.
Customizing built-in templates
Excel’s built-in templates serve as a great foundation for your spreadsheets, but sometimes you may need to customize them to better suit your specific requirements. Customization allows you to tailor the template to match your data, design preferences, and desired functionalities. Here are some key steps to consider when customizing built-in templates:
1. Assessing template suitability: Before customizing a template, evaluate its suitability for your needs. Consider whether the template aligns with your data structure and analysis goals. If the template’s layout or predefined formulas don’t quite fit, it may be worth exploring other options or starting from scratch.
2. Modifying layout and structure: If the template’s layout doesn’t align with your preferences, feel free to modify it. Add or delete columns, adjust row heights, or rearrange sections to ensure a clear and logical data presentation. This enables you to create a layout that is intuitive and suits your specific data organization needs.
3. Adjusting formulas and calculations: Built-in templates often include predefined formulas to automate calculations. Customize these formulas to accommodate your specific data and calculations. Modify cell references, update formulas with appropriate ranges, and incorporate additional calculations as required.
4. Customizing formatting: Excel offers a wide range of formatting options to customize the appearance of your template. Modify font styles, colors, and sizes to match your preferences or align with your organization’s branding guidelines. Apply conditional formatting to highlight specific data points or create visual cues for data analysis.
5. Incorporating data validation: Use Excel’s data validation feature to set restrictions on data entry. Apply data validation rules to specify acceptable values or formats for specific cells or columns. This ensures data accuracy and consistency and prevents errors or incorrect input.
6. Adding additional functionality: Excel’s built-in templates provide a solid foundation, but you may want to enhance them with additional functionalities. This could include adding additional worksheets, creating custom charts or graphs, or incorporating macros to automate repetitive tasks. Explore Excel’s extensive range of features to customize your template and improve its functionality.
7. Reviewing and testing: After customizing the template, thoroughly review and test it before using it with actual data. Check for any formatting inconsistencies, formula errors, or data validation issues. Ensure that the template functions as intended and provides accurate results. Make any necessary adjustments or corrections to achieve desired outcomes.
By customizing built-in templates, you can create spreadsheets that are tailored to your unique needs. Personalizing the layout, design, formulas, and functionalities improves the usability, accuracy, and effectiveness of your templates, ultimately enhancing your data analysis and decision-making capabilities.
Creating a template from scratch
If you have specific needs or prefer complete control over your spreadsheet design, creating a template from scratch can be a great option. Building a template from the ground up allows you to customize every aspect of your spreadsheet to meet your exact requirements. Here are some steps to help you create a template from scratch:
1. Identify your goals and requirements: Start by understanding the purpose of your template and what you want to achieve with it. Determine the type of data you need to track or analyze and the calculations or formulas you want to incorporate. Clearly defining your goals and requirements will guide you in creating the most effective template.
2. Plan the layout and structure: Sketch out the layout and structure of your template on a separate sheet of paper or a digital program. Consider the organization of data, proper labeling of columns and rows, and the overall intuitive flow of the template. It is important to ensure that the template is user-friendly and easy to navigate.
3. Set up the spreadsheet: Open a blank Excel workbook and begin setting up your template. Enter the necessary labels and headers, and format the cells and columns to align with your planned layout. Create any additional sheets if needed, such as summary sheets or data input forms.
4. Include necessary formulas and calculations: Depending on your requirements, incorporate the necessary formulas and calculations into your template. Utilize Excel’s wide range of functions to perform calculations, such as SUM, AVERAGE, IF, and VLOOKUP. Double-check the formulas for accuracy and make any adjustments as necessary.
5. Customize formatting: Apply formatting, such as font styles, colors, and borders, to enhance the visual appeal and readability of your template. Use consistent formatting throughout the spreadsheet to maintain a professional and cohesive look. Customize cell formats to display data in the desired format, such as currency, percentage, or date.
6. Implement conditional formatting: Consider implementing conditional formatting to highlight specific data points or cells based on certain criteria. This can help draw attention to important information or identify outliers that require further analysis. Use conditional formatting to make your template more visually informative and user-friendly.
7. Test and refine: Test your template with sample data to ensure that it functions correctly and provides the desired output. Verify that formulas are calculating accurately and that any predefined rules, such as data validation, are being enforced properly. Make any necessary adjustments or refinements based on the data testing process.
By creating a template from scratch, you have the freedom to design a customized spreadsheet that meets your precise needs. This allows for greater flexibility, control, and efficiency in managing and analyzing your data.
Setting up your template with formulas and functions
Formulas and functions are powerful tools in Excel that allow you to perform calculations, analyze data, and automate processes. When setting up your template, incorporating the right formulas and functions is crucial to ensure accurate data analysis and efficient workflow. Here’s how you can effectively utilize formulas and functions in your template:
1. Identify the calculations needed: Begin by identifying the calculations you need to perform in your template. Consider whether you need to sum up values, find averages, calculate percentages, or perform more complex mathematical operations. Clearly define the desired outcome of each calculation.
2. Understand Excel’s functions: Familiarize yourself with the various functions available in Excel. Excel offers a wide range of built-in functions, such as SUM, AVERAGE, COUNT, MAX, MIN, IF, VLOOKUP, and many more. Understanding how these functions work and what they can accomplish will enable you to make the most of your template.
3. Apply appropriate functions: Apply the most suitable functions to perform your desired calculations. For example, use the SUM function to add up a range of values, the AVERAGE function to find the average of a set of numbers, or the IF function to set conditional calculations based on specific criteria. Use nested functions when necessary to combine multiple functions in a single formula.
4. Utilize absolute and relative cell references: When using formulas, determine whether you need to use absolute or relative cell references. Absolute references with the dollar sign ($) keep a specific cell reference constant when copying or dragging formulas. Relative references adjust the cell references automatically as you copy or drag the formulas to other cells.
5. Incorporate named ranges: To make your formulas more understandable and efficient, consider using named ranges. Named ranges allow you to assign a meaningful name to a range of cells or a specific cell. This makes formulas more readable and easier to manage. To define a named range, select the desired cells, click on the “Formulas” tab, and choose “Define Name” from the “Defined Names” group.
6. Test and troubleshoot formulas: Test your formulas with sample data to ensure they are calculating correctly. Make sure all inputs and references are accurate and that the desired results are being produced. If you encounter any issues, use Excel’s error checking features and the formula auditing tools to identify and resolve problems.
7. Document your formulas: To ensure the continuity of your template and facilitate future use, document the formulas used in your worksheet. Clearly label and describe each formula, specify the inputs, and explain the purpose of the calculation. This documentation will prove valuable when revisiting or modifying the template in the future.
By setting up your template with appropriate formulas and functions, you can automate calculations, streamline data analysis, and save time in your spreadsheet workflow. Proper utilization of Excel’s functions and understanding of formulas will allow you to unlock the full potential of your template and enhance your data analysis capabilities.
Formatting your template
Formatting plays a crucial role in enhancing the visual appeal and readability of your spreadsheet template. It helps to organize and present your data in a clear and professional manner. By applying effective formatting techniques, you can improve the overall user experience and make your template more visually engaging. Here’s how you can format your template:
1. Apply consistent styles: Consistency is key in formatting. Choose a consistent font style and size throughout the template to maintain a uniform appearance. Ensure that headers, labels, and data are formatted consistently across columns and rows. This creates a cohesive and professional look.
2. Utilize colors strategically: Incorporate colors to highlight important information or make specific elements stand out. For example, use a different color for headers or totals to draw attention. However, use colors sparingly and avoid excessive use, which can make the template visually overwhelming.
3. Use cell shading and borders: Apply cell shading to differentiate sections or categories within your template. Use borders to create clear boundaries between cells or to separate specific sections. This visual separation makes it easier for users to read and interpret the data.
4. Align data properly: Proper alignment of data enhances readability. Left-align text in cells when dealing with labels or descriptions, and right-align numerical data such as dates, currency, or percentages. Consider center-aligning headers or column titles to make them stand out.
5. Format numbers and dates: Format numbers and dates appropriately to ensure accuracy and consistency. Excel provides a variety of number formats, such as currency, percentage, or scientific notation. Select the appropriate format depending on the type of data you are working with.
6. Embed conditional formatting: Conditional formatting is a powerful tool to highlight specific data points based on specific criteria. Use conditional formatting to automatically apply formatting rules based on the value in a cell. This can help identify trends, outliers, or other important data insights.
7. Consider readability: Pay attention to the readability of your template. Use legible font sizes and ensure that text is easily readable, especially when dealing with large amounts of data. Adjust column widths and wrap text when necessary to prevent truncation of text.
8. Provide clear headings and labels: Use clear and descriptive headers and labels to guide users and provide context. Bold or underline headers to make them stand out, and use appropriate font formatting for labels. Clear headings and labels improve the usability of the template and make it easier to navigate.
Remember, the goal of formatting is to enhance the understanding and usability of your template. Use formatting techniques effectively to create an aesthetically pleasing and user-friendly spreadsheet template.
Adding conditional formatting to your template
Conditional formatting is a valuable feature in Excel that allows you to visually highlight specific data based on predefined criteria. By using conditional formatting in your template, you can emphasize important information, identify trends, and easily spot outliers or exceptions. Here’s how you can add conditional formatting to your template:
1. Select the range: Determine the range of cells that you want to apply conditional formatting to. This could be a single column, a row, or a larger range of data. Make sure to select the appropriate cells that align with the condition or criteria you want to apply.
2. Choose a formatting rule: Excel offers a variety of formatting rules to choose from. For example, you can highlight cells that contain specific text, exceed a certain value, are above or below an average, or meet other criteria. Select the rule that best fits your needs and objectives for highlighting or identifying certain data points.
3. Define the formatting style: Once you’ve selected a formatting rule, define the specific formatting style that will be applied to cells that meet the criteria. This could include changing the font color, cell background color, font style, or adding special icons or data bars. Customize the formatting style to ensure it effectively stands out and draws attention to the relevant data.
4. Set the condition: Specify the condition or criteria that the selected range of cells should meet in order for the formatting rule to be applied. This could be a specific value, a formula, a date, or other criteria that you want Excel to evaluate. Choose the appropriate operator, such as equals, greater than, less than, or between, and provide the required values or references.
5. Preview and adjust: Take advantage of Excel’s preview feature to see how the conditional formatting will be applied to your template. Previewing allows you to make adjustments and fine-tune the formatting to ensure it achieves the desired effect. Make any necessary changes to the formatting style, condition, or range before applying the conditional formatting.
6. Apply the conditional formatting: Once you are satisfied with your settings, apply the conditional formatting to the selected range of cells. Excel will automatically evaluate the condition and apply the chosen formatting style to the cells that meet the criteria. The formatting will update dynamically if the data in the cells changes.
7. Modify or remove conditional formatting: You can easily modify or remove conditional formatting as needed. Use the “Conditional Formatting” menu to make adjustments to the existing rules, change formatting styles, or add additional rules. If you want to remove conditional formatting from a range of cells, use the “Clear Rules” option under the “Conditional Formatting” menu.
Conditional formatting is a powerful tool for visually highlighting important information and trends in your template. By applying conditional formatting strategically, you can make your data analysis more effective and improve the readability and usability of your spreadsheet template.
Setting up data validation in your template
Data validation is a feature in Excel that allows you to set restrictions on the type and range of data that can be entered into specific cells or columns. By implementing data validation in your template, you can ensure data accuracy, consistency, and integrity. Here’s how you can set up data validation in your template:
1. Select the range: Determine the range of cells or columns where you want to apply data validation. This could be a single cell, a column, or a larger range of cells. Consider the type of data that will be entered and select the appropriate range that aligns with the data validation rules you want to impose.
2. Access the data validation dialog box: In Excel, go to the “Data” tab and click on the “Data Validation” button in the “Data Tools” group. This will open the data validation dialog box, where you can define the validation rules and criteria.
3. Choose the validation criteria: In the data validation dialog box, choose the type of data validation criteria you want to apply to the selected range. Excel offers various validation criteria options, such as whole numbers, decimal numbers, text length, date formats, and custom formulas. Select the appropriate criteria that match your data requirements.
4. Specify the validation settings: Set the validation settings based on the chosen criteria. This might include setting minimum and maximum values, data range, or specific list entries. You can also customize the error message that appears when invalid data is entered, providing instructions or explanations to the user.
5. Preview and test the data validation: Use the “Input Message” and “Error Alert” tabs in the data validation dialog box to preview how the validation will be displayed to users. Test the data validation by entering different types of data into the specified range. The validation rules will be enforced, and Excel will display error messages or warnings if the entered data does not meet the defined criteria.
6. Apply the data validation: Once you are satisfied with the data validation settings, apply them to the selected range by clicking the “OK” button in the data validation dialog box. Excel will enforce the validation rules and restrict any data that does not adhere to the defined criteria from being entered into the validated cells.
7. Modify or remove data validation: If you need to make changes to the data validation settings, select the range, access the data validation dialog box again, and adjust the criteria or settings as needed. To remove data validation from a range of cells, select the range and click the “Data Validation” button in the “Data Tools” group, then select the “Clear All” option.
Data validation helps ensure the accuracy of your data and reduces the likelihood of errors or inconsistencies. By setting up data validation in your template, you can create a more reliable and user-friendly spreadsheet that maintains data integrity.
Protecting your template
Protecting your template is essential to maintain the integrity of your data, formulas, and formatting. Excel provides several security features that allow you to control access, prevent unauthorized changes, and safeguard the confidentiality of your template. Here’s how you can protect your template:
1. Password-protect your workbook: Set a password to protect your entire workbook from being opened by unauthorized users. This prevents anyone without the password from accessing the content of your template. To password-protect your workbook, go to the “File” tab, select “Save As,” and choose the “Tools” dropdown menu. Select “General Options” and enter a password to open and modify the workbook.
2. Protect specific worksheets: If your template consists of multiple worksheets, you can protect specific sheets to restrict edits or changes. For example, you may want to protect the main data sheet while allowing users to enter data in a separate input sheet. Right-click on the sheet tab, choose “Protect Sheet,” and set a password if desired. You can also specify permissions for individual users or groups.
3. Lock cells or ranges: Excel allows you to lock specific cells or ranges to prevent accidental modifications. By default, all cells are locked, but the protection is not enforced until you activate worksheet protection. To lock cells or ranges, select the cells, right-click, and choose “Format Cells.” Under the “Protection” tab, uncheck the “Locked” option for unlocked cells or ranges.
4. Enable worksheet protection: Activate worksheet protection to enforce the locking and protection settings you have applied. Go to the “Review” tab, click on “Protect Sheet,” and enter a password if required. This ensures that only authorized users can make changes to the protected elements in the worksheet, while still allowing access to the unlocked cells or ranges.
5. Allow specific edits: While protecting your template, you may want to allow certain users or groups to edit specific cells or ranges. Excel provides the option to allow specific edits even when the worksheet is protected. Access the “Allow Users to Edit Ranges” option under the “Review” tab, and define the ranges and users who are allowed to make changes.
6. Protect formulas and hidden data: If you have complex formulas or hidden data in your template, you can protect them from being altered or revealed. Protecting formulas prevents accidental changes, and protecting hidden rows, columns, or sheets maintains the confidentiality of the data. Use the protection options under the “Review” tab to safeguard these elements.
7. Test the protection settings: After setting up protection, test the protection settings to verify that they function as intended. Try to make edits or modifications to the protected elements using a user account without appropriate permissions. Ensure that the protection measures are effectively enforced, and make any necessary adjustments if issues arise.
By implementing the necessary protection measures, you can maintain the integrity and confidentiality of your template. Protecting your workbook, worksheets, cells, and formulas ensures that unauthorized changes or access are prevented, providing peace of mind and security for your important data.
Saving and sharing your template
Once you have created and customized your template, it’s important to save it properly and share it with others who can benefit from its use. Saving your template ensures that you can easily access and reuse it in the future, while sharing it allows for collaboration and consistency within your organization. Here’s how you can save and share your template:
1. Save your template in the appropriate format: When saving your template, choose the appropriate file format to ensure compatibility and easy access. In Excel, go to the “File” tab and select “Save As.” Choose the desired file format, such as .xlsx or .xlsm for Excel workbooks, depending on the features and functionalities you have incorporated into your template.
2. Provide a descriptive file name: Give your template a descriptive and meaningful file name that reflects its purpose. This makes it easier to identify and locate the template when you or others need to use it. Avoid using generic or ambiguous names that may cause confusion.
3. Save the template in a dedicated folder: Create a dedicated folder on your computer or network drive to keep all your templates organized. This facilitates easy access and retrieval when you need to use or share the template in the future. Save your template in this designated folder to maintain a structured library of templates.
4. Share the template with others: If you want to collaborate with others or share your template within your organization, utilize Excel’s sharing and collaboration features. One option is to upload the template to a shared network drive or file-sharing platform. Another option is to send the template directly to specific individuals via email, ensuring they have the necessary permissions to access and modify the template.
5. Communicate template usage guidelines: When sharing the template, provide clear guidelines and instructions for its usage. Include information on how to properly input data, make modifications, or use specific features within the template. Clear instructions and guidelines ensure that users make the most of the template and follow best practices.
6. Update and version control: As you make improvements or updates to your template over time, it’s important to maintain version control. Keep track of different versions of your template by using version numbers or dates in the file name. This helps to avoid confusion and ensures that everyone is using the latest and most up-to-date version of the template.
7. Regularly backup your template: It’s crucial to regularly back up your template to prevent data loss or corruption. Create backup copies of your template and store them in a secure location, such as an external hard drive or cloud storage. Regular backups protect your template against unforeseen circumstances and ensure that you can easily recover a working version if needed.
By saving your template properly and sharing it with others, you promote collaboration, efficiency, and consistency in data management and analysis. Properly organized and documented templates enable seamless sharing and utilization, maximizing the benefits of your custom-built spreadsheet template.
Troubleshooting common issues with templates
While working with templates, you may encounter certain issues or errors that can hinder your ability to effectively use or modify the template. Understanding these common issues and knowing how to troubleshoot them can save you time and frustration. Here are some common issues with templates and how to resolve them:
1. Formula errors: One common issue is when formulas in the template produce incorrect results or show errors. To troubleshoot formula errors, check for typographical errors, ensure correct cell references, and verify that the formula syntax is accurate. Consider using Excel’s formula auditing tools, such as the “Evaluate Formula” feature, to step through the formula and identify any potential issues.
2. Data not populating correctly: If the template is not retrieving data from other sources correctly or not populating data as expected, check the data source connections or external links. Verify that the data source is accessible, properly formatted, and in the correct location. Ensure that any necessary refresh or update actions are performed on linked data sources.
3. Formatting discrepancies: Sometimes, the formatting in the template may appear differently or get distorted when viewed on different devices or versions of Excel. To address this issue, use standard formatting options and avoid relying on features that may not be universally compatible. Use themes or styles that are consistent across different Excel versions, and test the template on various devices to ensure consistent formatting.
4. Performance issues: Templates with large amounts of data or complex calculations may experience sluggish performance, such as slow response times or freezing. To improve performance, consider optimizing formulas, reducing excessive formatting, and removing any unnecessary calculations or features. You may also want to close other applications or clear unnecessary files from your computer to free up system resources.
5. Error handling and validation: If your template incorporates error handling or validation, such as error messages or data validation rules, ensure they are working correctly. Test the error handling by intentionally inputting invalid data and verify that the appropriate error message or warning is displayed. Review data validation rules and adjust them as needed to ensure that they are correctly enforced for the intended data input.
6. Compatibility issues: Templates may encounter compatibility issues when opened in different versions of Excel or other spreadsheet software. To mitigate these issues, use compatible file formats, such as .xlsx, that can be opened in older versions of Excel. Avoid using advanced features or functions that may not be supported in older versions of Excel or other spreadsheet software.
7. User errors: Finally, common issues with templates can arise from user errors, such as accidental deletions or changes to important formulas or formatting. To prevent user errors, consider implementing worksheet protection, restricting editing permissions, or providing clear usage instructions and guidelines. Regularly back up your template to ensure you have a working version available to revert to if user errors occur.
By identifying and troubleshooting these common issues, you can resolve problems and ensure the smooth functionality and usability of your template. Regularly reviewing and testing your template will help identify and address any issues promptly, maximizing the effectiveness and efficiency of your spreadsheet template.