
Set Up Your Google Sheets Document
Creating a Google Sheets template is a convenient way to streamline your work and maintain consistency in your spreadsheets. Follow these steps to set up your Google Sheets document:
1. Create a new Google Sheets document: Open Google Drive and click on the “+ New” button. Select “Google Sheets” from the drop-down menu to create a new spreadsheet.
2. Choose a template: While creating a new document, you can choose from various pre-designed templates provided by Google or select a blank spreadsheet to customize according to your needs.
3. Set the document’s title: Give your document a descriptive title by clicking on the current document name at the top-left corner. Enter a name that reflects the purpose or content of your template.
4. Set up sheet tabs: By default, a new Google Sheets document starts with one sheet. To add more sheets, click on the “+” icon next to the existing sheet tabs at the bottom. Rename the sheets by right-clicking on the tab and selecting “Rename.”
5. Format your sheets: Adjust the appearance and formatting of your sheets by selecting the cells and applying formatting options such as font styles, colors, borders, and backgrounds. You can also merge cells or adjust column widths and row heights as needed.
6. Add headers and footers: Click on the “Insert” menu and select “Header & page number” or “Footer & page number” to add headers and footers to your document. Headers and footers can include text, page numbers, dates, and other information that will appear on every page.
7. Set up the document’s orientation and size: To change the orientation (landscape or portrait) of your document, go to the “File” menu, click on “Page setup,” and select your preferred orientation. You can also adjust the paper size to match your printing requirements.
By following these steps, you can create a well-structured and visually appealing Google Sheets document that serves as the foundation for your template. Take the time to customize the layout, formatting, and other settings to meet your specific needs and make your template truly functional.
Customize Your Template’s Layout and Design
When creating a Google Sheets template, it’s essential to customize the layout and design to make it visually appealing and easy to use. Follow these steps to customize your template:
1. Add color and themes: Google Sheets offers a variety of built-in themes and color choices. Click on the “Format” menu, go to “Theme,” and select a theme that aligns with your template’s purpose. You can also manually customize colors by selecting cells or ranges and changing the fill and font colors.
2. Apply cell formatting: Make important data stand out by applying formatting to cells. Use options like bold, italic, underline, and strikethrough to emphasize text. Additionally, you can change the font style, size, and alignment to create a consistent and professional look.
3. Organize your data with borders: Draw attention to specific sections or separate data by applying borders. Select cells or ranges, click on the “Format” menu, go to “Borders,” and choose the border style and thickness. Borders help create a structured and clean layout for your template.
4. Customize column and row headers: Make it easy for users to understand and navigate your template by customizing column and row headers. Use bold text, different font colors, or background shading to differentiate headers from regular data entries.
5. Add visual elements: Enhance the visual appeal of your template by inserting images or icons. They can be used as logos, icons for data categories, or visual representations of information. Use the “Insert” menu to add images or icons from your Google Drive or choose from the available options.
6. Utilize conditional formatting: Apply conditional formatting rules to highlight data based on specific criteria. Use color scales, data bars, or icon sets to visually represent values and provide a quick overview of trends or variations in your data.
7. Ensure readability: Choose appropriate font styles and sizes to ensure that your template is easily readable. Consider using headers, subheaders, and bullet points to break down information and make it more digestible.
By customizing the layout and design of your Google Sheets template, you can create a visually appealing and user-friendly document. Remember to consider the purpose of your template and the needs of your users so that you can optimize the layout and design accordingly.
Add Headers and Footers
Headers and footers are an important component of a well-organized Google Sheets template. They provide consistent information across all sheets and enhance the overall professional appearance. Follow these steps to add headers and footers to your template:
1. Access the header and footer options: Click on the “Insert” menu at the top of the Google Sheets document and select “Header & Page Number” or “Footer & Page Number.”
2. Modify the header: In the header section, you can add descriptive text or placeholders that will appear at the top of each page. Common header information includes titles, logos, company names, document-specific information, or any other relevant details.
3. Customize the footer: Similar to the header, the footer section allows you to add text or placeholders that will appear at the bottom of each page. Common footer information includes page numbers, dates, author names, copyright statements, or other essential details.
4. Insert placeholders: Placeholders are dynamic elements that automatically update based on the context. Use the available placeholders like page numbers, document titles, sheet names, or current dates to add relevant information to your headers and footers.
5. Format text and alignment: Customize the appearance of the text in your headers and footers by selecting the desired font style, size, and color. Additionally, you can align the text to the left, right, or center to achieve a visually appealing layout.
6. Apply different headers or footers: You can customize headers and footers for different sections or sheets within your template. Simply go to the “Insert” menu and choose “Header & Page Number” or “Footer & Page Number” again to modify the headers and footers for specific sheets.
7. Preview and adjust: After adding headers and footers, it’s important to preview your template to ensure that they appear as intended. Go to the “File” menu and select “Print” or use the keyboard shortcut Ctrl+P to preview how your headers and footers will look on paper or in a print preview.
By incorporating headers and footers into your Google Sheets template, you can provide important information that remains consistent across all sheets. Utilize placeholders to dynamically update information and ensure that your headers and footers contribute to the overall professionalism and usability of your template.
Create and Format Cells
The cells in your Google Sheets template are where you enter and organize data. It’s essential to create and format cells effectively to ensure usability and clarity. Follow these steps to create and format cells in your template:
1. Enter data: Double-click on a cell to enter data directly, or use the formula bar at the top to input formulas or functions. You can organize data in rows and columns, and resize cells as needed by dragging the borders.
2. Apply formatting options: Use the menu options in the toolbar or right-click on cells to access formatting options. Format data as numbers, dates, percentages, or currency to ensure proper display and calculation. You can also change the font style, size, and text color.
3. Format dates and times: If you need to display dates or times, use the “Format” menu and select “Number” > “More Formats,” and then choose the appropriate format. You can display dates in various styles (e.g., MM/DD/YYYY or DD-MMM-YYYY) or times in 12-hour or 24-hour formats.
4. Merge cells: Merge cells to create larger areas for titles or headers. Select multiple cells, right-click, and choose “Merge cells” from the menu. Note that merging cells only works for adjacent cells in the same row or column.
5. Wrap text: Adjust the cell’s text wrapping by selecting the cell(s), right-clicking, and choosing “Wrap text” from the menu. This ensures that longer text entries are displayed fully within the cell and automatically adjust the row height if needed.
6. Add borders and colors: Use borders to visually separate cells or create tables. Select cells or ranges, go to the “Format” menu, choose “Borders,” and apply the desired border style. Additionally, you can change cell background colors by using the fill color option.
7. Freeze rows or columns: To keep specific rows or columns visible while scrolling through your data, use the “View” menu and select “Freeze” > “1 row” or “1 column.” This can be helpful when working with large datasets.
By effectively creating and formatting cells in your Google Sheets template, you can ensure that data is organized, easily readable, and visually appealing. Take advantage of the various formatting options available to customize your cells and make your template more functional and user-friendly.
Apply Conditional Formatting
Conditional formatting is a powerful feature in Google Sheets that allows you to dynamically change the formatting of cells based on specific criteria. By applying conditional formatting, you can visually highlight important data or identify patterns and trends. Follow these steps to apply conditional formatting to your Google Sheets template:
1. Select the target range: Choose the range of cells that you want to apply conditional formatting to. This can be a single cell, a column, a row, or a range of cells.
2. Access conditional formatting options: Go to the “Format” menu and select “Conditional formatting.” This will open the conditional formatting sidebar.
3. Choose a formatting rule: In the conditional formatting sidebar, click on the drop-down menu and select the type of rule you want to apply. Options include “Cell is empty,” “Text contains,” “Greater than,” “Less than,” and many more.
4. Set the formatting criteria: Customize the condition by selecting an operator (such as “equal to,” “greater than,” “less than,” etc.) and specifying the value or formula. This determines when the formatting will be applied.
5. Apply formatting styles: Choose the formatting style that will be applied to the cells meeting the specified criteria. This can include changing the font color, fill color, font style, applying strikethrough, adding borders, or any other formatting option available in the toolbar.
6. Add additional rules: If you have multiple criteria or formatting requirements, you can add additional conditional formatting rules. This allows you to create complex conditions and apply different formatting styles based on specific criteria.
7. Preview and adjust: After applying conditional formatting, preview your template to ensure that the formatting is applied correctly and achieves the desired effect. Make any necessary adjustments by revisiting the conditional formatting sidebar.
Conditional formatting can be a powerful tool to visually analyze and highlight data within your Google Sheets template. It helps to draw attention to critical information and make patterns and trends more apparent. Experiment with different rules and formatting styles to make your template informative and visually appealing.
Use Formulas and Functions
Formulas and functions are the backbone of data calculations and analysis in Google Sheets. By utilizing formulas and functions, you can automate calculations, perform complex operations, and manipulate data efficiently. Follow these steps to make the most of formulas and functions in your Google Sheets template:
1. Learn the basic syntax: Formulas and functions in Google Sheets follow a specific syntax. A formula starts with an equals sign (=), followed by the function or operation, and any additional arguments or cell references enclosed in parentheses. Familiarize yourself with the basic syntax to construct formulas correctly.
2. Explore common functions: Google Sheets offers a wide range of built-in functions to perform various calculations. Common functions include SUM, AVERAGE, MAX, MIN, COUNT, IF, VLOOKUP, and many more. Take the time to understand and experiment with different functions to meet your specific calculation and data manipulation needs.
3. Referencing cells: Use cell references in your formulas to perform calculations based on the values in specific cells. For example, “=A1+B1” adds the values in cells A1 and B1. You can also use ranges, such as “=SUM(A1:A10)”, to calculate the sum of values in a range of cells.
4. Apply absolute and relative references: When copying formulas to other cells, you can use absolute or relative references. Absolute references ($A$1) remain constant when copied, while relative references (A1) adjust based on the new cell’s position. Use the appropriate reference type to ensure accurate calculations in your template.
5. Nest functions: Combine multiple functions within a formula to perform complex calculations. You can nest functions by using one function’s result as an argument for another function. This allows you to build intricate calculations and automate data analysis.
6. Use logical operators: Logical operators, such as =, <>, >, <, >=, and <=, help you compare values in your formulas. They allow you to create conditional calculations and make data-driven decisions based on specific criteria.
7. Experiment and troubleshoot: Don’t be afraid to try different formulas and functions in your template. Explore advanced functions, such as ARRAYFORMULA or QUERY, to achieve more sophisticated calculations. If you encounter errors, use the error messages in Google Sheets to troubleshoot and refine your formulas.
By harnessing the power of formulas and functions, you can automate calculations and perform advanced data manipulation in your Google Sheets template. Take the time to understand the available functions and experiment with different formulas to meet your specific needs and create a dynamic and efficient template.
Add Data Validation
Data validation is a powerful feature in Google Sheets that allows you to control the type and range of data entered into cells. By applying data validation rules, you can ensure data accuracy, consistency, and integrity in your Google Sheets template. Follow these steps to add data validation to your template:
1. Select the cell or range: Choose the cell or range of cells that you want to apply data validation to. This can be a single cell, a column, or a specific range of cells.
2. Access the data validation options: Go to the “Data” menu and select “Data validation.” This will open the data validation sidebar.
3. Choose the validation rule: In the data validation sidebar, select the type of data validation rule you want to apply. Options include “List from a range,” “Number,” “Text length,” “Date,” and many more.
4. Define the validation criteria: Customize the validation rule by specifying the criteria that the data must meet. For example, you can set a range of values, a specific text length, a date range, or even a custom formula to validate the data.
5. Set error messages: Define an error message that will display when the entered data does not meet the validation criteria. This helps users understand why their entry is not allowed and provides guidance for correcting the data.
6. Choose the on invalid data action: Decide what happens when invalid data is entered. You can show a warning, which allows users to proceed with entry but displays a message, or you can reject the data entry altogether and prompt users to correct the data before proceeding.
7. Apply to other cells or sheets (optional): If you have similar data validation requirements for other cells or sheets in your template, you can copy the data validation rules or apply the rules to different ranges as needed.
By adding data validation to your Google Sheets template, you can enhance data integrity and accuracy. Data validation ensures that only valid and properly formatted information is entered, reducing the risk of errors and inconsistencies. Take advantage of the various data validation options to create a reliable and user-friendly template.
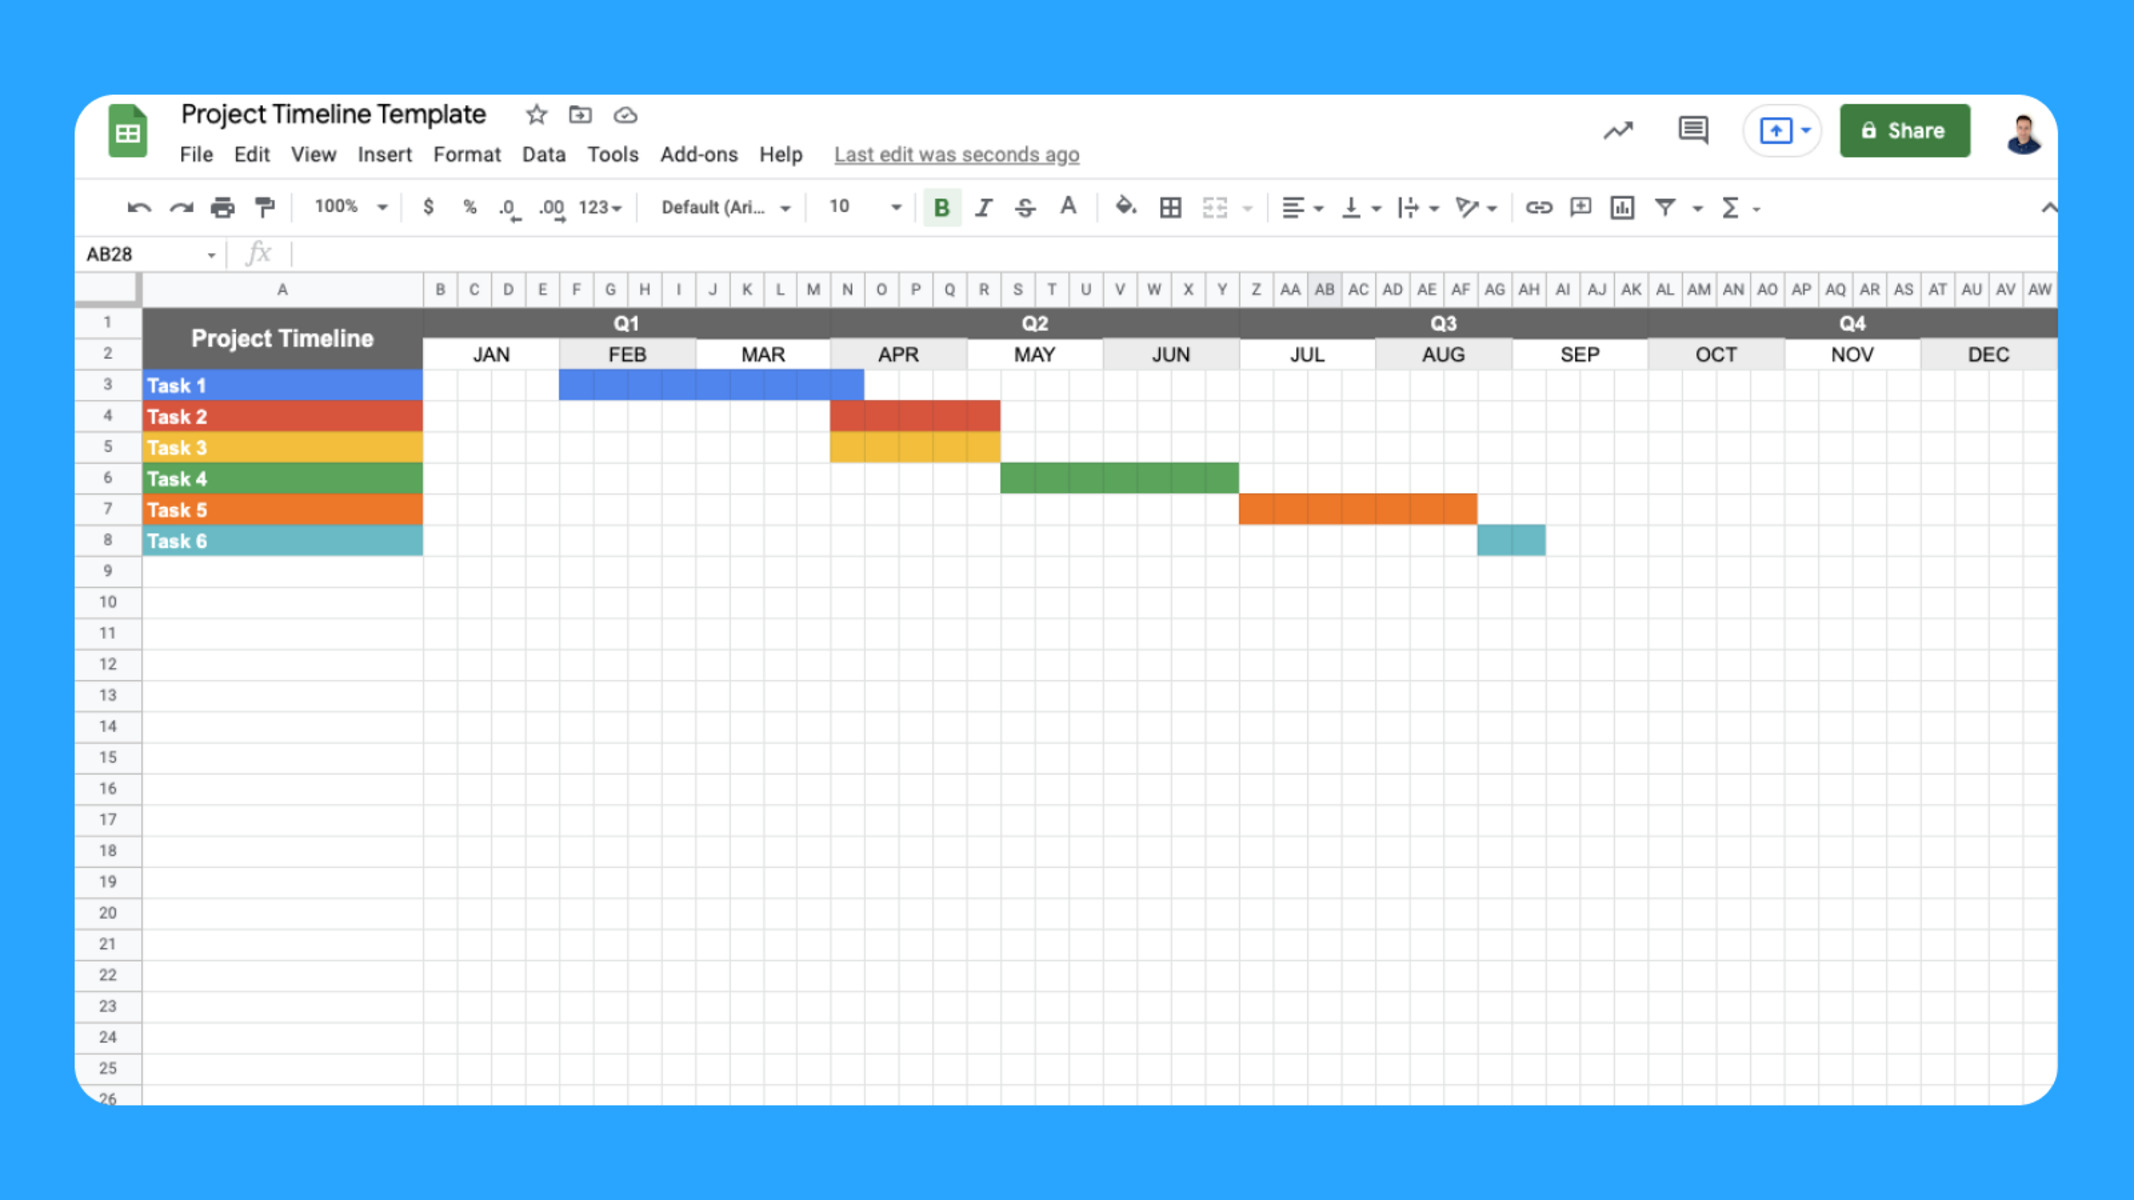
Include Charts and Graphs
Charts and graphs are effective visual tools that help you present data in a clear and meaningful way. By incorporating charts and graphs into your Google Sheets template, you can enhance data analysis and make information more accessible. Follow these steps to include charts and graphs in your template:
1. Select the data range: Choose the range of data that you want to visualize in your chart or graph. This can be a single column, multiple columns, or even multiple ranges of data in different sheets.
2. Access the chart options: Go to the “Insert” menu and select “Chart” or click on the chart icon in the toolbar. This will open the chart editor sidebar on the right side of the screen.
3. Select a chart type: In the chart editor sidebar, choose the type of chart or graph that best represents your data. Google Sheets offers various options, including bar charts, line charts, pie charts, scatter plots, and more.
4. Customize the chart: Adjust the chart’s appearance and layout by modifying options in the chart editor sidebar. You can change the title, axis labels, colors, data labels, and other chart-specific settings to better communicate your data.
5. Switch between chart types: Experiment with different chart types to find the most suitable representation for your data. Use the “Chart types” tab in the chart editor sidebar to switch between different chart styles and see how each one presents your data.
6. Add additional data series: If your data has multiple series or categories, you can add them to the chart by selecting the range and clicking on the “Add series” button in the chart editor sidebar. This allows you to compare and analyze different data groups within the same chart.
7. Position and resize the chart: Click and drag the chart in the worksheet to position it where you want it to appear. You can also resize the chart by clicking and dragging the corners or sides to make it fit the space available in your template.
By including charts and graphs in your Google Sheets template, you can visually represent data and provide a clearer understanding of trends, patterns, and comparisons. Experiment with different chart types and customization options to create impactful visualizations that enhance data analysis.
Insert Images and Icons
Adding images and icons to your Google Sheets template can enhance visual appeal and provide additional context to your data. Whether you want to include a logo, illustrate a concept, or highlight important information, follow these steps to insert images and icons into your template:
1. Access the “Insert” menu: Click on the “Insert” menu at the top of the Google Sheets document and select “Image” or “Drawing.” This will open the image insertion options.
2. Insert an image: If you have an image saved on your computer, select “Image” and choose the image file from your local storage. You can also insert images from the web by clicking on “By URL” and entering the image’s web address.
3. Resize and position: After inserting the image, you can click and drag the corners or sides to resize it as needed. To position the image, click and drag it to the desired location within your template.
4. Insert an icon: Icons can be used to represent concepts, instructions, or actions within your template. To insert icons, select “Insert” > “Drawing” and choose “New” to open the drawing tool. Use the drawing tools to create or select icons and shapes to insert into your template.
5. Format and customize: Once the image or icon is inserted, you can further customize its appearance. Use the “Image options” or “Drawing” toolbar to adjust properties such as brightness, contrast, transparency, borders, and other effects.
6. Use icons as buttons: Convert icons into clickable buttons by adding hyperlinks or assigning script functions to them. This allows users to interact with the template and perform actions by clicking on the icons.
7. Group and align objects: If you have multiple images or icons in your template, you can select them and use the alignment options to align them vertically, horizontally, or distribute them evenly. Grouping objects allows you to move and format them as a single unit.
By incorporating images and icons into your Google Sheets template, you can create visually appealing and informative documents. Images and icons help convey ideas, add context, and make your template more engaging for users.
Filter and Sort Data
Filtering and sorting data in Google Sheets is essential for organizing and analyzing large sets of information. By using these features, you can quickly locate specific data, identify patterns, and gain insights from your dataset. Follow these steps to filter and sort data in your Google Sheets template:
1. Identify the data range: Determine the range of cells that contain the data you want to filter or sort. This can be a single column, multiple columns, or even the entire dataset.
2. Filter data: To filter data based on specific criteria, click on the “Data” menu, select “Filter,” and choose “Create a filter.” This will add filter dropdowns to each column header, allowing you to select specific values or apply custom filter rules to display only the data that meets your criteria.
3. Sort data: To sort the data in ascending or descending order, select the range of cells, go to the “Data” menu, and choose “Sort range.” Specify the column to sort by and the order (A to Z, Z to A, or by numerical value).
4. Apply multiple filters: If you have multiple criteria for filtering, use the filter dropdowns to apply additional filters to different columns. This allows you to narrow down the displayed data based on multiple conditions.
5. Clear filters: To remove filters and display the entire dataset again, click on the filter dropdowns and select “Clear” or go to the “Data” menu and choose “Turn off filter.”
6. Create filter views: If you frequently use specific filters, you can save them as filter views. This allows you to switch between different filter configurations quickly without having to reapply the filters each time.
7. Sort with multiple criteria: To sort the data based on multiple columns, click on the “Sort range” option in the “Data” menu and select “Add another sort column.” This allows you to sort the data sequentially based on different columns, creating a customized sort order.
By mastering the filtering and sorting capabilities in Google Sheets, you can efficiently organize and analyze your data. These tools enable you to focus on the specific information you need, identify trends, and make data-driven decisions based on the filtered and sorted results.
Protect Your Template’s Data and Structure
Protecting your Google Sheets template’s data and structure is crucial to maintain data integrity and prevent unauthorized modifications. By implementing security measures, you can ensure the privacy and integrity of your template. Follow these steps to protect your template’s data and structure:
1. Set permissions: Determine who can access and edit your template. Restrict access to only trusted individuals or specific user groups by adjusting the sharing settings. Specify whether users can view, comment, or edit the template.
2. Protect sheets and ranges: Prevent accidental or unauthorized modifications by protecting specific sheets or ranges within your template. Go to the “Data” menu, select “Protect sheets and ranges,” and choose the desired options to limit editing rights for certain areas of the template.
3. Use sheet-level protection: Protect entire sheets or specific components within them, such as formulas, cells, or images. This ensures that critical elements of your template are safe from accidental changes. Specify the editing rights for each protected element.
4. Disable cell editing: To further secure your template, disable the ability to edit specific cells or columns. Right-click on the desired cell or column, choose “Protect range,” and adjust the editing permissions as needed. This prevents accidental modifications in essential areas.
5. Require password protection: Add an extra layer of security by requiring a password to access or make changes to your template. Go to the “File” menu, select “Protect sheet,” and set a password to limit access to the template.
6. Monitor changes: Enable the revision history feature to track any changes made to the template. This allows you to review and revert back to previous versions if necessary. Go to the “File” menu, select “Version history,” and choose “See version history” to access this feature.
7. Regularly backup your template: Avoid data loss by regularly backing up your template. Make copies of your template and store them in separate locations to ensure you have a backup in case of accidental deletion or corruption.
By taking measures to protect your Google Sheets template, you can safeguard your data and maintain the integrity of your template’s structure. These security measures mitigate the risk of unauthorized modifications and data loss, giving you peace of mind when working on sensitive or valuable information.
Share and Collaborate on Your Template
Sharing and collaborating on your Google Sheets template is essential for seamless teamwork and efficient data management. By leveraging the collaborative features of Google Sheets, you can work together with others, gather feedback, and ensure everyone stays informed. Follow these steps to share and collaborate on your template:
1. Share your template: Click on the “Share” button in the top-right corner of your Google Sheets document. Specify the email addresses or groups you want to share the template with, set the access level (view, comment, edit), and add a message if necessary.
2. Choose the appropriate access level: Determine the access level for each collaborator based on their roles and responsibilities. Grant editing access to team members who should have the ability to make changes, while providing view-only or commenting access to others who only need to review or provide feedback.
3. Collaborate in real-time: Enjoy the real-time collaboration feature of Google Sheets, allowing multiple users to work on the template simultaneously. Each collaborator’s changes are instantly reflected in the document, facilitating seamless teamwork without the need for manual merging of data.
4. Add comments and annotations: Use the commenting feature in Google Sheets to provide feedback, ask questions, or make suggestions on specific cells, ranges, or sections of the template. Collaborators can reply to comments and engage in discussions directly within the document.
5. Track changes: Enable the “Suggesting” mode in Google Sheets to track and view the changes made by collaborators. This allows you to review and accept or reject suggested edits, ensuring the integrity and consistency of the template.
6. Notify collaborators: Use the “Notify people” option when sharing your template to send email notifications to collaborators. This alerts them to important updates, changes, or requests for action within the document.
7. Review revision history: Access the revision history of your template to view past changes and restore previous versions if needed. Go to the “File” menu, select “Version history,” and choose “See version history” to access this feature.
By sharing and collaborating on your Google Sheets template, you can tap into the power of teamwork and leverage the collective expertise of your colleagues. Real-time collaboration, commenting, and tracking changes facilitate effective communication and ensure that everyone is on the same page, leading to enhanced productivity and successful project outcomes.
Publish and Embed Your Template
Once you’ve created a Google Sheets template, you have the option to publish and embed it, making it accessible to a wider audience. Publishing your template allows others to view and use it, while embedding it enables seamless integration into websites or other documents. Follow these steps to publish and embed your template:
1. Publish your template: Go to the “File” menu and select “Publish to the web.” In the dialog box, choose the sheets you want to publish and decide if you want to include formatting and notes. Click on the “Publish” button to make your template accessible to others.
2. Customize publishing settings: In the publishing dialog box, you can access additional publishing settings. Select the automatic republishing option to keep the published version up to date with changes made to your template. You can also set an expiration date or disable publishing if necessary.
3. Obtain the published URL: After publishing, you will receive a unique URL that leads directly to the published version of your template. Share this URL with others to provide them with access to your template.
4. Embed your template: To embed your template in a website or other online platforms, select the sheet or range you want to embed. Then, go to the “File” menu and select “Publish to the web.” In the “Embed” tab, customize the dimensions, whether to include the entire sheet or just a range, and the interactive options. Copy the embed code provided and paste it into the HTML source code of your website or document.
5. Update published or embedded versions: If you make changes to your template and want those changes to be reflected in the published or embedded versions, you’ll need to republish or update the embed code. Simply follow the same steps as before to publish or embed, and the new version of your template will be accessible.
6. Control access to the published version: Publish to specific users or groups by changing the sharing settings of your template. Adjust the permissions to allow only designated individuals or groups to view or access the published version.
7. Review and verify published or embedded data: Before sharing or embedding your template, double-check to ensure that any sensitive or confidential data is removed or masked. Verify that the published or embedded version displays the intended information accurately.
Publishing and embedding your Google Sheets template allows you to share it with a broader audience and integrate it seamlessly into websites or other documents. By providing access and enabling others to use your template, you can foster collaboration, maximize its usefulness, and increase its impact.
Make a Copy of Your Template
If you want to preserve the original version of your Google Sheets template while creating a new working copy, you can easily make a copy. This allows you to retain the template’s structure and formatting while starting afresh with new data or making modifications. Follow these steps to make a copy of your template:
1. Open your template: Access the Google Sheets template that you want to make a copy of. This can be a file stored in your Google Drive or a template you’ve created from scratch.
2. Select “Make a copy”: In the “File” menu, click on “Make a copy” or select the option from the drop-down menu. This will open a dialog box to configure the copy settings.
3. Name your copy: Provide a new name for the copied template. This helps differentiate it from the original and provides clarity on its purpose or content.
4. Choose the location: Decide where you want to store the copied template. You can select your Google Drive, a specific folder, or a shared drive depending on your preference and accessibility requirements.
5. Set sharing permissions (if necessary): Determine who can access the copied template by adjusting the sharing settings. Choose whether to keep it private or share it with specific individuals or user groups.
6. Customize copy settings: If you want to include comments, editors, or viewers from the original template in the copied version, you can select those options in the copy settings dialog box.
7. Create the copy: Once you’ve configured the copy settings, click on the “OK” or “Create” button to generate the copy of your template. You will then have a new Google Sheets document identical to the original, ready for your modifications or new data.
By making a copy of your Google Sheets template, you can preserve the integrity of the original while having the freedom to experiment, modify, or update a separate working version. This ensures that you always have a reliable template to use as a reference or as a basis for future projects.