
Benefits of Having a Digital Signature
A digital signature is a secure way to authenticate electronic documents and ensure their integrity. By using a digital signature, you can enjoy a range of benefits that enhance the security, efficiency, and legitimacy of your digital transactions. Here are some key advantages of having a digital signature:
1. Enhanced Security
Digital signatures use cryptographic algorithms to create a unique and tamper-proof identifier for each document. This helps to verify the authenticity and integrity of the document, ensuring that it has not been altered or tampered with. With a digital signature, you can be confident that your documents are secure and protected from unauthorized modifications.
2. Legally Binding
In many jurisdictions, digital signatures carry the same legal validity as handwritten signatures. They provide a way to electronically sign contracts, agreements, and other important documents, making them legally binding. This eliminates the need for printing, signing, and scanning physical copies, saving time and resources.
3. Cost and Time Savings
Using digital signatures eliminates the need for printing, mailing, and storing physical documents. This reduces paper and ink costs, as well as postage expenses. Additionally, the time saved by eliminating manual and paper-based processes increases productivity and efficiency.
4. Improved Workflow
With digital signatures, you can streamline and automate your document workflow. You can easily send documents for signature electronically, track their progress, and receive signed copies instantly. This eliminates the need for physical meetings and document exchanges, making the process faster and more convenient.
5. Global Reach
Digital signatures enable you to collaborate and do business with people from around the world. Electronic documents can be signed and exchanged electronically, allowing for seamless communication and transactions across different time zones and geographical boundaries.
6. Audit Trail and Accountability
Digital signatures provide an audit trail that records when a document was signed, who signed it, and any changes made to the document after it was signed. This creates accountability and traceability, making it easier to resolve disputes or prove the validity of a document if required.
7. Environmental Friendliness
By reducing the reliance on paper-based documents, digital signatures contribute to environmental sustainability. They help to save trees, conserve energy, and reduce carbon emissions associated with paper production, transportation, and disposal.
Step 1: Install Adobe Acrobat
Before you can create a digital signature in Adobe, you need to have Adobe Acrobat installed on your computer. Adobe Acrobat is a software program that allows you to view, create, and edit PDF documents.
Installing Adobe Acrobat is a straightforward process. Here are the steps to follow:
1. Visit the Adobe Website
Go to the official Adobe website and navigate to the “Acrobat” section. You can find this by searching for “Adobe Acrobat” in your preferred search engine.
2. Choose your Subscription Plan
Adobe offers different subscription plans for Acrobat, including individual and business plans. Select the plan that suits your needs and budget. You may also have the option to try out a free trial version before making a purchase.
3. Download and Install the Software
Click on the “Download” button to start downloading the Adobe Acrobat installation file. Once the download is complete, open the file and follow the on-screen instructions to install the software. Make sure to read and accept the terms and conditions before proceeding with the installation.
4. Activate the Software
After the installation is complete, launch Adobe Acrobat on your computer. You will be prompted to sign in with your Adobe ID or create a new one if you don’t have an account. Follow the instructions to activate the software using your login credentials.
5. Verify the Installation
Once the activation process is complete, you can verify that Adobe Acrobat has been successfully installed by opening a PDF document. Right-click on the PDF file and select “Open With Adobe Acrobat” from the context menu. The document should open in Adobe Acrobat, confirming that the installation was successful.
With Adobe Acrobat installed on your computer, you are now ready to proceed with creating a digital signature. The next steps will guide you through the process of adding a digital signature to your documents using Adobe Acrobat.
Step 2: Launch Adobe Acrobat
Once you have installed Adobe Acrobat on your computer, the next step is to launch the software. Launching Adobe Acrobat will open up the program, allowing you to access its features and functionality.
Here’s how to launch Adobe Acrobat:
1. Locate the Adobe Acrobat Icon
Look for the Adobe Acrobat icon on your desktop or in your list of installed programs. The icon typically consists of a red square with a white stylized “A” in the middle.
2. Double-click on the Adobe Acrobat Icon
Double-clicking on the Adobe Acrobat icon will initiate the program, and you will see the Adobe Acrobat main window opening on your screen.
3. Wait for Adobe Acrobat to Load
Adobe Acrobat may take a few moments to load, depending on your computer’s speed and the size of the program. During this time, you may see the Adobe Acrobat splash screen with the program’s logo.
4. Check for Updates
Once Adobe Acrobat is open, it is a good idea to check for any available updates. Updates often include new features, bug fixes, and security enhancements. To check for updates, click on the “Help” menu at the top of the screen and select “Check for Updates.” Follow the prompts to download and install any available updates.
5. Familiarize Yourself with the Interface
Take a moment to explore the Adobe Acrobat interface to become familiar with its various menus, toolbars, and panels. Understanding the layout of Adobe Acrobat will help you navigate the software more efficiently as you proceed with creating your digital signature.
By launching Adobe Acrobat, you have completed an essential step in the process of adding a digital signature to your documents. Next, you will learn how to open the document in Adobe Acrobat and prepare it for signing.
Step 3: Open the Document
After launching Adobe Acrobat, the next step in creating a digital signature is to open the document that you want to sign. Adobe Acrobat supports various file formats, including PDF, Word documents, Excel spreadsheets, and more.
Here’s how to open a document in Adobe Acrobat:
1. Click on “File” in the Menu Bar
Click on the “File” option located in the menu bar at the top of the Adobe Acrobat window. A drop-down menu will appear.
2. Select “Open”
In the drop-down menu, click on the “Open” option. This will open a file explorer window that allows you to navigate through your computer’s folders and directories.
3. Locate and Select the Document
Navigate to the folder where your document is saved and select it by clicking on it once. You can also use the search box within the file explorer window to find the document quickly.
4. Click on “Open”
After selecting the document, click on the “Open” button in the file explorer window. The selected document will now open in Adobe Acrobat, ready for further actions.
5. Review the Document
Take a moment to review the document to ensure that it is the correct one. Ensure that all the necessary content is included and in the desired order. You can scroll through the document using the scrollbar on the right side of the Adobe Acrobat window.
6. Save a Copy (Optional)
If you want to preserve the original document without any modifications, it is advisable to save a copy of it before adding the digital signature. To save a copy, click on the “File” option in the menu bar and select “Save As.” Choose a location, provide a new name for the document, and click on “Save.”
Once you have opened the document in Adobe Acrobat, you are ready to proceed with adding a digital signature. The next steps will guide you through the process of adding a digital ID and filling in the required information to create your signature.
Step 4: Click on “Certificates”
After opening the document in Adobe Acrobat, the next step in creating a digital signature is to access the “Certificates” feature. This feature allows you to manage and import digital IDs, which are essential for creating a secure and unique signature for your documents.
Here’s how to access the “Certificates” feature:
1. Navigate to the “Tools” Pane
Click on the “Tools” pane located on the right side of the Adobe Acrobat window. This will expand the Tools pane and display a list of available features and options.
2. Click on “Certificates”
Scroll down the Tools pane until you find the “Certificates” option. Click on “Certificates” to access the Certificates feature.
3. Explore the Certificates Feature
Once you click on “Certificates,” the Certificates feature will open, displaying the existing digital IDs and certificates associated with Adobe Acrobat. You can manage and organize your digital IDs using this feature.
4. Import a Digital ID (Optional)
If you already have a digital ID that you want to use for your digital signature, you can import it into Adobe Acrobat. To import a digital ID, click on the “More Tasks” button in the Certificates feature and select “Import.” Follow the prompts to locate and import your digital ID file.
Note: If you don’t have a digital ID, you can create one within Adobe Acrobat by following the next steps.
By clicking on “Certificates,” you have accessed the essential feature within Adobe Acrobat that allows you to manage digital IDs. In the next steps, you will learn how to add a digital ID and fill in the required information to create your unique digital signature.
Step 5: Add a Digital ID
In order to create a digital signature in Adobe Acrobat, you need to add a digital ID to your profile. A digital ID acts as a digital representation of your signature and is used to authenticate your identity when signing documents electronically.
Here’s how to add a digital ID:
1. Access the “Certificates” Feature
To add a digital ID, first, go to the “Certificates” feature in Adobe Acrobat. You can access this feature by clicking on the “Tools” pane located on the right side of the Adobe Acrobat window and then selecting “Certificates.”
2. Click on “Add ID”
Within the Certificates feature, click on the “Add ID” button. This will open the Add Digital ID dialog box.
3. Choose the Type of Digital ID
In the Add Digital ID dialog box, you will have the option to choose the type of digital ID you want to add. Adobe Acrobat offers different types of digital IDs, including a digital ID from a file or smart card, or a digital ID from a Windows certificate store. Select the appropriate option for your needs.
4. Follow the Prompts
Depending on the type of digital ID you choose, follow the prompts provided by Adobe Acrobat to add the digital ID. This may involve importing a digital ID file, inserting a smart card, or selecting a certificate from the Windows certificate store.
5. Provide the Required Information
When adding a digital ID, you will be asked to provide certain information, such as your name, email address, and organization. Fill in the required fields with accurate and valid information.
6. Set a Password
To protect your digital ID and ensure its security, set a strong password. Make sure to remember this password as you will need it to sign documents with your digital signature.
By adding a digital ID, you have established your unique digital signature within Adobe Acrobat. In the following steps, you will learn how to choose the appearance of your digital signature and apply it to your documents.
Step 6: Fill in the Required Information
After adding a digital ID to your profile in Adobe Acrobat, the next step in creating a digital signature is to fill in the required information associated with your digital ID. This information helps to verify your identity and ensures that your digital signature is legally binding and recognized.
Here’s how to fill in the required information:
1. Access the “Certificates” Feature
To fill in the required information, go to the “Certificates” feature in Adobe Acrobat. You can access this feature by clicking on the “Tools” pane located on the right side of the Adobe Acrobat window and then selecting “Certificates.”
2. Select your Digital ID
In the Certificates feature, you will see the list of digital IDs that are associated with your profile. Select the digital ID for which you want to fill in the required information.
3. Click on “More” and then “Certificate Properties”
Within the selected digital ID, click on the “More” button and then select “Certificate Properties.” This will open the Certificate Properties dialog box.
4. Fill in the Required Information
In the Certificate Properties dialog box, you will find various fields and tabs where you can provide the required information. Common fields include your name, email address, organization, and country. Fill in these fields accurately and ensure that the information matches your identification.
5. Review and Update Additional Information (if necessary)
In addition to the common fields, there may be other tabs or sections in the Certificate Properties dialog box where you can review and update additional information related to your digital ID. This may include information such as your address or phone number. Verify that all the information is correct and update any necessary details.
6. Save the Updated Information
After filling in the required information and reviewing the additional details, click on the “OK” or “Save” button in the Certificate Properties dialog box to save the updated information associated with your digital ID.
By filling in the required information, you have ensured that your digital signature contains accurate and valid information. In the subsequent steps, you will learn how to choose the appearance of your digital signature and apply it to your documents.
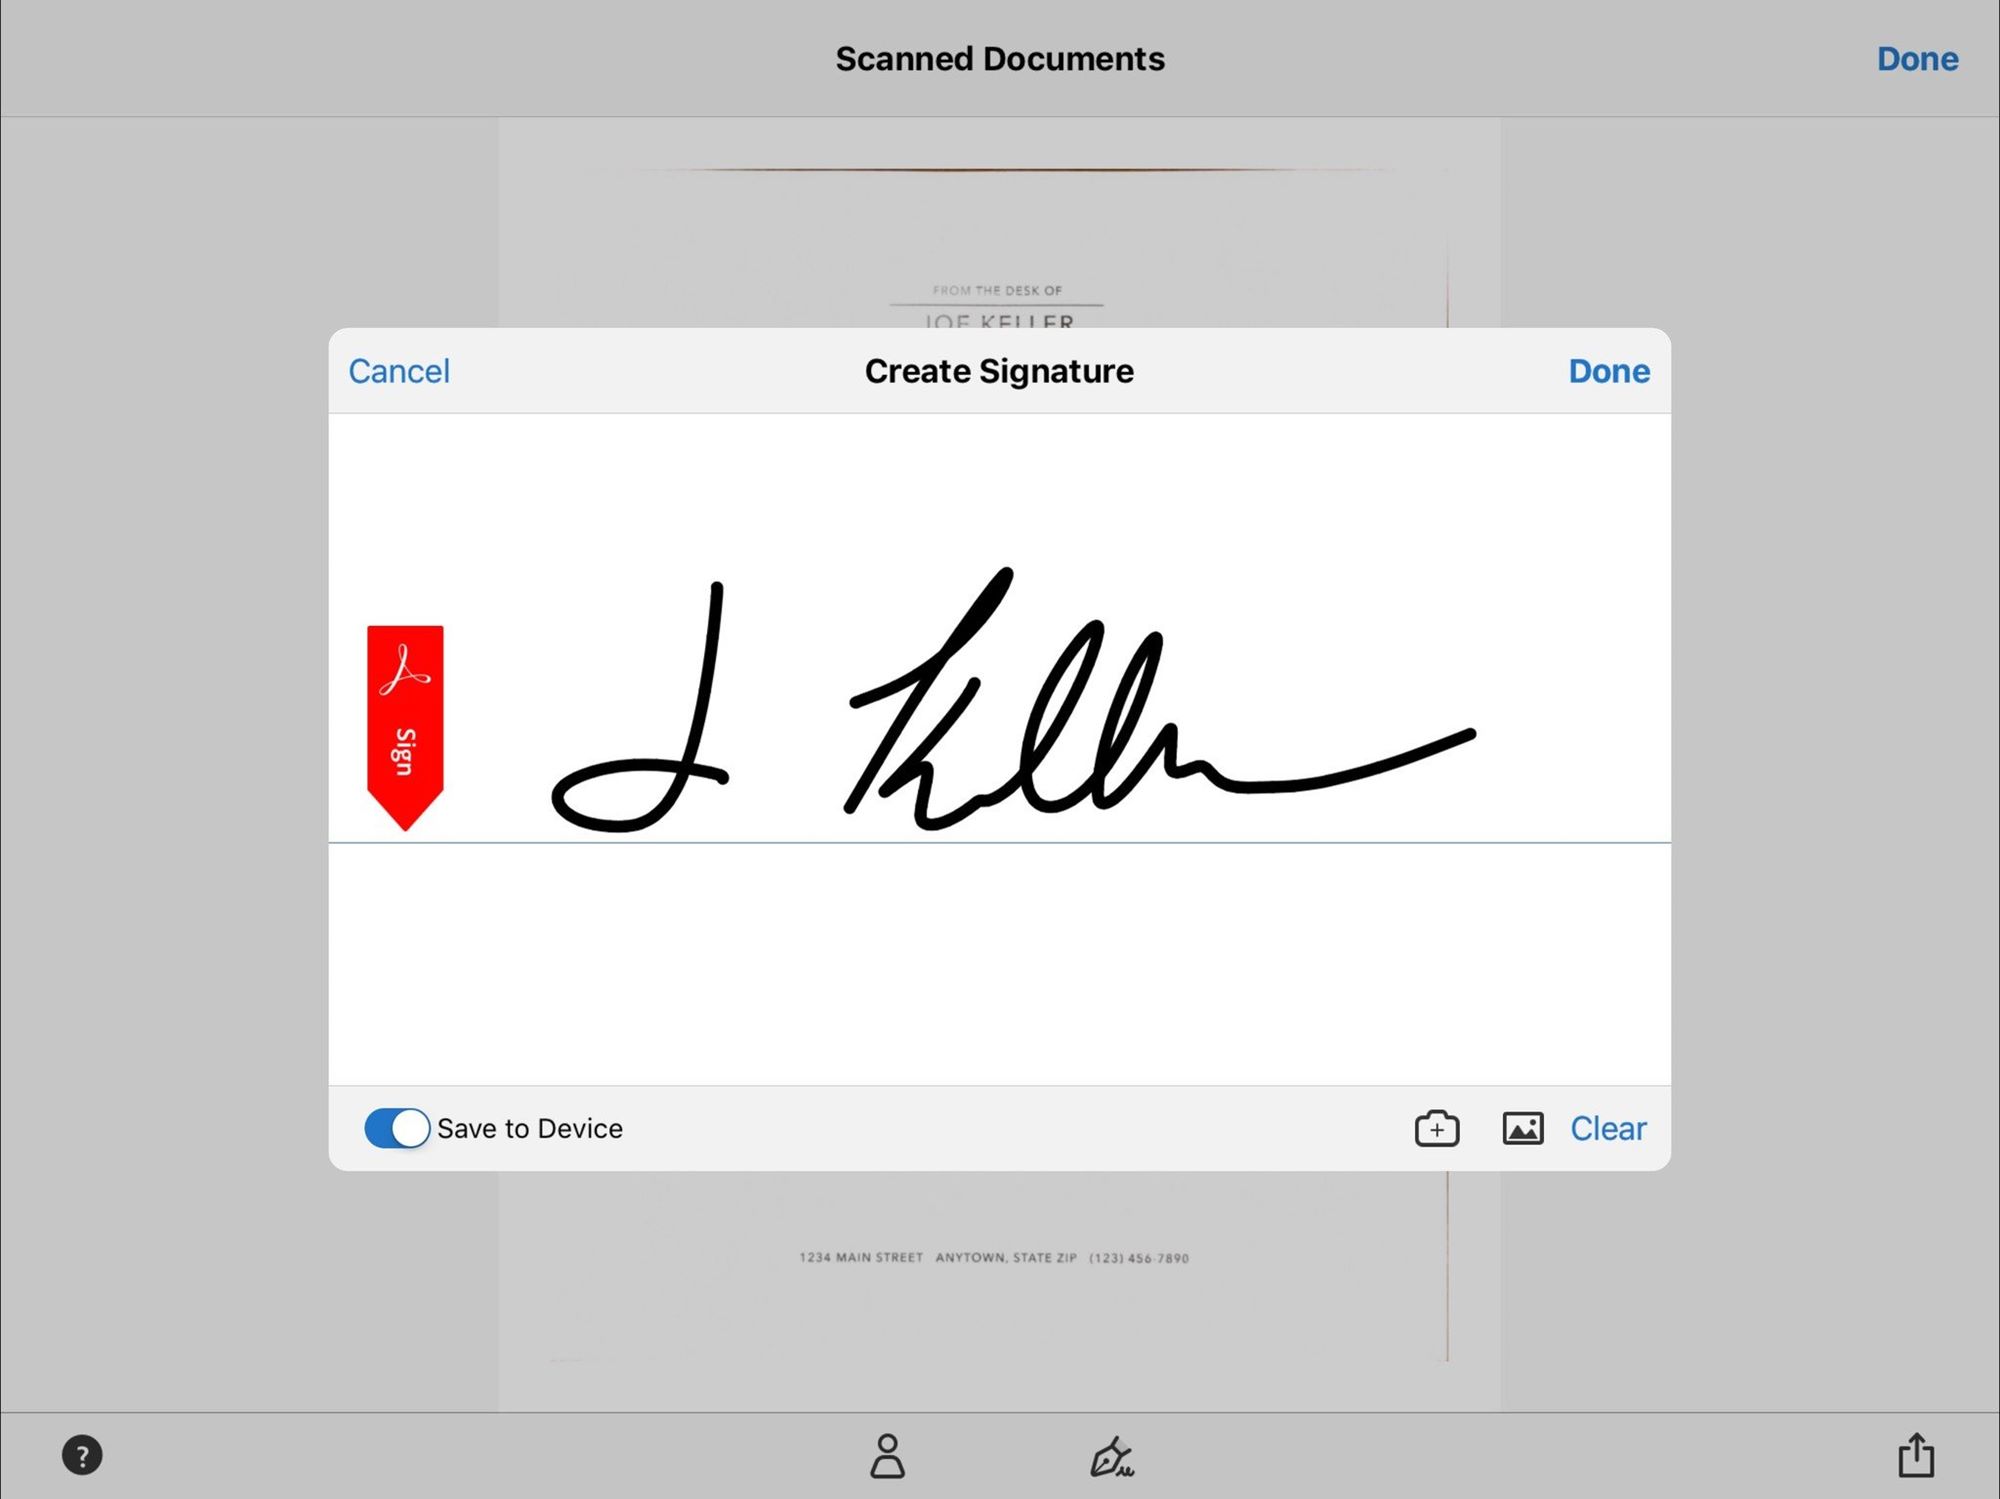
Step 7: Choose the Signature Appearance
After filling in the required information associated with your digital ID in Adobe Acrobat, the next step in creating a digital signature is to choose the appearance of your signature. The signature appearance determines how your digital signature will be displayed on the documents you sign.
Here’s how to choose the signature appearance:
1. Access the “Sign” Tool
To choose the signature appearance, go to the “Sign” tool in Adobe Acrobat. You can access this tool by clicking on the “Tools” pane located on the right side of the Adobe Acrobat window and then selecting “Sign.”
2. Click on “Place Signature”
In the Sign tool, you will see different options for creating a digital signature. Click on the “Place Signature” option to proceed.
3. Choose the Signature Placement
After clicking on “Place Signature,” you will be prompted to choose the placement for your digital signature. You can opt to place the signature directly onto the document or create a signature field where you can add your signature later. Select the desired option based on your preference.
4. Select a Signature Appearance
Once you have chosen the signature placement, you will have the option to select a signature appearance. Adobe Acrobat offers various pre-designed signature appearances that you can choose from. These appearances include handwritten styles, typewritten text, or even an image of your actual signature. Select the appearance that best suits your preference.
5. Customize the Signature Appearance (if desired)
If you want to customize the selected signature appearance, Adobe Acrobat provides options to adjust the size, position, and other settings of the signature. You can also upload an image of your own signature to use as the appearance. Explore the available customization options and make any desired adjustments.
6. Save the Signature Appearance
After choosing and customizing the signature appearance, click on the “Save” button to save the selected appearance for future use. You can give the appearance a name or leave it with the default name provided by Adobe Acrobat.
By choosing the signature appearance, you have defined how your digital signature will be displayed on the documents you sign. In the following step, you will learn how to apply your digital signature to the document.
Step 8: Apply the Digital Signature
With the signature appearance chosen in Adobe Acrobat, the next step in creating a digital signature is to apply it to the document. Applying the digital signature will attach your unique identifier to the document and indicate your authentication and intent to sign.
Here’s how to apply the digital signature:
1. Access the “Sign” Tool
To apply the digital signature, go to the “Sign” tool in Adobe Acrobat. You can find this tool by clicking on the “Tools” pane located on the right side of the Adobe Acrobat window and then selecting “Sign.”
2. Click on “Place Signature”
In the Sign tool, click on the “Place Signature” option to begin applying your digital signature.
3. Position your Signature
Once you have selected “Place Signature,” your cursor will change to a crosshair. Position the crosshair over the area of the document where you want to apply the signature. Click and drag to create a signature field if you haven’t already done so.
4. Apply the Signature
After positioning your signature field, a dialog box will prompt you to add your signature. Depending on the appearance you chose, you can sign using a stylus, your mouse, or by typing your name. Follow the prompts to apply your signature to the document.
5. Review and Confirm
Once you have applied your digital signature, review it to ensure that it appears as intended. Verify that your signature is clear, legible, and aligns with your desired appearance. If needed, you can make any necessary adjustments or redo the signature if it doesn’t meet your satisfaction.
6. Save the Document
After applying the digital signature, save the document to preserve the signature and its integrity. Go to the “File” menu and select “Save” or “Save As” to save the document with the applied digital signature. This will ensure that the signature remains intact and cannot be tampered with.
By applying the digital signature, you have successfully added your unique identifier to the document. In the next step, you will learn how to verify the digital signature to ensure its authenticity and integrity.
Step 9: Save the Document
After applying your digital signature in Adobe Acrobat, it is crucial to save the document to preserve the integrity of the signature and ensure that it can be verified in the future. Saving the document will create a secure and tamper-proof version that captures the applied digital signature.
Here’s how to save the document:
1. Access the “File” Menu
To save the document, click on the “File” menu located at the top left corner of the Adobe Acrobat window. A drop-down menu will appear.
2. Select “Save” or “Save As”
In the drop-down menu, select either “Save” or “Save As” option. The “Save” option will overwrite the existing file with the applied digital signature, while the “Save As” option allows you to save the document with a new name or in a different location.
3. Choose the File Name and Location
If you selected the “Save As” option, a dialog box will appear, allowing you to choose the file name and location for the saved document. Provide a suitable name that reflects the content and purpose of the document and select the desired location on your computer or network.
4. Click on “Save”
After choosing the file name and location (or if you selected the “Save” option), click on the “Save” button in the dialog box. The document will be saved with the applied digital signature, ensuring the security and authenticity of the signature.
5. Verify the Saved Document
To ensure that the document was saved correctly, navigate to the location where it was saved and open it again in Adobe Acrobat. Verify that the applied digital signature is still intact and that the document remains unchanged. This step provides confirmation that the document with the digital signature is saved appropriately.
By saving the document after applying the digital signature, you have secured the document and preserved the integrity of the signature. In the final step, you will learn how to verify the digital signature to ensure its authenticity and validity.
Step 10: Verify the Digital Signature
After saving the document with the applied digital signature in Adobe Acrobat, it is important to verify the digital signature to ensure its authenticity and integrity. Verifying the digital signature will confirm that the document has not been tampered with since the signature was applied and that the signer’s identity is valid.
Here’s how to verify the digital signature:
1. Open the Document
Open the document that contains the applied digital signature in Adobe Acrobat. Locate the document on your computer or network, then double-click on it to open it in Adobe Acrobat.
2. Click on the Signature Field
Locate the digital signature field on the document, usually indicated by a signature icon or a visible signature appearance. Click on the signature field to select it.
3. View the Signature Properties
After selecting the signature field, right-click on it and select “Signature Properties” from the context menu. This will open the Signature Properties dialog box.
4. Verify the Signature Details
In the Signature Properties dialog box, you can view the signature details such as the signer’s name, signing time, and the validity of the signature. Verify that the details match the intended signer’s identity and validate the signing time.
5. Check the Signature Status
In the Signature Properties dialog box, you will see the signature status indicating if the signature is valid or invalid. If the signature status is marked as valid, it means that the document has not been tampered with since the signature was applied and that the signer’s identity is authenticated.
6. View the Certificate Chain (Optional)
If necessary, you can view the certificate chain associated with the digital signature. The certificate chain provides information about the signing certificate and any intermediate certificates that were used to establish the validity of the signature.
7. Close the Signature Properties
After reviewing the signature details and status, close the Signature Properties dialog box by clicking on the appropriate button (e.g., “OK” or “Close”).
By verifying the digital signature, you can ensure the authenticity and integrity of the signed document. This provides confidence that the document has not been altered since the signature was applied and that the signer’s identity is valid.