
What is a Desktop Shortcut?
A desktop shortcut is a convenient way to access files, folders, programs, or websites directly from your desktop. It serves as a quick link that allows you to bypass navigating through multiple folders or menus to find what you need. A desktop shortcut typically consists of an icon that represents the file or application and a clickable link that opens it with just a single click.
Desktop shortcuts are like virtual bookmarks that can be customized to suit your preferences. They provide easy access to frequently used files or applications, saving you time and effort. Whether it’s a document you frequently work on, a folder you need to access regularly, or a program you use daily, creating a desktop shortcut can streamline your workflow and make your computer usage more efficient.
With a desktop shortcut, you can keep your most important files, folders, and programs within reach, organized right on your desktop. It eliminates the need to search for specific files or navigate through complex folder structures. Moreover, you can personalize your desktop by arranging and organizing shortcuts in a way that makes sense to you.
Desktop shortcuts are not limited to local files or applications. You can also create shortcuts for websites, allowing you to open your favorite websites with a single click. This is especially useful for websites that you frequently visit or web apps that you use regularly.
Overall, desktop shortcuts provide a convenient and efficient way to access files, folders, programs, and websites directly from your desktop. They simplify your computer usage, save you time, and help you stay organized. In the following sections, we will explore how to create, modify, and delete desktop shortcuts on a Windows operating system.
Creating a Desktop Shortcut for a File or Folder
Creating a desktop shortcut for a file or folder is a straightforward process that can be completed in just a few simple steps. Follow the steps below to create a desktop shortcut:
- Step 1: Right-click on the Desktop
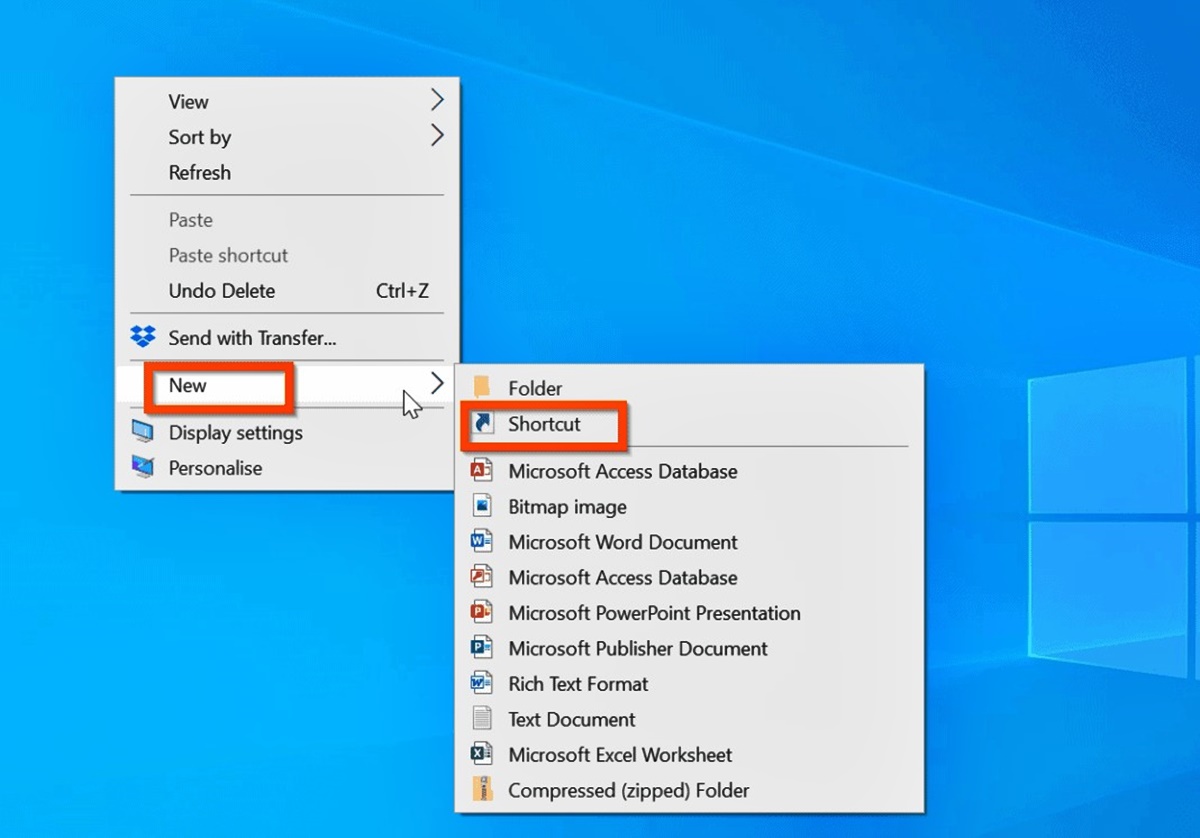
- Step 2: Select “New”
- Step 3: Click on “Shortcut”
- Step 4: Browse for the File or Folder
- Step 5: Name the Shortcut
- Step 6: Click “Finish”
To begin, navigate to your desktop and right-click on an empty area. This will open a context menu with various options.
In the context menu, hover over the “New” option to reveal a sub-menu with additional choices.
In the “New” sub-menu, click on the “Shortcut” option. This will initiate the shortcut creation process.
A window will appear, prompting you to locate the file or folder for which you want to create a shortcut. Use the browse button to navigate through your computer’s directories and select the desired file or folder.
After selecting the file or folder, you will need to provide a name for the shortcut. This name will appear below the shortcut icon on your desktop, so choose a descriptive name that will help you identify it quickly.
Once you have entered a name for the shortcut, click the “Finish” button to create the shortcut on your desktop.
That’s it! You have successfully created a desktop shortcut for a file or folder. You can now access the file or folder directly from your desktop by double-clicking on the shortcut.
Creating desktop shortcuts for frequently used files or folders can greatly enhance your productivity, as it eliminates the need to search for them in complex folder structures. This time-saving tip is especially useful for documents, presentations, or project folders that require regular access.
Step 1: Right-click on the Desktop
The first step in creating a desktop shortcut for a file or folder is to right-click on the desktop. The desktop is the main screen area of your computer, often filled with icons and a background image. To initiate the shortcut creation process, follow the instructions below:
- Locate an Empty Area:
- Right-Click:
- Explore the Context Menu:
- Select the “New” Option:
Take a moment to find an empty area on the desktop. This can be anywhere that doesn’t have a file or folder icon. If your desktop is cluttered, you may need to rearrange or minimize some windows to create space.
Once you’ve identified an empty area, right-click on it. This action will trigger a context menu to appear. The context menu contains various options that allow you to perform different actions on the desktop.
Upon right-clicking, you’ll see a list of options, including items like “New,” “View,” “Sort By,” “Refresh,” and more. These options are designed to help you manage and customize your desktop experience.
In the context menu, hover your mouse over the “New” option. This will expand a sub-menu with additional choices related to creating new items or elements on the desktop.
By following these steps, you have successfully right-clicked on the desktop and accessed the context menu. The context menu contains important options for creating and modifying desktop elements, including shortcuts.
Right-clicking on the desktop is a fundamental action in Windows that opens up a world of possibilities for customizing your computer’s appearance and functionality. From here, you can create shortcuts, change desktop backgrounds, access display settings, and much more. Mastering the art of right-clicking will make your desktop navigation a breeze.
Step 2: Select “New”
After right-clicking on the desktop, the next step in creating a desktop shortcut is to select the “New” option from the context menu. This action will reveal a sub-menu with a variety of choices that enable you to create new elements on your desktop. Follow the instructions below to proceed:
- Right-click on the Desktop:
- Locate the “New” Option:
- Hover over the “New” Option:
- Explore the Sub-Menu:
- Select the Desired Option:
Begin by right-clicking on an empty area of the desktop. This will bring up the context menu, which displays options for customizing your desktop.
Within the context menu, you’ll notice a list of options. Scan through the list until you find the “New” option. It is usually located towards the top of the menu.
Once you have found the “New” option, hover your mouse over it. This will cause a sub-menu to appear, displaying additional choices related to creating new items on the desktop.
The sub-menu that appears when you hover over “New” contains a range of options, such as creating new folders, shortcuts, text documents, compressed folders, and more. These options are designed to help you customize and organize your desktop with ease.
Take a moment to review the different choices available in the sub-menu. Depending on your needs, select the option that aligns with the type of element you wish to create. In this case, we are creating a desktop shortcut, so you will want to choose the “Shortcut” option.
By following these steps, you have successfully located and selected the “New” option in the context menu. This action has opened up a world of possibilities for customizing and organizing your desktop, allowing you to create new shortcuts and other elements.
The “New” option is a powerful tool within the context menu, enabling you to expand the functionality and personalization of your desktop. Whether you need to create shortcuts for files, folders, or other elements, the “New” option paves the way for a more efficient and organized desktop experience.
Step 3: Click on “Shortcut”
Continuing the process of creating a desktop shortcut, the next step is to click on the “Shortcut” option from the sub-menu that appears when you hover over the “New” option. This action will initiate the creation of a new shortcut on your desktop. Follow the steps below to proceed:
- Right-click on the Desktop:
- Locate the “New” Option:
- Click on “Shortcut”:
To begin, right-click on an empty area of your desktop. This will bring up the context menu with various options.
In the context menu, you will find the “New” option. Hover your mouse over it to reveal a sub-menu with additional choices.
In the sub-menu, you will see the “Shortcut” option. Click on it to proceed with creating a new shortcut on your desktop.
By following these steps, you have successfully clicked on the “Shortcut” option in the sub-menu. This action signals your intent to create a new shortcut on your desktop.
The “Shortcut” option is crucial for creating shortcuts to files, folders, programs, or even websites on your desktop. It serves as a bridge between the selected item and your desktop, allowing for quick and easy access with just a click.
Now that you have selected the “Shortcut” option, you will proceed to the next steps in the process, which involve browsing for the file or folder you want to create a shortcut for and naming the shortcut itself. These steps will be covered in the subsequent sections.
Step 4: Browse for the File or Folder
After selecting the “Shortcut” option, the next step in creating a desktop shortcut is to browse for the specific file or folder you want to create a shortcut for. This step allows you to locate the target item and link it to the shortcut on your desktop. Follow the steps below:
- Click on the “Browse” Button:
- Navigate Through Your Computer’s Directories:
- Select the Target File or Folder:
- Click the “OK” Button:
When you select the “Shortcut” option, a new window will appear, prompting you to browse for the file or folder you want to create a shortcut for. In this window, you will notice a “Browse” button—click on it to proceed.
Upon clicking the “Browse” button, a file explorer window will open, allowing you to navigate through your computer’s directories. Use the file explorer to browse and locate the file or folder of your choice.
Once you have found the file or folder you want to create a shortcut for, click on the item to select it. You may need to navigate through different directories and expand folders to locate the desired file or folder.
After selecting the target file or folder, click the “OK” button in the file explorer window. This action will close the window and return you to the shortcut creation wizard.
By following these steps, you have successfully browsed for the file or folder you want to create a shortcut for. The target item is now linked to the shortcut you are about to create on your desktop.
Browsing for the target file or folder allows you to specify the exact item you want to access through the desktop shortcut. It is essential to locate the correct file or folder to ensure that the shortcut functions as intended.
In the next steps, you will name the shortcut and complete the creation process. These steps will be covered in the following sections.
Step 5: Name the Shortcut
After browsing for the file or folder you want to create a shortcut for, the next step is to provide a suitable name for the shortcut. This name will appear below the shortcut icon on your desktop and should be descriptive enough to help you identify its purpose easily. Follow the steps below to name the shortcut:
- Type a Name for the Shortcut:
- Choose a Descriptive Name:
- Consider Adding Additional Details:
- Avoid Special Characters or Symbols:
In the shortcut creation wizard, you will notice a text field or box where you can type a name for the shortcut. Click on this field to activate it and begin typing the desired name.
When naming the shortcut, it’s important to choose a name that clearly represents the file or folder it’s linked to. This will make it easier for you to locate and recognize the shortcut on your desktop.
If necessary, you can include additional details in the shortcut’s name to provide more context. For example, if the shortcut points to a specific project folder, you can include the project name or any other relevant information.
When naming the shortcut, it’s best to use alphanumeric characters and avoid special characters or symbols. Stick to letters, numbers, and spaces to ensure compatibility and avoid any potential issues.
By following these steps, you have successfully named the shortcut. The name you have provided will be displayed below the shortcut icon on your desktop, making it easy to identify and locate.
Choosing a descriptive and appropriate name for the shortcut is essential for quick and efficient access. The name should clearly represent the purpose or contents of the file or folder it is linked to, allowing you to find the shortcut with ease.
In the next step, you will finalize the creation process by clicking the “Finish” button. This final step will be covered in the following section.
Step 6: Click “Finish”
After providing a suitable name for the shortcut, the final step in creating a desktop shortcut is to click the “Finish” button. This action will complete the shortcut creation process and place the newly created shortcut on your desktop. Follow the steps below to finish creating the shortcut:
- Review the Shortcut Details:
- Click the “Finish” Button:
- Find the Shortcut on Your Desktop:
- Test the Shortcut:
Before clicking “Finish,” take a moment to review the details of the shortcut. Make sure the name and target file or folder are correct, as this is your last opportunity to make any necessary changes.
Once you are satisfied with the shortcut details, click the “Finish” button. This action will finalize the creation process and add the shortcut to your desktop.
After clicking “Finish,” navigate to your desktop to locate the newly created shortcut. It should now appear on your desktop as an icon, with the name you provided displayed below it.
To ensure that the shortcut was created correctly, double-click on it to test its functionality. The associated file or folder should open, allowing you to access its contents directly from the desktop.
By following these steps, you have successfully completed the process of creating a desktop shortcut. The newly created shortcut is now readily available on your desktop, providing quick and convenient access to the associated file or folder.
Congratulations! You have successfully created a desktop shortcut for a file or folder. This time-saving tip will help you streamline your workflow and improve your productivity, allowing you to access important files or folders with just a single click.
In the next sections, we will explore how to modify the shortcut’s icon, as well as how to delete shortcuts when they are no longer needed.
Modifying the Shortcut’s Icon
Modifying the icon of a desktop shortcut can help personalize and distinguish it from other icons on your desktop. It allows you to choose a visually appealing or easily recognizable icon that aligns with the file or folder it represents. Follow the steps below to modify the shortcut’s icon:
- Right-click on the Shortcut:
- Select “Properties”:
- Click on “Change Icon”:
- Choose an Icon or Browse for an Icon File:
- Apply the New Icon:
- Click “OK” to Save Changes:
Start by locating the shortcut on your desktop and right-clicking on it. This will open a context menu with various options.
In the context menu, locate and click on the “Properties” option. This will open the properties window for the selected shortcut.
Within the properties window, navigate to the “Shortcut” tab. In this tab, you will find a button labeled “Change Icon.” Click on this button to proceed.
After clicking “Change Icon,” a new window will appear where you can select an icon for the shortcut. You can choose from a list of pre-installed icons or browse your computer for an icon file.
Once you have selected an icon, click “OK” or “Apply” to apply the new icon to the shortcut. The icon will now be updated to the chosen image.
Finally, click the “OK” button in the properties window to save the changes you made to the shortcut’s icon. The updated icon will now be visible on your desktop.
By following these steps, you have successfully modified the icon of the desktop shortcut. The personalized icon can now better represent the file or folder it is associated with, making it easier to identify and differentiate from other shortcuts.
Customizing the icon of a shortcut gives you the freedom to express your personal style or improve its visual recognition. Whether you want to use a distinct icon or match it to a specific theme, the ability to modify the shortcut’s icon adds a touch of personalization to your desktop.
In the next section, we will explore the process of deleting a desktop shortcut when it is no longer needed.
Step 1: Right-click on the Shortcut
The first step in modifying the icon of a desktop shortcut is to right-click on the shortcut itself. This action will open a context menu with various options, allowing you to access the properties and settings of the shortcut. Follow the steps below to proceed with modifying the shortcut’s icon:
- Locate the Shortcut on Your Desktop:
- Right-click on the Shortcut:
- Explore the Context Menu:
- Select “Properties”:
Start by locating the shortcut whose icon you want to modify on your desktop. It should be represented by an icon with the name of the associated file or folder displayed below it.
Once you have located the shortcut, right-click on it to open a context menu. This menu will provide various options for managing and customizing the properties of the shortcut.
Upon right-clicking on the shortcut, a context menu will appear. The menu contains options such as “Open,” “Cut,” “Copy,” “Delete,” and more. These options vary depending on the current state and properties of the shortcut.
In the context menu, locate and click on the “Properties” option. This action will open a properties window dedicated to the selected shortcut.
By following these steps, you have successfully right-clicked on the shortcut and accessed the context menu. This menu provides you with options for further customizing the properties of the shortcut, including the ability to change its icon.
The ability to right-click on a shortcut and access its properties is a valuable feature that allows for easy customization and management. It enables you to modify various aspects of the shortcut, including its icon, target, and associated settings.
In the next steps, we will explore how to proceed with modifying the icon of the shortcut within the properties window. These steps will be covered in the following sections.
Step 2: Select “Properties”
After right-clicking on the shortcut, the next step in modifying the icon is selecting the “Properties” option from the context menu. This action will open a dedicated properties window for the selected shortcut. Follow the steps below to proceed:
- Right-click on the Shortcut:
- Locate and Click on “Properties”:
- Wait for the Properties Window to Open:
Begin by locating the shortcut on your desktop and right-clicking on it. This will open a context menu with various options.
In the context menu, you will find the “Properties” option. It is usually located towards the bottom of the menu. Move your mouse over the option to highlight it, then left-click to select it.
After selecting “Properties,” a dedicated window will open, displaying the properties and settings specific to the selected shortcut. It may take a moment for the window to appear, depending on your computer’s performance.
By following these steps, you have successfully selected the “Properties” option from the context menu, initiating the opening of the properties window for the shortcut.
The properties window provides you with a range of options and settings that you can modify to customize the behavior and appearance of the shortcut. This includes changing the icon, adjusting the target file or folder, and fine-tuning other properties associated with the shortcut.
In the next steps, we will explore how to proceed with modifying the shortcut’s icon within the properties window. These steps will be covered in the following sections.
Step 3: Click on “Change Icon”
After opening the properties window for the shortcut, the next step in modifying the icon is to click on the “Change Icon” button. This action allows you to select a new icon from a list of pre-installed options or browse for an icon file on your computer. Follow the steps below to proceed:
- Open the Properties Window:
- Navigate to the “Shortcut” Tab:
- Click on the “Change Icon” Button:
To begin, right-click on the shortcut and select the “Properties” option from the context menu. This will open the properties window dedicated to the selected shortcut.
Within the properties window, locate and click on the “Shortcut” tab. This tab contains specific settings and options related to the chosen shortcut.
In the “Shortcut” tab, you will find a button labeled “Change Icon.” Click on this button to proceed with modifying the shortcut’s icon.
By following these steps, you have successfully clicked on the “Change Icon” button within the properties window. This action signifies your intent to modify the shortcut’s icon.
The “Change Icon” functionality provides you with the ability to give the shortcut a distinct visual representation. You can select from a range of pre-installed icons that come with your operating system or browse your computer for an icon file to use for the shortcut.
In the next steps, we will explore how to proceed with choosing a new icon for the shortcut. These steps will be covered in the following sections.
Step 4: Choose an Icon or Browse for an Icon File
After clicking on the “Change Icon” button, the next step in modifying the shortcut’s icon is to choose an icon from a pre-installed selection or browse for an icon file on your computer. This allows you to select a visually appealing or relevant icon that represents the shortcut’s purpose. Follow the steps below to proceed:
- Open the Properties Window:
- Go to the “Shortcut” Tab:
- Click on the “Change Icon” Button:
- Choose from the Pre-Installed Icons:
- Browse for an Icon File (Optional):
- Select the Desired Icon File:
To begin, right-click on the shortcut and select the “Properties” option from the context menu. This will open the properties window dedicated to the selected shortcut.
Within the properties window, navigate to the “Shortcut” tab. This tab contains specific settings and options related to the selected shortcut.
In the “Shortcut” tab, locate and click on the “Change Icon” button. This will open a new window with a selection of pre-installed icons.
Within the “Change Icon” window, you will see a list of pre-installed icons. Scroll through the available options and click on the one that best represents the shortcut’s purpose. The selected icon will be highlighted.
If none of the pre-installed icons suit your needs, you have the option to browse for an icon file on your computer. Click on the “Browse” button within the “Change Icon” window and navigate to the location where the icon file is stored.
Once you have found the desired icon file, click on it to select it. The selected file will be displayed in the “File name” field within the “Change Icon” window.
By following these steps, you have successfully chosen an icon for the shortcut. Whether selecting from the pre-installed options or browsing for an icon file, you have personalized the shortcut with a visually appealing or relevant image.
The ability to choose an icon allows you to give the shortcut a distinct visual identity, making it easier to locate and differentiate from other desktop icons. It also adds a touch of customization and personalization to your desktop experience.
In the next step, we will explore how to apply the new icon to the shortcut. This final step will be covered in the subsequent section.
Step 5: Apply the New Icon
After choosing a new icon for the shortcut, the next step is to apply the selected icon, replacing the previous one. This ensures that the visual representation of the shortcut reflects your customization and personalization choices. Follow the steps below to apply the new icon:
- Open the Properties Window:
- Go to the “Shortcut” Tab:
- Click on the “Change Icon” Button:
- Click “OK” or “Apply”:
- Click “OK” to Save Changes:
To begin, open the properties window for the shortcut. Right-click on the shortcut and select the “Properties” option from the context menu. This will open the dedicated properties window for the selected shortcut.
Within the properties window, navigate to the “Shortcut” tab if you are not already in that section. This tab contains specific settings and options related to the selected shortcut.
In the “Shortcut” tab, you have previously clicked on the “Change Icon” button, which opened a window where you chose a new icon.
Now, in the “Change Icon” window, click “OK” or “Apply” to confirm and apply the new icon to the shortcut. This will save your icon selection and close the “Change Icon” window.
Return to the properties window and click “OK” to save the changes you made, including the updated and applied icon.
By following these steps, you have successfully applied the new icon to the shortcut. The selected image has replaced the previous icon, visually representing the purpose or content of the shortcut on your desktop.
Applying the new icon enhances the customization and personalization of the shortcut, allowing you to have a more visually appealing and easily recognizable desktop experience. It adds a touch of individuality to your computer interface.
In the next steps, we will explore how to delete a desktop shortcut when it is no longer needed. This process will be covered in the following sections.
Deleting a Desktop Shortcut
Deleting a desktop shortcut is a simple process that allows you to remove shortcuts for files, folders, or programs that are no longer needed or relevant. Clearing your desktop of unnecessary shortcuts can help keep it tidy and organized. Follow the steps below to delete a desktop shortcut:
- Locate the Shortcut on Your Desktop:
- Right-click on the Shortcut:
- Select “Delete”:
- Confirm the Deletion:
Start by locating the shortcut that you want to delete. It will be represented by an icon with the name of the associated file, folder, or program displayed below it.
Once you have located the shortcut, right-click on it. This will open a context menu with various options.
In the context menu, locate and click on the “Delete” option. This will prompt a confirmation dialog box to appear.
In the confirmation dialog box, verify that you want to delete the shortcut. Click “Yes” to permanently delete the shortcut from your desktop.
By following these steps, you have successfully deleted the desktop shortcut. The shortcut will be removed from your desktop, freeing up space and reducing clutter.
Regularly deleting shortcuts that are no longer needed helps maintain a clean and organized desktop environment. It allows you to prioritize the shortcuts that are most important and relevant to your current tasks or projects.
It’s important to note that deleting a shortcut does not delete the actual file, folder, or program it represents. It only removes the shortcut itself from your desktop.
Remember to exercise caution when deleting shortcuts, as once deleted, they cannot be easily recovered. Double-check that you are deleting the correct shortcut before confirming the deletion.
In the next sections, we will recap the steps to creating a desktop shortcut, as well as provide some tips for optimizing your desktop experience.
Step 1: Right-click on the Shortcut
The first step in deleting a desktop shortcut is to right-click on the specific shortcut you want to remove. This action will open a context menu with various options for managing the shortcut. Follow the steps below to proceed with deleting the shortcut:
- Locate the Shortcut on Your Desktop:
- Right-click on the Shortcut:
- Access the Context Menu:
- Select “Delete”:
Start by locating the shortcut that you wish to delete on your desktop. This shortcut is represented by an icon with the name of the associated file, folder, or program displayed below it.
Once you have located the shortcut, right-click on it. This will evoke a context menu that provides several actions and customizations for the selected shortcut.
Upon right-clicking on the shortcut, a context menu will appear. This menu contains various options such as open, cut, copy, delete, and more, depending on the properties of the shortcut and the configuration of your computer.
In the context menu, locate and click on the “Delete” option. This action will prompt a confirmation dialog box to appear.
By following these steps, you have successfully right-clicked on the shortcut and accessed the context menu. This menu provides you with different options for managing and customizing the properties of the shortcut.
Deleting shortcuts that are no longer needed or relevant is an effective way to declutter and organize your desktop. It helps maximize your workspace and allows you to focus on the most essential shortcuts that facilitate your daily tasks.
Please exercise caution when deleting shortcuts, as once deleted, they cannot be easily recovered. Take a moment to verify that you are deleting the correct shortcut before confirming the deletion.
In the next sections, we will revisit the process of creating a desktop shortcut and share tips for optimizing your desktop experience.
Step 2: Select “Delete”
After right-clicking on the desktop shortcut, the next step in deleting the shortcut is to select the “Delete” option from the context menu. This action confirms your intention to remove the shortcut from your desktop. Follow the steps below to proceed with the deletion:
- Right-click on the Shortcut:
- Locate and Click on “Delete”:
- Confirm the Deletion:
- Click “Yes” to Delete:
To begin, locate the specific shortcut you want to delete on your desktop and right-click on it. This will open a context menu with various options.
In the context menu, search for the “Delete” option. The exact placement of this option may vary based on your operating system and configuration. Once found, left-click on “Delete” to initiate the deletion process.
After selecting “Delete,” a confirmation dialog box will appear, asking you to confirm that you want to delete the shortcut. Take a moment to review the message and verify that you are deleting the correct shortcut.
If you are sure that you want to proceed with the deletion, click on the “Yes” button in the confirmation dialog box. This action will permanently remove the shortcut from your desktop.
By following these steps, you have successfully selected the “Delete” option from the context menu and confirmed the deletion of the shortcut.
Deleting shortcuts that are no longer needed can help declutter your desktop and make your workspace more organized. It allows you to easily locate and focus on the shortcuts that are essential for your daily tasks.
While deleting a shortcut removes it from your desktop, it does not delete the actual file, folder, or program that the shortcut represents. Only the shortcut itself is removed.
Before proceeding with the deletion, double-check that you are deleting the intended shortcut to avoid accidentally removing an important item from your desktop.
In the following sections, we will recap the steps to create a desktop shortcut and provide additional tips for optimizing your desktop experience.
Step 3: Confirm the Deletion
After selecting the “Delete” option from the context menu, the next step in deleting a desktop shortcut is to confirm the deletion. This ensures that you are intentionally removing the shortcut from your desktop. Follow the steps below to proceed with the confirmation:
- Right-click on the Shortcut:
- Locate and Read the Confirmation Dialog:
- Review the Confirmation Message:
- Confirm the Deletion:
Begin by locating the desktop shortcut that you want to delete. Right-click on the shortcut to open a context menu with various options.
In the context menu, the “Delete” option will initiate the deletion process. When you select this option, a confirmation dialog box will appear, asking for your final confirmation before deleting the shortcut.
Take a moment to carefully read the confirmation message that appears in the dialog box. Make sure that you are deleting the correct shortcut and that you no longer need its presence on your desktop.
If you are sure that you want to proceed with the deletion, click on the appropriate button to confirm. The button might be labeled “Yes” or “OK.” This action will permanently remove the shortcut from your desktop.
By following these steps, you have successfully reviewed and confirmed the deletion of the desktop shortcut. Ensuring that the confirmation is accurate reduces the risk of accidentally deleting important shortcuts.
Confirming the deletion of unnecessary shortcuts helps declutter your desktop and keep it well-organized. It allows you to maintain a clean and efficient workspace by focusing on the shortcuts that are relevant to your current tasks.
Remember, when you delete a desktop shortcut, it only removes the shortcut itself and not the actual file, folder, or program it represents. The associated item will remain unaffected by the deletion.
Always take a moment to carefully verify your selection before confirming the deletion to avoid removing shortcuts that you may still need access to.
In the next sections, we will recap the steps for various desktop-related operations and provide some additional tips for optimizing your desktop experience.