
Reasons to Convert to Electronic Ignition
When it comes to maintaining and improving the performance of your vehicle’s engine, the ignition system plays a crucial role. Traditionally, most engines used a points-based ignition system, which relied on mechanical contacts to deliver the spark required for combustion. However, with advancements in technology, electronic ignition systems have become the preferred choice for many automotive enthusiasts. Here are a few reasons why you should consider converting to electronic ignition:
- Improved Reliability: One of the main advantages of electronic ignition systems is their enhanced reliability. Unlike points-based systems, electronic ignitions do not rely on physical contact to generate a spark. Instead, they utilize solid-state electronics that can operate without the need for moving parts, reducing the risk of failure due to worn-out points or misalignment.
- Increased Spark Energy: Electronic ignition systems can generate a more powerful spark compared to traditional points-based systems. This increased spark energy leads to better combustion, resulting in improved engine performance, fuel efficiency, and reduced emissions. With a stronger spark, you can expect smoother idling, faster acceleration, and better overall engine response.
- Easy Starting: Converting to electronic ignition can make starting your engine a breeze, especially in colder weather conditions. The consistent and powerful spark provided by an electronic ignition system ensures that your engine fires up quickly, allowing you to hit the road without any hassle or delays. Say goodbye to the frustration of stumbling, hard starting, or frequent cranking.
- Reduced Maintenance: Electronic ignition systems require minimal maintenance compared to points-based systems. Without the need to periodically adjust or replace points, you can save time and money on routine ignition system maintenance. Additionally, electronic ignitions are less susceptible to wear and tear, resulting in fewer breakdowns and the need for repairs.
- Compatibility with Modern Fuels: Traditional points-based ignition systems were designed with older fuel formulations in mind. However, modern fuels, especially those containing ethanol, can cause issues such as corroded points and inconsistent ignition timing. Electronic ignition systems are better equipped to handle these fuels, ensuring reliable performance and protection against potential fuel-related ignition problems.
By converting to electronic ignition, you can enjoy improved reliability, increased spark energy, effortless starting, reduced maintenance, and compatibility with modern fuels. Upgrading your ignition system can have a significant impact on your overall driving experience, enhancing both the performance and longevity of your vehicle’s engine.
Tools and Materials Needed
Before you embark on the process of converting your ignition system to electronic, it’s important to gather all the necessary tools and materials. Having everything on hand will save you time and ensure a smooth installation. Here is a list of the tools and materials you’ll need:
- Screwdrivers: You’ll need both flathead and Phillips head screwdrivers to remove screws and fasteners throughout the process. Make sure to have a set of various sizes to accommodate different screw types.
- Pliers: A good pair of pliers will come in handy for tasks such as removing wire connectors, bending small brackets, or tightening screws and nuts. Look for a versatile set that includes long-nose pliers and cutting pliers.
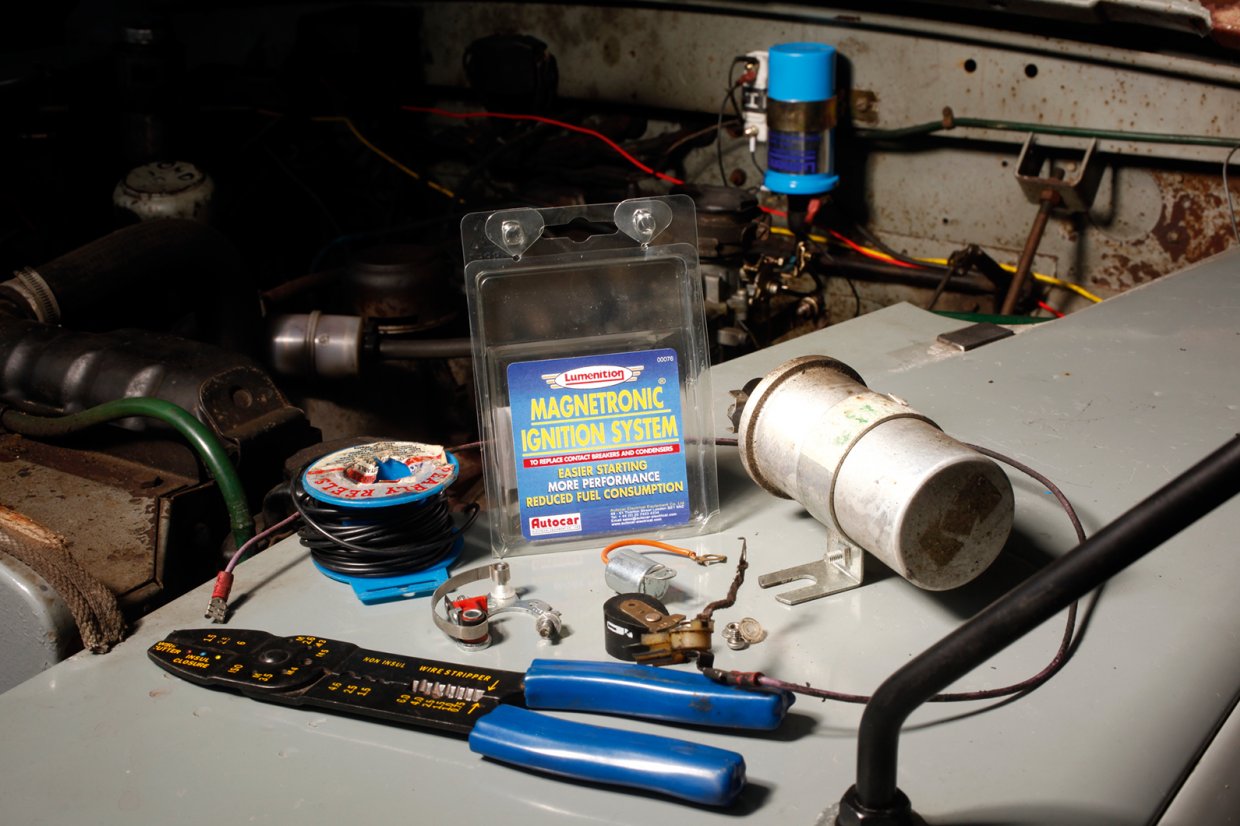
- Ignition Conversion Kit: This is the most important component for converting to electronic ignition. The conversion kit will include the electronic ignition module, wiring harness, and any necessary instructions or documentation.
- Timing Light: A timing light is essential for adjusting the ignition timing during the installation process. It allows you to set the correct timing and ensure optimal engine performance. Make sure to choose a timing light compatible with your vehicle’s ignition system.
- Protective Gloves and Eyewear: Safety should always be a priority when working on your vehicle. Ensure that you have a pair of gloves to protect your hands from any sharp edges or chemicals. Safety glasses or goggles will shield your eyes from debris or accidental splashes.
- Ratchet and Socket Set: A ratchet and socket set will be necessary for removing and installing components such as the distributor cap and any other fasteners that require a socket. Ensure that the set includes a variety of socket sizes to fit different bolts and nuts.
- Electrical Tape and Wire Cutters: Electrical tape is essential for securing and insulating wires. Wire cutters will come in handy for any necessary wire modifications or adjustments during the installation.
- Service Manual or Online Resources: It’s always helpful to have a service manual specific to your vehicle’s make and model. This will provide you with detailed instructions and diagrams for the ignition system. Alternatively, you can search for online resources or tutorials that offer step-by-step guidance.
Make sure to gather all the tools and materials mentioned to ensure a successful conversion from points to electronic ignition. This will enable a smoother installation process and help you achieve optimal results with your newly upgraded ignition system.
Step 1: Preparing the Engine
Before you begin the conversion process, take the time to prepare your engine for the installation of the electronic ignition system. This will help ensure a smooth transition and prevent any unnecessary issues later on. Follow these steps to properly prepare your engine:
- Disconnect the Battery: Start by disconnecting the negative terminal of the battery to avoid any electrical accidents during the installation process. This will prevent any accidental sparks or short circuits that could damage the electronic components.
- Identify the Distributor: Locate the distributor in your engine. It is usually a round or rectangular component mounted on the engine block. Take note of its position and any wires connected to it for easy reference later on.
- Clean the Work Area: Remove any debris, grease, or dirt around the distributor area. A clean work area will prevent any foreign particles from falling into the engine during the installation process, potentially causing damage or obstruction.
- Take Reference Pictures or Markings: Before removing any components, it’s a good idea to take reference pictures or make markings to ensure proper reassembly. Take pictures from different angles or use a marker to indicate the position of the distributor cap, wires, and any other relevant parts.
- Refer to the Service Manual: If you are unsure about any specific steps, consult your vehicle’s service manual for detailed instructions. The manual will provide you with accurate information regarding the location and removal of components specific to your vehicle’s make and model.
- Gather the Necessary Tools and Materials: Ensure that you have all the tools and materials mentioned in the previous section before proceeding. Having everything on hand will save you time and make the process more efficient.
Properly preparing your engine for the electronic ignition conversion is essential. Take the time to disconnect the battery, identify the distributor, clean the work area, take reference pictures, and gather the necessary tools and materials. These steps will lay the foundation for a successful installation and help prevent any issues or complications along the way.
Step 2: Removing the Distributor Cap
With the engine prepared, you can now proceed to remove the distributor cap. This step is crucial as it will grant you access to the internal components of the distributor, allowing for the removal of the points and condenser. Follow these steps to remove the distributor cap:
- Locate the Distributor Cap: The distributor cap is usually a round, plastic component sitting on top of the distributor. It is secured in place by screws or clips. Identify the cap and take note of any wires connected to its terminals for reference.
- Disconnect the Wires: Carefully disconnect the wires attached to the distributor cap terminals. To avoid confusion during reassembly, take note of their positions or use colored tape to mark them accordingly.
- Remove the Retaining Screws or Clips: Use the appropriate tools, such as a screwdriver or pliers, to remove the retaining screws or clips that secure the distributor cap in place. Depending on your vehicle’s make and model, there may be several screws or clips that need to be loosened or removed.
- Lift Off the Distributor Cap: Once the retaining screws or clips are removed, carefully lift off the distributor cap. Take note of any additional components, such as a rubber gasket, that may be present and set them aside for later reinstallation.
- Inspect the Cap for Damage: With the distributor cap removed, inspect it for any signs of damage, such as cracks or excessive wear. If the cap is damaged, it is recommended to replace it with a new one to ensure proper function and prevent future issues with your ignition system.
By following these steps, you can successfully remove the distributor cap from your engine. Take your time and be mindful of any wires or components connected to the cap. This will pave the way for further disassembly and the removal of the points and condenser.
Step 3: Removing the Points and Condenser
With the distributor cap removed, you can now proceed to remove the points and condenser from the distributor. These components are integral to the points-based ignition system and need to be replaced with the electronic ignition conversion kit. Follow these steps to remove the points and condenser:
- Identify the Points and Condenser: Locate the points and condenser inside the distributor. The points are typically two metal contacts, while the condenser is a small capacitor connected to the points. Take note of their positions and connections for reference during reassembly.
- Disconnect the Points and Condenser: Carefully disconnect the wiring and connections attached to the points and condenser. The points are usually connected to a cam follower while the condenser may be connected to the points or the distributor body. Take note of their positions or mark them with tape for easier reassembly.
- Remove the Points and Condenser: Use the appropriate tools, such as a screwdriver or pliers, to remove the mounting screws or clips that secure the points and condenser in place. Depending on your vehicle’s make and model, there may be multiple screws or clips to remove.
- Carefully Lift Out the Points and Condenser: Once the mounting screws or clips are removed, carefully lift out the points and condenser from the distributor. Pay attention to any additional components, such as a points plate or spring, and set them aside for later reinstallation or disposal.
- Inspect the Points and Condenser: Take a moment to inspect the points and condenser for any signs of wear, corrosion, or damage. If they appear worn or damaged, it is recommended to replace them with the new components provided in the electronic ignition conversion kit.
Removing the points and condenser is a crucial step in the conversion process. Take your time and ensure that all connections and screws are properly disconnected and removed. By following these steps, you’ll be ready to install the electronic ignition system and enjoy the benefits of improved engine performance and reliability.
Step 4: Installing the Electronic Ignition Conversion Kit
Now that you have removed the points and condenser, it’s time to install the electronic ignition conversion kit. This kit will replace the traditional points-based ignition system with a more reliable and efficient electronic ignition system. Follow these steps to install the electronic ignition conversion kit:
- Prepare the Conversion Kit: Gather the components of the electronic ignition conversion kit, including the electronic ignition module and wiring harness. Refer to the kit’s instructions or documentation to familiarize yourself with the specific components and their installation process.
- Position the Electronic Ignition Module: Locate the appropriate mounting location for the electronic ignition module inside the distributor. It is usually installed in place of the points or attached to a bracket. Ensure that the module is secure and properly aligned for optimal performance.
- Connect the Wiring Harness: Attach the wiring harness provided in the conversion kit to the electronic ignition module. Follow the kit’s instructions to ensure the correct connections are made. Take note of any specific instructions regarding wire routing or any additional components that need to be connected.
- Secure the Wiring and Module: Once the wiring harness is connected, secure it in place using zip ties or clips to prevent it from interfering with other engine components. Ensure that all connections are tight and properly insulated to avoid any electrical issues or interference.
- Follow Additional Kit Instructions: Depending on the specific electronic ignition conversion kit you have, there may be additional steps or components to install. Follow the instructions provided in the kit to ensure a proper and successful installation.
- Double Check Connections and Mountings: Once all components are installed, double check all connections, mountings, and wire routing to ensure everything is secure and properly positioned. This will prevent any potential issues or malfunctions in the ignition system.
With the electronic ignition conversion kit installed, you are one step closer to enjoying the benefits of improved ignition performance. Take your time during the installation process and refer to the specific instructions provided with your chosen conversion kit. By following these steps, you’ll be on your way to a reliable and efficient electronic ignition system.
Step 5: Connecting the Wires
After successfully installing the electronic ignition conversion kit, the next step is to connect the wires between the ignition module and other components of the ignition system. This step is crucial to ensure the proper functioning of the electronic ignition system. Follow these steps to connect the wires:
- Refer to the Conversion Kit Instructions: Consult the instructions provided with your electronic ignition conversion kit for specific details on wire connections. Different kits may have variations in the wiring configuration, so it’s essential to follow the instructions provided.
- Connect the Power Wire: Locate the power wire coming from the electronic ignition module. Connect this wire to a reliable source of switched 12-volt power. It is important to connect it to a source that only supplies power when the ignition is on, so that the electronic ignition system is not constantly drawing power and draining the battery.
- Connect the Ground Wire: Locate the ground wire coming from the electronic ignition module. Connect this wire to a suitable ground point within the engine compartment. Make sure the connection is secure and free from any paint or corrosion, as a proper ground connection is vital for the effective operation of the electronic ignition system.
- Connect the Wiring Harness: If your conversion kit includes a separate wiring harness, carefully route and connect the wires according to the provided instructions. Make sure each wire is connected to the appropriate component, such as the coil or ignition switch, based on the kit’s wiring diagram.
- Insulate and Secure the Connections: Once all the wires are properly connected, insulate the connections using electrical tape or heat shrink tubing. This will protect the connections from moisture, vibrations, and potential short circuits. Additionally, secure the wiring using zip ties or clips to prevent any damage or interference with other engine components.
By carefully connecting the wires according to the instructions provided with your electronic ignition conversion kit, you can ensure the proper function and performance of the ignition system. Take your time during this step and double-check all connections to avoid any electrical issues or malfunctions.
Step 6: Adjusting the Timing
Once the electronic ignition system is installed and the wires are connected, the next step is to adjust the ignition timing. Timing refers to the precise moment when the spark plug fires in relation to the position of the engine’s pistons. Proper timing is essential for optimal engine performance, fuel efficiency, and overall reliability. Follow these steps to adjust the timing:
- Refer to the Service Manual: Consult your vehicle’s service manual or the instructions provided with the electronic ignition conversion kit for the recommended timing specifications. This information will guide you in setting the correct timing for your specific engine.
- Locate the Timing Marks: Locate the timing marks on the crankshaft pulley and the timing scale near the engine or harmonic balancer. The timing scale is usually marked in degrees of crankshaft rotation.
- Connect the Timing Light: Connect the timing light to the battery and the spark plug wire of the first cylinder. Follow the instructions provided with the timing light for proper connection.
- Start the Engine: Start the engine and let it warm up to operating temperature. Ensure that the engine is running smoothly and at idle speed.
- Point the Timing Light: Point the timing light towards the timing marks on the crankshaft pulley and the timing scale. The timing light will flash each time the spark plug fires, allowing you to see the position of the timing marks.
- Adjust the Timing: Use a timing adjustment tool or a wrench to rotate the distributor slightly to adjust the timing. Rotate the distributor in the direction indicated by the manufacturer’s specifications to advance or retard the timing as necessary.
- Observe the Timing Marks: While adjusting the timing, observe the timing marks through the timing light. Align the timing mark on the crankshaft pulley with the correct degree on the timing scale based on the recommended specifications. This will ensure that the spark plug fires at the precise moment for optimal combustion.
- Tighten the Distributor: Once the timing is properly set, tighten the distributor hold-down bolt to secure it in place. Make sure the distributor is firmly seated and aligned with the engine block.
- Check the Timing Again: After tightening the distributor, recheck the timing to ensure it is still accurate. Make any necessary adjustments if needed and verify that the timing marks align correctly.
Adjusting the timing is a crucial step to optimize engine performance. By following these steps and accurately setting the timing, you’ll achieve proper combustion and maximize the benefits of your newly installed electronic ignition system.
Step 7: Reassembling the Distributor
With the timing properly adjusted, you can now reassemble the distributor to complete the installation of the electronic ignition system. This step includes putting the distributor cap back in place and ensuring all components are securely reinstalled. Follow these steps to reassemble the distributor:
- Place the Distributor Cap: Position the distributor cap back onto the distributor housing. Make sure the cap is aligned with the distributor and slides into place smoothly.
- Secure the Distributor Cap: Use the appropriate screws or clips to secure the distributor cap in place. Tighten them firmly but avoid over-tightening to prevent any damage to the cap or distributor housing.
- Connect the Spark Plug Wires: Reconnect the spark plug wires to their respective terminals on the distributor cap. Ensure that each wire is securely connected and properly routed to the correct spark plug.
- Inspect the Rotor: Examine the condition of the distributor rotor. If it shows signs of wear or damage, consider replacing it with a new one to ensure proper ignition performance.
- Replace the Rubber Gasket: If your distributor cap has a rubber gasket, ensure that it is in good condition. If necessary, replace it with a new one to create a proper seal and prevent any moisture or debris from entering the distributor.
- Verify Proper Connections: Before proceeding, double-check all connections, including the distributor cap screws, spark plug wires, and any other components that were removed during the installation process. Ensure that everything is securely connected and properly positioned.
- Reconnect the Battery: Lastly, reconnect the negative terminal of the battery that was disconnected earlier. This will restore power to the ignition system and allow you to test the electronic ignition system.
Once you have completed these steps, the distributor should be reassembled and ready for testing. Take your time and ensure all components are correctly positioned and secured to prevent any issues or malfunctions. With the distributor fully reassembled, you can move on to the next step of testing the electronic ignition system.
Step 8: Testing the Electronic Ignition
After reassembling the distributor, it’s crucial to test the electronic ignition system to ensure it is functioning properly. This step will verify that the installation was successful and that the engine is running smoothly with the new ignition system. Follow these steps to test the electronic ignition:
- Start the Engine: Start the engine and allow it to run at idle speed. Observe the engine’s behavior and listen for any abnormal sounds.
- Check for Smooth Operation: Assess how smoothly the engine is running. An effective electronic ignition system should provide steady and consistent engine operation, resulting in smoother idling and improved overall performance.
- Monitor Acceleration: Test the engine’s acceleration by gradually increasing the throttle. Note how quickly the engine responds and whether there are any hesitations or stutters. Ideally, the electronic ignition system should provide smooth acceleration without any significant delays.
- Observe Fuel Efficiency: Pay attention to the vehicle’s fuel efficiency. A well-functioning electronic ignition system can optimize fuel combustion, which may result in improved fuel efficiency and reduced fuel consumption.
- Listen for Pinging or Knocking: Listen carefully for any pinging or knocking sounds from the engine. These noises can indicate incorrect ignition timing or issues with the combustion process. If you notice any unusual sounds, consider rechecking the timing and consulting a professional if necessary.
- Verify Ignition System Stability: Monitor the ignition system’s stability during different driving conditions, such as idling, cruising, and acceleration. Ensure there are no intermittent spark or ignition failures that could affect the engine’s performance or reliability.
- Inspect for Any Warning Lights: Keep an eye on the dashboard for any warning lights. If the electronic ignition system is functioning properly, there should be no indication of ignition-related issues such as a flashing check engine light.
- Make Adjustments if Needed: If you notice any irregularities or issues during the testing phase, refer to the manufacturer’s instructions to make any necessary adjustments. This may include rechecking the timing, ensuring proper wire connections, or consulting a professional for further assistance.
By performing these tests, you can ensure that the electronic ignition system is functioning as intended and optimizing the engine’s performance. If any issues arise, address them promptly to maintain the reliability and efficiency of your ignition system.
Tips and Troubleshooting
While converting to an electronic ignition system can greatly improve the performance and reliability of your engine, it’s important to keep a few tips and troubleshooting strategies in mind to ensure smooth installation and operation. Consider the following tips and troubleshooting guidelines:
- Read the Instructions: Before starting the conversion process, thoroughly read and understand the instructions provided with the electronic ignition conversion kit. This will help you familiarize yourself with the specific components, wiring diagrams, and installation procedures required for your particular vehicle.
- Verify Compatibility: Ensure that the electronic ignition conversion kit is compatible with your vehicle’s make and model. Different engines may have specific requirements, so double-check compatibility before purchasing a kit.
- Take Pictures or Make Notes: Document the steps you take during the conversion process by taking pictures or making notes. This will assist you during reassembly in case you need to refer back to them later.
- Double-Check Connections: Take the time to firmly secure all connections and verify their correctness. Loose or incorrect connections may lead to ignition issues or engine performance problems.
- Perform Routine Maintenance: Even with an electronic ignition system, it’s still important to perform regular maintenance tasks such as inspecting and cleaning spark plugs, checking ignition wires for wear, and replacing any components as needed.
- Observe Safety Precautions: Always prioritize safety when working on your vehicle. Wear appropriate protective gear, disconnect the battery when necessary, and exercise caution when handling electrical components.
- Consult a Professional: If you encounter any issues or are unsure about any step of the conversion process, don’t hesitate to seek the assistance of a professional mechanic or experienced automotive technician.
- Keep the Old Ignition Components: It’s a good idea to keep the old points, condenser, and distributor cap as backups or for future reference. This will help in case you need to revert to the original ignition system or troubleshoot any issues that may arise.
- Document Any Changes: Make a note of any modifications or adjustments you make during the installation process. This will be helpful for troubleshooting or future maintenance needs.
- Regularly Test and Verify Operation: After the initial installation, periodically test and verify the operation of the electronic ignition system to ensure continued performance and reliability. This includes checking timing, inspecting wiring connections, and monitoring engine performance.
By following these tips and troubleshooting guidelines, you can increase the chances of a successful electronic ignition conversion and enjoy the benefits of a more reliable and efficient ignition system for your vehicle.