
Benefits of Controlling House Lights with Your iPhone
Controlling your house lights with your iPhone is not just a convenience but also offers a range of benefits that enhance your overall living experience. With the advancement in technology, smart lighting systems have become increasingly popular, and here are some of the key advantages of using your iPhone to control the lights in your home.
1. Convenience: One of the main benefits of controlling your house lights with your iPhone is the convenience it offers. With just a few taps on your phone, you can turn on/off lights in any room or adjust the brightness levels, eliminating the need to physically go to each switch. This is particularly helpful when you’re in bed or on the couch and want to adjust the lighting without getting up.
2. Energy Efficiency: Smart lighting systems integrated with your iPhone allow you to effectively manage and conserve energy. You can use your phone to create lighting schedules and automate routines, ensuring lights are only on when needed. Additionally, you can dim the lights to save energy and reduce your electricity costs.
3. Home Security: By controlling your house lights with your iPhone, you can enhance the security of your home. With the ability to remotely control the lights, you can create the illusion that someone is home even when you’re away on vacation. This can deter potential burglars and make your home less of a target.
4. Personalization: Another advantage of using your iPhone to control the lights in your home is the ability to personalize your lighting preferences. Whether you prefer bright white lights for productivity or warm dim lighting for a cozy ambiance, you can easily adjust the settings to match your mood or activity.
5. Integration with Smart Home Systems: If you have other smart devices in your home, such as smart thermostats or security systems, controlling your house lights with your iPhone allows for seamless integration and synchronization. This means you can create customized scenes that can simultaneously adjust the lights, temperature, and security settings, enhancing the overall smart home experience.
Controlling your house lights with your iPhone offers a wide range of benefits, including convenience, energy efficiency, home security, personalization, and compatibility with other smart home systems. By embracing this technology, you can transform your home into a smart, efficient, and customized living space.
Required Equipment for Controlling House Lights with Your iPhone
Before you can start controlling your house lights with your iPhone, you will need a few essential pieces of equipment. Here are the key components necessary for setting up your iPhone-controlled lighting system:
1. Smart Lighting Bulbs: To control your house lights with your iPhone, you will need smart lighting bulbs. These are LED bulbs that can connect to your home’s wireless network and be controlled through a mobile app. There are various brands and models available in the market, so choose ones that suit your lighting needs and budget.
2. Bridge or Hub: Most smart lighting systems require a bridge or hub, which serves as the connection point between your iPhone and the lighting bulbs. This device facilitates communication between the bulbs and your phone, allowing you to control them remotely. Make sure to check which bridge or hub is compatible with the smart lighting system you choose.
3. Smartphone App: You will need to download the smartphone app that corresponds to your smart lighting system. This app acts as the control center, where you can turn lights on/off, adjust brightness levels, create schedules, and more. It’s important to choose a system with a user-friendly and intuitive app interface for ease of use.
4. Wireless Network: To connect your iPhone to the smart lighting system, you must have a stable wireless network in your home. Ensure that your Wi-Fi router is functioning properly and has a strong signal strength in the areas where you plan to install the smart lighting bulbs. A reliable connection is crucial for seamless control of your house lights.
5. Compatible iPhone: Finally, you will need an iPhone or iOS device that is compatible with the smartphone app of your chosen smart lighting system. Check the system’s requirements to ensure compatibility with your iPhone model and iOS version. This will ensure smooth performance and optimal functionality.
By having the necessary equipment, including smart lighting bulbs, a bridge or hub, a smartphone app, a stable wireless network, and a compatible iPhone, you can easily set up and control your house lights with the convenience of your iPhone.
Setting Up a Smart Lighting System in Your Home
Setting up a smart lighting system in your home is a fairly straightforward process. Here are the steps to follow in order to get your iPhone-controlled lighting system up and running:
1. Choose the Right Smart Lighting System: Research and select a smart lighting system that best fits your needs and budget. Consider factors such as compatibility, ease of use, and additional features like color-changing capabilities if desired.
2. Install the Smart Lighting Bulbs: Replace your existing bulbs with the smart lighting bulbs. Follow the manufacturer’s instructions to ensure proper installation. Make sure to turn off the power before installing or replacing any bulbs to avoid electrical accidents.
3. Connect the Bridge or Hub: If your smart lighting system requires a bridge or hub, connect it to your home’s wireless network according to the provided instructions. This step is essential for establishing a connection between the lighting bulbs and your iPhone.
4. Download and Set Up the Smartphone App: On your iPhone, download the smartphone app specific to your smart lighting system from the App Store. Once installed, open the app and follow the prompts to create an account or sign in if you already have one. This will allow you to control your lights from your iPhone.
5. Pair the Smart Lighting Bulbs: Within the smartphone app, navigate to the settings or pairing section and follow the instructions to pair the smart lighting bulbs with your iPhone. This process may involve scanning a QR code or entering a specific code provided with the bulbs.
6. Customize Lighting Settings: Once the bulbs are successfully paired, you can start customizing your lighting settings. Use the app’s interface to designate which lights are in which rooms and set individual brightness levels or color preferences.
7. Test the System: Before fully integrating the smart lighting system into your daily routine, take the time to test all the features and ensure the bulbs respond correctly to your commands. This will help you familiarize yourself with the app and make any necessary adjustments.
8. Expand and Automate: If desired, you can expand your smart lighting system by adding more bulbs or integrating it with other smart devices in your home. Explore automation options, such as creating lighting schedules, setting up motion sensors, or syncing with voice assistant devices for a truly seamless experience.
By following these steps, you can easily set up a smart lighting system in your home and start controlling your house lights with your iPhone. Enjoy the convenience, energy-efficiency, and customizable features that come with this technology.
Connecting Your iPhone to the Smart Lighting System
Once you have set up your smart lighting system, the next step is to connect your iPhone to the system so that you can control the lights with ease. Here is a step-by-step guide on how to connect your iPhone to the smart lighting system:
1. Connect to Wi-Fi: Ensure that your iPhone is connected to the same Wi-Fi network that the smart lighting system is connected to. This is crucial for establishing a connection between your phone and the lighting system.
2. Open the Smartphone App: Launch the smartphone app that you downloaded for your smart lighting system. If you haven’t done so already, create an account and sign in to the app.
3. Enable Bluetooth: Make sure that Bluetooth is enabled on your iPhone. This is necessary for the initial pairing process and for maintaining a connection between your phone and the smart lighting system.
4. Pair the iPhone with the System: Within the app, look for a pairing or connection option. Follow the instructions provided to initiate the pairing process. This typically involves scanning a QR code, entering a code displayed on the app, or pressing a button on the bridge or hub to enable pairing mode.
5. Wait for the Connection: Allow the app a few moments to detect and establish a connection with the smart lighting system. This process may take a few seconds, so be patient and ensure that your iPhone is within range of the Wi-Fi network.
6. Verify the Connection: Once the connection is established, you should see a confirmation message or a visual indicator within the app. This indicates that your iPhone is successfully connected to the smart lighting system and ready for control.
7. Test the Lights: To confirm that the connection is working properly, test the lights by turning them on or off, adjusting brightness levels, or trying out any other features provided by the smart lighting system. If the lights respond as expected, you have successfully connected your iPhone to the system.
8. Troubleshooting: If you encounter any issues during the connection process, refer to the troubleshooting guide provided by the smart lighting system manufacturer. They may have specific instructions or solutions to common connection problems.
By following these steps, you can successfully connect your iPhone to the smart lighting system and enjoy the convenience of controlling your house lights from your phone. Once connected, you can easily adjust the lighting in your home, create customized lighting scenes, and enjoy the benefits of a smart and connected living space.
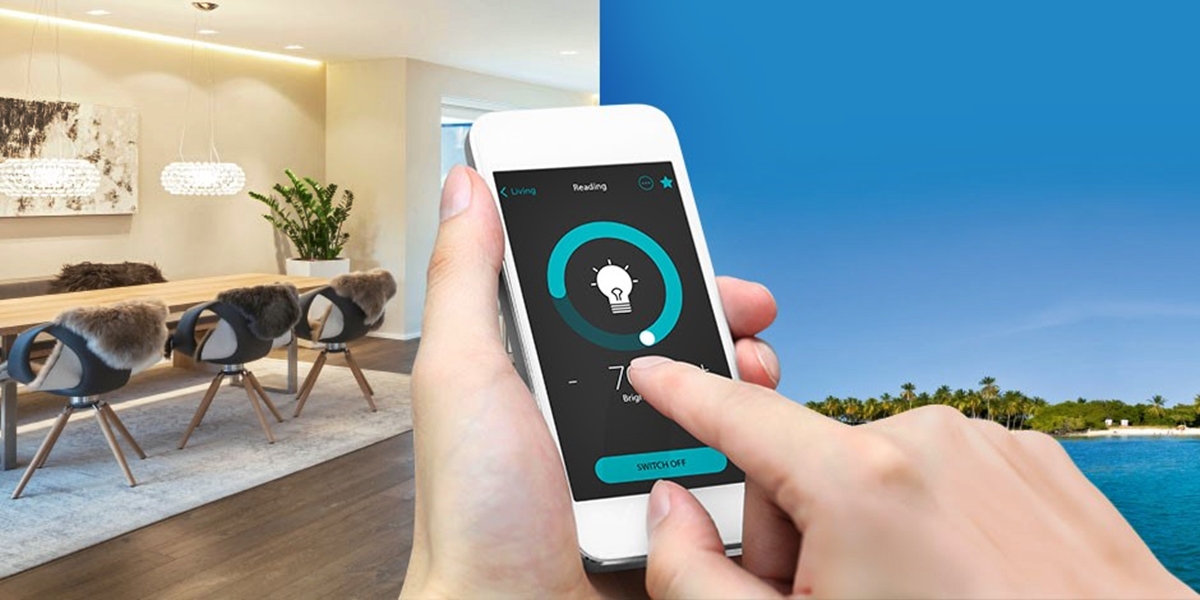
Controlling Individual Lights with Your iPhone
Controlling individual lights with your iPhone is a key feature of a smart lighting system. It grants you the flexibility to adjust each light independently according to your preferences. Here’s how you can control individual lights with your iPhone:
1. Open the Smartphone App: Launch the smartphone app for your smart lighting system on your iPhone. Make sure you’re logged in to your account and that your iPhone is connected to the smart lighting system.
2. Select the Room: Within the app, select the room or area where the light you wish to control is located. Most smart lighting systems allow you to organize lights into different rooms or groups for easy management.
3. Choose the Light: Once you’ve selected the room, you will see a list of individual lights within that room. Tap on the light you want to control to access its settings and options.
4. Turn On or Off: To turn the light on or off, simply tap the corresponding button or toggle switch within the app. The light will respond accordingly, providing instant illumination or darkness.
5. Adjust Brightness: If your smart lighting system supports dimming or adjusting brightness levels, use the provided slider or buttons to increase or decrease the intensity of the light. This allows you to create the perfect ambiance for any occasion.
6. Change Color (if applicable): If you have color-changing smart bulbs, you can also use the app to select and change the color of the light. Choose from a range of colors or use color presets to set the desired mood.
7. Save Favorite Settings: Some smart lighting systems allow you to save your preferred settings as “favorite” or “presets.” This saves you time by quickly applying your preferred brightness level or color to the light with just a single tap.
8. Group Lights: If you want to control multiple lights simultaneously, your smart lighting system may offer the option to group lights together. Create groups based on specific areas, such as “living room lights” or “kitchen lights,” and control them all at once.
9. Use Voice Commands: If your smart lighting system is compatible with voice assistants like Siri, Google Assistant, or Amazon Alexa, you can control individual lights using voice commands through your iPhone. Simply activate the voice assistant and give the command to turn on/off or adjust the light.
By following these steps, you can easily control individual lights with your iPhone. Enjoy the convenience of managing each light in your home according to your preferences and create the perfect lighting experience for any occasion.
Creating Lighting Scenes and Presets
Creating lighting scenes and presets allows you to customize and recreate specific lighting setups with just a few taps on your iPhone. This feature provides convenience and allows you to set the perfect ambiance for different activities or moods. Here’s how you can create lighting scenes and presets:
1. Open the Smartphone App: Launch the smartphone app for your smart lighting system on your iPhone. Make sure you’re logged in to your account and connected to the smart lighting system.
2. Choose a Room or Area: Select the room or area where you want to create the lighting scene or preset. Each room may have different lighting needs and setups, so choose accordingly.
3. Adjust Individual Lights: Within the app, adjust the individual lights in the room to the desired brightness level, color, or any other setting you want to include in the scene. This could be turning on specific lights, dimming others, or changing colors as needed.
4. Save the Scene: Once you have set up the lights to your liking, look for an option to save the scene or create a preset. Give the scene a name that reflects its purpose or ambiance. For example, “Movie Night” or “Dinner Party.”
5. Customize the Scene: Depending on your smart lighting system, you may have further customization options for each scene. This could include setting a specific transition time or choosing a fade-in/fade-out effect for a smoother lighting change.
6. Test and Adjust: After saving the scene, test it to make sure the lights respond as expected. If needed, go back to the scene settings and make any necessary adjustments until you achieve the desired lighting effect.
7. Create Multiple Scenes: Repeat the above steps to create multiple lighting scenes for different occasions or settings. For example, you can have a “Reading” scene with brighter lights and a “Relaxation” scene with dimmed lights.
8. Access Scenes and Presets: Once you have created the lighting scenes and presets, you can easily access them through the app on your iPhone. Look for an option to switch between scenes or presets and select the one you want to activate.
9. Voice Control: If your smart lighting system is compatible with voice assistants, you can also use voice commands through your iPhone to activate specific lighting scenes or presets. Simply activate the voice assistant and give the command to switch to a particular scene.
By creating lighting scenes and presets, you can effortlessly recreate your desired lighting setups with just a tap on your iPhone. Enjoy the convenience and flexibility of creating different moods and settings in your home with your smart lighting system.
Scheduling Lights to Turn On and Off
Scheduling your lights to turn on and off automatically is a convenient and energy-efficient feature offered by smart lighting systems. With the ability to program specific times and days, you can ensure that your lights are always activated when needed and save energy by turning them off when not in use. Here’s how you can schedule your lights to turn on and off:
1. Open the Smartphone App: Launch the smartphone app for your smart lighting system on your iPhone. Ensure that you’re logged in to your account and connected to the smart lighting system.
2. Access the Scheduling Section: Look for a scheduling or timer section within the app. This is where you can set up the specific times and days for your lights to turn on and off automatically.
3. Select the Lights: Choose the lights or group of lights that you want to schedule. This may include lights in specific rooms, outdoor lights, or a combination of both.
4. Set the On Time: Specify the time when you want the lights to turn on. Use the app’s time picker or input the desired time manually. This could be in the morning to wake up with gradual light or in the evening to simulate occupancy.
5. Set the Off Time: Indicate the time when you want the lights to turn off. This can be an hour after the on-time, at a specific time in the evening, or whenever you typically go to bed.
6. Select the Days: Choose the specific days of the week for the scheduled operation of the lights. You can set different schedules for weekdays and weekends or customize the schedule for individual days.
7. Customize Brightness and Color (if applicable): Depending on your smart lighting system, you may have additional options to customize the brightness or color of the lights when they turn on. This can help set the desired ambiance according to the time of day or activity.
8. Save the Schedule: Once you have set up the desired schedule for your lights, save the settings within the app. The smart lighting system will now automatically turn the lights on and off based on the programmed schedule.
9. Adjust and Modify: You can always go back to the schedule settings in the app to adjust or modify the programmed times. This is particularly useful if you have changes in your routine or need to adapt the schedule for specific occasions.
Scheduling your lights to turn on and off automatically not only provides convenience but also helps conserve energy and enhance home security. Enjoy the benefits of a well-lit home at the right time without the need for manual control. Embrace the flexibility and efficiency of your smart lighting system’s scheduling capabilities.
Controlling Lights Remotely with Your iPhone
The ability to control your lights remotely with your iPhone offers convenience and flexibility, allowing you to manage your lighting even when you’re away from home. Whether you’re on vacation, at work, or simply lounging on the couch, you can easily control your lights with a few taps on your phone. Here’s how you can remotely control your lights with your iPhone:
1. Ensure a Stable Internet Connection: Before you can control your lights remotely, make sure that your iPhone is connected to a stable internet connection. This can be through Wi-Fi or cellular data, depending on the capabilities of your smart lighting system.
2. Open the Smartphone App: Launch the smartphone app for your smart lighting system on your iPhone. Ensure that you’re logged in to your account and that your smart lighting system is connected to the internet.
3. Connect to Your Smart Lighting System: Within the app, establish a connection with your smart lighting system by selecting the appropriate options or devices. This will allow your iPhone to communicate with the lights and control them remotely.
4. Access the Remote Control Function: Look for a remote control or remote access feature within the app. This may be indicated by an icon or a specific section dedicated to remote control functionalities.
5. View and Control Your Lights: Once in the remote control section, you should see a list or visual representation of your lights. From there, you can easily turn them on or off, adjust brightness levels, change colors (if supported), or activate specific scenes or presets.
6. Geolocation-Based Control: Some smart lighting systems offer geolocation-based control, which allows your lights to automatically adjust based on your phone’s location. For example, when you’re nearing home, the lights can turn on to welcome you.
7. Voice Control: If your smart lighting system is compatible with voice assistants like Siri, Google Assistant, or Amazon Alexa, you can also control your lights remotely using voice commands through your iPhone. Simply activate the voice assistant and give the command to control the lights as desired.
8. Receive Status Updates: Depending on your smart lighting system, you may receive real-time status updates about the lights, such as whether they are on or off. This provides reassurance and helps you stay in control of your lighting even when you’re not physically present.
9. Ensure Security Measures: It is important to prioritize the security of your smart lighting system. Make sure to enable any recommended security measures, such as two-factor authentication or secure connections, to protect your lights from unauthorized access.
By remotely controlling your lights with your iPhone, you can enjoy the convenience of managing your lighting from anywhere. Whether you want to create a welcoming atmosphere before arriving home or ensure that your lights are off when you’re away, the flexibility and control provided by remote access enhance your smart lighting experience.
Troubleshooting Common Issues with iPhone-controlled Lighting
While iPhone-controlled lighting systems offer convenience and flexibility, there may be times when you encounter common issues or difficulties. Identifying and troubleshooting these issues will help ensure smooth operation and optimal performance. Here are some common problems you may encounter with iPhone-controlled lighting and how to troubleshoot them:
1. Connectivity Issues: If you’re experiencing connectivity issues between your iPhone and the smart lighting system, start by checking your Wi-Fi network. Ensure that your iPhone is connected to the same network as the lighting system. Restarting your router or the smart lighting bridge or hub can also help reestablish the connection.
2. Unresponsive Lights: If an individual light or a group of lights is unresponsive, try turning them off and on again through the app. If that doesn’t work, check the power supply to the lights and make sure they are securely connected. Restarting the smart lighting system or resetting the bulbs can also help resolve unresponsiveness issues.
3. App Errors or Crashes: If the smartphone app for your smart lighting system is experiencing errors or crashes, check for available updates and ensure that you have the latest version installed. Clearing the app’s cache or reinstalling it can help resolve any underlying issues. If the problem persists, reach out to the app’s support team for further assistance.
4. Inconsistent Dimming or Color Changes: If you notice inconsistent dimming or color changes with your smart lighting, check for any interference from nearby electrical devices or appliances. Moving the smart lighting bulbs away from such sources can improve their performance. Additionally, ensure that the bulbs are compatible with the dimmer switches, if applicable, and that the dimming settings are properly configured in the app.
5. Voice Control Issues: If you’re experiencing difficulties with voice control through your iPhone and smart lighting system, ensure that your iPhone’s voice assistant is properly set up and configured. Make sure the voice assistant is connected to the smart lighting system and authorized to control the lights. Rebooting your iPhone and the smart lighting system can also help resolve any temporary issues.
6. Firmware Updates: Keep an eye out for firmware updates for your smart lighting system. These updates often bring bug fixes, improvements, and added features. Check the manufacturer’s website or the smartphone app for any available updates and follow the provided instructions to install them.
7. Check Power Supply: If the smart lighting system or specific lights are not functioning at all, check the power supply. Ensure that all connections are securely plugged in and that there is power supply to the lighting system, bridge, or hub. If necessary, replace any faulty power adapters or cables.
8. Consult the Manufacturer or Support Team: If you have tried troubleshooting the issues mentioned above and are still facing difficulties with your iPhone-controlled lighting, it is advisable to contact the manufacturer or the support team of your smart lighting system. They can provide specific guidance and further assistance tailored to your system’s requirements and troubleshooting needs.
By troubleshooting common issues with your iPhone-controlled lighting system, you can resolve technical problems and ensure a seamless experience. Remember to refer to manufacturer instructions, support documents, and online forums for additional guidance specific to your smart lighting system.