
Determine USB Support
Before connecting a flash drive to your Android phone, it’s important to determine whether your device supports USB connectivity. While most modern Android phones do offer USB support, it’s always a good idea to check to avoid any compatibility issues.
The easiest way to determine USB support on your Android phone is to look for the presence of a USB port. Most Android phones come with a micro USB or USB-C port, which can be used for connecting various peripherals, including a flash drive.
If your phone doesn’t have a USB port, it may still support USB connectivity through other means. Some Android devices, particularly newer models, support wireless USB connections or have USB adapters that can be used to connect external devices like flash drives.
To confirm USB support on your Android phone, you can consult the device’s user manual or search online for the specific model’s USB connectivity capabilities. You can also check the specifications page on the manufacturer’s website, which will provide information regarding USB support.
By determining the USB support on your Android phone, you can ensure that your device is capable of connecting to a flash drive and accessing its contents. This step is crucial to ensure a seamless and successful connection between your phone and the flash drive.
Choose the Right USB Connection
Once you’ve confirmed that your Android phone supports USB connectivity, the next step is to choose the right USB connection for your device. This will depend on the type of USB port your phone has and the compatibility of the flash drive you want to connect.
There are two common types of USB ports on Android phones: micro USB and USB-C. Micro USB ports are more commonly found on older Android devices, while USB-C ports are becoming increasingly common on newer models. It’s important to know which type of USB port your phone has to select the appropriate USB connection.
If your Android phone has a micro USB port, you will need a micro USB to USB-A adapter. This adapter allows you to connect a regular USB-A cable to your phone’s micro USB port. This type of connection is typically used with older flash drives that have a USB-A connector.
On the other hand, if your Android phone has a USB-C port, you can directly connect a USB-C to USB-A cable to your device. This connection is usually used with newer flash drives that have a USB-C connector. USB-C connections offer faster data transfer speeds and are more future-proof, as USB-C is becoming the industry standard.
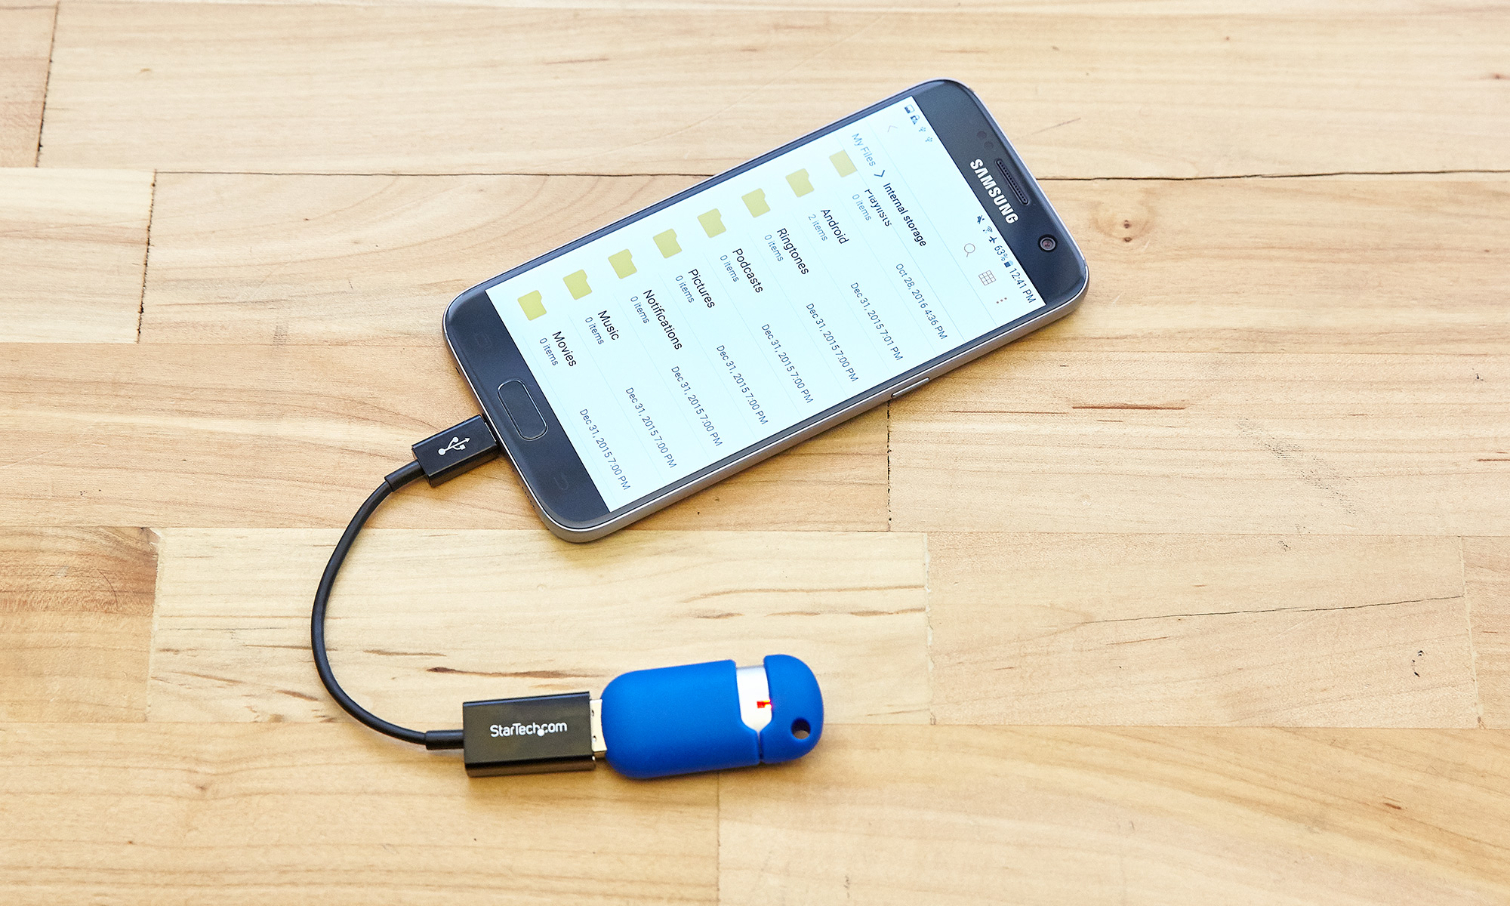
In some cases, you may also need an OTG (On-The-Go) cable to connect a flash drive to your Android phone. An OTG cable is used when your phone doesn’t natively support USB connections or if you want to connect devices that have different types of USB connectors. It acts as a bridge between your phone and the flash drive, allowing you to transfer files seamlessly.
Before purchasing any USB cables or adapters, it’s important to check the compatibility of your phone and the flash drive you want to connect. This will ensure that you choose the right USB connection and prevent any compatibility issues or damage to your devices.
Use an OTG Cable
If your Android phone doesn’t have native USB support or you want to connect devices with different USB connectors, you can use an OTG (On-The-Go) cable. An OTG cable allows you to connect a flash drive, keyboard, mouse, or other USB peripherals directly to your Android phone.
To use an OTG cable, you’ll need to make sure your Android phone supports OTG functionality. Most modern Android devices have OTG support, but it’s always good to check your phone’s specifications or consult the user manual to confirm.
Once you’ve verified OTG support, follow these steps to use an OTG cable:
- Obtain an OTG cable: You can purchase an OTG cable from various electronics stores or online retailers. Make sure to choose a high-quality cable to ensure a reliable and stable connection.
- Connect the OTG cable to your Android phone: Plug the micro USB or USB-C end of the OTG cable into the corresponding port on your phone.
- Connect the flash drive to the OTG cable: Plug the USB-A end of the OTG cable into the flash drive’s USB connector.
- Wait for the device to recognize the flash drive: Your Android phone should automatically detect the connected flash drive and display a notification indicating that it’s connected.
- Access files on the flash drive: Open the File Manager app or any other file browsing app on your Android phone. You should see the flash drive listed as a storage device. Tap on the flash drive’s icon to access its files and folders.
Using an OTG cable provides you with the flexibility to connect a wide range of USB devices to your Android phone. Whether you want to transfer files, play media directly from a flash drive, or use a USB keyboard or mouse, an OTG cable enables you to expand the capabilities of your Android device.
Connect the Flash Drive to Your Android Phone
Connecting a flash drive to your Android phone allows you to easily transfer files, access media, and expand your device’s storage capacity. Follow these steps to connect a flash drive to your Android phone:
- Ensure your Android phone is powered on and unlocked: Before connecting the flash drive, make sure your phone is turned on and the screen is unlocked. This will allow the phone to detect the flash drive.
- Locate the USB port on your Android phone: Most Android phones have a micro USB or USB-C port. The location of the port may vary depending on the phone’s make and model.
- Plug the flash drive into the USB port: Insert the USB connector of the flash drive into the corresponding USB port on your Android phone. Ensure that you insert it correctly and firmly to establish a stable connection.
- Wait for the phone to recognize the flash drive: Once the flash drive is connected, your Android phone will automatically detect it and display a notification indicating that it’s connected. Depending on your phone’s settings, you may also hear an audible notification.
- Access the flash drive: To access the files on the flash drive, open the File Manager app or any other file browsing app on your Android phone. You should see the flash drive listed as a storage device. Tap on the flash drive’s icon to view its contents.
It’s important to note that some Android phones may require additional steps or settings to be configured in order to recognize and access the flash drive. You can refer to your phone’s user manual or search for specific instructions online if you encounter any difficulties.
Once the flash drive is successfully connected to your Android phone, you can start transferring files to and from the drive, playing media directly from it, or using it as a portable storage device for your phone. Enjoy the convenience and flexibility that connecting a flash drive brings to your Android device!
Browse and Manage Files on the Flash Drive
Once you’ve connected a flash drive to your Android phone, you can browse through the files and folders stored on the drive directly from your device. Here’s how you can easily browse and manage files on the flash drive:
- Open the File Manager app: Most Android devices come with a pre-installed file manager app. You can access it from your app drawer or by searching for “File Manager” in the search bar. If your phone doesn’t have a file manager app, you can download one from the Google Play Store.
- Locate the flash drive: In the file manager app, navigate to the storage section or the “Devices” section. You should see the flash drive listed as a connected device, such as “USB” or the name of the flash drive itself.
- Tap on the flash drive: Select the flash drive to view its contents. You will see a list of files and folders stored on the drive.
- Browse through files and folders: Tap on a folder to access its contents or tap on a file to open it. You can use the file manager app’s built-in features to copy, move, rename, or delete files and folders as needed.
- Use the search function: If you’re looking for a specific file or folder on the flash drive, you can use the search function within the file manager app. This will allow you to quickly find the desired item without manually browsing through the folders.
- Create new folders or files: If you want to organize the files on your flash drive or create new files, the file manager app usually allows you to create new folders or documents directly on the flash drive.
By utilizing the file manager app on your Android phone, you can easily browse, organize, and manage the files and folders on your connected flash drive. Whether you’re transferring files, viewing media content, or organizing documents, the file manager app provides you with the necessary tools to navigate and interact with the files stored on the flash drive.
Transfer Files to and from the Flash Drive
Transferring files to and from a flash drive on your Android phone is a simple process that allows you to conveniently manage and transfer your data. Follow these steps to transfer files between your phone and the flash drive:
- Open the File Manager app: Launch the file manager app on your Android phone. If you don’t have one installed, you can download a file manager app from the Google Play Store.
- Select the files you want to transfer: Navigate to the location where the files you want to transfer are stored. Long-press on a file to select it, and then tap on any additional files you want to transfer. You can also select entire folders if you want to transfer multiple files at once.
- Copy or move the selected files: Once you’ve selected the files, tap on the “Copy” or “Move” option in the file manager app. You can usually find these options in a toolbar at the top or bottom of the screen.
- Navigate to the flash drive: In the file manager app, go to the location of the flash drive. Tap on the flash drive to open it.
- Paste the files onto the flash drive: Tap on the “Paste” option in the file manager app to transfer the selected files from your phone to the flash drive. The files will be copied or moved depending on the option you chose.
- Transfer files from the flash drive to your phone: To transfer files from the flash drive to your Android phone, follow the same steps as above, but select the files from the flash drive and choose the option to copy or move them to the desired location on your phone.
During the file transfer process, it’s important to ensure that both your Android phone and the flash drive have sufficient storage space. Additionally, be mindful of the file formats supported by your Android phone to ensure compatibility.
By following these steps, you can easily transfer files to and from a flash drive on your Android phone. Whether you’re transferring photos, videos, documents, or other types of files, this process allows you to manage and organize your data efficiently.
Eject the Flash Drive Safely
After using a flash drive on your Android phone, it’s important to safely eject it before physically disconnecting it from your device. Safely ejecting the flash drive ensures that all data has been properly written and prevents potential data corruption or loss. Follow these steps to safely eject the flash drive:
- Close any open files or applications: Before ejecting the flash drive, make sure that you’ve closed any files or applications that were accessing it. This ensures that all data has been saved and no files are in use.
- Access the notification panel: Swipe down from the top of the screen to bring up the notification panel on your Android phone.
- Tap on the USB notification: Look for a notification related to the flash drive connection. It may be labeled as “USB connected” or display the name of the flash drive.
- Tap on the “Eject” or “Unmount” option: In the notification panel, you should see an option to safely eject or unmount the flash drive. Tap on this option to initiate the ejection process.
- Wait for confirmation: After selecting the eject option, your Android phone will safely dismount the flash drive. Wait for a confirmation message that states it is safe to remove the flash drive.
- Physically disconnect the flash drive: Once you’ve received the confirmation, carefully remove the flash drive from the USB port of your Android phone. Avoid pulling it out forcefully to prevent damage to both the flash drive and the phone’s USB port.
It’s important to note that not safely ejecting the flash drive can lead to data corruption or loss. Therefore, it’s recommended to always follow the proper ejection process to ensure the integrity of your files.
By safely ejecting the flash drive, you can protect your data and extend the lifespan of both the flash drive and your Android phone’s USB port. Make it a habit to always perform this step before physically disconnecting any external storage devices from your device.
Troubleshooting Tips
While connecting and using a flash drive on your Android phone is generally straightforward, you may encounter some common issues along the way. Here are some troubleshooting tips to help you resolve any problems you may encounter:
- Check USB connection: Ensure that the flash drive is securely plugged into the USB port of your Android phone. Sometimes a loose or faulty connection can prevent the phone from recognizing the flash drive.
- Restart your phone: If the flash drive is not being detected by your Android phone, try restarting your device. This can help refresh the system and resolve any temporary software glitches.
- Use a different USB cable or adapter: If you’re using an OTG cable or USB adapter, try using a different one to rule out any issues with the cable or adapter itself. Sometimes a faulty cable or adapter can cause connectivity problems.
- Check USB OTG support: If you’re using an OTG cable and the flash drive is not being recognized, ensure that your Android phone supports OTG functionality. Some older or budget devices may not have OTG support.
- Format the flash drive: If your Android phone is unable to read files or folders on the flash drive, it may be due to incompatible file formats or file system errors. Try formatting the flash drive using the FAT32 or exFAT file system to ensure compatibility with your Android device.
- Update your Android system: Outdated system software can sometimes cause compatibility issues with external devices. Make sure your Android phone is running the latest software update by going to the Settings app and checking for system updates.
- Try a different flash drive: If the issue persists, try using a different flash drive to see if the problem lies with the specific drive. Sometimes a faulty flash drive can cause connection or compatibility problems.
- Seek technical support: If you’ve tried the above troubleshooting steps and are still experiencing issues, it may be necessary to seek technical support. Contact the manufacturer of your Android phone or the flash drive for further assistance.
Remember, every Android phone and flash drive combination can have its own unique quirks and compatibility issues. These troubleshooting tips should help resolve most common problems, but if you encounter persistent issues, it’s always a good idea to reach out for assistance from the appropriate professionals.