
Required Equipment
Before you can connect your Xbox One to a TV, you will need a few essential pieces of equipment. Here’s a list of what you’ll need:
- Xbox One Console: This is the central device that allows you to play games and access entertainment apps on your TV.
- HDMI Cable: You’ll need an HDMI cable to connect the Xbox One to your TV. Most modern TVs have HDMI ports, but make sure to check your TV’s inputs to ensure compatibility.
- TV: Of course, you’ll need a television with an available HDMI input to connect your Xbox One.
- Power Adapter: The Xbox One comes with a power adapter that you’ll need to plug into a power outlet.
- Xbox One Controller: The Xbox One controller is necessary to navigate menus, play games, and control the console’s functions.
- Internet Connection: To access online features and download game updates, you’ll need an active internet connection. You can connect your Xbox One to the internet via Wi-Fi or using an Ethernet cable if you have a wired connection available.
Make sure you have all these items ready before proceeding with the connection process. Having the necessary equipment at hand will make the setup process smoother and allow you to enjoy gaming on your Xbox One without any interruptions.
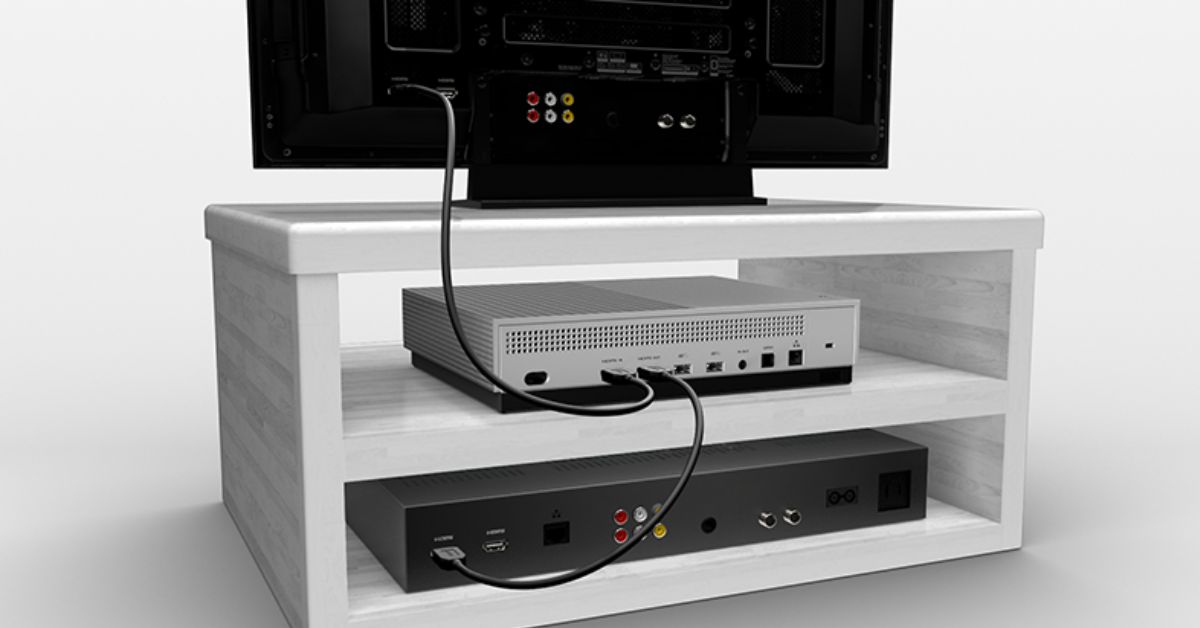
Step 1: Connect the HDMI Cable
The first step in connecting your Xbox One to a TV is to connect the HDMI cable. Here’s how you do it:
- Locate the HDMI Out port on the back of your Xbox One console. It is usually labeled as “HDMI Out” or “TV.”
- Take one end of the HDMI cable and insert it into the HDMI Out port on your Xbox One.
- Next, find an available HDMI input on your TV. The HDMI inputs are usually labeled as “HDMI 1,” “HDMI 2,” etc.
- Insert the other end of the HDMI cable into the HDMI input on your TV.
- Ensure that the HDMI cable is securely plugged into both the Xbox One and your TV. A loose connection can result in a poor quality or no video output.
Once you have successfully connected the HDMI cable, you’re ready to move on to the next step. The HDMI cable is responsible for transmitting both audio and video signals from the Xbox One to your TV, ensuring that you get the best possible gaming experience.
Step 2: Power On the Xbox One
After connecting the HDMI cable, the next step is to power on your Xbox One console. Follow these simple steps to get started:
- Locate the power button on your Xbox One console. It is usually located on the front or side of the console.
- Press the power button to turn on the Xbox One.
- Wait for a few seconds while the console powers up. You’ll see the Xbox logo appear on your TV screen.
- Once the Xbox logo appears, the console will go through a startup process. This may take a few moments.
- Once the startup process is complete, you’ll be directed to the Xbox One’s home screen.
It’s important to wait for the startup process to complete before proceeding to the next step. This ensures that the console is fully powered on and ready for use. Now that your Xbox One is powered on, let’s move on to setting it up.
Step 3: Set Up the Xbox One
Once your Xbox One is powered on, you’ll need to go through the initial setup process. Follow these steps to get your console up and running:
- You’ll be prompted with a language selection screen. Use the Xbox controller to navigate and select your preferred language.
- The next screen will ask you to connect to a network. Choose your Wi-Fi network or select “Wired network” if you’re using an Ethernet cable.
- Enter your network password if prompted, and wait for the console to connect to your chosen network.
- Once connected, the console will check for updates. If any updates are available, it will download and install them automatically. This may take a few minutes.
- After the updates are installed, you’ll be asked to sign in to your Xbox Live account. If you already have an account, enter your credentials. If not, you’ll have the option to create a new account.
- Follow the on-screen prompts to complete the account setup process.
- Once your account is set up, you’ll be taken to the Xbox One dashboard, where you can access your games, apps, and settings.
Completing the setup process ensures that your Xbox One is properly configured and ready to use. Take your time to review the settings and customize them according to your preferences. Now that your Xbox One is set up, let’s move on to the next step: connecting to the internet.
Step 4: Connect to the Internet
Connecting your Xbox One to the internet is vital for accessing online features, multiplayer gaming, and downloading game updates. Follow these steps to get your console connected:
- From the Xbox One dashboard, press the Xbox button on your controller to open the guide.
- Navigate to the “Profile & system” tab and select “Settings.”
- In the Settings menu, select “Network.”
- Choose “Set up wireless network” if you’re using Wi-Fi, or select “Network settings” for a wired connection.
- If you’re setting up a wireless connection, choose your Wi-Fi network from the available options and enter your network password if prompted. If you’re using a wired connection, select “Go offline” to disconnect from any Wi-Fi networks.
- Wait for the console to establish a connection to the internet. Once connected, you’ll see a checkmark next to your selected network.
- Test your network connection by selecting “Test network connection.” This will ensure that your Xbox One is successfully connected to the internet.
Once you’ve successfully connected to the internet, you can take full advantage of online features, browse the Xbox Store, and play multiplayer games with friends and players from around the world. With your Xbox One connected to the internet, it’s time to move on to the next step: connecting your Xbox One controller.
Step 5: Connect Xbox One Controller
The Xbox One controller is crucial for gaming on your console. Here’s how to connect it:
- Make sure your Xbox One controller is turned off.
- Locate the Micro-USB port on the top of the controller.
- Take the Micro-USB cable and plug one end into the controller’s Micro-USB port.
- The other end of the cable should be plugged into the USB port on the front or side of the Xbox One console.
- Turn on the controller by pressing the Xbox button in the center.
- Wait for the console to recognize the controller. Once connected, the Xbox logo on the controller should light up, indicating a successful connection.
Now that your Xbox One controller is connected, you can use it to navigate through menus, control your gameplay, and enjoy immersive gaming experiences on your TV screen. If you have multiple controllers, you can repeat these steps to connect them as well.
With the Xbox One controller set up, it’s time to move on to the next step: adjusting the display settings to optimize your gaming experience.
Step 6: Adjust Display Settings
Adjusting the display settings on your Xbox One ensures that you have the best visual experience while gaming. Follow these steps to calibrate the display settings:
- From the Xbox One dashboard, press the Xbox button on your controller to open the guide.
- Navigate to the “Profile & system” tab and select “Settings.”
- In the Settings menu, choose “Display & sound.”
- Select “Video output,” and then choose the “TV resolution” option.
- Based on your TV’s capabilities, select the resolution that provides the best picture quality. Common options include 1080p (recommended for most TVs) or 4K if your TV supports it.
- Next, you can adjust other display settings such as brightness, contrast, and color. Experiment with these settings to find the optimal visual balance for your viewing experience.
- If your TV supports High Dynamic Range (HDR), make sure to enable the HDR setting for enhanced graphics and color reproduction. This option is typically found in the same “Display & sound” menu.
By fine-tuning the display settings, you can ensure that your games look their best on your TV screen. Take some time to explore the various options and adjust them according to your preferences. Now that you have optimized the display settings, let’s move on to adjusting the audio settings for immersive sound.
Step 7: Adjust Audio Settings
Adjusting the audio settings on your Xbox One allows you to tailor the sound output to your liking. Follow these steps to optimize the audio settings:
- From the Xbox One dashboard, press the Xbox button on your controller to open the guide.
- Navigate to the “Profile & system” tab and select “Settings.”
- In the Settings menu, choose “Display & sound.”
- Select “Audio output,” and then choose the “Audio format” option.
- Based on your audio setup, select the appropriate option. For most users, “Stereo uncompressed” or “Dolby Digital 5.1” is preferred. If you have a surround sound system, select the option that matches your system’s capabilities.
- Next, you can adjust other audio settings such as volume normalization, screen time, and headset audio if you’re using a gaming headset.
- If you’re using external audio devices such as soundbars or home theater systems, make sure to select the correct audio output and adjust any additional settings on those devices for optimal sound quality.
Tweaking the audio settings allows you to immerse yourself in the rich soundscapes of your games. Take some time to explore the different options and adjust them to match your audio setup and personal preferences.
Now that you have optimized the audio settings, it’s time to move on to the next step: setting up your Xbox Live account for online gaming and accessing additional features.
Step 8: Set Up Xbox Live Account
An Xbox Live account is essential for accessing online multiplayer features and taking advantage of additional benefits on your Xbox One. Follow these steps to set up your Xbox Live account:
- From the Xbox One dashboard, press the Xbox button on your controller to open the guide.
- Navigate to the “Profile & system” tab and select “Sign in.”
- Choose “Create one” to set up a new Xbox Live account, or select “Sign in” if you already have an account.
- Follow the on-screen prompts to enter your email address, create a unique gamertag, and set a secure password for your account. You may also be asked to provide additional account details such as your date of birth and location.
- Once your account is created, you’ll have the option to set privacy settings and customize your profile. You can also add friends, join communities, and access exclusive content.
- If you already have an Xbox Live account, select “Sign in” and enter your account credentials when prompted.
Setting up an Xbox Live account allows you to connect with friends, participate in online gaming, and unlock various features and benefits. Take the time to explore the Xbox Live community and personalize your profile to make the most of your gaming experience.
Now that you have set up your Xbox Live account, it’s recommended to check for any game updates to ensure you have the latest versions and improvements. Let’s move on to the next step: downloading game updates.
Step 9: Download Game Updates
Game updates are essential for improving gameplay, fixing bugs, and adding new content. Follow these steps to download game updates on your Xbox One:
- From the Xbox One dashboard, navigate to the “My games & apps” tab.
- Select “Updates” to view a list of available updates for your installed games.
- Choose the game you want to update, and then select “Update.”
- The Xbox One will begin downloading and installing the update. The time it takes to complete will depend on the size of the update and your internet connection speed.
- Once the update is installed, you’ll be able to enjoy the latest features and improvements in your game.
- It’s important to regularly check for updates, as game developers often release patches and updates to enhance the gaming experience and address any issues.
- You can also enable automatic updates in the settings to ensure that your games are always up to date.
Downloading game updates not only improves the performance and stability of your games but also allows you to access new content and features. Stay on top of updates to enjoy the best gaming experience possible.
Now that you have downloaded the necessary game updates, it’s time to start enjoying gaming on your TV. Let’s move on to the final step.
Step 10: Enjoy Gaming on Your TV
With all the necessary setup and configurations completed, it’s time to dive into the exciting world of gaming on your TV with your Xbox One. Here’s how to start enjoying your gaming experience:
- From the Xbox One dashboard, navigate to the “My games & apps” tab to access your game library.
- Select the game you want to play by highlighting it and pressing the A button on your controller.
- If the game requires a disc, insert it into the disc drive of your Xbox One console. The game will start once the console recognizes the disc.
- If you have a digital game, simply select it from your library, and it will start to download and launch automatically.
- Once the game is launched, use your Xbox One controller to navigate the menus and control your character or avatar in the game.
- Explore the vast game worlds, complete quests, compete against other players, or enjoy single-player experiences, depending on the game you choose.
- Remember to save your progress regularly to ensure that you don’t lose any hard-earned achievements or progress in the game.
- Consider connecting a headset or speaker system for an immersive audio experience while playing.
Now it’s time to unleash your gaming skills and embark on thrilling adventures with your Xbox One. Grab your controller, sit back, and get ready to have an incredible gaming experience on your TV.
Enjoy your gaming sessions and have fun exploring the exciting collection of games available on the Xbox One platform!