
Step 1: Ensure the Echo Dot and iPhone are Set Up
Before connecting your Echo Dot to your iPhone, it is important to ensure that both devices are properly set up. Follow these steps to ensure a smooth connection:
- Set up the Echo Dot: If you haven’t already done so, unbox your Echo Dot and plug it into a power outlet. Wait for the light ring to turn blue and then orange, indicating that the device is in setup mode.
- Download the Alexa app: Open the App Store on your iPhone and search for the Amazon Alexa app. Tap “Get” and wait for the app to download and install on your device. Once installed, open the app.
- Sign in to your Amazon account: If you already have an Amazon account, sign in with your email and password. If you don’t have an account, tap “Create a new Amazon account” and follow the on-screen instructions to set one up.
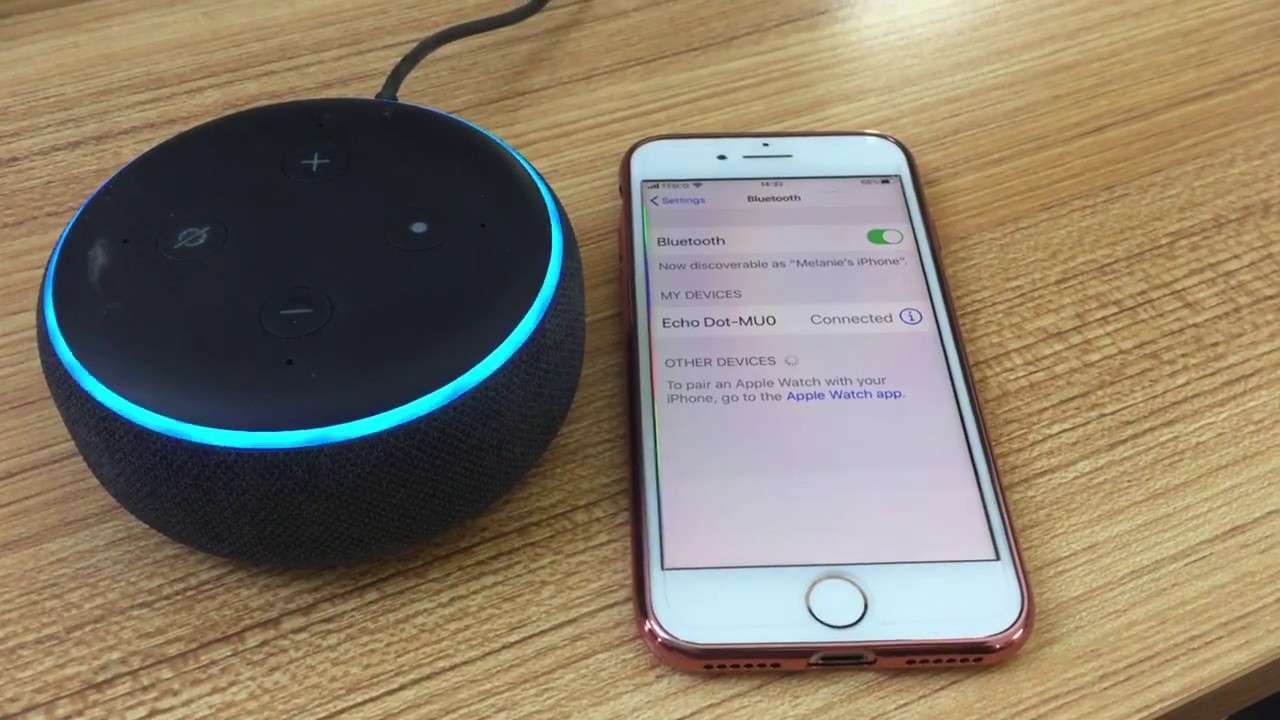
- Connect the Echo Dot to Wi-Fi: In the Alexa app, tap on “Devices” at the bottom right corner of the screen. Then tap on the “+” icon at the top right corner to add a new device. Select “Amazon Echo” and choose the specific Echo Dot model you have. Follow the on-screen instructions to connect the Echo Dot to your Wi-Fi network.
Once you have completed these initial setup steps, you are ready to continue with the process of connecting the Echo Dot to your iPhone. Having both the Echo Dot and the iPhone set up correctly will ensure a seamless connection between the two devices, allowing you to enjoy all the features and capabilities of your Echo Dot using your iPhone.
Step 2: Connect the Echo Dot to Wi-Fi
Connecting your Echo Dot to Wi-Fi is an essential step in the setup process. Follow these instructions to establish a stable Wi-Fi connection:
- Launch the Alexa app: Open the Alexa app on your iPhone.
- Find your Echo Dot: Tap on “Devices” at the bottom right corner of the screen.
- Add a new device: Tap the “+” icon at the top right corner of the screen to add a new device to your Alexa app.
- Select “Amazon Echo”: Choose “Add Device” and select “Amazon Echo” from the list of available devices.
- Select your Echo Dot model: Choose the specific model of your Echo Dot from the options presented.
- Press and hold the Action button: On your Echo Dot, find the button with the symbol of a dot and a ring. Press and hold this button until the light ring turns orange, indicating that the device is in setup mode.
- Wait for the Echo Dot to appear: In the Alexa app, wait for your Echo Dot to appear on the screen. Once it does, tap on it to select it.
- Connect to Wi-Fi: Follow the on-screen instructions to connect your Echo Dot to your Wi-Fi network. Make sure you enter the correct password for your Wi-Fi network when prompted.
- Wait for the connection to be established: Once you have successfully entered the Wi-Fi password, wait for your Echo Dot to connect to the Wi-Fi network. The light ring on the Echo Dot will turn blue and then cyan, indicating a successful connection.
Once the Echo Dot is connected to Wi-Fi, it will be ready to use with your iPhone. This connection allows you to control the Echo Dot using your voice and take advantage of all its features and functionalities. Enjoy the seamless integration between your Echo Dot and iPhone!
Step 3: Open the Alexa App on the iPhone
In order to connect your Echo Dot to your iPhone, you need to open the Alexa app on your iPhone. Follow these steps to open the app:
- Locate the Alexa app: On your iPhone home screen, look for the Alexa app icon. It resembles a white outline of a speech bubble on a blue background.
- Tap the Alexa app icon: Simply tap on the Alexa app icon to launch the app.
- Wait for the app to load: Give the app a moment to load as it prepares to connect to your Echo Dot and provide you access to its features.
Once the Alexa app is open, you will be greeted with the main screen, which is your gateway to controlling your Echo Dot and accessing all its functionalities using your iPhone. From here, you can issue voice commands, customize settings, and explore the various capabilities of your Echo Dot.
It’s worth noting that you need a stable internet connection on your iPhone to ensure a seamless connection with your Echo Dot via the Alexa app. So, make sure you are connected to Wi-Fi or have a good cellular data signal before proceeding.
Now that you have successfully opened the Alexa app on your iPhone, you are ready to continue with the process of connecting your Echo Dot and iPhone, bringing together the power of both devices for a enhanced smart home experience.
Step 4: Tap the Devices Tab
Once you have opened the Alexa app on your iPhone, the next step is to navigate to the Devices tab. Follow these simple instructions to access the Devices tab:
- Look for the bottom navigation bar: At the bottom of the Alexa app, you will see a navigation bar with various icons. The Devices tab is one of these icons and is represented by an outline of a house.
- Tap on the Devices icon: Simply tap on the Devices icon in the navigation bar to access the Devices tab.
Once you tap on the Devices icon, you will be taken to the Devices tab, which displays a list of all your connected devices, including your Echo Dot. This tab provides you with a centralized location to manage and control your devices, making it easy to connect and customize your Echo Dot according to your preferences.
It’s important to note that if you haven’t set up any devices yet, the Devices tab may be empty initially. However, after you successfully connect your Echo Dot, it will appear in this tab, allowing you to interact with it and manage its settings.
By tapping on the Devices tab, you are only a few steps away from completing the process of connecting your Echo Dot to your iPhone. The Devices tab serves as a hub for controlling and organizing your Echo Dot and other connected devices, making it convenient to manage your smart home ecosystem.
Step 5: Tap the “+” Icon
To continue the process of connecting your Echo Dot to your iPhone, you need to tap the “+” icon in the Alexa app. This allows you to add a new device and initiate the setup process. Follow these steps to tap the “+” icon:
- Open the Alexa app: Launch the Alexa app on your iPhone, if you haven’t already done so.
- Locate the bottom navigation bar: Look for the navigation bar at the bottom of the app. The “+” icon is one of the options available.
- Tap the “+” icon: Simply tap on the “+” icon to proceed with adding a new device.
When you tap the “+” icon, a new screen will open, providing you with options to connect various smart devices to your Amazon Alexa ecosystem. These devices can include smart bulbs, thermostats, cameras, and of course, your Echo Dot.
By tapping the “+” icon and accessing the device setup screen, you are taking a significant step towards seamlessly integrating your Echo Dot into your iPhone and enjoying the convenience and functionality it offers.
Once you have successfully tapped the “+” icon, you are ready to move on to the next steps in the setup process, ensuring a cohesive connection between your Echo Dot and iPhone.
Step 6: Select “Add Device”
After tapping the “+” icon in the Alexa app, the next step in connecting your Echo Dot to your iPhone is to select “Add Device”. This will prompt the app to guide you through the device setup process. Follow these instructions to select “Add Device”:
- Go to the device setup screen: Once you have tapped the “+” icon, you will be taken to the device setup screen. Here, you will find a list of device types compatible with the Alexa app.
- Choose “Add Device”: Scroll through the list until you find the option labeled “Add Device”. Select it by tapping on it.
By selecting “Add Device”, you are indicating that you want to connect a new device to your Alexa app, in this case, your Echo Dot. This action signals to the app that you are ready to begin the specific setup process for your Echo Dot.
It’s important to note that the Alexa app supports a wide range of smart devices, so selecting “Add Device” allows you to expand your smart home ecosystem beyond just the Echo Dot. However, for the purpose of this guide, we are focusing on connecting the Echo Dot to your iPhone.
Once you have successfully selected “Add Device”, you are now ready to move forward with the subsequent steps, bringing you closer to the complete connection between your Echo Dot and your iPhone.
Step 7: Choose “Amazon Echo”
When connecting your Echo Dot to your iPhone, the next step is to choose “Amazon Echo” from the device options in the Alexa app. This selection enables the app to recognize and guide you through the specific setup process for your Echo Dot. Follow these steps to choose “Amazon Echo”:
- Access the device setup screen: After selecting “Add Device”, you will be presented with a list of device types compatible with the Alexa app.
- Look for “Amazon Echo”: Scroll through the list until you find “Amazon Echo” as one of the available options. Tap on it to select it.
Choosing “Amazon Echo” signifies that you are connecting an Echo device to your Alexa app, thus directing the app to guide you in setting up and configuring your Echo Dot specifically.
While there may be other device options available, such as smart plugs or cameras, selecting “Amazon Echo” ensures that you are on the right track to seamlessly integrating your Echo Dot with your iPhone and enjoying all the features and capabilities it offers.
Once you have successfully chosen “Amazon Echo”, you are now prepared to proceed with the subsequent steps, getting closer to the successful connection between your Echo Dot and your iPhone.
Step 8: Select the Echo Dot Model
After choosing “Amazon Echo” in the Alexa app, the next step in connecting your Echo Dot to your iPhone is to select the specific model of your Echo Dot. This selection ensures that the app provides you with accurate instructions tailored to your device. Follow these steps to select the Echo Dot model:
- View the available Echo Dot models: Once you have chosen “Amazon Echo”, the app will present you with a list of available Echo Dot models.
- Select your Echo Dot model: Scroll through the list and tap on the specific model of your Echo Dot. This selection will vary depending on the generation of your device.
Choosing the correct Echo Dot model is crucial as each model may have different features and specifications. By selecting the right model, you ensure that the setup process is tailored to your specific Echo Dot device, allowing you to make the most out of its capabilities.
If you are unsure of your Echo Dot model, you can usually find this information on the bottom or back of your device. It may also be listed on the packaging or in the product documentation.
Once you have successfully selected the Echo Dot model, you are now ready to proceed with the subsequent steps, getting closer to the successful connection between your Echo Dot and your iPhone.
Step 9: Press and Hold the Action Button on the Echo Dot
In order to connect your Echo Dot to your iPhone, the next step is to press and hold the Action button on the Echo Dot. This action puts your device into setup mode, allowing it to be discovered by the Alexa app. Follow these steps to press and hold the Action button:
- Locate the Action button: On your Echo Dot device, find the button with the symbol of a dot or a circle. This is the Action button.
- Press and hold the Action button: Use your finger to press and hold the Action button for about five seconds or until the light ring on the Echo Dot turns orange.
Pressing and holding the Action button on your Echo Dot initiates the setup process and puts it into discovery mode. This mode allows the Alexa app to detect and establish a connection with your Echo Dot, enabling you to control it using your iPhone.
The Action button may vary in appearance depending on the generation of your Echo Dot. It could be a physical button on the top or the side of the device, or it may be a touch-sensitive area.
Once you have successfully pressed and held the Action button, your Echo Dot will be ready to connect to your iPhone. This step brings you closer to completing the setup process and enjoying the seamless integration between your Echo Dot and iPhone.
Step 10: Wait for the Echo Dot to Appear on the iPhone
After pressing and holding the Action button on your Echo Dot, the next step in connecting it to your iPhone is to wait for the device to appear on your iPhone. The Alexa app will automatically detect the Echo Dot and display it as a newly discovered device. Follow these instructions to wait for the Echo Dot to appear on your iPhone:
- Keep your iPhone nearby: Make sure your iPhone is within range of your Echo Dot and that both devices are connected to the same Wi-Fi network.
- Observe the Alexa app: Open the Alexa app on your iPhone and keep an eye on the screen.
- Wait for the Echo Dot to appear: After a few moments, the Echo Dot should appear as a newly discovered device on the app’s screen.
During the setup process, the Alexa app will search for nearby Echo devices and establish a connection with your Echo Dot. This may take a minute or two, so be patient and allow the app some time to detect the device.
If the Echo Dot doesn’t appear on your iPhone, ensure that your Echo Dot is in setup mode and that your iPhone is connected to the same Wi-Fi network. You may need to troubleshoot the connection or repeat the previous steps to ensure a successful connection.
Once the Echo Dot appears on your iPhone, you are ready to proceed with the next steps and complete the setup process, enabling you to control your Echo Dot using your iPhone.
Step 11: Select the Echo Dot
After the Echo Dot appears on your iPhone, the next step in connecting it to your device is to select it in the Alexa app. This will establish a direct connection between your Echo Dot and iPhone, allowing you to control the device using the app. Follow these steps to select the Echo Dot:
- Look for the Echo Dot device: In the Alexa app, locate the Echo Dot device from the list of discovered devices.
- Select the Echo Dot: Tap on the name or image of your Echo Dot device to select it.
By selecting the Echo Dot, you are confirming that you want to establish a connection between your iPhone and the device. This step ensures that the app establishes a secure and stable link, giving you full control over your Echo Dot through the Alexa app.
It’s essential to choose the correct Echo Dot from the list if you have multiple Echo devices in your home. Selecting the right one ensures that you are connecting to the specific device you intend to control via your iPhone.
Once you have successfully selected the Echo Dot, you are now ready to proceed with the next steps and complete the configuration process, enhancing your smart home experience by seamlessly integrating your Echo Dot with your iPhone.
Step 12: Follow the On-Screen Instructions to Connect the Echo Dot to Wi-Fi
Once you have selected your Echo Dot in the Alexa app, the next step in connecting it to your iPhone is to follow the on-screen instructions to connect the Echo Dot to Wi-Fi. These instructions will guide you through the process of connecting your Echo Dot to your preferred Wi-Fi network. Here’s how to proceed:
- Verify your Wi-Fi network: The Alexa app will display a list of available Wi-Fi networks. Choose the network you want to connect your Echo Dot to.
- Enter your Wi-Fi network password: If prompted, enter the password for your Wi-Fi network. Double-check that you have entered it correctly.
- Wait for the Echo Dot to establish a connection: Once you have entered the correct Wi-Fi password, wait for your Echo Dot to connect to the Wi-Fi network. The light ring on the Echo Dot will turn blue and then cyan, indicating a successful connection.
Following the on-screen instructions ensures a secure and reliable connection between your Echo Dot and your Wi-Fi network. It is essential to enter the correct Wi-Fi password to establish a successful connection.
If the Echo Dot fails to connect to the Wi-Fi network, make sure you are within range of your router, and the Wi-Fi network is functioning correctly. You may need to troubleshoot the network or consult the Echo Dot’s troubleshooting guide for further assistance.
Once your Echo Dot is connected to Wi-Fi, it will be ready to use with your iPhone. This connection enables you to control the Echo Dot using the Alexa app on your iPhone, unlocking its full range of features and capabilities.
Step 13: Customize Echo Dot Settings on the iPhone
After successfully connecting your Echo Dot to Wi-Fi, the next step is to customize its settings on your iPhone. The Alexa app provides a range of customization options, allowing you to personalize your Echo Dot to suit your preferences. Follow these steps to customize the Echo Dot settings on your iPhone:
- Open the Alexa app: Launch the Alexa app on your iPhone.
- Go to the Device Settings: Tap on the “Devices” tab at the bottom right corner of the app.
- Select your Echo Dot: Choose your Echo Dot device from the list of discovered devices.
- Explore the settings: Within the device settings, you can adjust various options such as the device name, Wi-Fi network, language preferences, and more.
- Customize specific features: Scroll through the settings to find specific features such as alarms, music services, and skills that can be enabled or disabled on your Echo Dot.
- Make desired changes: Tap on the settings you wish to change and follow the on-screen prompts and instructions.
Customizing the Echo Dot settings on your iPhone allows you to tailor the device to your preferences and needs. Whether you want to change the device’s name, adjust the volume settings, or explore the various capabilities of the Echo Dot, the Alexa app provides a user-friendly interface to modify these settings.
Take your time to navigate through the settings and explore the options available to fully optimize your Echo Dot experience. You can experiment with different features and configurations to make the most out of your device.
Once you have personalized and customized the settings according to your preferences, your Echo Dot is now ready to use with your iPhone, offering you a seamless and personalized smart home experience.
Step 14: Start Using the Echo Dot with iPhone
After customizing the settings of your Echo Dot, the final step in connecting it to your iPhone is to start using it. The Alexa app on your iPhone serves as a command center, allowing you to control your Echo Dot and harness its full potential. Here’s how you can begin using your Echo Dot with your iPhone:
- Ensure your Echo Dot and iPhone are connected to the same Wi-Fi network: Make sure both devices are connected to the same network to ensure seamless communication.
- Launch the Alexa app: Open the Alexa app on your iPhone.
- Tap on the “Devices” tab: Access the list of devices by tapping on the “Devices” tab at the bottom right corner of the app.
- Select your Echo Dot: Choose your Echo Dot device from the list of discovered devices.
- Start using voice commands: Tap on the microphone icon in the Alexa app to activate the voice assistant. You can now issue commands and ask questions to the Echo Dot using your iPhone.
- Explore features and skills: Use the Alexa app to discover and enable various skills, such as controlling smart home devices, playing music, setting alarms, and much more.
With your Echo Dot and iPhone connected, you can now utilize the full range of features and capabilities offered by the Echo Dot. Use your voice to control smart devices, stream music, check the weather, set reminders, or even order products from Amazon.
Don’t forget to periodically check for updates in the Alexa app, as Amazon frequently releases new features and enhancements to improve the functionality of your Echo Dot.
Now that you have successfully connected your Echo Dot to your iPhone, you can enjoy the convenience and power of a voice-controlled smart home ecosystem, all at your fingertips.